

例とユースケース
HERE SDKを使用して、屋内地図と施設を効果的に活用するための実用的な例とユースケースを確認してください。このセクションでは、屋内地図機能を最大限に活用するためのさまざまなトピックを取り上げます。
すべての屋内地図を一覧表示する
HERE SDK for iOS (Navigate) を使用すると、アカウントと選択したコレクションでアクセス可能なすべての民間施設を一覧表示できます。VenueMapには、施設識別子、施設ID、施設名を含むVenueInfo要素を保持するリストが含まれます。
let venueInfo:[VenueInfo]? = venueEngine?.venueMap.getVenueInfoList()
if let venueInfo = venueInfo {
  for venueInfo in venueInfo {
      print("Venue Identifier: \(venueInfo.venueIdentifier)." + " Venue Id: \(venueInfo.venueId)." + " Venue Name: \(venueInfo.venueName).")
  }
}施設IDがUUIDの地図の場合、venueIdは0を返します。
施設を読み込んで表示する
HERE SDK for iOS (Navigate) を使用すると、IDごとに施設を読み込んで視覚化できます。現在の資格情報セットの施設IDを知っている必要があります。施設を読み込んで視覚化する方法は複数あります。
VenueMapには、マップに施設を追加する2つのメソッド、selectVenueAsync()とaddVenueAsync()があります。どちらのメソッドでも、getVenueService().addVenueToLoad()を使用してIDで施設を読み込み、それをマップに追加します。メソッドselectVenueAsync()では施設も選択します。
venueEngine.venueMap.selectVenueAsync(venueIdentifier: String);venueEngine.venueMap.addVenueAsync(venueIdentifier: String);
注
int型の施設IDを使用するレガシーマップの場合、VenueMapは引き続きselectVenueAsync(venueID: Int)およびaddVenueAsync(venueID: Int)をサポートしており、施設IDで施設を読み込みます。
施設が読み込まれると、VenueServiceはVenueDelegate.onGetVenueCompleted()メソッドを呼び出します。
// Delegate for the venue loading event.
extension ViewController: VenueDelegate {
    func onGetVenueCompleted(venueIdentifier: String, venueModel: VenueModel?, online: Bool, venueStyle: VenueStyle?) {
        if venueModel == nil {
            print("Loading of venue \(venueIdentifier) failed!")
        }
    }
}
注
int型の施設IDを使用するレガシーマップの場合、VenueServiceはVenueListener.onGetVenueCompleted(venueID: Int, venueModel: VenueModel?, online: Bool, venueStyle: VenueStyle?)メソッドを呼び出します。
施設が正常に読み込まれると、addVenueAsync()メソッドを使用している場合は、VenueLifecycleDelegate.onVenueAdded()メソッドのみがトリガーされます。selectVenueAsync() メソッドを使用している場合は、VenueSelectionDelegate.onSelectedVenueChanged() メソッドもトリガーされます。
// Delegate for the venue selection event.
extension ViewController: VenueSelectionDelegate {
    func onSelectedVenueChanged(deselectedVenue: Venue?, selectedVenue: Venue?) {
        if let venueModel = selectedVenue?.venueModel {
            if moveToVenue {
                // Move camera to the selected venue.
                let center = GeoCoordinates(latitude: venueModel.center.latitude,
                                            longitude: venueModel.center.longitude,
                                            altitude: 500.0)
                mapView.camera.lookAt(point: center)
                // This functions is used to facilitate the toggling of topology visibility.
                // Setting isTopologyVisible property to true will render the topology on scene and false will lead to hide the topology.
                selectedVenue?.isTopologyVisible = true;
            }
        }
    }
}VenueをVenueMapから削除することもでき、これによりVenueLifecycleDelegate.onVenueRemoved(venueIdentifier: String)メソッドがトリガーされます。
venueEngine.venueMap.removeVenue(venue: venue)
注
int型の施設IDを使用するレガシーマップの場合、addVenueAsync()メソッドを使用するとVenueLifecycleListener.onVenueAdded()メソッドがトリガーされます。
int型の施設IDをVenueMapから削除すると、VenueLifecycleListener.onVenueRemoved(venueID: Int)がトリガーされます。
ラベルテキストの優先設定
施設のデフォルトのラベル テキスト設定を上書きできます。
VenueEngineが初期化されると、コールバックが呼び出されます。この時点から、VenueService にアクセスできるようになります。オプションのメソッド setLabeltextPreference() を呼び出して、レンダリング中にラベル テキストの設定を行うことができます。デフォルトのスタイル ラベル テキスト優先設定をオーバーライドすると、順序によって優先設定が定義されるリストとして次のオプションを設定できます。
- "OCCUPANT_NAMES"
- "SPACE_NAME"
- "INTERNAL_ADDRESS"
- "SPACE_TYPE_NAME"
- "SPACE_CATEGORY_NAME"
これらは任意の順序で設定できます。たとえば、ラベル テキストの優先設定に "OCCUPANT_NAMES" が含まれない場合は、リストの順序に基づいて "SPACE_NAME" などに切り替わります。優先設定が見つからない場合は何も表示されません。
private func onVenueEngineInit() {
    // Get VenueService and VenueMap objects.
    let venueMap = venueEngine.venueMap
    let venueService = venueEngine.venueService

    // Add needed delegates.
    venueService.addServiceDelegate(self)
    venueService.addVenueDelegate(self)
    venueMap.addVenueSelectionDelegate(self)

    // Start VenueEngine. Once authentication is done, the authentication completion handler
    // will be triggered. Afterwards VenueEngine will start VenueService. Once VenueService
    // is initialized, VenueServiceListener.onInitializationCompleted method will be called.
    venueEngine.start(callback: {
        error, data in if let error = error {
            print("Failed to authenticate, reason: " + error.localizedDescription)
        }
    })

    if (hrn != "") {
        // Set platform catalog HRN
        venueService.setHrn(hrn: hrn)
    }

    // Set label text preference
    venueService.setLabeltextPreference(labelTextPref: LabelPref)
}
施設の図面と階を選択する
Venue オブジェクトを使用すると、施設の状態を制御できます。
Venue.selectedDrawing プロパティを使用すると、地図に表示される描画を取得および設定できます。新しい描画が選択されると、VenueDrawingSelectionDelegate.onDrawingSelected() メソッドがトリガーされます。
以下に、UITableView でアイテムをクリックしたときに描画を選択する方法の例を示します。
extension DrawingSwitcher: UITableViewDelegate {
    public func tableView(_ tableView: UITableView, didSelectRowAt indexPath: IndexPath) {
        let drawingIndex: Int = indexPath.row
        if let venue = venueMap?.selectedVenue {
            // Set the selected drawing when a user clicks on the item in the table view.
            let drawing: VenueDrawing = venue.venueModel.drawings[drawingIndex]
            venue.selectedDrawing = drawing
            ...
        }
    }
}Venue.selectedLevel、Venue.selectedLevelIndex、Venue.selectedLevelZIndex プロパティを使用すると、地図に表示されるレベルを取得および設定できます。新しいレベルが選択されると、VenueLevelSelectionDelegate.onLevelSelected() メソッドがトリガーされます。
以下は、UITableViewの反転レベルリストに基づいてレベルを選択する方法の例を示しています。
extension LevelSwitcher: UITableViewDelegate {
    public func tableView(_ tableView: UITableView, didSelectRowAt indexPath: IndexPath) {
        // Rows in the LevelSwitcher's table view are presented in the reversed way
        currentLevelIndex = Int32(levels.count - indexPath.row - 1)
        updateLevel(currentLevelIndex)
    }
}func updateLevel(_ levelIndex: Int32) {
if let venue = venueMap?.selectedVenue {
venue.selectedLevelIndex = currentLevelIndex
}
}描画とレベルを制御するUIスイッチャーの完全な例は、GitHubにある「IndoorMap」サンプルアプリで入手できます。
施設のスタイルをカスタマイズする
VenueGeometry オブジェクトのビジュアル スタイルを変更できます。ジオメトリー スタイル オブジェクトやラベル スタイル オブジェクトを作成して、Venue.setCustomStyle() メソッドに提供する必要があります。
// Create geometry and label styles for the selected geometry.
geometryStyle = VenueGeometryStyle(
    mainColor: selectedColor, outlineColor: selectedOutlineColor, outlineWidth: 1)
labelStyle = VenueLabelStyle(
fillColor: selectedTextColor, outlineColor: selectedTextOutlineColor, outlineWidth: 1, maxFont: 28)venue.setCustomStyle(geometries: [geometry], style: geometryStyle, labelStyle: labelStyle)識別子でスペースを選択する
スペース、レベル、描画の ID は getIdentifier() を使用して抽出できます。スペースの場合は spaces.getIdentifier() を呼び出します。次に、これらの ID 値を使用して、getGeometryById(id:) でレベルや描画の特定のスペースを検索します。
var geometriesID : [String] = [];
var geometries : [VenueGeometry] = [];
for id in geometriesID
{
    VenueGeometry geometry = selectedVenue?.getSelectedDrawing().getGeometryById(id);
    geometries.append(geometry);
}
geometryStyle = VenueGeometryStyle(
    mainColor: selectedColor, outlineColor: selectedOutlineColor, outlineWidth: 1)
labelStyle = VenueLabelStyle(
    fillColor: selectedTextColor, outlineColor: selectedTextOutlineColor, outlineWidth: 1, maxFont: 28)
selectedVenue.setCustomStyle(geometries: geometries, style: geometryStyle, labelStyle: labelStyle)
施設のタップ ジェスチャーを処理する
施設オブジェクトはタップで選択できます。まず、タップ デリゲートを設定します。
// Create a venue tap handler and set it as default tap delegate.
mapView.gestures.tapDelegate = VenueTapHandler(venueEngine: venueEngine,
                                               mapView: mapView,
                                               geometryLabel: geometryNameLabel)
タップ デリゲート内では、タップされた地理座標を VenueMap.getGeometry() と VenueMap.getVenue() メソッドのパラメーターとして使用できます。
public func onTap(origin: Point2D) {
    deselectGeometry()

    let venueMap = venueEngine.venueMap
    // Get geo coordinates of the tapped point.
    if let position = mapView.viewToGeoCoordinates(viewCoordinates: origin) {
        // If the tap point was inside a selected venue, try to pick a geometry inside.
        // Otherwise try to select an another venue, if the tap point was on top of one of them.
        if let selectedVenue = venueMap.selectedVenue, let geometry = venueMap.getGeometry(position: position) {
            onGeometryPicked(venue: selectedVenue, geometry: geometry)
        } else if let venue = venueMap.getVenue(position: position) {
            venueMap.selectedVenue = venue
        }
    }
}

func deselectGeometry() {
    // If a map marker is already on the screen, remove it.
    if let currentMarker = marker {
        mapView.mapScene.removeMapMarker(currentMarker)
    }
}

func onGeometryPicked(venue: Venue,
                      geometry: VenueGeometry) {
    // If the geomtry has an icon, add a map marker on top of the geometry.
    if geometry.lookupType == .icon {
        if let image = getMarkerImage() {
            marker = MapMarker(at: geometry.center,
                               image: image,
                               anchor: Anchor2D(horizontal: 0.5, vertical: 1.0))
            if let marker = marker {
                mapView.mapScene.addMapMarker(marker)
            }
        }
    }
}
選択した施設、描画、またはレベルが変更された場合は、タップされたジオメトリーの選択を解除することをお勧めします。
public init(venueEngine: VenueEngine, mapView: MapView, geometryLabel: UILabel) {
    ...
    let venueMap = venueEngine.venueMap
    venueMap.addVenueSelectionDelegate(self)
    venueMap.addDrawingSelectionDelegate(self)
    venueMap.addLevelSelectionDelegate(self)
}

deinit {
    let venueMap = venueEngine.venueMap
    venueMap.removeVenueSelectionDelegate(self)
    venueMap.removeDrawingSelectionDelegate(self)
    venueMap.removeLevelSelectionDelegate(self)
}extension VenueTapHandler: VenueSelectionDelegate {
public func onSelectedVenueChanged(deselectedVenue: Venue?, selectedVenue: Venue?) {
self.deselectGeometry()
}
}
extension VenueTapHandler: VenueDrawingSelectionDelegate {
public func onDrawingSelected(venue: Venue, deselectedDrawing: VenueDrawing?, selectedDrawing: VenueDrawing) {
self.deselectGeometry()
}
}
extension VenueTapHandler: VenueLevelSelectionDelegate {
public func onLevelSelected(venue: Venue, drawing: VenueDrawing, deselectedLevel: VenueLevel?, selectedLevel: VenueLevel) {
self.deselectGeometry()
}
}施設でのマップタップイベントの使用法を示す完全な例は、GitHubにある「IndoorMap」サンプルアプリで入手できます。
Indoor Routing
HERE SDK for iOS (Navigate) は施設内のルートを計算し視覚化する包括的な屋内ルーティング機能を提供します。このセクションでは、屋内ルーティング機能の設定方法と使用方法について説明します。
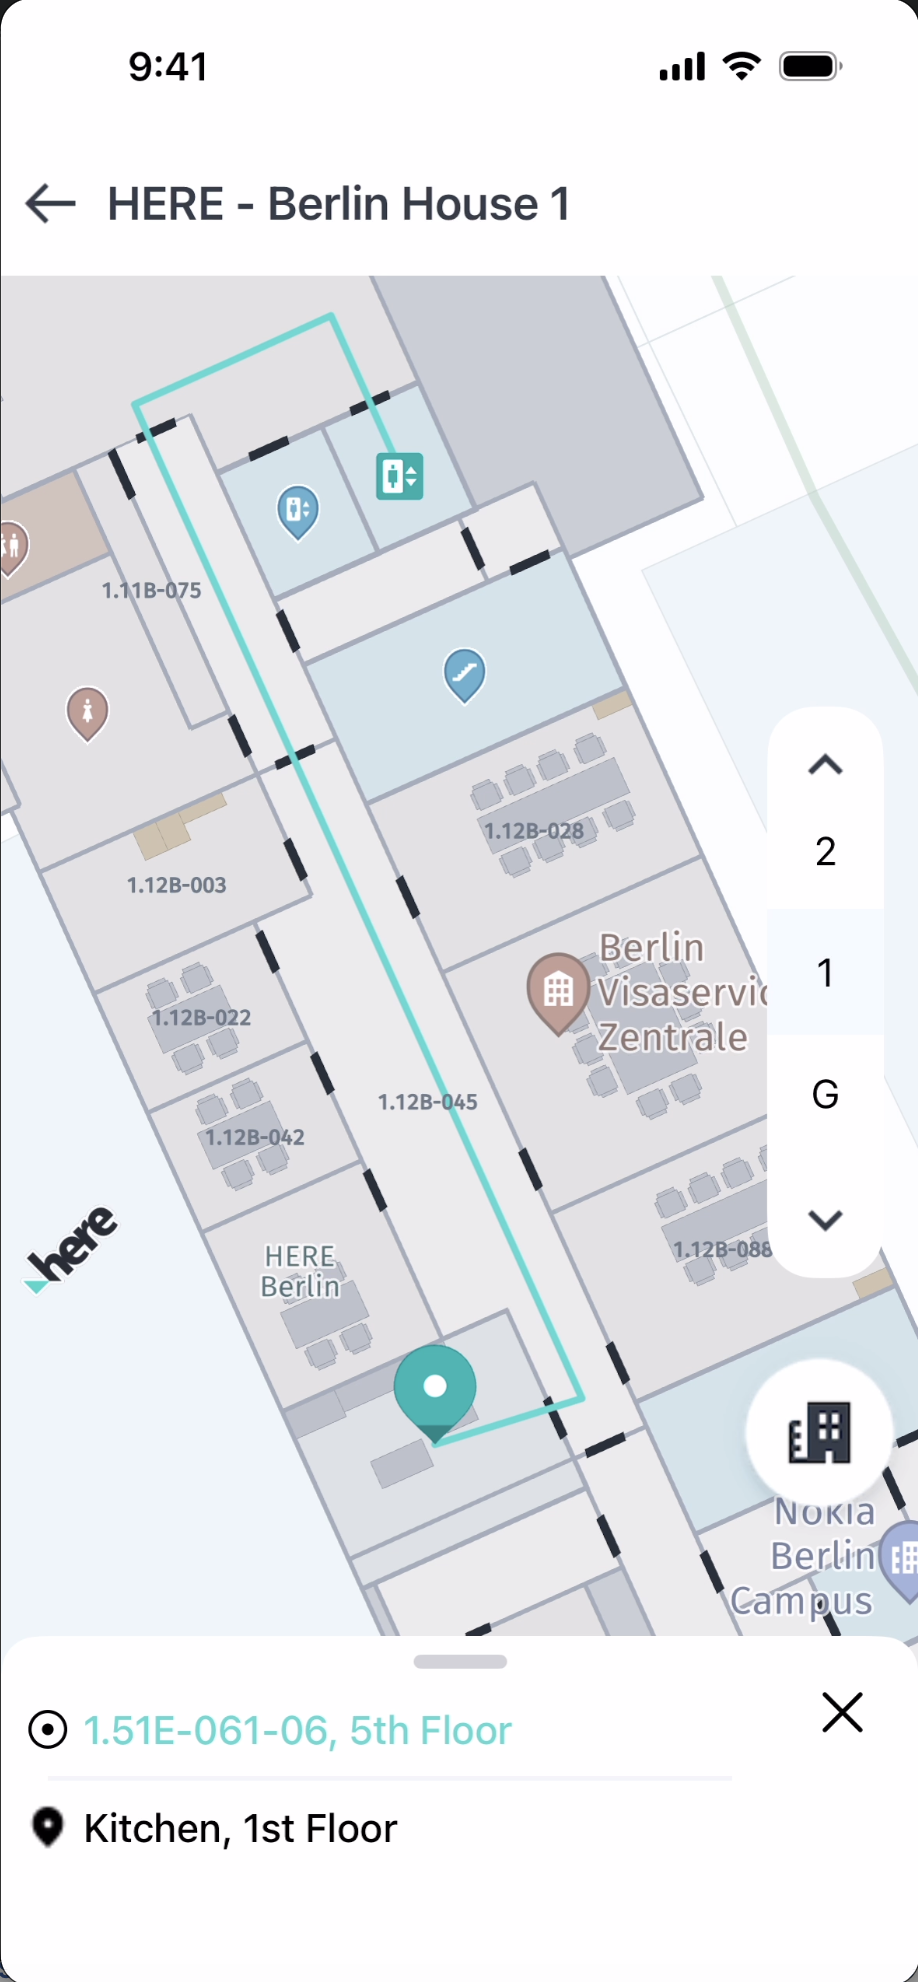
屋内ルートの計算
屋内ルートを計算するには、IndoorRoutingEngineを作成し、施設およびフロア情報を含む経由地を指定する必要があります。経由地は出発地点と到着地点ごとに作成します。
まず、次のようにルーティングエンジンを作成します。
let routingEngine = IndoorRoutingEngine(_: venueService)開始地と目的地の経由地を作成します。屋内の場所には、次のように施設IDとフロアIDを指定します。
let startPoint = IndoorWaypoint(
    coordinates: position,
    venueId: String(venueModel.identifier),
    levelId: String(venue.selectedLevel.identifier))

let destinationPoint = IndoorWaypoint(
    coordinates: position,
    venueId: String(venueModel.identifier),
    levelId: String(venue.selectedLevel.identifier))
routingEngineを使用して次のようにルートを計算します。
let routeOptions = IndoorRouteOptions()
routingEngine?.calculateRoute(
    from: startPoint,
    to: destinationPoint,
    routeOptions: routeOptions) { error, routes, routeNotices in
        if error == nil, let routes = routes {
            let route = routes[0]
            // Use the calculated route
        }
    }
複数のフロアにまたがるルートの計算
屋内ルートは、施設内の複数のフロアにまたがることがあります。SDKはフロア間の移動を自動的に処理し、ルート内のフロア変更に関する情報を提供します。
屋内セクションの詳細およびフロア情報にアクセスするには、次のようにします。
for section in route.sections {
    // Check if section has indoor details
    if let indoorDetails = section.indoorSectionDetails {
        print("Indoor Section - Departure: \(indoorDetails.departurePlace.venueId ?? "")")
        print("Indoor Section - Arrival: \(indoorDetails.arrivalPlace.venueId ?? "")")

        // Iterate through indoor maneuvers
        for indoorManeuver in indoorDetails.indoorManeuvers {
            if let action = indoorManeuver.action {
                print("IndoorManeuver Action: \(action)")
            }
            print("IndoorManeuver Location Info: Level_Z_Index: \(indoorManeuver.levelZIndex)")

            // Check for level change data
            if let levelChangeData = indoorManeuver.indoorLevelChangeData {
                print("IndoorManeuver Level change using: \(levelChangeData.connector)")
                print("changeInLevel: \(levelChangeData.deltaZ)")
            }
        }
    }
}IndoorLevelChangeDataは、次の情報を提供します。
connector:使用されるフロア間の接続手段の種類 (エレベーター、階段、エスカレーター、スロープなど)deltaZ:フロアの変化量 (上方向は正、下方向は負)
エラー処理とルート通知
ルート計算コールバックでは、エラー情報とルート通知の両方が提供されます。ルート通知には、ルート計算中に発生した問題や警告に関する詳細情報が含まれますが、ルート検索は、ルート検索プロセス自体の失敗を示します。
ルート通知の処理
ルート通知は、ルート検索が正常に完了した場合でもコールバックで提供されます。これには、計算されたルートに関する重要な情報が含まれます。
routingEngine?.calculateRoute(
    from: startPoint,
    to: destinationPoint,
    routeOptions: routeOptions) { error, routes, routeNotices in
        // Handle route notices first (available even on success)
        if let routeNotices = routeNotices, !routeNotices.isEmpty {
            for notice in routeNotices {
                let logMessage = notice.title

                // Log based on severity
                if notice.severity == .critical {
                    print("CRITICAL: \(logMessage)")
                } else {
                    print("INFO: \(logMessage)")
                }

                // Handle specific notice codes
                switch notice.code {
                    // CRITICAL notices - route calculation failed
                    case .noRouteFound:
                        // No Route was found
                        break
                    case .couldNotMatchOrigin:
                        // Origin waypoint could not be matched
                        break
                    case .couldNotMatchDestination:
                        // Destination waypoint could not be matched
                        break

                    // INFO notices - vehicle usage violations
                    case .violatedRouteHeadCondition:
                        // Cannot provide route with the given vehicle routeHead condition
                        print("Cannot provide route with the given vehicle routeHead condition")
                    case .violatedRouteTailCondition:
                        // Cannot provide route with the given vehicle routeTail condition
                        print("Cannot provide route with the given vehicle routeTail condition")
                    case .violatedEntireRouteCondition:
                        // Cannot provide route with the given vehicle entireRoute condition
                        print("Cannot provide route with the given vehicle entireRoute condition")
                    default:
                        break
                }

                // Access additional details
                if let details = notice.details, !details.isEmpty {
                    for detail in details {
                        print("Detail - Type: \(detail.type), Cause: \(detail.cause), Title: \(detail.title)")
                    }
                }
            }
        }

        // Handle routing errors
        if let error = error {
            var errorMessage: String
            switch error {
                case .mapNotFound:
                    errorMessage = "Requested map not found"
                case .parsingError:
                    errorMessage = "Routing response not in correct format"
                case .unknownError:
                    errorMessage = "Unknown error encountered"
                default:
                    errorMessage = "Unknown error encountered"
            }
            print("Routing error: \(errorMessage)")
            return
        }

        // Process successful route
        if let routes = routes, !routes.isEmpty {
            let route = routes[0]
            // Use the calculated route
        }
    }
ルートレベルの通知コード
以下のルートレベルの通知はレスポンスの最上位レベルに表示され、通常は重大な失敗または条件違反を示します。
| 通知コード | 重大度 | カテゴリー | 説明 |
|---|---|---|---|
noRouteFound | CRITICAL (重大) | ルートの失敗 | ルートが見つかりませんでした |
couldNotMatchOrigin | CRITICAL (重大) | ルートの失敗 | 出発地の経由地が一致しませんでした |
couldNotMatchDestination | CRITICAL (重大) | ルートの失敗 | 目的地の経由地が一致しませんでした |
noRouteFoundWithWaypoint | CRITICAL (重大) | ルートの失敗 | 指定された出発地と目的地の間に、指定された経由地を含む利用可能なルートがありません |
couldNotMatchWaypoint | CRITICAL (重大) | ルートの失敗 | 経由地が一致しませんでした最も近いルート検索ノードが見つかりませんでした |
violatedRouteHeadCondition | INFO (情報) | 車両違反 | 指定された車両routeHead条件でルートを提供できません |
violatedRouteTailCondition | INFO (情報) | 車両違反 | 指定された車両routeTail条件でルートを提供できません |
violatedEntireRouteCondition | INFO (情報) | 車両違反 | 指定された車両entireRoute条件でルートを提供できません |
ignoredVehicleEnable | INFO (情報) | 無視されたパラメーター | 指定された移動モードでは車両有効化オプションが無視されます |
ignoredVehicleSpeed | INFO (情報) | 無視されたパラメーター | 指定された移動モードでは車両速度が無視されます |
ignoredVehicleAvoidFeatures | INFO (情報) | 無視されたパラメーター | 車両に関連付けられているLevelConnectorsのうち、回避機能の一部として受信されたものは無視されます |
violatedTransportMode | INFO (情報) | 移動モード | 選択した移動モードではルートを提供できません。 |
注:CRITICAL (重大) 通知はルート計算が失敗したことを示しています。INFO(情報)通知は、パラメーター違反や無視されたオプションについて警告を表示しますが、ルート検索自体は正常に完了する場合があります。
セクションレベルの通知コード
以下のセクションレベルの通知は個々のルートセクション内に表示され、そのセクションでは回避対象として指定した条件を回避できなかったことを示します。
| 通知コード | 重大度 | カテゴリー | 説明 |
|---|---|---|---|
violatedAvoidStairs | INFO (情報) | 回避違反 | ルートが階段の回避制約に違反しています |
violatedAvoidElevator | INFO (情報) | 回避違反 | ルートがエレベーターの回避制約に違反しています |
violatedAvoidRamp | INFO (情報) | 回避違反 | ルートがランプの回避制約に違反しています |
violatedAvoidEscalator | INFO (情報) | 回避違反 | ルートがエスカレーターの回避制約に違反しています |
violatedAvoidPedestrianRamp | INFO (情報) | 回避違反 | ルートが歩行者ランプの回避制約に違反しています |
violatedAvoidCarLift | INFO (情報) | 回避違反 | ルートがカーリフトの回避制約に違反しています |
violatedAvoidDriveRamp | INFO (情報) | 回避違反 | ルートがドライブランプの回避制約に違反しています |
violatedAvoidElevatorBank | INFO (情報) | 回避違反 | ルートがエレベーターバンクの回避制約に違反しています |
注:セクションレベルのviolatedAvoid...通知は情報通知であり、重大度はinfoです。
フロア間の接続手段の回避オプション
屋内ルートの計算時に、ユーザーの設定やアクセシビリティ要件に基づいて、特定の種類のフロア間の接続手段を回避するようルーティングエンジンを設定できます。
let routeOptions = IndoorRouteOptions()

// Add features to avoid
routeOptions.indoorAvoidanceOptions.indoorFeatures.append(.elevator)
routeOptions.indoorAvoidanceOptions.indoorFeatures.append(.escalator)
routeOptions.indoorAvoidanceOptions.indoorFeatures.append(.stairs)
回避可能なフロア間の接続手段の種類は次のとおりです。
.elevator:エレベーター.escalator:エスカレーター.stairs:階段.ramp:一般的なスロープ.pedestrianRamp:歩行者専用スロープ.driveRamp:車両用スロープ.carLift:車両用リフト.elevatorBank:エレベーター群.connector:汎用接続手段
回避オプションを削除するには、次のようにします。
if let index = routeOptions.indoorAvoidanceOptions.indoorFeatures.firstIndex(of: .elevator) {
    routeOptions.indoorAvoidanceOptions.indoorFeatures.remove(at: index)
}
ルート設定
IndoorRouteOptionsオブジェクトを使用して、ルート計算の設定を行います。
ルート最適化モード
次のように、最速ルートと最短ルートから選択します。
let routeOptions = IndoorRouteOptions()

// For fastest route
routeOptions.routeOptions.optimizationMode = OptimizationMode.fastest

// For shortest route
routeOptions.routeOptions.optimizationMode = OptimizationMode.shortest
マルチモーダル交通機関サポート
HERE SDKは、屋内ルーティングのために複数の交通機関モードをサポートしています:徒歩、車、タクシー、スクーター。交通機関特有のパラメーターはVenueTransportSpecificationを使用して設定できます。
歩行者用ルート
徒歩ルートの場合、歩行速度を設定するにはVenuePedestrianSpecificationを使用してください:
// Create pedestrian specification
let pedestrianSpec = VenuePedestrianSpecification()
pedestrianSpec.walkingSpeedInMetersPerSecond = 1.5 // Valid range: 0.5 to 2.0 m/s

// Create transport specification using Builder
let transportSpec = VenueTransportSpecification.PedestrianBuilder()
    .withPedestrianSpecification(pedestrianSpec)
    .build()

// Create route options
let routeOptions = IndoorRouteOptions()
routeOptions.transportMode = .pedestrian
routeOptions.venueTransportSpecification = transportSpec
車両ルート (車、タクシー、スクーター)
車両ベースのルートの場合、車両特有のパラメーターを設定します:
// Create car specification
let carSpec = VenueCarSpecification()
carSpec.speedInMetersPerSecond = 3.0 // Valid range: 2.0 to 5.0 m/s
carSpec.enableOption = .routeHead // Use car only at route start

// Also set pedestrian spec for walking portions
let pedestrianSpec = VenuePedestrianSpecification()
pedestrianSpec.walkingSpeedInMetersPerSecond = 1.4

// Create transport specification using Builder
let transportSpec = VenueTransportSpecification.CarBuilder()
    .withCarSpecification(carSpec)
    .build()

// Create route options
let routeOptions = IndoorRouteOptions()
routeOptions.transportMode = .car
routeOptions.venueTransportSpecification = transportSpec同じパターンがVenueTaxiSpecificationとVenueScooterSpecificationに適用されます。
車両有効オプション
EnableOption列挙型は、ルートに沿って車両が使用できる場所を制御します:
.routeHead:ルートの開始時のみ車両を使用 (例:入口近くに車を駐車し、その後徒歩).routeTail:ルートの終了時のみ車両を使用 (例:最初に徒歩、その後駐車場から運転).entireRoute:ルート全体で車両を使用
ルートの末尾でスクーターを使用した例:
let scooterSpec = VenueScooterSpecification()
scooterSpec.speedInMetersPerSecond = 5.0
scooterSpec.enableOption = .routeTail

let transportSpec = VenueTransportSpecification.ScooterBuilder()
    .withScooterSpecification(scooterSpec)
    .build()

let routeOptions = IndoorRouteOptions()
routeOptions.transportMode = .scooter
routeOptions.venueTransportSpecification = transportSpec
輸送モード変更によるセクションベースのルート
車両輸送モードを持つルートは、異なる輸送モードを持つ複数のセクションを持つ場合があります:
for section in route.sections {
    // Get transport mode for this section
    let sectionMode = section.sectionTransportMode

    switch sectionMode {
    case .pedestrian:
        print("Walking section")
    case .car:
        print("Driving section")
    case .taxi:
        print("Taxi section")
    case .scooter:
        print("Scooter section")
    default:
        break
    }

    print("Section distance: \(section.lengthInMeters) meters")
}
経由地のサポート
HERE SDKでは屋内ルート検索のための経由地がサポートされているため、出発地と目的地の間でルートが通過しなければならない中間地点を指定できます。経由地は指定されたとおりの順序で処理されます。
経由地の作成
経由地はIndoorWaypointを使用して作成され、IndoorRouteOptions.viaWaypointsリストに追加されます。経由地は5つまで作成できます。
IndoorWaypointは、屋内ルート計算の入力として使用される屋内経由地を表しています。ルートリクエストで出発地、目的地、経由地を指定できます。経由地タイプごとに、サポートされるプロパティに対して異なる制約があります。
出発地の経由地:
stopDurationをサポートしていないpassThroughをサポートしていない- 基本的な初期化子を使用:
IndoorWaypoint(coordinates:venueId:levelId:)
目的地の経由地:
stopDurationをサポート(例:到着/waitingの指定のため)passThroughをサポートしていないIndoorWaypoint(coordinates:venueId:levelId:)またはIndoorWaypoint(coordinates:venueId:levelId:stopDuration:)を使用
屋内経由地:
stopDurationとpassThroughの両方をサポートIndoorWaypoint(coordinates:venueId:levelId:)、IndoorWaypoint(coordinates:venueId:levelId:stopDuration:)、またはIndoorWaypoint(coordinates:venueId:levelId:passThrough:)を使用passThroughがtrueの場合、ルートは停止せずに続行passThroughがfalseまたはnilの場合、ルートは経由地で停止stopDurationが指定されている場合、ルートは指定された時間だけ停止
検証ルートリクエストが行われる際、経由地は上記のルールに従って検証されます。検証が失敗した場合(例:出発地に
stopDurationまたはpassThroughがある、または目的地にpassThroughがある)、ルートリクエストはIndoorRoutingError.badRequestでエラーを返します。
次の2種類の経由地があります。
- ストップオーバーポイント:ルートは経由地で停止します。必要に応じて、待機時間を指定するために
stopDuration(秒単位)を指定できます。ストップオーバーポイントの場合、ルート内に別のセクションが作成されます。 - パススルーポイント:ルートは経由地を通過するだけで停止しません。パススルーポイントの場合はセクションが作成されず、セクションのパススルーポイントリストに表示されません。
注経由地では、
passThroughを有効にしながら同時にstopDurationも設定するということはできません。これらのオプションはいずれか1つしか使用できません。
ストップオーバーポイント
ルートが停止する経由地を作成するには、デフォルトコンストラクタまたはstopDurationがあるコンストラクタを使用します。
// Basic stopover point (creates a section in route response)
let waypointStop = IndoorWaypoint(
    coordinates: position,
    venueId: String(venueModel.identifier),
    levelId: String(venue.selectedLevel.identifier))

// Stopover point with a duration (in seconds, range: 1-49999)
let waypointStopWithDuration = IndoorWaypoint(
    coordinates: position,
    venueId: String(venueModel.identifier),
    levelId: String(venue.selectedLevel.identifier),
    stopDuration: Int32(60)) // Stop for 60 seconds
パススルーポイント
ルートが通過するだけで停止しない経由地を作成するには、passThroughがtrueに設定された初期化子を使用します。
// Passthrough point (does not create a section in route response)
let waypointPassThrough = IndoorWaypoint(
    coordinates: position,
    venueId: String(venueModel.identifier),
    levelId: String(venue.selectedLevel.identifier),
    passThrough: true)
ルートオプション内で経由地を設定する
ルートを計算する前に、IndoorRouteOptionsに経由地を追加します。
let routeOptions = IndoorRouteOptions()

// Create waypoints
var waypoints: [IndoorWaypoint] = []
waypoints.append(waypoint1)
waypoints.append(waypoint2)

// Set waypoints in route options
routeOptions.viaWaypoints = waypoints;

// Calculate the route
routingEngine?.calculateRoute(
    from: startPoint,
    to: destinationPoint,
    routeOptions: routeOptions) { error, routes, routeNotices in
        if error == nil, let routes = routes {
            let route = routes[0]
            // Use the calculated route
        }
    }
ルート内のパススルーポイントにアクセスする
パススルーポイントが使用される場合、それらはセクションポリライン内のオフセットとともにIndoorSectionDetails.passthroughWaypointsリストに表示されます。
for section in route.sections {
    if let indoorDetails = section.indoorSectionDetails {
        // Access passthrough points within this section
        for passthrough in indoorDetails.passthroughWaypoints {
            print("Passthrough point at offset: \(passthrough.offset)")
            print("Venue ID: \(passthrough.place.venueId)")
            print("Level ID: \(passthrough.place.levelId)")
        }
    }
}
ストップオーバーポイントのポストアクションにアクセスする
stopDurationがあるストップオーバーポイントが使用される場合、セクションのポストアクションリストにWAITアクションが追加されます。
for section in route.sections {
    if let indoorDetails = section.indoorSectionDetails {
        // Access post actions (e.g., WAIT actions at waypoints)
        for postAction in indoorDetails.postActions {
            if postAction.action == .wait {
                print("Wait action at waypoint")
            }
        }
    }
}
経由地エラーの処理
ルート計算では、経由地に関連する特定の通知コードが返される場合があります。
| 通知コード | 重大度 | カテゴリー | 説明 |
|---|---|---|---|
.couldNotMatchWaypoint | CRITICAL (重大) | ルートの失敗 | 経由地が一致しませんでした最も近いルート検索ノードが見つかりませんでした |
.noRouteFoundWithWaypoint | CRITICAL (重大) | ルートの失敗 | 指定された出発地と目的地の間に、指定された経由地を含む利用可能なルートがありません |
routingEngine?.calculateRoute(
    from: startPoint,
    to: destinationPoint,
    routeOptions: routeOptions) { error, routes, routeNotices in
        if let routeNotices = routeNotices {
            for notice in routeNotices {
                switch notice.code {
                case .couldNotMatchWaypoint:
                    print("Waypoint could not be matched. Nearest routing node not found")
                case .noRouteFoundWithWaypoint:
                    print("No route available between given origin and destination with given waypoint")
                default:
                    break
                }
            }
        }
    }
ターンバイターンアクション
屋内ルートでは、IndoorManeuverクラスを通じて詳細なターンバイターンの誘導情報が提供されます。
for section in route.sections {
    if let indoorDetails = section.indoorSectionDetails {
        for indoorManeuver in indoorDetails.indoorManeuvers {
            // Get the maneuver action
            if let action = indoorManeuver.action {
                print("Action: \(action)")
            }

            // Get the level information
            print("Level Z-Index: \(indoorManeuver.levelZIndex)")

            // Check for level change information
            if let levelChangeData = indoorManeuver.indoorLevelChangeData {
                print("Level change via: \(levelChangeData.connector)")
                print("Change in levels: \(levelChangeData.deltaZ)")
            }

            // Get space information (room/area details)
            if let spaceData = indoorManeuver.indoorSpaceData {
                print("Space Category: \(spaceData.spaceCategory)")
                print("Space Type: \(spaceData.spaceType)")
            }
        }
    }
}IndoorManeuverは次を提供します。
- Action:実行するアクションのタイプ
- Level Z-Index:操作が行われるフロアの階層
- Indoor Level Change Data:接続手段の種類や移動するフロア数など、フロア間の移動に関する情報
- Indoor Space Data:進入または通過する空間に関する詳細 (カテゴリーやタイプなど)
ルートのETAと総距離
計算されたルートから、到着予測時刻 (ETA) と総距離を取得できます。
let route = routes[0]

// Get the total duration in seconds
let durationInSeconds = route.duration.seconds

// Get the total length in meters
let lengthInMeters = route.lengthInMeters

// Format for display
print("Route duration: \(durationInSeconds) seconds")
print("Route distance: \(lengthInMeters) meters")

// Convert to more readable format
let minutes = durationInSeconds / 60
let seconds = durationInSeconds % 60
let kilometers = Double(lengthInMeters) / 1000.0

print(String(format: "ETA: %d min %d sec", minutes, seconds))
print(String(format: "Distance: %.2f km", kilometers))
セクション単位の詳細は、次のとおりです。
for section in route.sections {
    let sectionDuration = section.duration.seconds
    let sectionLength = section.lengthInMeters

    print("Section duration: \(sectionDuration) seconds")
    print("Section distance: \(sectionLength) meters")
}
ルートのレンダリング
IndoorRoutingControllerは、地図上での屋内ルートの視覚化を処理します。
まず、次のようにコントローラーを作成します。
let routingController = IndoorRoutingController(_: venueMap, mapView: mapView)ポリラインのレンダリング
地図上にルートを表示するには、showRoute()メソッドを使用します。
// Create route style
let routeStyle = IndoorRouteStyle()

// Show the route
routingController?.showRoute(route: route, style: routeStyle)
ルートを非表示にするには、次のようにします。
routingController?.hideRoute()フロア変更アイコンの配置
さまざまなルート要素やフロア変更インジケーターのカスタムマーカーを設定します。
let routeStyle = IndoorRouteStyle()

// Set start and destination markers
let middleBottomAnchor = Anchor2D(horizontal: 0.5, vertical: 1.0)

if let startImage = UIImage(named: "ic_route_start.png"),
   let startPngData = startImage.pngData() {
    let markerImage = MapImage(pixelData: startPngData, imageFormat: .png)
    let startMarker = MapMarker(
        at: GeoCoordinates(latitude: 0.0, longitude: 0.0),
        image: markerImage,
        anchor: middleBottomAnchor)
    routeStyle.startMarker = startMarker
}

if let endImage = UIImage(named: "ic_route_end.png"),
   let endPngData = endImage.pngData() {
    let markerImage = MapImage(pixelData: endPngData, imageFormat: .png)
    let endMarker = MapMarker(
        at: GeoCoordinates(latitude: 0.0, longitude: 0.0),
        image: markerImage,
        anchor: middleBottomAnchor)
    routeStyle.destinationMarker = endMarker
}

// Set transport mode markers
if let walkImage = UIImage(named: "indoor_walk.png"),
   let walkPngData = walkImage.pngData() {
    let markerImage = MapImage(pixelData: walkPngData, imageFormat: .png)
    let walkMarker = MapMarker(
        at: GeoCoordinates(latitude: 0.0, longitude: 0.0),
        image: markerImage,
        anchor: Anchor2D(horizontal: 0.5, vertical: 0.5))
    routeStyle.walkMarker = walkMarker
}

if let driveImage = UIImage(named: "indoor_drive.png"),
   let drivePngData = driveImage.pngData() {
    let markerImage = MapImage(pixelData: drivePngData, imageFormat: .png)
    let driveMarker = MapMarker(
        at: GeoCoordinates(latitude: 0.0, longitude: 0.0),
        image: markerImage,
        anchor: Anchor2D(horizontal: 0.5, vertical: 0.5))
    routeStyle.driveMarker = driveMarker
}
次のように、方向インジケーター付きのフロア変更フィーチャーのマーカーを設定します。
// Configure markers for each level change feature
let features: [IndoorLevelChangeFeatures] = [
    .elevator,
    .escalator,
    .stairs,
    .ramp
]

for feature in features {
    // Create markers for up, down, and neutral directions
    let upMarker = createMarker(for: feature, deltaZ: 1)       // Going up
    let downMarker = createMarker(for: feature, deltaZ: -1)    // Going down
    let neutralMarker = createMarker(for: feature, deltaZ: 0)  // No vertical change

    routeStyle.setIndoorMarkersFor(
        feature: feature,
        upMarker: upMarker,
        downMarker: downMarker,
        exitMarker: neutralMarker)
}
次のように、フィーチャータイプと方向に基づいてマーカーを作成するヘルパーメソッドを定義します。
private func createMarker(for feature: IndoorLevelChangeFeatures, deltaZ: Int) -> MapMarker? {
    let imageName = getImageName(for: feature, deltaZ: deltaZ)

    guard let image = UIImage(named: imageName),
          let pngData = image.pngData() else {
        return nil
    }

    let markerImage = MapImage(pixelData: pngData, imageFormat: .png)
    return MapMarker(
        at: GeoCoordinates(latitude: 0.0, longitude: 0.0),
        image: markerImage,
        anchor: Anchor2D(horizontal: 0.5, vertical: 0.5))
}

private func getImageName(for feature: IndoorLevelChangeFeatures, deltaZ: Int) -> String {
    var baseName: String

    switch feature {
    case .elevator:
        baseName = "indoor_elevator"
    case .escalator:
        baseName = "indoor_escalator"
    case .stairs:
        baseName = "indoor_stairs"
    case .ramp:
        baseName = "indoor_ramp"
    default:
        return ""
    }

    if deltaZ > 0 {
        return "\(baseName)_up.png"
    } else if deltaZ < 0 {
        return "\(baseName)_down.png"
    } else {
        return "\(baseName).png"
    }
}deltaZパラメーターは次のように方向を示します。
1(正):上のフロアに移動-1(負):下の階に降りる0:上下方向のフロア変更なし
showRoute()メソッドはルートのレンダリングに関してカスタマイズの範囲が限定されています。フロアに関する高度なカスタマイズを適用する場合は、ルートの各座標間に描画されるMapPolylineを使用します。「地図上にルートを表示する」を参照してください。
施設を含む屋内ルート検索の使用方法を示す完全な例は、GitHubにある「IndoorMap」サンプルアプリで確認できます。
12 日前の更新