AWS EC2
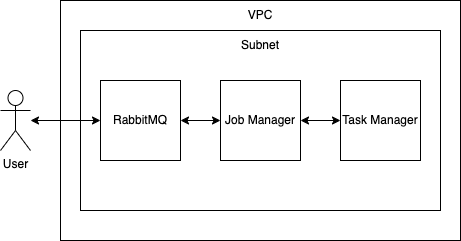
Deploying HERE Anonymizer Self-Hosted on AWS EC2 requires creating instances that make up the HERE Anonymizer Self-Hosted environment on AWS using EC2. In a simple implementation, these include:
- RabbitMQ
- Flink Job Manager
- Flink Task Manager
You can deploy in secured and unsecured networks. Deployments in unsecured networks are recommended only when security is not a concern or when there are external security methods that protect the deployments.
In unsecured networks all resources are public. This includes the underlying architecture, subnets, and other related services. All instances that make up the HERE Anonymizer Self-Hosted have public IP addresses. Additionally, unsecure, unauthorized, and predictable SSH connections can lead to malware attacks.
For all other scenarios we recommend deploying HERE Anonymizer Self-Hosted in a secure network set up following the provided instructions.
Secure network implementation
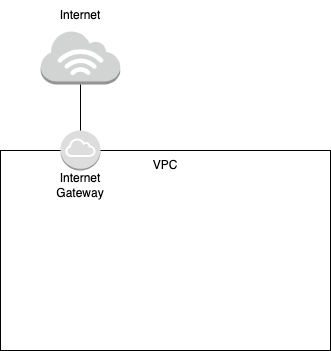
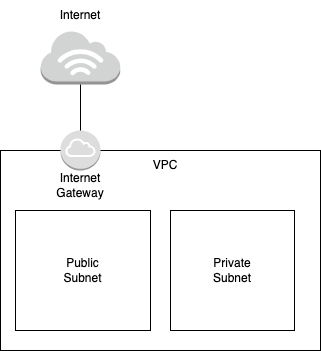
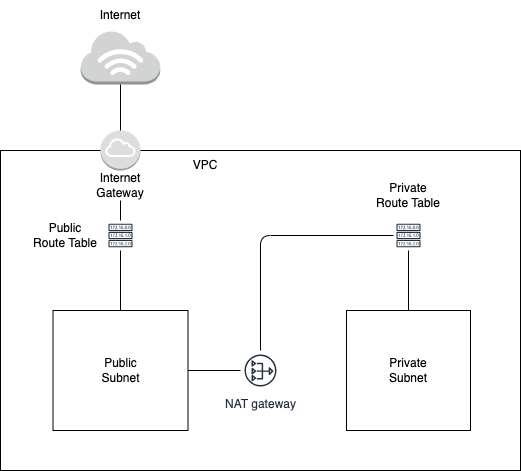
The simple implementation of a secure network created for this example deployment keeps all instances in a private environment that can be accessed through a Bastion host. Such setup requires two different subnets contained in a single VPC (virtual private cloud):
- Private subnet, which consists of the instances hosting Rabbit MQ, Flink Job Manager, and Flink Task Manager.
- Public subnet, which consists of an instance that acts as a Bastion host (entry point) for the instances in the private subnet.
SSH port
The communication between the instances, subnets, and the user is performed through SSH. As port 22 is commonly in malware attacks, avoid using it in your secure network setup. When configuring the instances, select random SSH port numbers excluding the port 22.
The following network and instance setup instructions use a CUSTOM_SSH_PORT placeholder to indicate places where you should use a random SSH excluding port 22.
Note
Following commands are created using and tested on Amazon Linux Image namely the
ami-00385a401487aefa4. Some steps may vary for different images.
Create a secure network
Prerequisites
- Install AWS CLI and configure AWS credentials.
- Install jq.
- Configure HERE Anonymizer Self-Hosted license on your machine.
Procedure
-
Create a VPC (virtual private cloud).
VPC_ID=$(\ aws ec2 create-vpc \ --cidr-block "$VPC_CIDR_BLOCK" \ --query 'Vpc.VpcId' \ --output text \ --tag-specifications "ResourceType=vpc,Tags=[{Key=Name,Value=$VPC_NAME},$TAGS]" ) aws ec2 wait vpc-available --vpc-ids "$VPC_ID" aws ec2 modify-vpc-attribute --vpc-id "$VPC_ID" --enable-dns-hostnames "{\"Value\":true}" echo "VPC $VPC_ID created" -
Create an internet gateway attached to the VPC.
INTERNET_GATEWAY_ID=$(\ aws ec2 create-internet-gateway \ --query 'InternetGateway.InternetGatewayId' \ --output text \ --tag-specifications "ResourceType=internet-gateway,Tags=[{Key=Name,Value=$INTERNET_GATEWAY_NAME},$TAGS]" ) aws ec2 wait internet-gateway-exists --internet-gateway-ids "$INTERNET_GATEWAY_ID" -
Attach the internet gateway to the VPC.
aws ec2 attach-internet-gateway --vpc-id "$VPC_ID" --internet-gateway-id "$INTERNET_GATEWAY_ID" -
Create the public (Bastion/Jump) and private subnets.
# Create a public (Bastion/Jump) subnet. PUBLIC_SUBNET_ID=$(\ aws ec2 create-subnet \ --vpc-id "$VPC_ID" \ --availability-zone "$AVAILABILITY_ZONE" \ --cidr-block "$PUBLIC_SUBNET_CIDR_BLOCK" \ --query 'Subnet.SubnetId' \ --output text \ --tag-specifications "ResourceType=subnet,Tags=[{Key=Name,Value=$PUBLIC_SUBNET_NAME},$TAGS]" ) aws ec2 wait subnet-available --subnet-ids "$PUBLIC_SUBNET_ID" aws ec2 modify-subnet-attribute --subnet-id "$PUBLIC_SUBNET_ID" --map-public-ip-on-launch "{\"Value\":true}" # Create a private subnet. PRIVATE_SUBNET_ID=$(\ aws ec2 create-subnet \ --vpc-id "$VPC_ID" \ --availability-zone "$AVAILABILITY_ZONE" \ --cidr-block "$PRIVATE_SUBNET_CIDR_BLOCK" \ --query 'Subnet.SubnetId' \ --output text \ --tag-specifications "ResourceType=subnet,Tags=[{Key=Name,Value=$PRIVATE_SUBNET_NAME},$TAGS]" ) aws ec2 wait subnet-available --subnet-ids "$PRIVATE_SUBNET_ID" -
Create route tables.
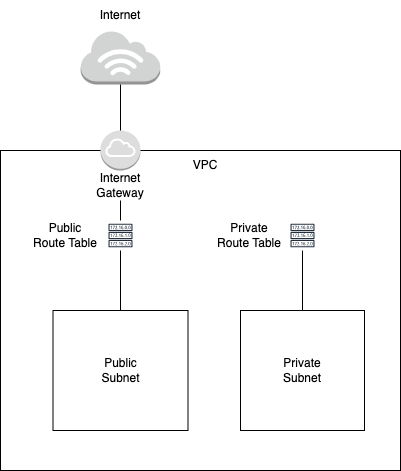
# Create a route table associated to the public subnet. PUBLIC_ROUTE_TABLE_ID=$(\ aws ec2 create-route-table \ --vpc-id "$VPC_ID" \ --query 'RouteTable.RouteTableId' \ --output text \ --tag-specifications "ResourceType=route-table,Tags=[{Key=Name,Value=$PUBLIC_ROUTE_TABLE_NAME},$TAGS]" ) # Create a route in the public route table to allow the instances in the public subnet to connect to the internet after the public route table is associated with the public subnet. aws ec2 create-route \ --route-table-id "$PUBLIC_ROUTE_TABLE_ID" \ --destination-cidr-block "0.0.0.0/0" \ --gateway-id "$INTERNET_GATEWAY_ID" # Associate the public route table to the public subnet. aws ec2 associate-route-table \ --subnet-id "$PUBLIC_SUBNET_ID" \ --route-table-id "$PUBLIC_ROUTE_TABLE_ID" # Create a route table associated to the private subnet. PRIVATE_ROUTE_TABLE_ID=$(\ aws ec2 create-route-table \ --vpc-id "$VPC_ID" \ --query 'RouteTable.RouteTableId' \ --output text \ --tag-specifications "ResourceType=route-table,Tags=[{Key=Name,Value=$PRIVATE_ROUTE_TABLE_NAME},$TAGS]" ) # Associate the private route table to the private subnet. aws ec2 associate-route-table \ --subnet-id "$PRIVATE_SUBNET_ID" \ --route-table-id "$PRIVATE_ROUTE_TABLE_ID" -
Create a NAT gateway and a route in the private route table to establish communication between the public and private subnets. This blocks direct, unauthorized access from the internet and allows communication via resources in the Bastion/Jump/public subnet which in turn gives access to authorized users only.
# Create a NAT gateway. NAT_GATEWAY_ID=$(\ aws ec2 create-nat-gateway \ --subnet-id "$PUBLIC_SUBNET_ID" \ --connectivity-type "public" \ --allocation-id "$ALLOCATION_ID" \ --query "NatGateway.NatGatewayId" \ --output text \ --tag-specifications "ResourceType=natgateway,Tags=[{Key=Name,Value=$NAT_GATEWAY_NAME},$TAGS]" ) aws ec2 wait nat-gateway-available --nat-gateway-ids "$NAT_GATEWAY_ID" # Create a route in the private route table. aws ec2 create-route \ --route-table-id "$PRIVATE_ROUTE_TABLE_ID" \ --destination-cidr-block "0.0.0.0/0" \ --nat-gateway-id "$NAT_GATEWAY_ID" -
Create a key pair that will be registered in the instances. Authorized users must have this key pair to establish communication with the secured network.
aws ec2 create-key-pair \ --key-name $KEY_PAIR_NAME \ --query 'KeyMaterial' \ --output text > $KEY_PAIR_FILE # Once the authorized user has this key pair, they must modify the file permission to a suitable one. chmod 400 $KEY_PAIR_FILE # Add the key pair to the local SSH registry. ssh-add -K $KEY_PAIR_FILE # Save the key pair details. KEY_PAIR_ID=$(\ aws ec2 describe-key-pairs \ --key-names "$KEY_PAIR_NAME" \ --query "KeyPairs[0].KeyPairId" \ --output text ) -
Create security groups for public and private subnets and the Bastion host instance.
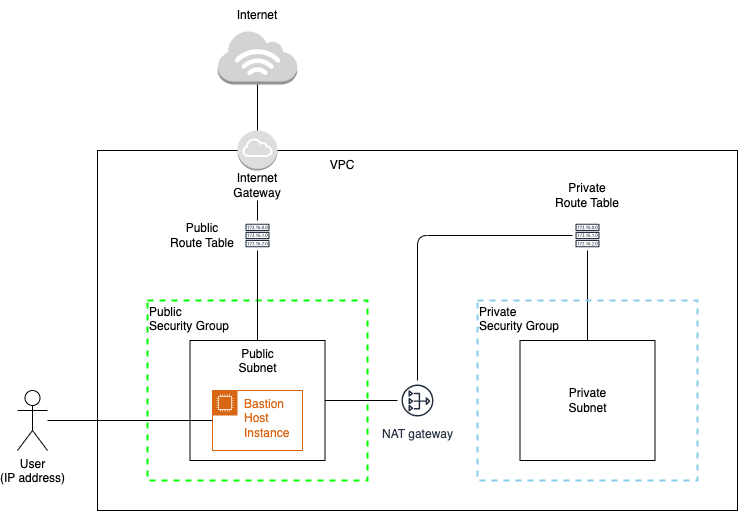
# Create a security group for the Bastion/public subnet. BASTION_SECURITY_GROUP_ID=$(\ aws ec2 create-security-group \ --group-name "$BASTION_SECURITY_GROUP_NAME" \ --description "Bastion Host Security Group" \ --vpc-id "$VPC_ID" \ --query 'GroupId' \ --output text \ --tag-specifications "ResourceType=security-group,Tags=[{Key=Name,Value=$BASTION_SECURITY_GROUP_NAME},$TAGS]" ) aws ec2 wait security-group-exists --group-ids "$BASTION_SECURITY_GROUP_ID" # Create a Bastion/public instance/host in the public subnet. # Use this user data for the Bastion host: read -r -d '' BASTION_USER_DATA << EOM #!/bin/bash sed -i -e "s/#Port 22/Port $CUSTOM_SSH_PORT/" /etc/ssh/sshd_config systemctl restart sshd EOM # Create the Bastion host using the above user data. BASTION_INSTANCE_ID=$(\ echo $BASTION_USER_DATA | base64 | aws ec2 run-instances \ --image-id $AMI_ID \ --count 1 \ --subnet-id "$PUBLIC_SUBNET_ID" \ --key-name $KEY_PAIR_NAME \ --instance-type "t2.micro" \ --user-data "$BASTION_USER_DATA" \ --security-group-ids "$BASTION_SECURITY_GROUP_ID" \ --query 'Instances[0].InstanceId' \ --output text \ --tag-specifications "ResourceType=instance,Tags=[{Key=Name,Value=$BASTION_INSTANCE_NAME},$TAGS]" ) aws ec2 wait instance-status-ok --instance-ids "$BASTION_INSTANCE_ID" # Save the Bastion host public and private IPs. bastion_instance_ips=$(\ aws ec2 describe-instances \ --instance-ids "$BASTION_INSTANCE_ID" \ --query "Reservations[0].Instances[0].{PublicIpAddress:PublicIpAddress, PrivateIpAddress:PrivateIpAddress}" ) BASTION_INSTANCE_PUBLIC_IP=$(echo "$bastion_instance_ips" | jq -r ".PublicIpAddress") BASTION_INSTANCE_PRIVATE_IP=$(echo "$bastion_instance_ips" | jq -r ".PrivateIpAddress") # Create a security group for the private subnet. PRIVATE_SECURITY_GROUP_ID=$(\ aws ec2 create-security-group \ --group-name "$PRIVATE_SECURITY_GROUP_NAME" \ --description "Private Security Group" \ --vpc-id "$VPC_ID" \ --query 'GroupId' \ --output text \ --tag-specifications "ResourceType=security-group,Tags=[{Key=Name,Value=$PRIVATE_SECURITY_GROUP_NAME},$TAGS]" ) aws ec2 wait security-group-exists --group-ids "$PRIVATE_SECURITY_GROUP_ID" -
Allow traffic by creating rules in the public and private security groups.
# Allow the traffic to instances in the private subnet from the Bastion host only. BASTION_TO_PVT_INST_SGR_ID=$(\ aws ec2 authorize-security-group-ingress \ --group-id "$PRIVATE_SECURITY_GROUP_ID" \ --protocol tcp \ --port $CUSTOM_SSH_PORT \ --cidr "$BASTION_INSTANCE_PRIVATE_IP/32" \ --query "SecurityGroupRules[0].SecurityGroupRuleId" \ --output text \ --tag-specifications "ResourceType=security-group-rule,Tags=[{Key=Description,Value=Bastion to Private Instances},$TAGS]" ) # Allow traffic between instances in the private subnet. WITHIN_PVT_INST_SGR_ID=$(aws ec2 authorize-security-group-ingress \ --group-id "$PRIVATE_SECURITY_GROUP_ID" \ --protocol -1 \ --cidr "0.0.0.0/0" \ --query "SecurityGroupRules[0].SecurityGroupRuleId" \ --output text \ --tag-specifications "ResourceType=security-group-rule,Tags=[{Key=Description,Value=All traffic within private subnet},$TAGS]" ) -
Allow the user's IP address to connect to the Bastion host.
USER_MACHINE_TO_BASTION_SGR_ID=$(\
  aws ec2 authorize-security-group-ingress \
  --group-id "$BASTION_SECURITY_GROUP_ID" \
  --protocol tcp \
  --port $CUSTOM_SSH_PORT \
  --cidr "$USER_IP/32" \
  --query "SecurityGroupRules[0].SecurityGroupRuleId" \
  --output text \
  --tag-specifications "ResourceType=security-group-rule,Tags=[{Key=Description,Value=User Machine to Bastion Instance via $CUSTOM_SSH_PORT},$TAGS]"
)
Deploy to secure network
The sample deployment of HERE Anonymizer Self-Hosted in a secure network presented in this section uses the minimal viable configuration that has single instances of RabbitMQ, Flink Job Manager, and Flink Task manager.
All files defined in the cloud-init configuration required to initialize the instances can be uploaded through an SSH connection or downloaded from publicly accessible URLs. However, file transfers can take a long time. To speed up the process, upload these files to a dedicated AWS S3 bucket. Once the instances are up, download the required assets from the AWS S3 bucket.
Prerequisites
This information and files are required to deploy HERE Anonymizer Self-Hosted to a secure network:
- Note down the details (IDs, names) of the resources created in the secure network.
- Prepare the following files:
- RabbitMQ instance user data
- Flink Job Manager user data
- Flink Task Manager user data
- Anonymization configuration file
- Latest HERE Anonymizer Self-Hosted signed JAR file
Procedure
-
Create a bucket in AWS S3 and upload the required files. Make sure to export the required environment variables.
aws s3 cp $FILE_PATH s3://$S3_BUCKET_NAME/$FILE_NAME
aws s3api wait object-exists --bucket "$S3_BUCKET_NAME" --key $FILE_NAME

# Upload a file with Flink setup to the AWS S3 bucket and update 'FLINK_DOWNLOAD_CMD' in the cloud-init file to:
FLINK_DOWNLOAD_CMD="aws s3 cp s3://$S3_BUCKET_NAME/$FLINK_ZIP_FILE_NAME $FLINK_ZIP_FILE_NAME"

# Alternatively, update the cloud-init file to download the file from a URL:
FLINK_DOWNLOAD_CMD="curl -L $FLINK_DOWNLOAD_URL -o $FLINK_ZIP_FILE_NAME"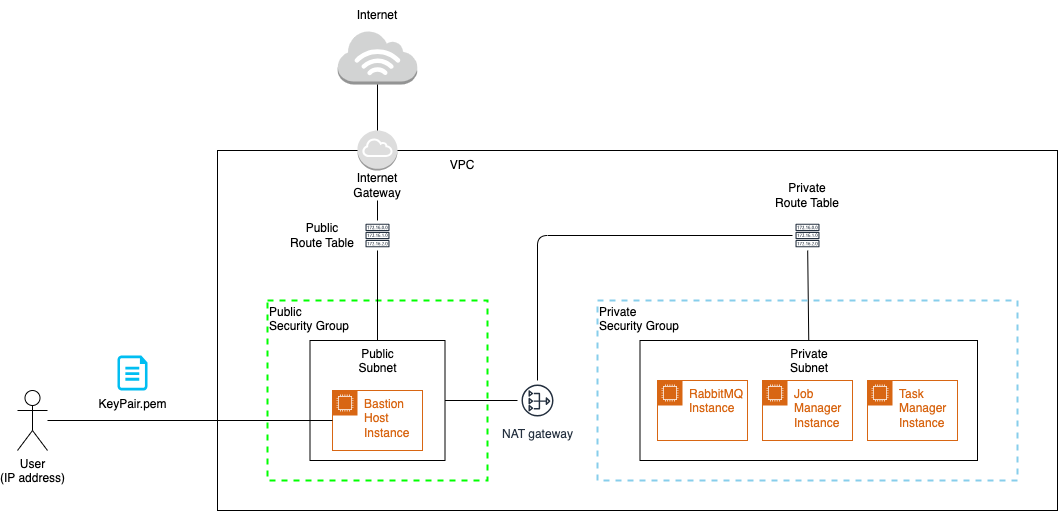
-
Deploy RabbitMQ.
-
Update RabbitMQ user data and run its instance in the private subnet.
RABBITMQ_USER_DATA=$(envsubst < "$RABBITMQ_USER_DATA") RABBITMQ_INSTANCE_ID=$(\ echo $RABBITMQ_USER_DATA | base64 | aws ec2 run-instances \ --image-id $AMI_ID \ --count 1 \ --subnet-id "$PRIVATE_SUBNET_ID" \ --key-name $KEY_PAIR_NAME \ --instance-type "t2.medium" \ --user-data "$RABBITMQ_USER_DATA" \ --security-group-ids "$PRIVATE_SECURITY_GROUP_ID" \ --query 'Instances[0].InstanceId' \ --output text \ --tag-specifications "ResourceType=instance,Tags=[{Key=Name,Value=$RABBITMQ_INSTANCE_NAME},$TAGS]" ) aws ec2 wait instance-status-ok --instance-ids "$RABBITMQ_INSTANCE_ID" -
Save the details of the RabbitMQ instance.
RABBITMQ_AMQP_PORT=5672 RABBITMQ_MANAGEMENT_PORT=15672 RABBITMQ_PRIVATE_IP=$(\ aws ec2 describe-instances \ --instance-ids "$RABBITMQ_INSTANCE_ID" \ --query "Reservations[0].Instances[0].PrivateIpAddress" \ --output text ) export RABBITMQ_PRIVATE_IP=$RABBITMQ_PRIVATE_IP -
Define
SOURCE_URIandSINK_URIused by Flink to accept payloads and dump the results respectively. Replace the placeholders with your username and password. Use the same credentials in the RabbitMQ cloud-init file.export SOURCE_URI=rabbit://{USERNAME}:{PASSWORD}@${RABBITMQ_PRIVATE_IP}:$RABBITMQ_AMQP_PORT/input-queue export SOURCE_FORMAT=HERE_PROBE export SINK_URI=rabbit://{USERNAME}:{PASSWORD}@${RABBITMQ_PRIVATE_IP}:$RABBITMQ_AMQP_PORT/output-queue export SINK_FORMAT=HERE_PROBE -
Update the private security group and add a rule that authorizes traffic from the Bastion host to the RabbitMQ instance using the RabbitMQ management port
15672. Private IP addresses of the Bastion host and the RabbitMQ instance are used for this communication.BASTION2PVT_RABBITMQ_MGMT_SGR_ID=$(\ aws ec2 authorize-security-group-ingress \ --group-id "$PRIVATE_SECURITY_GROUP_ID" \ --protocol tcp \ --port $RABBITMQ_MANAGEMENT_PORT \ --cidr "$BASTION_INSTANCE_PRIVATE_IP/32" \ --query "SecurityGroupRules[0].SecurityGroupRuleId" \ --output text \ --tag-specifications "ResourceType=security-group-rule,Tags=[{Key=Description,Value=Bastion to Pvt Instance via RabbitMQ MGMT Port},$TAGS]" )
-
-
Deploy the Job Manager.
-
Update Job Manager user data and run the Job Manager instance in the private subnet.
JOB_MANAGER_USER_DATA=$(envsubst < "$JOB_MANAGER_USER_DATA") JOB_MANAGER_INSTANCE_ID=$(\ echo $JOB_MANAGER_USER_DATA | base64 | aws ec2 run-instances \ --image-id $AMI_ID \ --count 1 \ --subnet-id "$PRIVATE_SUBNET_ID" \ --key-name $KEY_PAIR_NAME \ --instance-type "t2.medium" \ --user-data "$JOB_MANAGER_USER_DATA" \ --security-group-ids "$PRIVATE_SECURITY_GROUP_ID" \ --query 'Instances[0].InstanceId' \ --output text \ --tag-specifications "ResourceType=instance,Tags=[{Key=Name,Value=$JOB_MANAGER_INSTANCE_NAME},$TAGS]" ) aws ec2 wait instance-status-ok --instance-ids "$JOB_MANAGER_INSTANCE_ID" -
Save the details of the Job Manager instance.
JOB_MANAGER_PRIVATE_IP=$(\ aws ec2 describe-instances \ --instance-ids "$JOB_MANAGER_INSTANCE_ID" \ --query "Reservations[0].Instances[0].PrivateIpAddress" \ --output text ) export JOB_MANAGER_PRIVATE_IP=$JOB_MANAGER_PRIVATE_IP export FLINK_UI_PORT=8081 -
Update the private security group and add a rule that authorizes traffic from the Bastion host to the Job Manager instance using the Flink UI port
8081. Private IP addresses of the Bastion host and the Job Manager instance are used for this communication.BASTION2PVT_FLINK_SGR_ID=$(\ aws ec2 authorize-security-group-ingress \ --group-id "$PRIVATE_SECURITY_GROUP_ID" \ --protocol tcp \ --port $FLINK_UI_PORT \ --cidr "$BASTION_INSTANCE_PRIVATE_IP/32" \ --query "SecurityGroupRules[0].SecurityGroupRuleId" \ --output text \ --tag-specifications "ResourceType=security-group-rule,Tags=[{Key=Description,Value=Bastion to Pvt Instance via Flink Port},$TAGS]" ) -
Authorize the ports used by Flink for communication between different nodes of Job Managers and Task Managers.
FLINK_RPC_PORT_RANGE="6121-6125"

JOB_MANAGER_FLINK_RPC_PORT_RANGE_SGR_ID=$(\
  aws ec2 authorize-security-group-ingress \
  --group-id "$PRIVATE_SECURITY_GROUP_ID" \
  --protocol tcp \
  --port $FLINK_RPC_PORT_RANGE \
  --cidr "$JOB_MANAGER_PRIVATE_IP/32" \
  --query "SecurityGroupRules[0].SecurityGroupRuleId" \
  --output text \
  --tag-specifications "ResourceType=security-group-rule,Tags=[{Key=Description,Value=Job Manager via Flink Port range $FLINK_RPC_PORT_RANGE},$TAGS]"
)
-
-
Deploy the Task Manager.
-
Update the Task Manager user data and run the instance in the private subnet.
TASK_MANAGER_USER_DATA=$(envsubst < "$TASK_MANAGER_USER_DATA") TASK_MANAGER_INSTANCE_ID=$(\ echo $TASK_MANAGER_USER_DATA | base64 | aws ec2 run-instances \ --image-id $AMI_ID \ --count 1 \ --subnet-id "$PRIVATE_SUBNET_ID" \ --key-name $KEY_PAIR_NAME \ --instance-type "t2.medium" \ --user-data "$TASK_MANAGER_USER_DATA" \ --security-group-ids "$PRIVATE_SECURITY_GROUP_ID" \ --query 'Instances[0].InstanceId' \ --output text \ --tag-specifications "ResourceType=instance,Tags=[{Key=Name,Value=$TASK_MANAGER_INSTANCE_NAME},$TAGS]" ) aws ec2 wait instance-status-ok --instance-ids "$TASK_MANAGER_INSTANCE_ID" -
Save the details of the Task Manager instance.
TASK_MANAGER_PRIVATE_IP=$(\ aws ec2 describe-instances \ --instance-ids "$TASK_MANAGER_INSTANCE_ID" \ --query "Reservations[0].Instances[0].PrivateIpAddress" \ --output text ) -
Authorize the ports used by Flink for communication between different nodes of Job Managers and Task Managers.
TASK_MANAGER_FLINK_RPC_PORT_RANGE_SGR_ID=$(\
  aws ec2 authorize-security-group-ingress \
  --group-id "$PRIVATE_SECURITY_GROUP_ID" \
  --protocol tcp \
  --port $FLINK_RPC_PORT_RANGE \
  --cidr "$TASK_MANAGER_PRIVATE_IP/32" \
  --query "SecurityGroupRules[0].SecurityGroupRuleId" \
  --output text \
  --tag-specifications "ResourceType=security-group-rule,Tags=[{Key=Description,Value=Task Manager via Flink Port range $FLINK_RPC_PORT_RANGE},$TAGS]"
)
-
-
Allow several minutes for the configuration, initialization, and discovery of instances.
-
Create a tunnel from the local environment to access RabbitMQ and the Flink dashboard through the Bastion host.
# For RabbitMQ: ssh -i $KEY_PAIR_FILE -p $CUSTOM_SSH_PORT -L $RABBITMQ_MANAGEMENT_PORT:$RABBITMQ_PRIVATE_IP:$RABBITMQ_MANAGEMENT_PORT ec2-user@$BASTION_INSTANCE_PUBLIC_IP -fN # For Flink: ssh -i $KEY_PAIR_FILE -p $CUSTOM_SSH_PORT -L $FLINK_UI_PORT:$JOB_MANAGER_PRIVATE_IP:$FLINK_UI_PORT ec2-user@$BASTION_INSTANCE_PUBLIC_IP -fNNote
These commands run in the background. If you don't want to run them in the background, remove the
-fNoption. -
Access RabbitMQ and Flink dashboards on from your local environment using the following URLs:
# RabbitMQ
http://localhost:15672

# Flink
http://localhost:8081
Terminate deployment
-
Revoke rules for RabbitMQ, Job Manager, and Task Manager instances from private security groups.
aws ec2 revoke-security-group-ingress \ --group-id "$PRIVATE_SECURITY_GROUP_ID" \ --security-group-rule-ids \ "$JOB_MANAGER_FLINK_RPC_PORT_RANGE_SGR_ID" \ "$BASTION2PVT_RABBITMQ_MGMT_SGR_ID" \ "$BASTION2PVT_FLINK_SGR_ID" -
Terminate RabbitMQ, Job Manager, and Task Manager EC2 Instances.
aws ec2 terminate-instances --instance-ids "$RABBITMQ_INSTANCE_ID" aws ec2 terminate-instances --instance-ids "$JOB_MANAGER_INSTANCE_ID" aws ec2 terminate-instances --instance-ids "$TASK_MANAGER_INSTANCE_ID" # Wait for termination. aws ec2 wait instance-terminated --instance-ids "$RABBITMQ_INSTANCE_ID" aws ec2 wait instance-terminated --instance-ids "$JOB_MANAGER_INSTANCE_ID" aws ec2 wait instance-terminated --instance-ids "$TASK_MANAGER_INSTANCE_ID" -
Clean and delete the AWS S3 bucket.
# Check if bucket exists
if aws s3api head-bucket --bucket $S3_BUCKET_NAME 2>/dev/null; then
  # Clean bucket
  aws s3 rm s3://$S3_BUCKET_NAME --recursive

  # Delete the bucket
  aws s3 rb s3://$S3_BUCKET_NAME
fi
Remove the secure network
-
Terminate the Bastion host instance.
aws ec2 terminate-instances --instance-ids "$BASTION_INSTANCE_ID" # Check if terminated aws ec2 wait instance-terminated --instance-ids "$BASTION_INSTANCE_ID" -
Delete the key pair.
aws ec2 delete-key-pair --key-pair-id "$KEY_PAIR_ID" -
Delete security groups.
# Delete public/bastion security group aws ec2 delete-security-group --group-id "$BASTION_SECURITY_GROUP_ID" # Delete private security group aws ec2 delete-security-group --group-id "$PRIVATE_SECURITY_GROUP_ID" -
Delete the private subnet.
aws ec2 delete-subnet --subnet-id "$PRIVATE_SUBNET_ID" -
Delete the NAT Gateway.
aws ec2 delete-nat-gateway --nat-gateway-id "$NAT_GATEWAY_ID" # Check if deleted aws ec2 wait nat-gateway-deleted --nat-gateway-ids "$NAT_GATEWAY_ID" -
Release elastic IP address associated with the NAT gateway.
aws ec2 release-address --allocation-id "$ALLOCATION_ID" -
Delete the public subnet.
aws ec2 delete-subnet --subnet-id "$PUBLIC_SUBNET_ID" -
Detach the internet gateway from the VPC.
aws ec2 detach-internet-gateway \ --internet-gateway-id "$INTERNET_GATEWAY_ID" \ --vpc-id "$VPC_ID" -
Delete the internet gateway.
aws ec2 delete-internet-gateway --internet-gateway-id "$INTERNET_GATEWAY_ID" -
Delete the private route table.
aws ec2 delete-route-table --route-table-id "$PRIVATE_ROUTE_TABLE_ID"- Delete the public route table.
aws ec2 delete-route-table --route-table-id "$PUBLIC_ROUTE_TABLE_ID"- Find and delete security groups automatically assigned to the VPC.
vpc_security_group_ids=$(\
  aws ec2 describe-security-groups \
  --filters "Name=vpc-id,Values=$VPC_ID" \
  --query "SecurityGroups[].{GroupId:GroupId}"
)

for i in $(seq 0 $(($(echo $vpc_security_group_ids | jq length)-1)));
do
  sg_id=$(echo $vpc_security_group_ids | jq -r ".[$((i))].GroupId")
  # Delete the security group
  aws ec2 delete-security-group --group-id "$sg_id" >/dev/null 2>&1

  # Check the exit code of the previous command
  if [[ $? -eq 0 ]]; then
    echo "Security group $sg_id deleted successfully."
  else
    echo "Failed to delete security group $sg_id."
  fi
done- Delete the VPC.
aws ec2 delete-vpc --vpc-id "$VPC_ID"Deployment using supplied scripts
You can complete the deployment scenario by running the supplied scripts from the directory where you unpacked the HERE Anonymizer Self-Hosted located under dist/deployments/vm
Procedrue
-
Set the required environment variables.
# AWS credentials export AWS_ACCESS_KEY_ID="{AWS_ACCESS_KEY}" export AWS_SECRET_ACCESS_KEY="{AWS_SECRET_ACCESS_KEY}" export AWS_REGION="{AWS_REGION}" export AWS_OUTPUT_FORMAT="json" # License export HERE_ANONYMIZER_LICENSE={HERE_ANONYMIZER_LICENSE} # AWS instances cloud-init user data template file paths RABBITMQ_USER_DATA={PATH_OF_RABBITMQ_USERDATA_CLOUD_INIT_TEMPLATE_FILE} JOB_MANAGER_USER_DATA={PATH_OF_JOBMANAGER_USERDATA_CLOUD_INIT_TEMPLATE_FILE} ASK_MANAGER_USER_DATA={PATH_OF_TASKMANAGER_USERDATA_CLOUD_INIT_TEMPLATE_FILE} # Anonymizer configuration file path ANON_CONFIG_FILE_PATH={PATH_OF_ANONYMIZATION_CONFIGURATION_FILE} # HERE Anonymizer Self-Hosted latest signed JAR file path HASH_JAR_FILE_PATH={PATH_OF_OPA_FLINK_SIGNED_JAR} # Flink setup zip file path FLINK_ZIP_FILE_PATH={PATH_OF_INSTALLABLE_FLINK_ZIP_FILE} # To be created file paths that will store details of AWS resources SECURE_NETWORK_DETAILS={PATH_OF_SECURE_NETWORK_RESOURCES_DETAILS_FILE} HASH_INSTANCES_DETAILS={PATH_OF_HASH_INSTANCES_RESOURCES_DETAILS_FILE} -
Create a secure network with a Bastion host and a Jump host
create_secure_network.sh -i $AWS_ACCESS_KEY_ID -k $AWS_SECRET_ACCESS_KEY -r $AWS_REGION -f $AWS_OUTPUT_FORMAT -l $HERE_ANONYMIZER_LICENSE -
Deploy HERE Anonymizer Self-Hosted instances on the secure network.
deploy_HERE Anonymizer Self-Hosted_instances.sh -s $SECURE_NETWORK_DETAILS -c $ANON_CONFIG_FILE_PATH -a $HERE Anonymizer Self-Hosted_JAR_FILE_PATH -r $RABBITMQ_USER_DATA -j $JOB_MANAGER_USER_DATA -t $TASK_MANAGER_USER_DATA -f $FLINK_ZIP_FILE_PATH -
Authorize the user (IP address)
authorize_user.sh -s $SECURE_NETWORK_DETAILS -
Create a tunnel from the local environment to access RabbitMQ and the Flink dashboard through the Bastion host.
# For RabbitMQ: ssh -i $KEY_PAIR_FILE -p $CUSTOM_SSH_PORT -L $RABBITMQ_MANAGEMENT_PORT:$RABBITMQ_PRIVATE_IP:$RABBITMQ_MANAGEMENT_PORT ec2-user@$BASTION_INSTANCE_PUBLIC_IP -fN # For Flink: ssh -i $KEY_PAIR_FILE -p $CUSTOM_SSH_PORT -L $FLINK_UI_PORT:$JOB_MANAGER_PRIVATE_IP:$FLINK_UI_PORT ec2-user@$BASTION_INSTANCE_PUBLIC_IP -fN -
Access RabbitMQ and Flink dashboards on from your local environment using the following URLs:
# RabbitMQ
http://localhost:15672

# Flink
http://localhost:8081
Cleanup
-
Revoke the user's access (IP address).
unauthorize_user.sh -s $SECURE_NETWORK_DETAILS -
Terminate and delete HERE Anonymizer Self-Hosted instances from the secure network.
terminate_HERE Anonymizer Self-Hosted_instances.sh -s $SECURE_NETWORK_DETAILS -a $HERE Anonymizer Self-Hosted_INSTANCES_DETAILS -
Terminate the secure network.
terminate_secure_network.sh -s $SECURE_NETWORK_DETAILS
Updated 26 days ago