

CarPlayとの統合
このチュートリアルでは、AppleのCarPlayを使用して、乗用車のインフォテイメントディスプレイにMapViewをレンダリングする方法を説明します。CarPlay を使うと、乗用車の実際のハードウェアでアプリを実行できます。これは、開発マシンで実行されている CarPlay シミュレーターを使用して、iOS シミュレーターと並列でシミュレーションを実行できます。
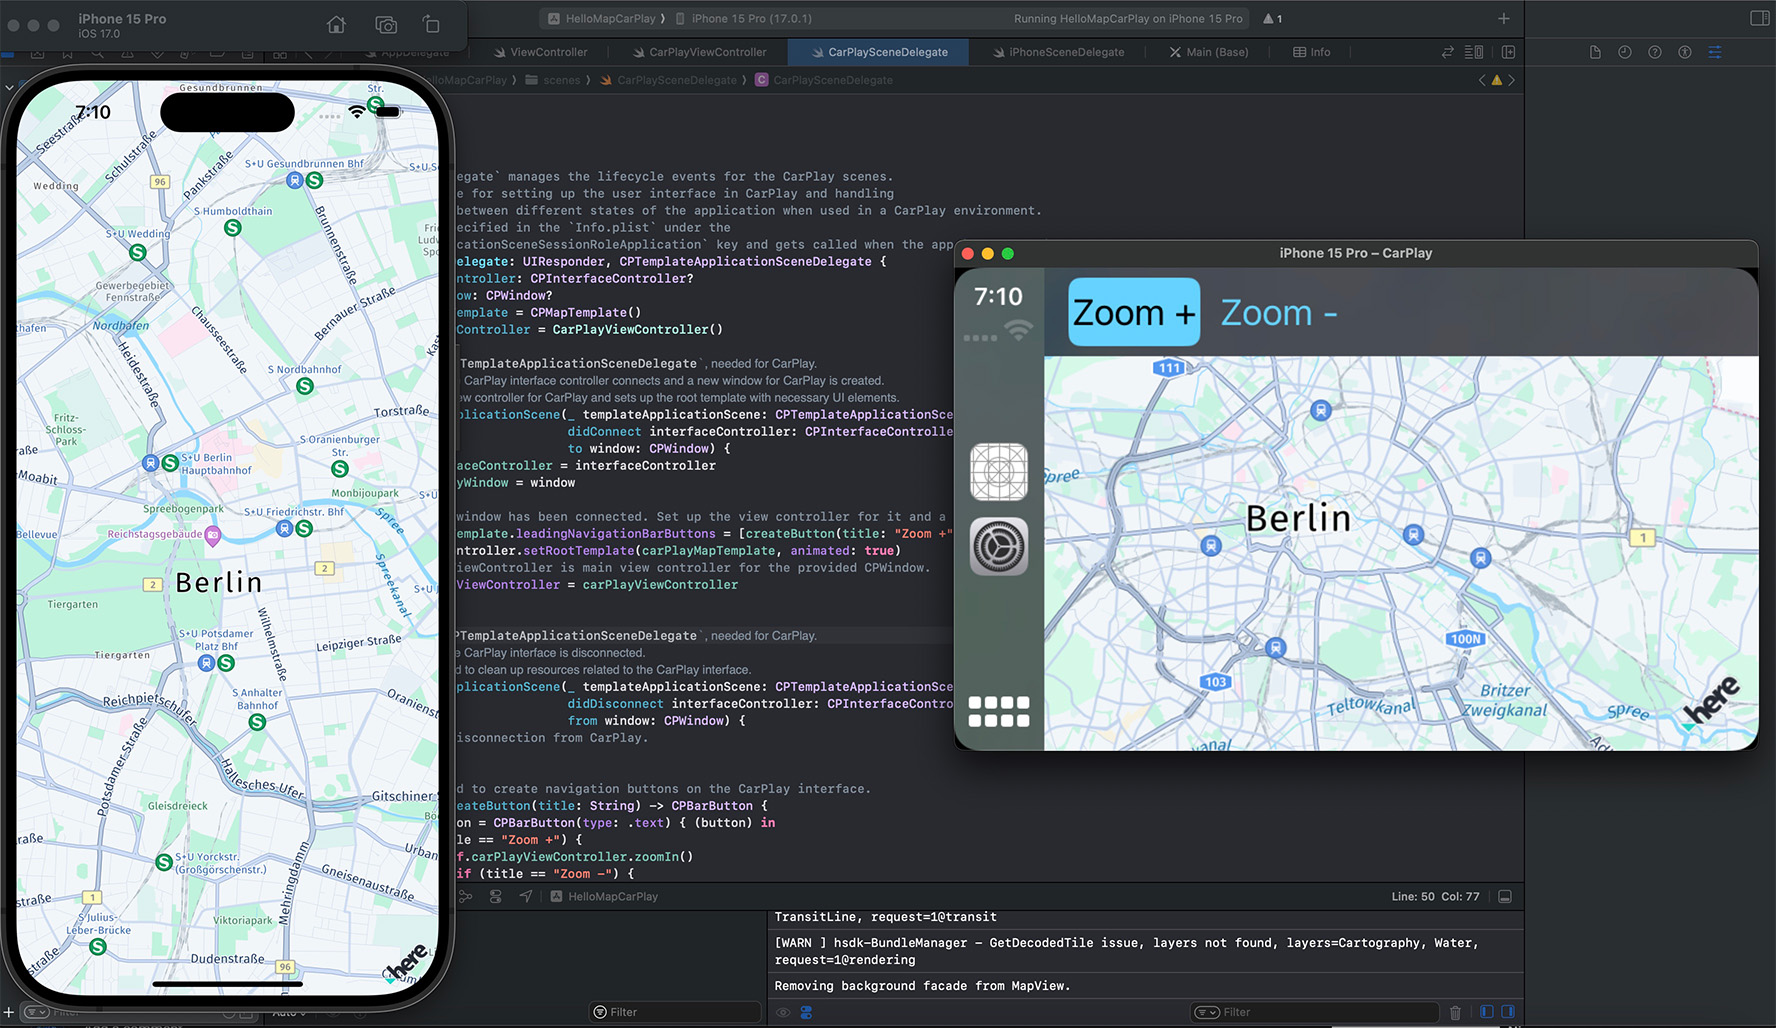
このチュートリアルに従って作成されるアプリは、車載ヘッド ユニット ディスプレイに MapView インスタンスを表示し、ズームイン ボタンとズームアウト ボタンを使用します。別のMapViewインスタンスは、接続されているモバイル機器またはシミュレーターの画面に表示されます。完成した「HelloMapCarPlay」サンプルアプリはGitHubで確認できます。
注CarPlay が期待どおりに機能したとしても、この依存関係は HERE SDK チームによって管理およびテストされていないため、互換性は保証されません。
仕組み
HERE SDK は特別な設定は必要ありません。CarPlay 開発者ガイドに従って、他の API と同様に CarPlay と連携できます。便利なリソースとして、Apple から提供されている CarPlay API リファレンスと CarPlay プログラミング ガイドもご利用ください。
一般的な CarPlay 統合は次のようになります。
Info.plistに CarPlay を設定して CarPlay シーンとコントローラーを処理します。CarPlaySceneDelegateクラスで、CPTemplateApplicationSceneDelegateを実装して CarPlay ライフサイクル イベントを管理します。iPhoneSceneDelegateクラスで、UIWindowSceneDelegateを実装してモバイル アプリケーションの UI シーンのライフサイクル イベントを管理します。CarPlayViewControllerを作成し CarPlay およびViewControllerに表示される地図を管理して、モバイル機器に表示されるメインのビュー コントローラーを管理します。- CarPlay 環境で地図を初期化して設定します。
- 通常どおりにアプリを構築し実行します。さらに、[I/O] - > [External Displays](外部ディスプレイ) - > [CarPlay] を選択して、シミュレーターのメイン メニューから CarPlay シミュレーターを起動します。これにより、iPad または iPhone シミュレーターを一方のウィンドウに表示し、CarPlay シミュレーターを 2 つ目のウィンドウに表示できます。
車載用の Apple の設計ガイドラインに従う必要がある場合を除いて、UIViewController で特定の要件を満たす必要はありません。
アプリを配布したり、実際にデバイスにデプロイしたりするには、Apple によるアプリの審査が必要です。これには、CarPlay アプリのエンタイトルメントを作成し、CarPlay Entitlement Addendum に同意する必要があります。
注Apple によってエンタイトルメントが審査されるまで、CarPlay アプリを実際のデバイスにインストールすることはできません。代わりに iOS デバイス シミュレーターを使用します。実際のデバイスへのデプロイには、テスト目的であっても、エンタイトルメントで有効になっているプロビジョニング プロフィールが必要です。
CarPlay を統合する
詳細を確認し、新しい CarPlay アプリを作成しましょう。
このチュートリアルでは、GitHubにあるHelloMapアプリを使用します。デフォルトでは、デバイスにMapViewが表示されます。次に、このアプリを拡張して、車載ヘッド ユニット ディスプレイに MapView の 2 つ目のインスタンスを表示します。これを行うには、CarPlay を統合する必要があります。
MapView は標準の MapView のように次のように動作します。外観をカスタマイズしたり、3D オブジェクトを追加したり、他の HERE SDK エンジンを連動して使用したりできますが、マップ ジェスチャーはまだサポートされません。そのため、ボタンを追加して地図を操作する必要があります。
注結果として得られるアプリはテストのみを目的とするものです。本番環境で使用できるアプリについては、CarPlay の設計ガイドラインに従って、車両環境に関連するアプリの設計方法を確認してください。
ステップ 1 - CarPlay エンタイトルメントを作成する
このステップでは、Entitlements.plist ファイルを作成する必要があります。これはアプリの機能を指定し、アプリ ID にバインドされます。Xcode で作成できます。こちらで説明されているプロセスに従ってください。該当するエンタイトルメントについては、Apple に連絡する必要があります。以下のシミュレーターによるテスト設定では、これはまだ必要ありません。
- Xcode で、
Entitlements.plistという名前で新しいプロパティ リスト ファイルを作成します。 - [Build Settings](構築設定) -> [Code Signing Entitlements](コード署名エンタイトルメント) で、パスを
HelloMapCarPlay/Entitlements.plistに設定します。
ファイルが次の場所にあることを確認します:HelloMapCarPlay/HelloMapCarPlay/Entitlements.plist - ここで、「HelloMapCarPlay」はプロジェクト名で、その中に同じ名前の別のフォルダーがあります。このフォルダーにファイルを追加します。
Entitlements.plist ファイルを以下のように編集します (後でアプリケーションの実際の要件に合わせて調整します)。
<?xml version="1.0" encoding="UTF-8"?>
<!DOCTYPE plist PUBLIC "-//Apple//DTD PLIST 1.0//EN" "http://www.apple.com/DTDs/PropertyList-1.0.dtd">
<plist version="1.0">
<dict>
	<key>com.apple.developer.carplay-maps</key>
	<true/>
</dict>
</plist>
com.apple.developer.carplay-maps キーは、ターン・バイ・ターンナビ アプリで必要となるアプリケーション スコープを示します。
ステップ2:Info.plist を更新する
次を Info.plist に追加し CarPlay シーン設定を有効にします。
<key>UIApplicationSceneManifest</key>
<dict>
    <key>UIApplicationSupportsMultipleScenes</key>
    <true/>
    <key>UISceneConfigurations</key>
    <dict>

        <key>UIWindowSceneSessionRoleApplication</key>
        <array>
            <dict>
                <key>UISceneConfigurationName</key>
                <string>Default Configuration</string>
                <key>UISceneClassName</key>
                <string>UIWindowScene</string>
            </dict>
        </array>


        <key>CPTemplateApplicationSceneSessionRoleApplication</key>
        <array>
            <dict>
                <key>UISceneClassName</key>
                <string>CPTemplateApplicationScene</string>
                <key>UISceneConfigurationName</key>
                <string>Default CarPlay Configuration</string>
                <key>UISceneDelegateClassName</key>
                <string>$(PRODUCT_MODULE_NAME).CarPlaySceneDelegate</string>
            </dict>
        </array>
    </dict>
</dict>
<key>UIRequiresFullScreen</key>
<true/>

<key>UILaunchScreen</key>
<dict>
    <key>UIColorName</key>
    <string>White</string>
</dict>
ステップ 3 - CarPlay シーン デリゲートを作成する
クラス CarPlaySceneDelegate を適用し CPTemplateApplicationSceneDelegate プロトコルに準拠して、CarPlay シーンのライフサイクル イベントを管理します。
CPTemplateApplicationSceneDelegate は CarPlay でユーザー インターフェースを設定し、CarPlay 環境で使用する際にアプリケーションのさまざまな状態間の遷移を処理します。このクラスはInfo.plistの
CPTemplateApplicationSceneSessionRoleApplicationキーの配下に指定され、アプリがCarPlayとやり取りをする時に呼び出されます。
CPTemplateApplicationSceneDelegate は 2 つのメソッドを実装する必要があります。1 つ目のメソッドは、モバイル機器がヘッド ユニットのディスプレイに接続されると通知し、これにより CarPlay ウィンドウを受信してコンテンツを表示できます。2 つ目のメソッドは、デバイスが切断されると通知します。
CPTemplateApplicationSceneDelegate により CarPlayViewController インスタンスを rootViewController として設定する CPWindow を受信できるようになり ます。これは、CarPlay ウィンドウのコンテンツを管理する基本ビューになります。
これに加え、CPMapTemplate を作成し 2 つの CPBarButton タイプのボタンを定義します。Apple の CPMapTemplate でも、タッチ イベントを受け取り、処理できます。ボタンをクリックすると、イベントがビュー コントローラーに転送され、MapView がズームします。
ビュー コントローラーと同様に、CPMapTemplate インスタンスをルート テンプレートとして設定します。
以下は CarPlaySceneDelegate の実装です。
// `CarPlaySceneDelegate` manages the lifecycle events for the CarPlay scenes.
class CarPlaySceneDelegate: UIResponder, CPTemplateApplicationSceneDelegate {
    var interfaceController: CPInterfaceController?
    var carPlayWindow: CPWindow?
    var carPlayMapTemplate = CPMapTemplate()
    let carPlayViewController = CarPlayViewController()

    /// Conform to `CPTemplateApplicationSceneDelegate`, needed for CarPlay.
    /// Called when the CarPlay interface controller connects and a new window for CarPlay is created.
    /// Initializes the view controller for CarPlay and sets up the root template with necessary UI elements.
    func templateApplicationScene(_ templateApplicationScene: CPTemplateApplicationScene,
                                  didConnect interfaceController: CPInterfaceController,
                                  to window: CPWindow) {
        self.interfaceController = interfaceController
        self.carPlayWindow = window

        // CarPlay window has been connected. Set up the view controller for it and a map template.
        carPlayMapTemplate.leadingNavigationBarButtons = [createButton(title: "Zoom +"), createButton(title: "Zoom -")]
        interfaceController.setRootTemplate(carPlayMapTemplate, animated: true)
        // CarPlayViewController is main view controller for the provided CPWindow.
        window.rootViewController = carPlayViewController
    }

    /// Conform to `CPTemplateApplicationSceneDelegate`, needed for CarPlay.
    /// Called when the CarPlay interface is disconnected.
    /// Use this method to clean up resources related to the CarPlay interface.
    func templateApplicationScene(_ templateApplicationScene: CPTemplateApplicationScene,
                                  didDisconnect interfaceController: CPInterfaceController,
                                  from window: CPWindow) {
        // Handle disconnection from CarPlay.
    }

    // Helper method to create navigation buttons on the CarPlay interface.
    private func createButton(title: String) -> CPBarButton {
        let barButton = CPBarButton(type: .text) { (button) in
            if (title == "Zoom +") {
                self.carPlayViewController.zoomIn()
            } else if (title == "Zoom -") {
                self.carPlayViewController.zoomOut()
            }
        }
        barButton.title = title
        return barButton
    }
}
ステップ 4 -電話シーン デリゲートを作成する
iPhoneSceneDelegate クラスに UIWindowSceneDelegate を実装し、アプリケーションの UI シーンのライフサイクル イベントを管理します。
UIWindowSceneDelegate はアプリケーションのウィンドウとそのコンテンツの設定と分解を処理し、シーン内の状態遷移に応答します。シーン管理には、ウィンドウの作成と削除、バックグラウンドとフォアグラウンド間のアプリケーションの移行、設定変更の処理があります。これは標準の iOS ユーザー インターフェースの UISceneConfigurations キーの Info.plist で指定されます。
以下は iPhoneSceneDelegate の実装です。
// `iPhoneSceneDelegate` manages the lifecycle events of a UI scene for the application.
class iPhoneSceneDelegate: UIResponder, UIWindowSceneDelegate {

    var window: UIWindow?

    /// Called when a new scene session is being created and associated with the app.
    /// This method sets up the initial content and configuration for the scene using either Storyboards or programmatically via SwiftUI (not shown here).
    func scene(_ scene: UIScene, willConnectTo session: UISceneSession, options connectionOptions: UIScene.ConnectionOptions) {
        // Use this method to optionally configure and attach the UIWindow `window` to the provided UIWindowScene `scene`.
        // If using a storyboard, the `window` property will automatically be initialized and attached to the scene.
        // This delegate does not imply that the connecting scene or the session are new (see `application(_:configurationForConnecting:options:)`).

        guard let windowScene = scene as? UIWindowScene else { return }

        // If using Storyboards
        window = UIWindow(windowScene: windowScene)
        window?.rootViewController = UIStoryboard(name: "Main", bundle: nil).instantiateInitialViewController()
        window?.makeKeyAndVisible()
    }
}
ステップ 5 - CarPlay ビュー コントローラーを作成する
UIViewController を使用して MapView を表示します。「HelloMap」サンプル アプリには、MapView を表示する ViewController クラスがすでに含まれています。次に、CarPlay で使用するためにのみインスタンス化される 2 つ目のインスタンスを作成します。ただし、コードとしては、次とまったく同じクラスのようになります。
import heresdk
import UIKit

// This is the view controller shown on an in car's head unit display with CarPlay.
class CarPlayViewController: UIViewController {

    var mapView : MapView!

    override func viewDidLoad() {
        super.viewDidLoad()

        // Initialize MapView without a storyboard.
        mapView = MapView(frame: view.bounds)
        view.addSubview(mapView)

        // Load the map scene using a map scheme to render the map with.
        mapView.mapScene.loadScene(mapScheme: MapScheme.normalDay, completion: onLoadScene)
    }

    // Completion handler when loading a map scene.
    private func onLoadScene(mapError: MapError?) {
        guard mapError == nil else {
            print("Error: Map scene not loaded, \(String(describing: mapError))")
            return
        }

        // Configure the map.
        let camera = mapView.camera
        let distanceInMeters = MapMeasure(kind: .distanceInMeters, value: 1000 * 7)
        camera.lookAt(point: GeoCoordinates(latitude: 52.518043, longitude: 13.405991), zoom: distanceInMeters)
    }

    public func zoomIn() {
        mapView.camera.zoomBy(2, around: mapView!.camera.principalPoint)
    }

    public func zoomOut() {
        mapView.camera.zoomBy(0.5, around: mapView!.camera.principalPoint)
    }

    override func didReceiveMemoryWarning() {
        super.didReceiveMemoryWarning()
        mapView.handleLowMemory()
    }
}
この新しいビュー コントローラーを使って、2 つ目の MapView インスタンスを作成します。また、2 つのズーム メソッド zoomIn() と zoomOut() を追加し、地図に実装できる基本的な操作を示します。次のステップでは、ヘッド ユニット ディスプレイに表示される 2 つのボタンを作成し、両方のメソッドを呼び出します。
パンなどの地図を操作するためのボタンを追加できます。ただし、Apple の設計ガイドラインに従って、ドライバーの注意をそらすことがないようにします。また、MapImageOverlay クラスで画像をオーバーレイとして MapScene にピン留めして、マップ ビューに地図と一緒に移動、拡大縮小、傾斜しないビットマップ グラフィックを表示できます。
注HERE SDK は、CarPlay のマップ ジェスチャーはサポートしません。そのため、ボタンを使用して地図を操作する必要があります。また、パンの動作などのタッチ ジェスチャーをサポートしない乗用車もあります。CarPlay プログラミングガイドを読み、ノブとタッチ パッドのイベントによるパンのジェスチャーの詳細をご覧ください。
次に、[Build](ビルド) をクリックしてシミュレーターを構築および実行します。シミュレーターが起動したら、シミュレーターのアプリ メニューを開き、[I/O] - > [External Displays](外部ディスプレイ) - > [CarPlay] を選択します。2 つ目のウィンドウが開き、CarPlay のホーム画面にアプリが表示されます。
結果として得られるアプリは次のようになります。
Screenshot: Showing the HERE Map running on a CarPlay and iPhone simulator.
CarPlayサンプルアプリを試す
完成した「HelloMapCarPlay」サンプルアプリはGitHubで確認できます。
次のステップ
このチュートリアルでは、既存のアプリに CarPlay のサポートを追加する方法を説明します。2つの個別のMapViewインスタンス (デバイスで1つとヘッドユニットで1つ) を実行しますが、両方のMapViewインスタンスは同じアプリのライフサイクル内で実行されるため、デバイスとヘッドユニット間で機能を引き継ぐことができます。たとえば、ユーザーは自宅のモバイル機器でルート計画を開始し、その後、車載のUSBにそのデバイスを接続して運転を開始できます (アプリがNavigateを使用している場合)。ナビゲーションの進行状況が車のヘッドユニットに表示され、デバイスには運転操作の詳細などのサポート情報が表示されます。
情報を増やしすぎてドライバーの注意をそらさないようにします。では、音声操作を追加で実装して、アプリを操作できるようにしてはどうでしょうか。他にもアイデアをいくつか示します。
- 速度警告アシスタントを追加します。これにより、現在有効な制限速度がヘッドのユニットディスプレイに表示され、この制限速度を超えると音声で警告されます。
- 現在走行している道路の道路属性情報をサポートとして表示します。
- ガソリンスタンド、レストラン、観光スポットなど、近くのPOI (施設情報) の場所情報を表示するアプリを実装します。
2 か月前の更新