

ナビゲーションを最適化する
このセクションでは、特定のユーザーニーズやシナリオに合わせてナビゲーションプロセスを調整し、シームレスで堅牢なナビゲーションエクスペリエンスを提供するのに役立つ追加機能とカスタマイズオプションについて説明します。
ナビゲーション中にマップ ビューを更新する
ナビゲーション中は、あらかじめ決められたルートを追随するかどうかにかかわらず、正確で有益なマップ ビューを維持することが重要です。主なタスクは次のとおりです。
- 現在の位置情報を追随する:マップがユーザーの現在位置の中央に配置されるようにします。
- 位置矢印を表示する:ユーザーの現在の方向を矢印で示します。
- 地図を回転する:地図の向きをユーザーの現在の方向に合わせます。
- ビジュアル アセットの追加:運転操作アイコンなどの追加要素を組み込むことで、より明確なルート案内を実現します。
これらのタスクは、位置情報の更新に手動で応答するか、VisualNavigator を活用してこれらのプロセスを自動化することで管理できます。
新しい位置情報イベントが発生するたびに、新しい NavigableLocation が発生します。これには VisualNavigator にフィードした元の GPS 信号に基づいて計算された、マップマッチングした場所が含まれています。このマップマッチングした場所は、マップ ビューを更新するために使用されます。
注意点として、多くの場合、位置情報の更新の取得は頻繁に発生しますが、これは個別のステップで行われます。そのため、各位置には数百メートルの間隔が存在する可能性があります。カメラを新しい位置に更新する際に、わずかなジャンプが発生する可能性があります。
一方、VisualNavigator のレンダリング機能を使用すると、移動が補間されスムーズに更新されます。ドライバーの速度に応じて、2 つの位置の更新で欠落した座標が補間され、対象となる地図の位置情報が自動的に更新されます。
さらに、VisualNavigator では地図を傾け、地図を進行方向に合わせて回転させ、3D の位置矢印と LocationIndicator を表示できます。これらはすべて、1 行のコードでアクティブ化されます。
visualNavigator.startRendering(mapView: mapView)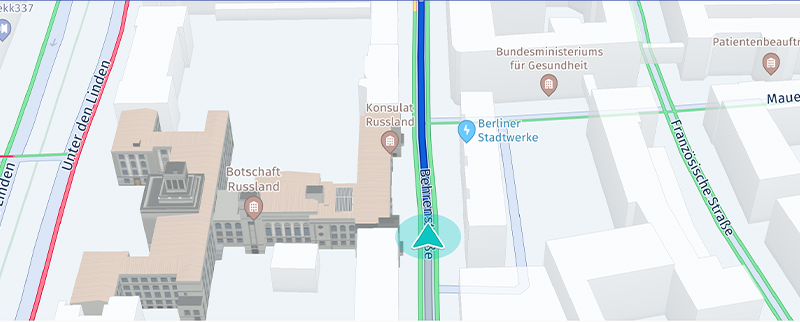
Screenshot: Turn-by-turn navigation example running on a device.
さらに、次のコマンドを使用して、現在の位置の追随を停止できます。
visualNavigator.cameraBehavior = nil次のコマンドを使用すると、再度有効にできます。
// Alternatively, use DynamicCameraBehavior to auto-zoom the camera during guidance.
visualNavigator.cameraBehavior = FixedCameraBehavior()
デフォルトでは、カメラ トラッキングは有効になっています。したがって、地図は常に現在の位置を中心に配置して表示されます。これは一時的に無効にでき、それによりユーザーが手動でパンしたり、ナビゲーション中またはトラッキング中に地図を操作したりできるようになります。3D 位置矢印は移動し続けますが、地図は移動しません。カメラ トラッキング モードを再び有効にすると、地図は現在の位置にジャンプし、位置情報の更新を再びスムーズに追随します。
実行中のナビゲーションを停止するには、visualNavigator.route = nil を呼び出すか、上記のデリゲートを nil にリセットします。あるいは、単純に位置情報プロバイダーで stop() を呼び出します。詳細については、「ルート案内を開始および停止する」セクションを参照してください。
完全なソース コードについては、対応する Navigation のサンプル アプリを確認してください。
ナビゲーションエクスペリエンスをカスタマイズする
「NavigationCustom」サンプルアプリは、カスタムのLocationIndicatorに切り替える方法とナビゲーションが停止したときに別のタイプに切り替える方法を示しています。また、ナビゲーションのパースペクティブをカスタマイズする方法を確認できます。GitHub でサンプル アプリを確認してください。
CameraBehaviorでは、ガイダンス中のマップ ビューの表示方法をカスタマイズできます。これにより、DynamicCameraBehaviorを使用して自動ズーム動作を 設定したり、FixedCameraBehaviorを使用して静止チルトおよびズームの向きを設定したりでき、プログラムによって更新できます。主点の変更など、他のオプションも可能です。SpeedBasedCameraBehaviorでもカスタマイズ オプションが提供されており、トラッキング モード中に最適です。ManeuverNotificationOptionsでは、TTS 音声コマンドを転送するタイミングを指定できます。
ヘッドレスの Navigator にはデフォルトまたはカスタマイズ可能なレンダリング オプションがなく、その代わりにマップ ビュー全体を独自にレンダリングできます。たとえば、ルート ラインを大きくしたり、その他の可視化のカスタマイズを行ったりする場合は、HERE SDK の一般的なレンダリング機能を使用できます。ただし、補間を実装する必要がある場合もあります。補間は VisualNavigator では実装済みです。
VisualNavigator を使用する場合、ルート レンダリングやデフォルトの LocationIndicator の表示など、特定のレンダリング機能を無効にできます。引き続きスムーズなマップ エクスペリエンスをレンダリングするには、マップ ビューの現在の対象位置情報を独自に更新する必要があります。位置情報プロバイダーでは、新しい位置情報の更新が個別のステップでしか送信されず、高い頻度で配信されても、マップ ビューの「ジャンプ」が生じます。そのため、InterpolatedLocationListenerを使用して、デフォルトと同じようにスムーズな位置情報の更新を実現することを検討してください。
デフォルトでは、MapViewは60フレーム/秒 (fps) でレンダリングします。ターン・バイ・ターンナビがVisualNavigatorによって有効になっている場合、フレームレートは30 fpsに低下します。この値はカスタマイズできます。たとえば、以下では60 fpsに設定しています。
visualNavigator.guidanceFrameRate = 60位置情報インジケーターをカスタマイズする
事前設定された MapMarker3D インスタンスは、独自のモデルを設定してカスタマイズでき、無効にすることもできます。内部的には、VisualNavigator で LocationIndicator インスタンスが使用されるため、VisualNavigator にカスタム LocationIndicator を設定することもできます。また、これが完了したら、インスタンスを手動で追加、削除、更新する必要があります。同様に、すでにマップ ビューで LocationIndicator インスタンスを使用している場合は、関連するマップ アイテムのセクションを参照してください。
デフォルトでは、LocationIndicator のスタイルは VisualNavigator に設定できる移動モードから決定されます。ルートが設定されている場合は、代わりにルート インスタンスから取得されます。カスタム アセットが使用されている場合は、LocationIndicator のクラスでスタイルを直接切り替える必要があります。
注NavigationCustomのサンプルアプリは、カスタムの
LocationIndicatorに切り替える方法とナビゲーションが停止したときに別のタイプに切り替える方法を示しています。また、ナビゲーションのパースペクティブをカスタマイズする方法を確認できます。
通過済みルート
デフォルトでは、VisualNavigator は、ユーザーがこれから先に向かう部分と現在の位置の背後にあるすでに通過した部分を視覚的に区別できるように、異なる色を使用して Route をレンダリングします。これは、無効にしたり、カスタマイズしたりできます。デフォルトでは、HERE WeGo モバイル アプリケーションと同じ色が使用されています。
通過済みルートの可視化を無効にする場合は、次の呼び出しを行います。
visualNavigator.isRouteProgressVisible = falseデフォルトの VisualNavigatorColors は day & night (日中および夜間) モードに対応しています。たとえば、時間帯によって色が切り替わります。デフォルト色は、次のようにカスタマイズできます。
private func customizeVisualNavigatorColors() {
    let routeAheadColor = UIColor.blue
    let routeBehindColor = UIColor.red
    let routeAheadOutlineColor = UIColor.yellow
    let routeBehindOutlineColor = UIColor.gray
    let maneuverArrowColor = UIColor.green

    let visualNavigatorColors = VisualNavigatorColors.dayColors()
    let routeProgressColors = RouteProgressColors(
        ahead: routeAheadColor,
        behind: routeBehindColor,
        outlineAhead: routeAheadOutlineColor,
        outlineBehind: routeBehindOutlineColor
    )

    // Sets the color used to draw maneuver arrows.
    visualNavigatorColors.maneuverArrowColor = maneuverArrowColor
    // Sets route color for a single transport mode. Other modes are kept using defaults.
    visualNavigatorColors.setRouteProgressColors(sectionTransportMode: SectionTransportMode.car, routeProgressColors: routeProgressColors)
    // Sets the adjusted colors for route progress and maneuver arrows based on the day color scheme.
    visualNavigator?.colors = visualNavigatorColors
}
この方法によって、パスに沿ってレンダリングされる運転操作矢印の色を変更して、次の右左折を示すこともできます。
UI アセットを取得する
VisualNavigatorのような一部の例外を除き、HERE SDKには独自のアプリを構築するためのUIやUIアセットは用意されていません。また、ルートに沿って利用可能なほとんどのルート案内情報は、単純なデータ型として提供されます。
-
ただし、独自のアプリケーションで使用できる再利用可能なアセットは、公式のHEREアイコンライブラリに用意されています。
-
HEREアイコンライブラリから取得できる運転操作アクション用のオープンソースアセットを含む、基本的な運転操作パネルを表示する再利用可能なUIビルディングブロックは、GitHubで「Rerouting」のサンプルアプリの一部として見つけることができます。
通知頻度を調整する
RouteProgress などのすべてのイベントまたは複数の警告イベントが、位置情報の更新に応じて送信されます。LocationEngine を使用している場合は、少なくとも更新頻度ができるだけ 1 秒に近い LocationAccuracy.navigation を使用します。
このルールの例外となるのは、RouteDeviation、RoadAttributes、RoadTexts、Milestone、ManeuverViewLaneAssistance イベントなどのイベントに基づく通知です。それぞれの位置情報の更新後、このようなイベントを配信する必要があるかどうかの確認があります。これは通常、現在の道路で属性が変更されたときに行われます。
ManeuverNotificationTimingOptions を使用した運転操作通知テキストなど、一部のイベントについてはしきい値を設定できます。
警告機能の警告通知距離は、「通知距離を設定する」に記載された方法で設定できます。
経由地イベントを取得する
VisualNavigator/Navigator のクラスはより実用的な通知を提供します。以下は、通過した経由地に関する通知を受信する方法の例です。目的地の経由地で通知を受けるには、次の 2 つの方法があります。
- 下の例の1番目のデリゲートでは、目的地に到達したときに通知を受け取ります。それにより、ナビゲーションが停止します。
- 一方、以下の2番目のデリゲートでは、目的地の経由地を含むすべてのタイプの経由地で通知を受け取ります。
// Conform to DestinationReachedDelegate.
// Notifies when the destination of the route is reached.
func onDestinationReached() {
    showMessage("Destination reached.")
    // Guidance has stopped. Now consider to, for example,
    // switch to tracking mode or stop rendering or locating or do anything else that may
    // be useful to support your app flow.
    // If the DynamicRoutingEngine was started before, consider to stop it now.
}

// Conform to MilestoneStatusDelegate.
// Notifies when a waypoint on the route is reached or missed.
func onMilestoneStatusUpdated(milestone: Milestone, status: MilestoneStatus) {
    if milestone.waypointIndex != nil && status == MilestoneStatus.reached {
        print("A user-defined waypoint was reached, index of waypoint: \(String(describing: milestone.waypointIndex))")
        print("Original coordinates: \(String(describing: milestone.originalCoordinates))")
    } else if milestone.waypointIndex != nil && status == MilestoneStatus.missed {
        print("A user-defined waypoint was missed, index of waypoint: \(String(describing: milestone.waypointIndex))")
        print("Original coordinates: \(String(describing: milestone.originalCoordinates))")
    } else if milestone.waypointIndex == nil && status == MilestoneStatus.reached {
        // For example, when transport mode changes due to a ferry a system-defined waypoint may have been added.
        print("A system-defined waypoint was reached, index of waypoint: \(String(describing: milestone.mapMatchedCoordinates))")
    } else if milestone.waypointIndex == nil && status == MilestoneStatus.missed {
        // For example, when transport mode changes due to a ferry a system-defined waypoint may have been added.
        print("A system-defined waypoint was missed, index of waypoint: \(String(describing: milestone.mapMatchedCoordinates))")
    }
}onMilestoneStatusUpdated()メソッドは、ルート上の通過した経由地または未通過の経由地に関する情報が含まれるMilestoneインスタンスを提供します。stopover 経由地のみが含まれます。目的地の経由地と、ユーザーが追加したその他の stopover 経由地も含まれます。また、フェリーに乗る必要がある場合など、HERE SDK によって追加される経由地が含まれます。ただし、最初の経由地は移動の出発地点となるため除外されます。タイプpassThroughの経由地もデフォルトで除外されますが、NavigatorまたはVisualNavigatorで対応するフラグを設定することで含めることができます。
Milestoneには経路計算時にユーザーが設定した経由地リストを参照するインデックスが含まれます。リストがない場合は、Milestoneはルート計算中に設定された経由地を参照します。たとえば、フェリーを利用する必要があることを示すルート検索アルゴリズムによって追加のストップオーバーがある場合です。
MilestoneStatus 列挙型 (enum) は、対応する Milestone に到達したか、未通過かを示します。
ナビゲーション開始時に欠落しているマイルストーンイベントを処理する
ルートに重複するセクションが含まれている場合は、次の考慮事項が適用されます。
ユーザーがナビゲーションを開始し、現在の位置が重複するsectionの開始経由地より前にある場合、sectionIndexがこのsection以下であるすべてのマイルストーンに対して、missedまたはreachedのステータスが通知されます。
これは、HERE SDKがアプリケーションによって提供された現在の位置に基づいて近くのセクションを特定しようとするために発生します。重複があるため、最初に一致するsectionIndexは0ではなく、より大きな値になる場合があります。
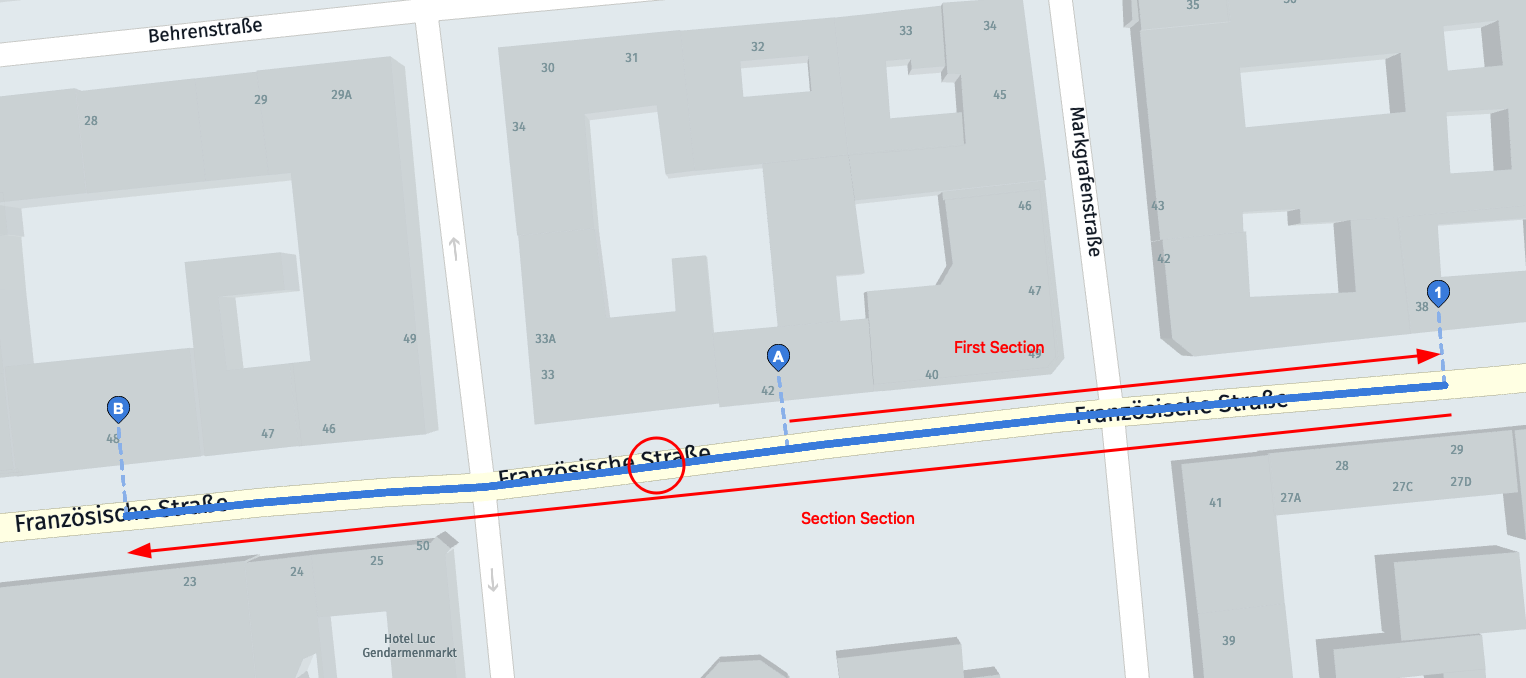
Screenshot: Route with section overlap.
たとえば、スクリーンショットに示すように、ルートが経由地「A」、経由地「1」、経由地「B」へと移動し、ユーザーが経由地「1」を省略して「B」と「A」の間のナビゲーションを開始した場合、経由地「1」はMISSEDマイルストーンとして通知されます。HERE SDKは見逃されたマイルストーンについて1回だけ通知します。さらに、最初の位置情報の更新がルートの最初のセクションに含まれない場合は、マイルストーンを見逃したイベントがトリガーされます。
ユーザーが「A」から開始していないことを検出した場合、ナビゲーション開始後に「1」のマイルストーンを見逃すイベントを回避するために、ユーザーが「A」に到達した時点でルート全体を再計算することを検討してください。
一般的に、missedマイルストーンイベントを受け取った場合は、ルートの逸脱を検出したときと同様に、ルートを再計算することを検討してください。
道路標識アイコンを取得する
iconProvider.createRoadShieldIcon(...)を使用すると、「A7」や「US-101」などの道路番号がマップ ビューにすでに表示されているように、非同期でUIImageを作成できます。
道路標識アイコンの作成はオフラインで行われ、インターネット接続は必要ありません。アイコンの作成に必要なデータは、Route自体から取得されますが、手動で入力することもできます。

Examples of road shield icons.
ルートを追随しながらオンザフライでデータを取得する方法を以下に示します。すべての道路、特に小さな道路では、ルートの道路標識アイコンで可視化できるとは限りません。一般に、ガイダンスを開始する前のルート プレビューの一部としてアイコンを表示したり、次の運転操作のガイダンス中にアイコンを表示して、運転操作が必要な場所について視覚的なヒントを提供したりできます。
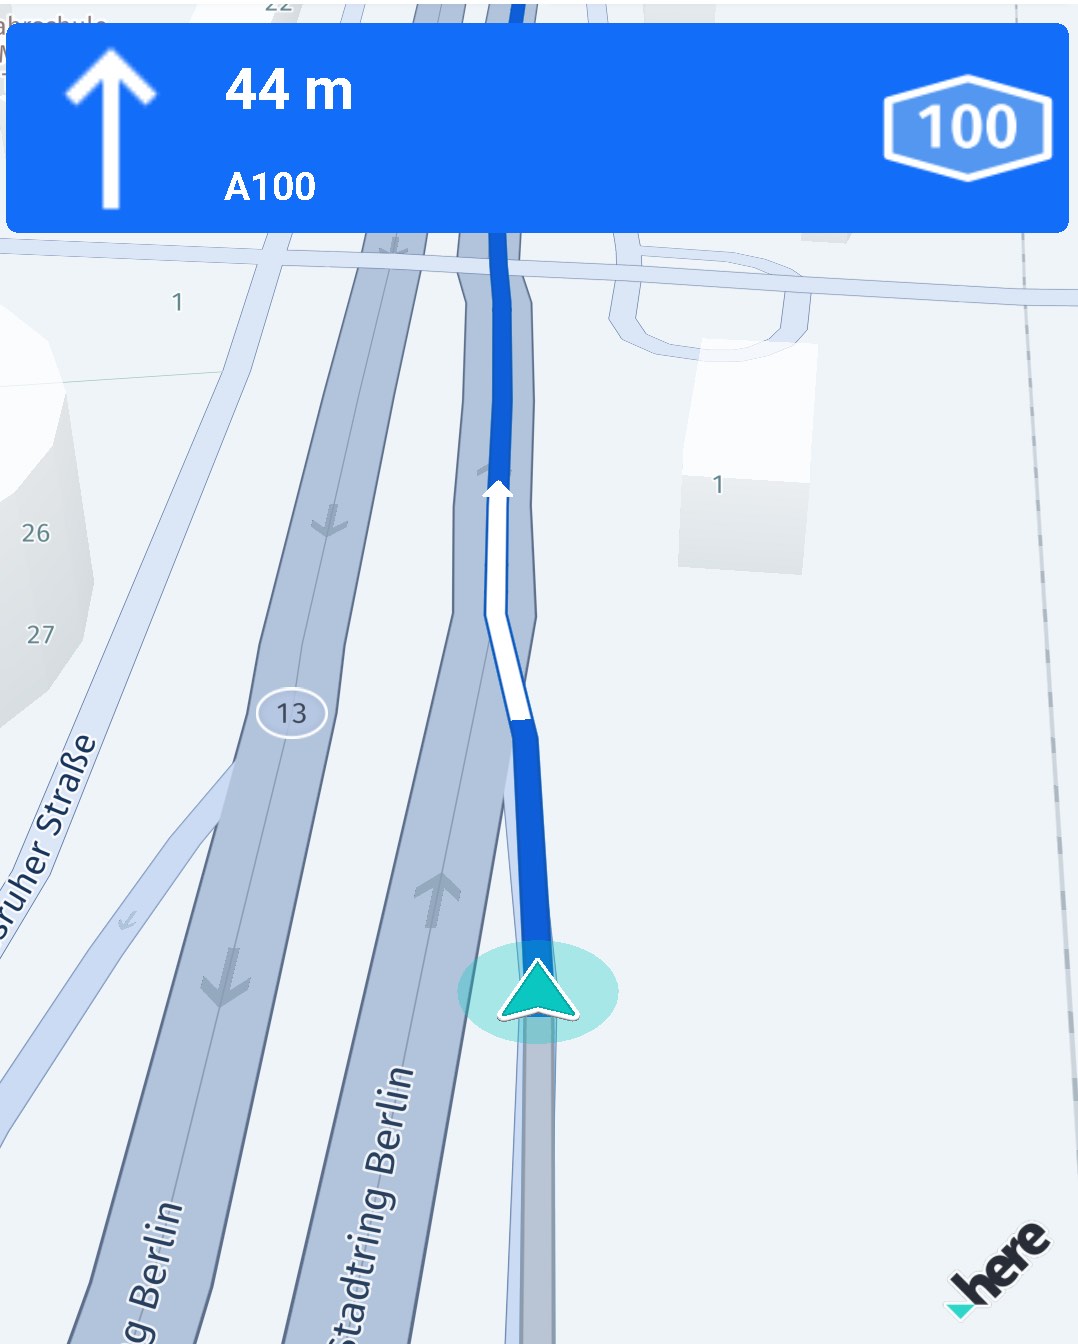
Showing a road shield together with the next maneuver.
道路標識アイコンを生成するために必要なすべての情報は、Route オブジェクトの一部です。
アイコンは RouteType や LocalizedRoadNumber などのパラメーターを必要とする RoadShieldIconProperties からオフラインで生成されます。これらのパラメーターは、Route オブジェクトの Span から取得できます。
span.getShieldText(..) を使用して、RoadShieldIconProperties で使用する shieldText を取得します。span.roadNumbers を使用すると、RouteType (主要道路かどうかを 1 から 6 のレベルで示す) や、CardinalDirection (「101 West」など) のような追加情報を持つ LocalizedRoadNumber 項目のリストを取得できます。
IconProvider.IconCallback では、結果の画像またはエラーを受け取ることができます。
注これはこの機能のベータリリースであるため、いくつかのバグや予期しない動作が発生する可能性があります。関連するAPIは、廃止のプロセスを経ずに、新しいリリースに変更される可能性があります。
例として、RouteProgress イベントで道路標識アイコンを表示または非表示にする方法を以下に紹介します。
// Conform to RouteProgressDelegate.
func onRouteProgressUpdated(_ routeProgress: heresdk.RouteProgress) {
    let maneuverProgressList = routeProgress.maneuverProgress
    guard let nextManeuverProgress = maneuverProgressList.first else {
        print("No next maneuver available.")
        return
    }

    // ...
    // Here you can extract maneuver information from nextManeuverProgress.
    // ...

    let nextManeuverIndex = nextManeuverProgress.maneuverIndex
    let nextManeuver = visualNavigator.getManeuver(index: nextManeuverIndex)

    if previousManeuver == nextManeuver {
        // We are still trying to reach the next maneuver.
        return;
    }
    previousManeuver = nextManeuver;

    // A new maneuver takes places. Hide the existing road shield icon, if any.
    uiCallback?.onHideRoadShieldIcon()

    guard let maneuverSpan = getSpanForManeuver(route: visualNavigator.route!,
                                                maneuver: nextManeuver!) else {
        return
    }
    createRoadShieldIconForSpan(maneuverSpan)
}
この例では、アプリ側で uiCallback メカニズムを使用してビューを更新します。このコードはここでは特に紹介する必要はないので、省略していますが、GitHubにある付属のReroutingのサンプルアプリで確認できます。
次のような運転操作のスパンを取得できます。
private func getSpanForManeuver(route: Route, maneuver: Maneuver) -> Span? {
    let index = Int(maneuver.sectionIndex)
    let sectionOfManeuver = route.sections[index]
    let spansInSection = sectionOfManeuver.spans

    // The last maneuver is located on the last span.
    // Note: Its offset points to the last GeoCoordinates of the route's polyline:
    // maneuver.offset = sectionOfManeuver.geometry.vertices.last.
    if maneuver.action == ManeuverAction.arrive {
        return spansInSection.last
    }

    let indexOfManeuverInSection = maneuver.offset
    for span in spansInSection {
        // A maneuver always lies on the first point of a span. Except for the
        // the destination that is located somewhere on the last span (see above).
        let firstIndexOfSpanInSection = span.sectionPolylineOffset
        if firstIndexOfSpanInSection >= indexOfManeuverInSection {
            return span
        }
    }

    // Should never happen.
    return nil
}
情報を抽出して道路標識アイコンを生成するコードを以下に示します。
private func createRoadShieldIconForSpan(_ span: Span) {
    guard !span.roadNumbers.items.isEmpty else {
        // Road shields are only provided for roads that have route numbers such as US-101 or A100.
        // Many streets in a city like "Invalidenstr." have no route number.
        return
    }

    // For simplicity, we use the first item as fallback. There can be more numbers you can pick per desired language.
    guard var localizedRoadNumber = span.roadNumbers.items.first else {
        // First time should not be nil when list is not empty.
        return
    }

    // Desired locale identifier for the road shield text.
    let desiredLocale = Locale(identifier: "en_US")
    for roadNumber in span.roadNumbers.items {
        if roadNumber.localizedNumber.locale == desiredLocale {
            localizedRoadNumber = roadNumber
            break
        }
    }

    // The route type indicates if this is a major road or not.
    let routeType = localizedRoadNumber.routeType
    // The text that should be shown on the road shield.
    let shieldText = span.getShieldText(roadNumber: localizedRoadNumber)
    // This text is used to additionally determine the road shield's visuals.
    let routeNumberName = localizedRoadNumber.localizedNumber.text

    if lastRoadShieldText == shieldText {
        // It looks like this shield was already created before, so we opt out.
        return
    }

    lastRoadShieldText = shieldText

    // Most icons can be created even if some properties are empty.
    // If countryCode is empty, then this will result in an IconProviderError.ICON_NOT_FOUND. Practically,
    // the country code should never be null, unless when there is a very rare data issue.
    let countryCode = span.countryCode ?? ""
    let stateCode = span.countryCode ?? ""

    let roadShieldIconProperties = RoadShieldIconProperties(
        routeType: routeType,
        countryCode: countryCode,
        stateCode: stateCode,
        routeNumberName: routeNumberName,
        shieldText: shieldText
    )

    // Set the desired constraints. The icon will fit in while preserving its aspect ratio.
    let widthConstraintInPixels: UInt32 = ManeuverView.roadShieldDimConstraints
    let heightConstraintInPixels: UInt32 = ManeuverView.roadShieldDimConstraints

    // Create the icon offline. Several icons could be created in parallel, but in reality, the road shield
    // will not change very quickly, so that a previous icon will not be overwritten by a parallel call.
    iconProvider.createRoadShieldIcon(properties: roadShieldIconProperties,
                                      mapScheme: MapScheme.normalDay,
                                      assetType: IconProviderAssetType.ui,
                                      widthConstraintInPixels: widthConstraintInPixels,
                                      heightConstraintInPixels: heightConstraintInPixels,
                                      callback: handleIconProviderCallback)
}
HERE SDK では追加のフラグ lastRoadShieldText を使用してアイコンがすでに作成されているかどうかを確認します。
handleIconProviderCallback は以下に示すように実装できます。
private func handleIconProviderCallback(image: UIImage?,
                                        description: String?,
                                        error: IconProviderError?) {
    if let iconProviderError = error {
        print("Cannot create road shield icon: \(iconProviderError.rawValue)")
        return
    }

    // If iconProviderError is nil, it is guaranteed that bitmap and description are not nil.
    guard let roadShieldIcon = image else {
        return
    }

    // A further description of the generated icon, such as "Federal" or "Autobahn".
    let shieldDescription = description ?? ""
    print("New road shield icon: \(shieldDescription)")

    // An implementation can now decide to show the icon, for example, together with the
    // next maneuver actions.
    uiCallback?.onRoadShieldEvent(roadShieldIcon: roadShieldIcon)
}この場合も、アプリ側でuiCallbackメカニズムを使用してビューを更新します。このコードはここでは特に紹介する必要はないので、省略していますが、GitHubにある付属のReroutingのサンプルアプリで確認できます。
マップマッチングの場所
未加工のGPS座標は、多くの場合、実際の道路位置情報とは異なります。マップマッチングは位置情報信号を道路ネットワークに合わせ、ナビゲーション中の精度を向上させ、道路固有の情報にアクセスできるようにします。
HERE SDKを使用してマップマッチングした場所を取得するには、次の2つの方法があります。
- MapMatcher:個々の場所を手動で照合するスタンドアロンコンポーネント。
- NavigableLocationListener:ナビゲーション中に継続的にマップマッチングした場所を提供するイベント駆動型リスナー (内部ではMapMatcherを使用)。
MapMatcherを使用してマップマッチングした場所を取得する
MapMatcherは位置情報信号を道路ネットワークに合わせ、ナビゲーション中の精度を向上させます。未加工の座標は実際の道路位置情報とは異なることが多いため、MapMatcherは過去の位置情報、速度、方位データを使用して結果を改善し、より正確なポジショニングを実現します。
注これはこの機能のベータリリースであるため、いくつかのバグや予期しない動作が発生する可能性があります。関連するAPIは、廃止のプロセスを経ずに、新しいリリースに変更される可能性があります。
MapMatcherを作成するには、SDKNativeEngineInstanceで初期化します。セグメントジオメトリーデータを取得する際、レンダリングレイヤーを使用するかどうかを任意で指定できます。
do {
    try mapMatcher = MapMatcher(sdkEngine: sdkNativeEngineInstance, useRenderingLayers: useRenderingLayers)
} catch let InstantiationError {
    fatalError("Initialization failed. Cause: \(InstantiationError)")
}Locationオブジェクトでmatch(location)を呼び出すと、正確な座標と道路セグメント情報を含むMapMatchedLocationを受け取ります。MapMatcherを適切に動作させるには、Locationオブジェクトごとにtimeパラメーターを設定する必要があります。timeが指定されていない場合はnullが返され、エラーメッセージがログに記録されます。このパラメーターは連続するマッチング間の時間距離を計算するために使用されます。speedパラメーターと一緒に使用することで、あるマッチングが前回のマッチングと整合する可能性を計算できます。マッチング精度を向上させるには、各Locationオブジェクトにbearingおよびspeedパラメーターを指定することが推奨されています。
private func matchLocation(geoCoordinates: GeoCoordinates) {
      let location = Location(coordinates: geoCoordinates, time: Date())

      guard let mapMatcher = mapMatcher else {
          print("MapMatcher is not available")
          return
      }

      let mapMatchedLocation = mapMatcher.match(location: location)

      // A null mapMatchedLocation indicates that the location could not be matched to the road network.
      // This means the location is offroad or the data is not in the cache.
      if let matchedLocation = mapMatchedLocation {
          showDialog(title: "MapMatcher", message: "Map-matched location is highlighted with red dot on the map. Check logs for more information on matched location.")

          // Show the map-matched location on the map.
          if let marker = addMapMarker(geoCoordinates: matchedLocation.coordinates, imageName: "map_matched_location_dot.png") {
              mapMatcherMapMarker = marker
          }

          // Fetch IDs from mapMatchedLocation and convert them into OCMSegmentID required by loadSegmentData method.
          let mapMatchedSegmentId: OCMSegmentId = OCMSegmentId(tilePartitionId: Int32(matchedLocation.segmentReference.tilePartitionId), localId: Int32(matchedLocation.segmentReference.localId!))

          loadSegmentData(ocmSegmentId: mapMatchedSegmentId)
      } else {
          print("Location could not be map-matched. Check if the picked location is within 50-meter radius of a road.")
      }
}mapMatchedLocationがnilの場合、位置情報を道路ネットワークとマッチングできなかったことを意味します。これは位置情報が道路から外れている場合 (現在、マッチングは指定された場所から半径50メートル以内で行われます)、または必要なマップデータがキャッシュ内で使用できない場合に発生する可能性があります。
正確なマップマッチングした場所を取得したら、その情報を活用して、SegmentDataLoaderを使用して詳細な道路セグメント情報にアクセスできます。この組み合わせにより、ユーザーが移動している道路セグメントの正確な道路属性を取得できます。この詳細なマップデータへのアクセスの詳細については、「マップデータにリアルタイムでアクセスする」を参照してください。
MapMatcherはキャッシュ、プリフェッチ、またはインストール済みのオフラインマップを使用したOCMタイルデータを必要とします。必要なタイルがない場合は、バックグラウンドでサイレントダウンロードを開始し、すぐにnilを返します。キャッシュに保存されたデータが使用可能になると、その後の呼び出しではそのデータを使用できます。
タイルはより広いエリアをカバーしているため、今後のマッチングでは多くの場合、以前にダウンロードしたデータを活用できます。
MapMatcherは位置情報が更新されても内部状態を維持して、連続するマッチング間の一貫性を確保し、精度の低い位置情報による非現実的な場所の移動を検出します。
この実装例は、GitHubのRoutingWithAvoidanceOptionsサンプルアプリで確認できます。
ナビゲーション中にマップマッチングした場所を取得する
スタンドアロンのMapMatcherは、個々の位置情報ポイントに対して柔軟なマップマッチング機能を提供しますが、ナビゲーション中はNavigableLocationDelegateを介して継続的にマップマッチングした場所を受け取ることができます。内部ではMapMatcherを使用します。
visualNavigator.navigableLocationDelegate = self

...

// Conform to NavigableLocationDelegate.
// Notifies on the current map-matched location and other useful information while driving or walking.
func onNavigableLocationUpdated(_ navigableLocation: NavigableLocation) {
    guard navigableLocation.mapMatchedLocation != nil else {
        print("The currentNavigableLocation could not be map-matched. Are you off-road?")
        return
    }

    lastMapMatchedLocation = navigableLocation.mapMatchedLocation!

    let latitude = mapMatchedLocation.coordinates.latitude
    let longitude = mapMatchedLocation.coordinates.longitude
    print("MapMatchedLocation - Lat: \(latitude), Lon: \(longitude)")

    if (navigableLocation.mapMatchedLocation?.isDrivingInTheWrongWay == true) {
        // For two-way streets, this value is always false. This feature is supported in tracking mode and when deviating from a route.
        print("This is a one way road. User is driving against the allowed traffic direction.");
    }

    let speed = navigableLocation.originalLocation.speedInMetersPerSecond
    let accuracy = navigableLocation.originalLocation.speedAccuracyInMetersPerSecond
    print("Driving speed: \(String(describing: speed)) plus/minus accuracy of \(String(describing: accuracy)).")
}
選択した位置情報ソースから提供される各位置情報の更新は、道路ネットワークにマッチングするナビゲーション可能な位置になります。通常、未処理の場所の信号はデバイスの実際の位置によって異なります。マップマッチングにより、未処理の場所は画面上を飛び越えません。さらに、ターン・バイ・ターンナビ中は、トンネル外挿時などにルートの形状が考慮されます。
さらに、イベントはユーザーの現在の速度を提供し、ユーザーが間違った方向に運転しているかどうかを示します。
オフロード目的地を処理する
オフロード ガイダンスを使用すると、道路外にある目的地にユーザーを案内できます。通常、ガイダンスはマップマッチングした目的地で停止します。目的地が森の真ん中にあるなど、道路ネットワークにマップマッチングできない場合、目的地はオフロードと見なされます。
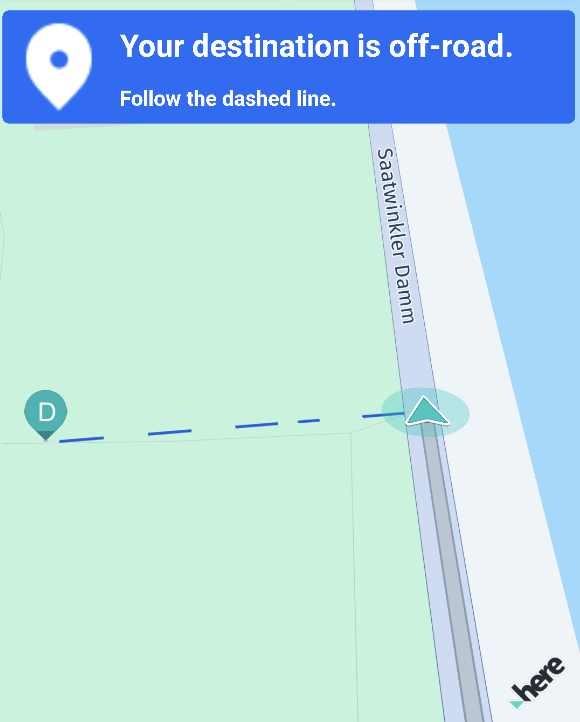
Screenshot: Off-road guidance.
この機能はオフロード目的地のみをサポートしています。出発地がオフロードの場合、ルート計算にはマップマッチングした最も近い場所、つまり次の道路が出発地として使用されます (オプションでアクセス ポイントを使用できます)。出発地が道路ネットワークから遠すぎる場合、ルート計算は最終的に失敗し、couldNotMatchOrigin エラーが発生します。
以下のように、目的地がオフロードであるかどうかを確認したり、マップマッチングした目的地に到達したときにユーザーに知らせたりできます。
// Conform to DestinationReachedDelegate.
// Notifies when the destination of the route is reached.
func onDestinationReached() {
    guard let lastSection = lastCalculatedRoute?.sections.last else {
        // A new route is calculated, drop out.
        return
    }
    if lastSection.arrivalPlace.isOffRoad() {
        print("End of navigable route reached.")
        let message1 = "Your destination is off-road."
        let message2 = "Follow the dashed line with caution."
        // Note that for this example we inform the user via UI.
        uiCallback?.onManeuverEvent(action: ManeuverAction.arrive,
                                   message1: message1,
                                   message2: message2)
    } else {
        print("Destination reached.")
        let distanceText = "0 m"
        let message = "You have reached your destination."
        uiCallback?.onManeuverEvent(action: ManeuverAction.arrive,
                                   message1: distanceText,
                                   message2: message)
    }
}
この例では、アプリ側で uiCallback メカニズムを使用してビューを更新します。このコードはここでは特に紹介する必要はないので、省略しています。これはGitHubにある付属のReroutingのサンプルアプリで確認できます。
マップマッチングした目的地、たとえば森林につながる道路に到達していない場合は、ユーザーはオフロード ガイダンスを得られません。オフロード ガイダンスは、onDestinationReached() イベントを受け取った後にのみ開始されます。
注オフロード イベントが開始されると、新しいルートが設定されない限り、標準のガイダンス モードに戻って
RouteProgressイベントを受け取ることはできません。
オフロードの目的地へのガイダンスを提供するには、以下のコードを追加します。
// Conform to OffRoadProgressDelegate.
// Notifies on the progress when heading towards an off-road destination.
// Off-road progress events will be sent only after the user has reached
// the map-matched destination and the original destination is off-road.
// Note that when a location cannot be map-matched to a road, then it is considered
// to be off-road.
func onOffRoadProgressUpdated(_ offRoadProgress: heresdk.OffRoadProgress) {
    let distanceText = convertDistance(meters: offRoadProgress.remainingDistanceInMeters)
    // Bearing of the destination compared to the user's current position.
    // The bearing angle indicates the direction into which the user should walk in order
    // to reach the off-road destination - when the device is held up in north-up direction.
    // For example, when the top of the screen points to true north, then 180° means that
    // the destination lies in south direction. 315° would mean the user has to head north-west, and so on.
    let message = "Direction of your destination: \(round(offRoadProgress.bearingInDegrees))°"
    uiCallback?.onManeuverEvent(action: ManeuverAction.arrive,
                                message1: distanceText,
                                message2: message)
}

// Conform to OffRoadDestinationReachedDelegate.
// Notifies when the off-road destination of the route has been reached (if any).
func onOffRoadDestinationReached() {
    print("Off-road destination reached.")
    let distanceText = "0 m"
    let message = "You have reached your off-road destination."
    uiCallback?.onManeuverEvent(action: ManeuverAction.arrive,
                                message1: distanceText,
                                message2: message)
}
この例では、アプリ側で convertDistance() メソッドを使用して距離をメートルとキロメートルに変換します。このコードは HERE SDK での使用にあたって特に紹介する必要はないので、上の例では実装を省略しています。
ユーザーがマップマッチングした目的地に到達するまで、オフロード ガイダンスを受けることはできません。また、ユーザーが道路からそれたり、未知の道路を移動したりした場合には、移動中のオフロード経路のサポートは提供されません。ユーザーが既知の道路ネットワークで到達可能なルートの最後のポイントに到達した場合にのみ、オフロード ガイダンスが開始されます。
デフォルトでは、上のコードがない場合でも、オフロードの目的地につながる破線が地図上に表示されます。これは以下のようにコントロールできます。
// Enable off-road visualization (if any) with a dotted straight-line
// between the map-matched and the original destination (which is off-road).
// Note that the color of the dashed line can be customized, if desired.
// The line will not be rendered if the destination is not off-road.
// By default, this is enabled.
visualNavigator.isOffRoadDestinationVisible = true
注この機能はパスに沿ってユーザーをガイドしたり、運転操作に関する情報を提供したりするものではありません。提供された情報が慎重に取り扱われるよう徹底してください。ユーザーの現在位置からオフロードの目的地までが直線のみで描画されます。実際には、目的地が到達不可能な場合、目的地が歩行者の通行できない危険な領域にある場合があります。その旨をユーザーに必ず通知してください。
デバイスがコンパス データをサポートしている場合、アプリケーションによってユーザー エクスペリエンスを向上させるために、デバイスを回転させてオフロードの視覚化に合わせて表示できます。これは、目的地までの破線の形でのみ表示されます。このようなコンパス機能は HERE SDK ではサポートされていないため、純粋なアプリケーション側の実装になることに注意してください。
より適切なルートを検索する
DynamicRoutingEngineを使用すると、現在の交通状況に基づいて最適化されたルートを定期的にリクエストできます。このエンジンは、現在運転しているルートよりも早い (到達予測時刻に基づいて) 新しいルートを検索します。
DynamicRoutingEngine では、オンライン接続と RouteHandle が必要です。オフラインでよりよいルートを検索しようとすると、またはRouteHandleが有効になっていないと、ルート検索エラーが伝播されます。
// Enable route handle.
var routingOptions = RoutingOptions()
routingOptions.routeOptions.enableRouteHandle = true
DynamicRoutingEngineOptions を設定することで、よりよいルートに関する通知を受け取る前に minTimeDifference を定義できます。minTimeDifference は、現在設定されているルートの残りの到達予測時刻と比較されます。DynamicRoutingEngineOptions を使用すると pollInterval を設定して、エンジンがより適切なルートを検索する頻度を決定することもできます。
private class func createDynamicRoutingEngine() -> DynamicRoutingEngine {
    // Both, minTimeDifference and minTimeDifferencePercentage, will be checked:
    // When the poll interval is reached, the smaller difference will win.
    let minTimeDifferencePercentage = 0.1
    let minTimeDifferenceInSeconds: TimeInterval = 1
    // Below, we use 10 minutes. A common range is between 5 and 15 minutes.
    let pollIntervalInSeconds: TimeInterval = 10 * 60

    let dynamicRoutingOptions =
        DynamicRoutingEngineOptions(minTimeDifferencePercentage: minTimeDifferencePercentage,
                                    minTimeDifference: minTimeDifferenceInSeconds,
                                    pollInterval: pollIntervalInSeconds)

    do {
        // With the dynamic routing engine you can poll the HERE backend services to search for routes with less traffic.
        // This can happen during guidance - or you can periodically update a route that is shown in a route planner.
        //
        // Make sure to call dynamicRoutingEngine.updateCurrentLocation(...) to trigger execution. If this is not called,
        // no events will be delivered even if the next poll interval has been reached.
        return try DynamicRoutingEngine(options: dynamicRoutingOptions)
    } catch let engineInstantiationError {
        fatalError("Failed to initialize DynamicRoutingEngine. Cause: \(engineInstantiationError)")
    }
}
minTimeDifference を 0 に設定すると、イベントは発生しません。minTimeDifferencePercentage についても同様です。イベントを取得できるようにするには、必ず 0 より大きい値を設定してください。
注
DynamicRoutingEngineはHERE Routingバックエンドへの定期的な呼び出しを開始します。契約によっては、呼び出しごとに個別に請求される場合があります。このコードの実行頻度は、アプリケーション側が決定します。
よりよいルートを受信した場合、元のrouteとの差がメートルと秒で提供されます。
private func startDynamicSearchForBetterRoutes(_ route: Route) {
    do {
        // Note that the engine will be internally stopped, if it was started before.
        // Therefore, it is not necessary to stop the engine before starting it again.
        try dynamicRoutingEngine.start(route: route, delegate: self)
    } catch let instantiationError {
        fatalError("Start of DynamicRoutingEngine failed: \(instantiationError). Is the RouteHandle missing?")
    }
}

// Conform to the DynamicRoutingDelegate.
// Notifies on traffic-optimized routes that are considered better than the current route.
func onBetterRouteFound(newRoute: Route,
                        etaDifferenceInSeconds: Int32,
                        distanceDifferenceInMeters: Int32) {
    print("DynamicRoutingEngine: Calculated a new route.")
    print("DynamicRoutingEngine: etaDifferenceInSeconds: \(etaDifferenceInSeconds).")
    print("DynamicRoutingEngine: distanceDifferenceInMeters: \(distanceDifferenceInMeters).")

    // An implementation needs to decide when to switch to the new route based
    // on above criteria.
}

// Conform to the DynamicRoutingDelegate.
func onRoutingError(routingError: RoutingError) {
    print("Error while dynamically searching for a better route: \(routingError).")
}
現在のルートと比較した etaDifferenceInSeconds および distanceDifferenceInMeters に基づいて、アプリケーションは newRoute を使用すべきかどうかを判断できます。新しいルートを使用する決定が下された場合は、Navigator または VisualNavigator に設定できます。
注
DynamicRoutingEngineは新しく設定されたルートを認識しません。そのため、ルートの逸脱が検出されると、新しいルートを並行して計算しようとします。たとえば、routingEngine.returnToRoute(...)を呼び出してnavigatorインスタンスに新しいルートが設定されたら、DynamicRoutingEngineに知らせる必要があります。そのためには、stop()を呼び出して、次にdynamicRoutingEngineインスタンスのstart(...)を呼び出し、新しいルートで再度開始します。これは、ルートがnavigatorに設定された後にonBetterRouteFound()コールバック外で適切に行うことができます。RouteDeviationイベントでは、ユーザーがルートからどれだけ逸脱しているかを計算できます (「逸脱後にルートに戻る」を参照)。
わかりやすいように、新しいルートの設定に関する推奨フローを以下に示します。
- 新しいルートを設定すべきかどうかを決定します。
- 「はい」の場合は、
DynamicRoutingEngineを停止します。 - 新しいルート
navigator.route = newRouteを設定します。 - 新しいルートで
DynamicRoutingEngineを開始します。
これらのステップは、必ず onBetterRouteFound() イベント外で呼び出してください。新しい位置情報の更新を受信した場合はローカル フラグを使用して、上のステップに従います。たとえば dynamicRoutingEngine.updateCurrentLocation(..) を呼び出す前には以下を参照してください。
ガイダンス中に新しいルートを渡すとユーザー エクスペリエンスに影響が及ぶ可能性があります。変更についてユーザーに通知することをお勧めします。また、ユーザーが事前に条件を定義できるようにすることをお勧めします。たとえば、どの etaDifferenceInSeconds でも新しいルートを追随する根拠を示すことができない場合があります。
注
DynamicRoutingEngineを使用して定期的に交通情報と到達予測時刻を更新できますが、新しいルートで違いが出る保証はありません。さらに、DynamicRoutingEngineはdistanceDifferenceInMetersで通知します。ただし、ルートの長さが変わっていなくても、ルート形状が同じであるとは限りません。ただし到達予測時刻のみが変更され、長さが同じ場合は、交通状況によって到達予測時刻だけが更新された可能性があります。元のルートを維持することが重要な場合は、ルート形状の座標を比較する必要があります。または、routingEngine.refreshRoute()によって自分で新しいルートを計算することを検討します。refreshRoute()の呼び出しではルート形状は変更されません。詳細については、ルート検索のセクションを参照してください。これに対し、DynamicRoutingEngineの使用目的はより適切なルートを見つけることであり、そのためには多くの場合、交通の障害物を迂回する新しいルート形状に従うのが最適です。また、よりよいルートは、前方のルートに交通の障害物が存在する (またはなくなった) 場合にのみ見つけることができます。
RouteProgress または NavigableLocation の更新の一部として最後にマップマッチングしたドライバーの場所を更新し、取得してすぐに DynamicRoutingEngine に設定します。これは、よりよいルートが常にドライバーの現在地の近くから開始されるようにするために重要です。
dynamicRoutingEngine.updateCurrentLocation(mapMatchedLocation: lastMapMatchedLocation,
                                           sectionIndex: routeProgress.routeMatchedLocation.sectionIndex)
DynamicRoutingEngine では、ルート上にあるマップマッチングした場所が必要です。ユーザーがルートから逸脱すると、RoutingError.couldNotMatchOrigin を受信します。
NavigableLocationListener から取得できる lastMapMatchedLocation および RouteProgressListener から取得できる sectionIndex。RouteProgressListener からイベントを受信した場合は updateCurrentLocation() を呼び出すことをお勧めします。
目的地に到着した後にエンジンが自動的に停止することはありません。したがって、エンジンが必要なくなった場合は、stop() を呼び出すことをお勧めします。
この実装例は、対応するナビゲーションのサンプル アプリにあります。
交通情報を更新する
交通遅延時間を踏まえたアップデート済みの到達予測時刻を提供し、現在のルートの先にある交通障害物を通知することは非常に重要です。移動での交通情報を更新するにはどうすればよいでしょうか。
2 つのシナリオが考えられます。
- 既存のルートを維持する:この場合は、
RoutingEngineを使用して定期的にrefreshRoute()を呼び出します。 - 交通障害物を回避するよりよいルートの候補を見つける:
DynamicRouteEngineを使用します。ユーザーが新しいRouteをフォローするようにする場合、そのルートをNavigatorまたはVisualNavigatorインスタンスに設定します。
Route オブジェクトからアップデート済みの到達予測時刻、交通遅延、交通渋滞を取得できます。
ルートのポリラインを独自にレンダリングする場合は、ルートの交通状況の可視化がサポートされます。この例は、ルート検索のセクションで確認できます。このセクションでは、Route オブジェクトから交通情報を取得する方法も説明しています。
注または、地図の交通流レイヤーを有効にすることができます。
VisualNavigatorのデフォルトの設定では、どのズーム レベルでも、ルートのポリラインに加えて交通流ラインが表示されます。たとえば、HERE WeGo アプリケーションはこのアプローチを使用して現在の交通状況を可視化します。
プリフェッチされたデータを使用する
マップ キャッシュに動的に読み込まれるプリフェッチされたデータを使用して移動の準備ができます。
これにより、ユーザーエクスペリエンスが向上し、たとえば、ターン・バイ・ターンナビ中の一時的なネットワーク損失を適切に処理できます。この機能の詳細については、プリフェッチに関するセクションを参照してください。
オフラインでナビゲーションする
オフライン マップ データがキャッシュ、インストール、またはプリロードされている場合、ほぼすべてのナビゲーション機能はインターネット接続なしでも動作します。オンライン接続を必要とする機能は、DynamicRouteEngine を使用して交通状況に最適化されたルートをオンラインで検索するなど、ごく一部です。
他のエンジンとは異なり、VisualNavigator または Navigator は、事前にキャッシュ、インストール、またはプリロードされていない地域に到達すると自動的にオンライン データをダウンロードしようとします。その逆に、デバイスでオフライン マップ データを利用できる場合は、オンライン接続できるときでも、この地図データを使用します。
トンネルをナビゲーションする
HERE SDK は、道路のマップマッチングと現在の道路区間の基準制限速度を使用して、トンネル内の車の位置を自動的に推定します。ターン・バイ・ターンナビでは、ルート パスも使用されます。これは、十分な強度の GPS 信号が感受できないときにのみ行われます。交通渋滞によって車がトンネル内で停止しなくてはならない場合、可視化されている位置はあくまで推定であるため、位置矢印が引き続き前方に進むことがあります。
- トンネルでの
NavigableLocationイベントには推定のLocationが含まれますが、そのタイム スタンプと速度の属性は意図的にnullとなります。これは、誤解を招く可能性のある情報を提供しないようにするためです。 - 推定の
Locationは、InterpolatedLocationListenerからもアクセスできます。このリスナーは、フィードされた個々の GPS 信号間に計算された位置を絶え間なく提供するため、トンネルの外でも役立つ可能性があります。このリスナーは、VisualNavigatorでどの位置情報を使用してLocationIndicatorをレンダリングしているかを知る必要がある場合または独自にレンダリングする場合に役立つ可能性があります。通常、位置情報の更新は 1 Hz のバンドで着信します。マップ ビューは通常 60 Hz でレンダリングされるため、スムーズなアニメーションを実現するには、このバンドでは低すぎます。フレーム レートはMapViewに向けて調整できます。その場合、InterpolatedLocationListenerもそれに応じて調整されます。
アプリケーションは Location の更新が Navigator または VisualNavigator にフィードされているかどうか (およびどの位置情報の更新か) を検出できますが、NavigableLocation が推定されているかどうかを正確に確認できる API は現在のところはありません。
トンネル外挿は無効にすることもできます。デフォルトでは、トンネル外挿は有効になっています。これを変更するには、Navigator と VisualNavigator で isEnableTunnelExtrapolation プロパティを使用します。
isExtrapolationEnabled プロパティを使用すると、位置情報更新の外挿ロジックを有効にするか無効にするかを制御できます。デフォルトでは、これは有効になっています。この機能は、LocationIndicator の遅れの問題を軽減するのに役立ち、トンネルとは関係なく使用できます。
2 か月前の更新