

Android Autoと統合する
このチュートリアルでは、Android Autoを使用して、車のインフォテインメントディスプレイにMapViewを表示する方法を紹介します。Android Auto はそれ自体が車の実際のハードウェアにインストールされるアプリです。開発マシンで実行中の Desktop Head Unit (DHU) アプリを使用してシミュレートできます。
プロプライエタリーである Android Automotive ソリューションとの統合についてはここでは説明しませんが、こちらの Android サンプル アプリで示されているのと同じ原則に従います。
注Android Auto や Android Automotive が期待どおりに機能したとしても、依存関係は HERE SDK チームによって管理およびテストされていないため、互換性は保証されません。
DHU の設定は時間のかかる作業であるため、前述の car-app-library にある公式の Android サンプル アプリを使用してローカル設定をテストすることをお勧めします。
このチュートリアルの結果として得られるアプリでは、MapView インスタンスがズームインボタン (+) とズームアウトボタン (-) とともに DHU に表示されます。別のMapViewインスタンスは、DHUに接続されているモバイル機器の画面に表示されます。完成した「HelloMapAndroidAuto」サンプルアプリはGitHubにあります。
注Android Auto は Android 6.0 (API レベル 23) 以上を実行中の携帯電話とのみ互換性があります。
Desktop Head Unit (DHU) を設定する
この手順については、Android Auto の公式ドキュメントに従ってください。
基本的な手順:
- Google Play Services をテスト用のモバイル機器にインストールするか、最新バージョンを使用していることを確認します。
- モバイル機器で Play ストアに移動し、最新の Android Auto アプリがインストールされていることを確認します。Samsung デバイスの場合、またはデバイスに Android Auto が見つからない場合:
Settingsアプリに移動し、「Android Auto」を検索します。 - モバイル機器で、デバイスと Android Auto アプリの両方の Android 開発者設定を有効にします (https://developer.android.com/studio/debug/dev-options)。
- モバイル機器で Android Auto アプリの不明な情報ソースを有効にします (https://developer.android.com/training/cars/testing#step1)。
- 開発マシンに DHU をインストールします。テストには DHU 1.1 を使用します。
- DHU を実行し、Android Auto サンプル アプリをインストールして、設定が機能しているかどうかを確認します。
テストには必ず実際のモバイル機器を使用し、DHU はコンピューターで実行してください。テストにはエミュレータを使用しないでください。
テストの開始方法:
- USB 経由でデバイスをコンピューターに接続します。
- Android Auto アプリで、Android ヘッド ユニット サーバーが起動していることを確認します。設定アプリで「Android Auto」を検索し、[Start head unit server](ヘッド ユニット サーバーを起動) をクリックします。次のトースト メッセージが表示されます。「Starting head unit server ...」(ヘッド ユニット サーバーを起動しています...)。
- コマンド ライン ウィンドウを開き、Android Auto がインストールされているディレクトリ (
cd /Users/yourname/Library/Android/sdk/extras/google/autoなど) に移動します。 adb kill-serverと入力し、進行中のセッションをリセットします。adb forward tcp:5277 tcp:5277と入力し、デバイスを ADB に接続します。「daemon started successfully at tcp:5037」(デーモンが tcp:5037 で正常に開始されました) のようなメッセージが表示されます。- 次に、
./desktop-head-unitと入力して DHU を起動します。 - 数秒待ちます。画面が黒いままになることがあります。デバイスと DHU の許可プロンプトが表示された場合は、それを確認します。うまくいかない場合は、上の手順をすべて繰り返します。
- 別のウィンドウが表示され、DHU とインストールされているすべての Android Auto アプリが表示されます。
quitと入力すると、セッションを終了できます。デバイスで「Stop head unit server」(ヘッド ユニット サーバーを停止) も忘れずに呼び出してください。
注これを初めて行う場合は、必ずデバイスと DHU で設定プロセスを実行してください。多くのライセンスと権限を受け入れる必要があります。それでもうまくいかない場合は、以下の「トラブルシューティング」セクションを参照してください。
成功すると、DHU で実行中のいくつかの Android Auto アプリが表示されます。独自のアプリをテストするには、USB/ADB 経由でデバイスにデプロイします。これにより、デバイスの画面と DHU の画面が自動的に更新されます。
注Android Auto アプリは Google Play ストアですでに配信されていない限り、実際のヘッド ユニットで車載の Android Auto アプリをテストできません。こちらの Google の注意も参照してください。
Android Auto を統合する
このチュートリアルでは、GitHubにあるHelloMapアプリを使用します。デフォルトでは、デバイスにMapViewが表示されます。これから、このアプリを拡張して DHU に MapView の 2 番目のインスタンスを表示します。このためには、Android Auto を統合する必要があります。
注結果として得られるアプリはテストのみを目的とするものです。本番環境に対応したアプリについては、Android Auto のガイドラインに従って、車環境に適したアプリを設計する方法を確認してください。
Android Auto は Android 6.0 以降でのみサポートされているため、アプリの build.gradle ファイルで minSdkVersion バージョンが 23 以降に設定されていることを確認します。
minSdkVersion 23同じファイルで、dependencies クロージャーに Android Auto を統合します。
dependencies {
    ...
    implementation "androidx.car.app:app:1.2.0-rc01"
}
AndroidManifest ファイルに、次の必要な権限を追加します。
<uses-permission android:name="androidx.car.app.ACCESS_SURFACE"/>
<uses-permission android:name="androidx.car.app.NAVIGATION_TEMPLATES"/>同じファイルで、application タグに以下を追加します。
<service
    android:name="com.here.hellomapandroidauto.HelloMapCarAppService"
    android:exported="true">
    <intent-filter>
        <action android:name="androidx.car.app.CarAppService"/>
        <category android:name="androidx.car.app.category.NAVIGATION"/>
    </intent-filter>
</service>


<meta-data
    android:name="androidx.car.app.minCarApiLevel"
    android:value="1"/>
<meta-data
    android:name="com.google.android.gms.car.application"
    android:resource="@xml/automotive_app_desc"
    tools:ignore="MetadataTagInsideApplicationTag"/>
パスとクラス名 (com.here.hellomapandroidauto.HelloMapCarAppService) を独自のアプリに合わせて変更します。以下の HelloMapCarAppService クラスと、必要な automotive_app_desc.xml テンプレートを作成します。この例では、このファイルには次の内容のみが含まれています。
<?xml version="1.0" encoding="utf-8"?>

<automotiveApp>
    <uses name="template" />
</automotiveApp>新しい「xml」フォルダーを作成し、次のファイルを追加します:app/src/main/res/xml/automotive_app_desc.xml。
次に、HelloMapCarAppService Javaクラス/ファイルを作成します。なお、必要に応じて Kotlin も使用できます。ここでは Java を使用しています。
package com.here.hellomapandroidauto;

import android.content.Intent;
import android.content.pm.ApplicationInfo;

import androidx.annotation.NonNull;
import androidx.annotation.Nullable;
import androidx.car.app.CarAppService;
import androidx.car.app.Screen;
import androidx.car.app.Session;
import androidx.car.app.validation.HostValidator;

/**
 * Entry point for the hello map app.
 *
 * <p>{@link CarAppService} is the main interface between the app and the car host. For more
 * details, see the <a href="https://developer.android.com/training/cars/apps">Android for
 * Cars Library developer guide</a>.
 */
public final class HelloMapCarAppService extends CarAppService {

    public HelloMapCarAppService() {
        // Exported services must have an empty public constructor.
    }

    @Override
    @NonNull
    public Session onCreateSession() {
        return new Session() {
            @Override
            @NonNull
            public Screen onCreateScreen(@Nullable Intent intent) {

                // Ensure the HERE SDK is initialized (if it is not already initialized
                // via MainActivity).
                HereSDKInitializer.run(HelloMapCarAppService.this);

                return new HelloMapScreen(getCarContext());
            }
        };
    }

    @NonNull
    @Override
    public HostValidator createHostValidator() {
        if ((getApplicationInfo().flags & ApplicationInfo.FLAG_DEBUGGABLE) != 0) {
            return HostValidator.ALLOW_ALL_HOSTS_VALIDATOR;
        } else {
            return new HostValidator.Builder(getApplicationContext())
                    .addAllowedHosts(androidx.car.app.R.array.hosts_allowlist_sample)
                    .build();
        }
    }
}
package com.here.hellomapandroidautokotlin
import android.content.Intent
import android.content.pm.ApplicationInfo
import androidx.car.app.CarAppService
import androidx.car.app.R
import androidx.car.app.Screen
import androidx.car.app.Session
import androidx.car.app.validation.HostValidator
import androidx.lifecycle.DefaultLifecycleObserver
import androidx.lifecycle.LifecycleOwner
/**
* Entry point for Android Auto - when connected to a DHU or an in-car head unit.
*
*
* [CarAppService] is the main interface between the app and the car host. For more
* details, see the [Android for Cars Library developer guide](https://developer.android.com/training/cars/navigation).
*/
class HelloMapCarAppService : CarAppService() {
override fun onCreateSession(): Session {
val session: Session = object : Session() {
override fun onCreateScreen(intent: Intent): Screen {
return HelloMapScreen(carContext)
}
}
session.lifecycle.addObserver(object : DefaultLifecycleObserver {
override fun onCreate(owner: LifecycleOwner) {
HERESDKLifecycle.start(this@HelloMapCarAppService)
}
override fun onDestroy(owner: LifecycleOwner) {
HERESDKLifecycle.stop()
}
})
return session
}
override fun createHostValidator(): HostValidator {
return if ((applicationInfo.flags and ApplicationInfo.FLAG_DEBUGGABLE) != 0) {
HostValidator.ALLOW_ALL_HOSTS_VALIDATOR
} else {
HostValidator.Builder(applicationContext)
.addAllowedHosts(R.array.hosts_allowlist_sample)
.build()
}
}
}すべての Android Auto アプリは 1 つ以上の CarAppService を継承する必要があります。これを使用して HelloMapScreen を表示します。このチュートリアルで DHU に表示する画面はこれだけです。このクラスの他の部分については、Android Auto のドキュメントを参照してください。すべての CarAppService で必要な一般的なボイラー プレート コードを示しています。
地図を統合する
次の手順では、HelloMapScreen を次のように作成します。
package com.here.hellomapandroidauto;

import android.util.Log;

import androidx.annotation.NonNull;
import androidx.annotation.Nullable;
import androidx.car.app.AppManager;
import androidx.car.app.CarContext;
import androidx.car.app.Screen;
import androidx.car.app.SurfaceCallback;
import androidx.car.app.SurfaceContainer;
import androidx.car.app.model.Action;
import androidx.car.app.model.ActionStrip;
import androidx.car.app.model.CarIcon;
import androidx.car.app.model.Template;
import androidx.car.app.navigation.model.NavigationTemplate;
import androidx.core.graphics.drawable.IconCompat;

import com.here.sdk.core.GeoCoordinates;
import com.here.sdk.core.Point2D;
import com.here.sdk.core.Size2D;
import com.here.sdk.mapview.MapError;
import com.here.sdk.mapview.MapMeasure;
import com.here.sdk.mapview.MapScene;
import com.here.sdk.mapview.MapScheme;
import com.here.sdk.mapview.MapSurface;

/**
 * A screen that shows a HERE SDK map view.
 *
 * <p>See {@link HelloMapCarAppService} for the app's entry point to the car host.
 */
public class HelloMapScreen extends Screen implements SurfaceCallback {

    private MapSurface mapSurface;
    private CarContext carContext;

    public HelloMapScreen(@NonNull CarContext carContext) {
        super(carContext);
        this.carContext = carContext;

        Log.d("HelloMapScreen", "Register surface callback");
        carContext.getCarService(AppManager.class).setSurfaceCallback(this);

        // Since the MapSurface implements MapViewBase, it behaves like a MapView, except that it
        // renders on the DHU running Android Auto.
        mapSurface = new MapSurface();
    }

    @NonNull
    @Override
    public Template onGetTemplate() {
        CarIcon zoomInIcon = new CarIcon.Builder(
                IconCompat.createWithResource(carContext, R.drawable.plus)).build();
        CarIcon zoomOutIcon = new CarIcon.Builder(
                IconCompat.createWithResource(carContext, R.drawable.minus)).build();

        // Add buttons to zoom in/out the map view and to exit the app.
        ActionStrip.Builder actionStripBuilder = new ActionStrip.Builder();
        actionStripBuilder.addAction(
                new Action.Builder()
                        .setIcon(zoomInIcon)
                        .setOnClickListener(this::zoomIn)
                        .build());
        actionStripBuilder.addAction(
                new Action.Builder()
                        .setIcon(zoomOutIcon)
                        .setOnClickListener(this::zoomOut)
                        .build());
        actionStripBuilder.addAction(
                new Action.Builder()
                        .setTitle("Exit")
                        .setOnClickListener(this::exit)
                        .build());

        NavigationTemplate.Builder builder = new NavigationTemplate.Builder();
        builder.setActionStrip(actionStripBuilder.build());
        return builder.build();
    }

    @Override
    public void onSurfaceAvailable(@NonNull SurfaceContainer surfaceContainer) {
        Log.d("HelloMapScreen", "Received a surface.");
        mapSurface.attachSurface(
                carContext,
                surfaceContainer.getSurface(),
                surfaceContainer.getWidth(),
                surfaceContainer.getHeight());

        mapSurface.getMapScene().loadScene(MapScheme.NORMAL_DAY, new MapScene.LoadSceneCallback() {
            @Override
            public void onLoadScene(@Nullable MapError mapError) {
                if (mapError == null) {
                    double distanceInMeters = 1000 * 10;
                    MapMeasure mapMeasureZoom = new MapMeasure(MapMeasure.Kind.DISTANCE_IN_METERS, distanceInMeters);
                    mapSurface.getCamera().lookAt(new GeoCoordinates(52.530932, 13.384915), mapMeasureZoom);
                } else {
                    Log.d("HelloMapScreen", "Loading map failed: mapError: " + mapError.name());
                }
            }
        });
    }

    @Override
    public void onSurfaceDestroyed(@NonNull SurfaceContainer surfaceContainer) {
        mapSurface.destroySurface();
    }

    private void zoomIn() {
        double zoomFactor = 2;
        mapSurface.getCamera().zoomBy(zoomFactor, getCenterPoint());
    }

    private void zoomOut() {
        double zoomFactor = 0.5;
        mapSurface.getCamera().zoomBy(zoomFactor, getCenterPoint());
    }

    private void exit() {
        carContext.finishCarApp();
    }

    private Point2D getCenterPoint() {
        Size2D viewport = mapSurface.getViewportSize();
        return new Point2D(viewport.width * 0.5, viewport.height * 0.5);
    }
}
package com.here.hellomapandroidautokotlin
import android.util.Log
import androidx.car.app.AppManager
import androidx.car.app.CarContext
import androidx.car.app.Screen
import androidx.car.app.SurfaceCallback
import androidx.car.app.SurfaceContainer
import androidx.car.app.model.Action
import androidx.car.app.model.ActionStrip
import androidx.car.app.model.CarIcon
import androidx.car.app.model.Template
import androidx.car.app.navigation.model.NavigationTemplate
import androidx.core.graphics.drawable.IconCompat
import com.here.sdk.core.GeoCoordinates
import com.here.sdk.core.Point2D
import com.here.sdk.mapview.MapMeasure
import com.here.sdk.mapview.MapScheme
import com.here.sdk.mapview.MapSurface
/**
* A screen that shows a HERE SDK map view - when connected to a DHU or an in-car head unit.
*
*
* See [HelloMapCarAppService] for the app's entry point to the car host.
*/
class HelloMapScreen(private val carContext: CarContext) : Screen(carContext), SurfaceCallback {
private val mapSurface: MapSurface
init {
Log.d(TAG, "Register surface callback")
carContext.getCarService(AppManager::class.java).setSurfaceCallback(this)
// Since the MapSurface implements MapViewBase, it behaves like a MapView, except that it
// renders on the DHU running Android Auto.
mapSurface = MapSurface()
}
override fun onGetTemplate(): Template {
val zoomInIcon = CarIcon.Builder(
IconCompat.createWithResource(carContext, R.drawable.plus)
).build()
val zoomOutIcon = CarIcon.Builder(
IconCompat.createWithResource(carContext, R.drawable.minus)
).build()
// Add buttons to zoom in/out the map view and to exit the app.
val actionStripBuilder = ActionStrip.Builder()
actionStripBuilder.addAction(
Action.Builder()
.setIcon(zoomInIcon)
.setOnClickListener { this.zoomIn() }
.build())
actionStripBuilder.addAction(
Action.Builder()
.setIcon(zoomOutIcon)
.setOnClickListener { this.zoomOut() }
.build())
actionStripBuilder.addAction(
Action.Builder()
.setTitle("Exit")
.setOnClickListener { this.exit() }
.build())
val builder = NavigationTemplate.Builder()
builder.setActionStrip(actionStripBuilder.build())
builder.setMapActionStrip(
ActionStrip.Builder()
.addAction( // Must be present (even on a car with touch screen) to enable PAN mode. PAN
// mode is required to enable reception of gestures.
Action.Builder(Action.PAN).build()
).build()
)
return builder.build()
}
override fun onSurfaceAvailable(surfaceContainer: SurfaceContainer) {
Log.d(TAG, "Received a surface.")
mapSurface.attachSurface(
carContext,
surfaceContainer.surface,
surfaceContainer.width,
surfaceContainer.height
)
mapSurface.mapScene.loadScene(
MapScheme.NORMAL_DAY
) { mapError ->
mapError?.let {
Log.d(TAG, "Loading map failed: mapError: ${mapError.name}")
return@loadScene
}
val distanceInMeters = (1000 * 10).toDouble()
val mapMeasureZoom =
MapMeasure(MapMeasure.Kind.DISTANCE_IN_METERS, distanceInMeters)
mapSurface.camera.lookAt(GeoCoordinates(52.530932, 13.384915), mapMeasureZoom)
}
}
override fun onSurfaceDestroyed(surfaceContainer: SurfaceContainer) {
mapSurface.destroySurface()
}
private fun zoomIn() {
val zoomFactor = 2.0
mapSurface.camera.zoomBy(zoomFactor, centerPoint)
}
private fun zoomOut() {
val zoomFactor = 0.5
mapSurface.camera.zoomBy(zoomFactor, centerPoint)
}
private fun exit() {
carContext.finishCarApp()
}
private val centerPoint: Point2D
get() {
val viewport = mapSurface.viewportSize
return Point2D(viewport.width * 0.5, viewport.height * 0.5)
}
/**
* Will be called on scroll event. Needs car api version 2 to work.
* See [SurfaceCallback.onScroll] definition for more details.
*/
override fun onScroll(distanceX: Float, distanceY: Float) {
mapSurface.gestures.scrollHandler.onScroll(distanceX, distanceY)
}
/**
* Will be called on scale event. Needs car api version 2 to work.
* See [SurfaceCallback.onScale] definition for more details.
*/
override fun onScale(focusX: Float, focusY: Float, scaleFactor: Float) {
mapSurface.gestures.scaleHandler.onScale(focusX, focusY, scaleFactor)
}
/**
* Will be called on scale event. Needs car api version 2 to work.
* See [SurfaceCallback.onFling] definition for more details.
*/
override fun onFling(velocityX: Float, velocityY: Float) {
/**
*
* Fling event appears to have inverted axis compared to scroll event on desktop head unit.
* This should not be the case according to
* [androidx.car.app.navigation.model.NavigationTemplate]. To compensate inverted axis
* , factor of -1 was introduced. This might differ depending on which head unit model is
* used.
*/
mapSurface.gestures.flingHandler.onFling(-1 * velocityX, -1 * velocityY)
}
companion object {
private val TAG: String = HelloMapScreen::class.java.simpleName
}
}これはこのアプリの最も興味深い部分です。AndroidManifest で Android Auto をサポートするサービスとしてこのアプリを宣言しました。そのためインストール時、または後で Android Auto アプリ経由で直接起動するときに、DHU には HelloMapScreen が自動的に表示されます。
コンテンツをレンダリングするには、アプリを Surface にレンダリングする必要があります。このため、すべての Android Auto 画面は SurfaceCallback を実装し、Surface が利用可能になったときに通知を受け取ります。便宜上、HERE SDK はパラメーターとして SurfaceContainer を受け入れる MapSurface クラスを提供します。
mapSurface.attachSurface(
        carContext,
        surfaceContainer.getSurface(),
        surfaceContainer.getWidth(),
        surfaceContainer.getHeight());
mapSurface.attachSurface(
carContext,
surfaceContainer.surface,
surfaceContainer.width,
surfaceContainer.height
)アプリが Android Auto から SurfaceContainer を受信したら準備は完了です。HERE SDK の MapSurface は MapViewBase インターフェースを実装しているため、普通の MapView ように動作します。この例では、同じアプリの MainActivity で行うのと同じように、これを使用してマップ シーンを読み込みます。基本的に、MapView インスタンスの代わりに MapSurface インスタンスを使用します。
注HERE SDK
MapSurfaceはジェスチャーをサポートしています。ボタンを使用して地図を操作することもできます。すべての車がパンなどのタッチ ジェスチャーをサポートしているわけではありません。
この例では、2 つのボタンを使用して地図を操作します。これらのボタンは Android Auto の ActionStrip.Builder で作成します。このコールバックでは、地図をズームする基本的な地図操作を実行します。
double zoomFactor = 2;
mapSurface.getCamera().zoomBy(zoomFactor, getCenterPoint());
val zoomFactor = 2.0
mapSurface.camera.zoomBy(zoomFactor, centerPoint)パンなどの地図を操作するためのボタンを追加できます。ただし、必ず Android Auto のガイドラインに従ってドライバーの注意をそらさないようにします。Android の CarIcon の代わりに、MapImageOverlay クラスを使用して MapScene に画像をオーバーレイとしてピン留めすることもできます。これにより、地図と一緒に移動、拡大縮小、傾斜しないビットマップ グラフィックをマップ ビューの上に表示できます。
結果として得られるアプリは次のようになります。
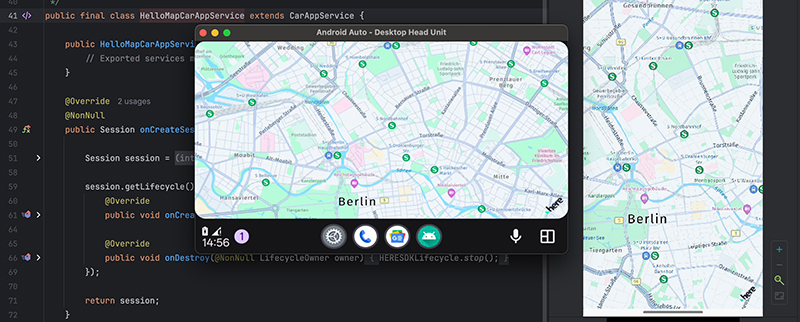
Screenshot: Showing the HERE Map running on a DHU.
ジェスチャー処理を追加する
HERE SDK は ScrollHandler、ScaleHandler、FlingHandler の各インターフェースを提供します。これらのハンドラーは、対応する getter (Gestures.getScaleHandler など) を呼び出すことで、Gestures クラスから取得できます。
各ハンドラーは、ジェスチャー処理をトリガーする 1 つのメソッドを提供します。
onScroll(float distanceX, float distanceY)は地図をパンします。onScale(float focusX, float focusY, float scaleFactor)は特定のポイントの周囲を倍率でズームします。onFling(float velocityX, float velocityY)は与えられた初速度で動的に動きます。
これらのハンドラーはAndroid AutoでMapSurfaceを使用する場合のジェスチャー処理に役立ちます。GitHubにある「HelloMapAndroidAuto」アプリで使用例を確認してください。OpenGL ESの例は、GitHubにある「HelloMapSurface」サンプルアプリで見ることができます。これはRenderListenerを使用してマップビューに単純な図形をレンダリングする方法を示しています。
Android Autoサンプルアプリを試す
完成した「HelloMapAndroidAuto」サンプルアプリはGitHubにあります。
トラブルシューティング
テスト用に Android Auto (または Android ツール全般) を設定するのは面倒な場合があります。ここでは役立つヒントをいくつか紹介します。
- ADB を実行すると「command not found: adb」と表示される:これは、パス変数に Android の ADB がまだ設定されていないことを意味します。ADB はコンソール ターミナルからコンピューターにデバイスを接続するのに役立つツールです。以下に、Mac で Zsh シェルを使用する場合のソリューションの例を示します。まず、[ツール] -> [Android] -> [SDK Manager](SDKマネージャー) からAndroidのSDKマネージャーを起動し、最新のAndroid SDKプラットフォームツールがインストールされていることを確認します。インストールされていない場合は、インストールしてください。ADB ツールは Android SDK プラットフォームツールの一部です。次に、シェル環境で ADB を認識させる必要があります。以下のコマンドを実行して
PATH変数を更新します。たとえば、nano $HOME/.zshrcでnanoエディターを使用します。以下の行を追加し、「Ctrl + X」を押してから「Y」を押して保存します。以下の例を環境に合わせて調整します。その後、source ~/.zshrcを実行します。
export PATH=$PATH:~/Library/Android/sdk/platform-tools
export ANDROID_HOME=~/Library/Android/sdk
export PATH="$HOME/.bin:$PATH"
export PATH="~/Library/Android/sdk/platform-tools":$PATH
次のステップ
このチュートリアルでは、既存のアプリに Android Auto のサポートを追加する方法を紹介しました。2つの個別のMapViewインスタンス (デバイスで1つとヘッドユニットで1つ) を実行しますが、両方のMapViewインスタンスは同じアプリのライフサイクル内で実行されるため、デバイスとヘッドユニット間で機能を引き継ぐことができます。たとえば、ユーザーは自宅のモバイル機器でルート計画を開始し、その後、車載のUSBにそのデバイスを接続して運転を開始できます (アプリがNavigateを使用している場合)。ナビゲーションの進行状況が車のヘッドユニットに表示され、デバイスには運転操作の詳細などのサポート情報が表示されます。
情報を増やしすぎてドライバーの注意をそらさないようにします。では、音声操作を追加で実装して、アプリを操作できるようにしてはどうでしょうか。他にもアイデアをいくつか示します。
- 速度警告アシスタントを追加します。これにより、現在有効な制限速度がヘッドのユニットディスプレイに表示され、この制限速度を超えると音声で警告されます。
- 現在走行している道路の道路属性情報をサポートとして表示します。
- ガソリンスタンド、レストラン、観光スポットなど、近くのPOI (施設情報) の場所情報を表示するアプリを実装します。
2 か月前の更新