

ポジショニングを最適化する
以下に、さまざまなアプリケーションで正確で信頼性の高い位置データを取得するための追加オプションを示します。
位置情報オプションを指定する
位置を生成する際の考慮事項をさらに制御する必要がある場合は、LocationOptions オブジェクトを作成して必要に応じて設定し、それを使用してエンジンを開始します。
// ...

// Create a new LocationOptions object. By default all options are enabled.
LocationOptions locationOptions = new LocationOptions();

// Use WiFi and satellite (GNSS) positioning only.
locationOptions.wifiPositioningOptions.enabled = true
locationOptions.satellitePositioningOptions.enabled = true
locationOptions.sensorOptions.enabled = false;
locationOptions.sensorOptions.vdrEnabled = false;
locationOptions.cellularPositioningOptions.enabled = false

// Receive a location approximately every minute, but not more often than every 30 seconds.
locationOptions.notificationOptions.smallestIntervalMilliseconds = TimeUnit.SECONDS.toMillis(30);
locationOptions.notificationOptions.desiredIntervalMilliseconds = TimeUnit.SECONDS.toMillis(60);

locationEngine.start(locationOptions);

// ...
以下の表は、利用可能な LocationAccuracy モードの概要と、そのモードが内部的にどのように LocationOptions に変換されるかを示しています。
| LocationAccuracy | LocationOptions |
|---|---|
| BEST_AVAILABLE | cellularPositioningOptions.enabled = true satellitePositioningOptions.enabled = true wifiPositioningOptions.enabled = true sensorOptions.enabled = true sensorOptions.vdrEnabled = false notificationOptions.desired_interval_millisec = 30000 (30s) notificationOptions.smallest_interval_millisec = 900 (0.9s) |
| NAVIGATION | cellularPositioningOptions.enabled = false satellitePositioningOptions.enabled = true wifiPositioningOptions.enabled = true sensorOptions.enabled = true sensorOptions.vdrEnabled = false notificationOptions.desired_interval_millisec = 1000 (1.0s) notificationOptions.smallest_interval_millisec = 900 (0.9s) |
| SUB_METER_NAVIGATION | cellularPositioningOptions.enabled = false satellitePositioningOptions.enabled = true satellitePositioningOptions.hdEnabled = true wifiPositioningOptions.enabled = true sensorOptions.enabled = true sensorOptions.vdrEnabled = true notificationOptions.desired_interval_millisec = 1000 (1.0s) notificationOptions.smallest_interval_millisec = 900 (0.9s) |
| TENS_OF_METERS | cellularPositioningOptions.enabled = false satellitePositioningOptions.enabled = false wifiPositioningOptions.enabled = true sensorOptions.enabled = true sensorOptions.vdrEnabled = false notificationOptions.desired_interval_millisec = 30000 (30s) notificationOptions.smallest_interval_millisec = 900 (0.9s) |
| HUNDREDS_OF_METERS | cellularPositioningOptions.enabled = true satellitePositioningOptions.enabled = false wifiPositioningOptions.enabled = true sensorOptions.enabled = false notificationOptions.desired_interval_millisec = 30000 (30s) notificationOptions.smallest_interval_millisec = 900 (0.9s) |
| KILOMETERS | cellularPositioningOptions.enabled = true satellitePositioningOptions.enabled = false wifiPositioningOptions.enabled = false sensorOptions.enabled = false sensorOptions.vdrEnabled = false notificationOptions.desired_interval_millisec = 30000 (30s) notificationOptions.smallest_interval_millisec = 900 (0.9s) |
注
LocationEngineでは希望の間隔になることは保証されません。位置情報が配信される頻度が高くなるあるいは低くなる可能性があります。一方、最小間隔は、定義された値を上回る頻度で位置情報が配信されないことを保証します。
Android Autoで車両GNSSとモーションセンサーを使用する
LocationEngineは、Android Autoを介して車両に接続された携帯電話で実行し、車両のGNSSおよびモーションセンサーデータを使用できます。これにより、特に市街地のビル群やトンネルで、デバイスのGNSSやセンサーのみに依存する場合と比較して、位置精度と可用性を向上させることができます。
車両センサーを有効にする
車両GNSSおよびモーションセンサーデータを使用できるようにするには、CarContextからCarHardwareManagerインスタンスを取得し、それをLocationEngine.enableVehicleSensors()に渡します。
CarHardwareManager hwManager = (CarHardwareManager) carContext.getCarService(CarContext.HARDWARE_SERVICE);
locationEngine.enableVehicleSensors(hwManager);
車両GNSSおよびセンサデータの使用を停止するには、次を呼び出します。
locationEngine.disableVehicleSensors();
注車両からのGNSSおよびモーションセンサーデータの品質は、環境条件や車両の性能によって大きく異なる場合があります。アプリケーションのUIで、車両センサーデータの使用をオンまたはオフに切り替えるオプションをユーザーに提供することをお勧めします。
車両セッションの状態変更を処理する
車両セッションの状態が「開始」に変わったら、LocationEngine.enableVehicleSensors()を呼び出して車両センサーを再度有効にする必要があります。これは通常、ライフサイクルオブザーバーのonStart()メソッドで行います。
    @Override
    public void onStart(@NonNull LifecycleOwner owner) {
        super.onStart(owner);
		 CarHardwareManager hwManager = (CarHardwareManager) carContext.getCarService(CarContext.HARDWARE_SERVICE);
        locationEngine.enableVehicleSensors(hwManager);
    }
この手順が必要なのは、セッション状態が停止に移行すると登録が失われ、セッション再開時に再登録が必要になるためです。
VDR (Vehicle Dead Reckoning) を有効にする
注デフォルトでは、VDRは有効になっておらず、資格情報を認証するにはVDRライセンスが必要です。 VDRを有効にするには、当社までお問い合わせください。
VDRは、GNSS信号がブロックされている間でも位置情報を提供することでGNSSを補完できます。
Androidデバイスを対象とする場合、標準GNSSまたはHD GNSSのいずれかでVDRを有効にできます。デフォルトではこの機能は無効になっていますが、LocationOptionsでsensorOptions.setVDREnabled(true)を設定することで有効にできます。VDRでは、最大10 Hzの位置間隔がサポートされます。10 Hzの間隔を有効にするには、desired_interval_millisecとsmallest_interval_millisecを100に設定します。
開始する前に、使用するデバイスが次の前提条件を満たしていることを確認してください。
- IMU (Inertial Measurement Unit) を有効にするには、Androidデバイスが3軸加速度計と3軸ジャイロスコープの測定値を提供する必要があります。現在のところ、ほとんどのスマートフォンはIMUの使用に十分なセンサーが搭載されています。
- デバイスはホルダーにしっかりと固定してください。
注VDRが動作可能になるまで、デバイスのキャリブレーションには数分かかります。デバイスをホルダーから取り外した場合は、再キャリブレーションが必要です。
トラブルシューティング
IMU測定が使用されないのはなぜですか?
- GNSS信号が受信できることを確認してください。トンネルや市街地のビル群など、GNSS信号が遮断される環境では、キャリブレーションが成功しない場合があります。
- デバイスは、車両に取り付けられたホルダーにしっかりと固定してください。
- センサーが正しく調整されていることを確認します。次の手順を実行します。GNSSの位置情報が取得可能な状態で数分間走行し、その間に数回の右左折を行います。
- GNSSの位置情報が一定時間取得できない場合、IMU測定値の使用は停止しますのでご注意ください。
サブメートル精度を追加する
注デフォルトでは、HD精度は有効になっておらず、資格情報を認証するにはHDライセンスが必要です。 HD GNSSを有効にするには、当社までお問い合わせください。
HD GNSS機能は、デバイスのGNSSおよびIMUの測定値を使用して正確なポジショニングを行うことができます。
Androidデバイスを対象とする場合、LocationEngineをLocationAccuracy.subMeterNavigationモードで開始すると、HERE HD GNSS Positioningが有効になります。HD GNSS (High Definition Global Navigation Satellite System) 機能により、レーンアシスタンス、経路誘導ガイダンスから拡張現実まで、さまざまなユースケースに対応した高精細なポジショニングが実現します。HD GNSSは、一般向けデバイスが世界中どこでもサブメートル精度を実現できるようにする補正データサービスです。
開始する前に、使用するデバイスが次の前提条件を満たしていることを確認してください。
- お使いのAndroidデバイスがGNSSの未処理の測定値をサポートしている(Androidバージョン12以降 (API 31) が必要)。
- GNSSの未処理の測定値に、搬送波位相測定値 (ADR:Accumulated Delta Range) が含まれている。
- お使いのAndroidデバイスが2周波GNSS (L1+L5) をサポートしている。
- お使いのAndroidデバイスがマルチコンステレーションGNSS (GPS、Galileo、Beidou、GLONASS) をサポートしている。
対応するデバイスを確認するには、次を実行します。
- GNSSデータベースを検索して、互換性のあるデバイスを確認します。たとえば、「GPSTest Database」(GPSテストデータベース) を使用します。ほとんどのGoogle PixelデバイスはHD GNSSをサポートしています (例:Pixel 7、Pixel 7 Pro、Pixel 8、Pixel 8 Pro)。
- 無料のGNSSアプリを使用してデバイスを検証し、上記の情報を確認します。ツールの一例としてGNSSLoggerがあります。
詳細については、Androidのセンサーに関するドキュメントもご覧ください。
使用するデバイスが上の条件に対応していることを確認するのは、ユーザーの責任となります。対応していない場合、必要な精度レベルに達しない可能性があります。
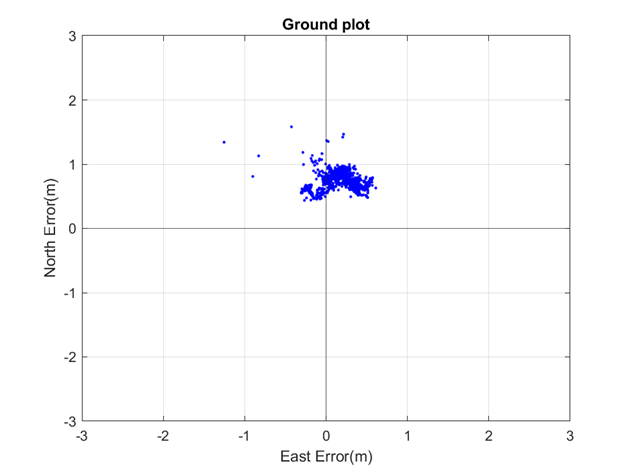
Example comparison of ground track accuracy of traditional GNSS solution (left) and HERE HD GNSS solution (right).
注
LocationAccuracy.subMeterNavigationが設定されていても、常に使用されるわけではありません。場合によっては、他のポジショニングソースやテクノロジーが代わりに使用されることがあります。デバイスの機能と測定品質の詳細を確認するには、LocationIssueListenerを設定します。潜在的な問題に関する詳細については、「APIリファレンス」を参照してください。
サブメートル精度のポジショニングに関するトラブルシューティング
HD GNSSの位置が表示されない場合は、次を確認します。
- アプリで
LocationAccuracy.subMeterNavigationが有効になっており、使用されている資格情報でHDアクセスが承認されていることを確認します。 - アプリに
ACCESS_FINE_LOCATIONの位置情報権限が付与されていることを確認します。 - デバイスの互換性を確認します。上述のガイドラインをご覧ください。
- GNSS信号の受信を確認します。屋外の開けた場所に出ます。
- インターネットが接続されていることを確認します。
HD GNSSのパフォーマンスが常時サブメートル精度ではないのはなぜですか?
- デバイスの互換性を確認します。上述のガイドラインをご覧ください。
- GNSS信号の受信を確認します。屋外の見通しのよい (近くに木や建物などがない) 場所に移動し、アプリケーションを数分間実行して精度を確認します。
- デバイスの配置を確認します。Androidデバイスを縦向きに設置することをお勧めします。
一般に、パフォーマンスは主にデバイスの性能とユーザーの使用環境に影響を受けます。これにより、信号の受信条件が設定され、測定品質に影響を及ぼします。
GNSSバッテリーの消費を最適化する
GNSS (全地球衛星測位システム) の更新頻度は、smallest interval設定で管理できます。この設定では、Android OSから要求されるGNSS位置情報更新の最小時間間隔を定義します。
高頻度のGNSS更新 (1 Hzなど) が不要なシナリオでは、位置情報の更新間隔を長くすることでバッテリー消費量を抑えることができます。デバイスの GNSS システムは電力消費を抑えながら、アプリケーションの需要に適した速度で位置情報データを提供します。
たとえば、アプリケーションで正確なリアルタイム追跡が不要な場合は、更新間隔を長くすることで大幅に電力を節約し、デバイスのバッテリー寿命を延ばすことができます。
位置情報の精度に対応する
座標とタイムスタンプを除き、他のすべての Location フィールドは任意です。たとえば、受信した Location オブジェクトには方位角や現在の速度に関する情報が含まれている場合がありますが、これが必ず取得できるとは限りません。使用できない値は null として返されます。ポジショニングに使用される情報ソースの種類 (前述の LocationOptions で定義)、およびデバイスの機能は、どのフィールドが取得されるかに影響します。
if (location.speedInMetersPerSecond != null) {
    Log.d(TAG, "Speed (m/s): " + location.speedInMetersPerSecond);
} else {
    Log.d(TAG, "Speed (m/s): Not available");
}
Location オブジェクトに存在する horizontalAccuracyInMeters フィールドは、「不確実性の半径」とも呼ばれ、実際の地理座標が存在する可能性がある領域の推定値を 68% の確率で提供します。これは、現在地の周囲にハロー インジケーターを描画するために使用されます。下の図は、内側の緑色の円が location.coordinates として、周囲の円が半径 horizontalAccuracyInMeters の精度円として描かれています。真の地理座標が存在する可能性は、精度円の内側 (68%) または外側 (32%) です。
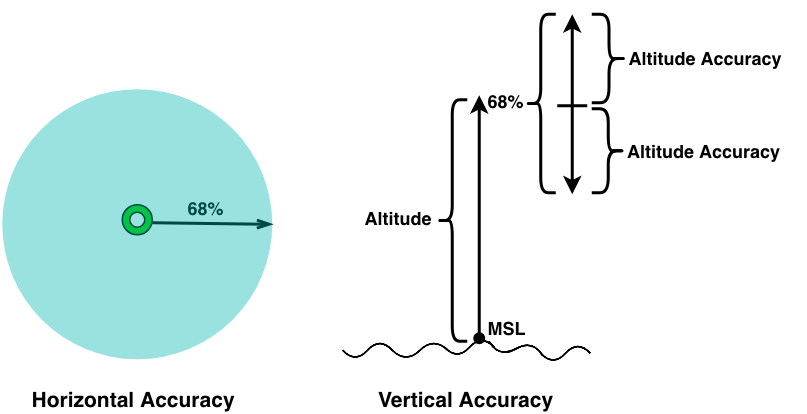
Illustration: Radius of horizontal uncertainty and vertical uncertainty.
同様に、高度の場合は verticalAccuracyInMeters 値が 10 メートルのときに、実際の高度が 68% の確率で高度 - 10 メートルから高度 + 10 メートルの範囲内に収まると予想されることを示します。bearingAccuracyInDegrees や speedAccuracyInMetersPerSecond などの他の精度値も同じルールに従います。つまり、不確実性が小さいほど精度が高くなります。
注Android デバイスでは、
coordinates.altitude値は WGS 84 準拠楕円体に関連して指定されます。
68% (CEP68) 以外の確率を達成する
指定された確率 68% (CEP68) が十分ではない場合、99% の精度を達成することは可能でしょうか。はい、可能です。指定された平均誤差半径 (CEP) は 2 自由度のカイ二乗分布に従うため、次の式に基づいて目的の確率を簡単に計算できます。
| 確率 | 不確実性の半径 |
|---|---|
| 50% | CEP50 = 0.78 x CEP68 |
| 60% | CEP60 = 0.90 x CEP68 |
| 70% | CEP70 = 1.03 x CEP68 |
| 80% | CEP80 = 1.19 x CEP68 |
| 90% | CEP90 = 1.42 x CEP68 |
| 95% | CEP95 = 1.62 x CEP68 |
| 99% | CEP99 = 2.01 x CEP68 |
上の表を使用して、地図のハローインジケーターのさまざまな確率レベルを可視化できます。たとえば、水平精度が 20 メートルの場合、半径を (およそ) 2 倍にして、99% の確率を達成できます。精度値は常に CEP68 として与えられます。これは次のことを意味します。
CEP99 = 2.01 x CEP68 = 2.01 x 20 m = 40.2 m
これで、見つかった位置の周囲に半径 40.2 メートルの範囲を描くことができます。および、実際の位置は 99% の確率でその円の中に存在します。一方、半径 0 メートルの確率は 0% です。
現在地をテキストとして表示する
次の実装は、各更新で受信した位置情報をテキスト形式で表示する方法の例を示しています。
public class MainActivity extends AppCompatActivity {

    // ...

    // TextViews to display Location information to the user
    private TextView mLatitudeValue;
    private TextView mLongitudeValue;
    private TextView mAltitudeValue;
    private TextView mBearingValue;
    private TextView mBearingAccuracyValue;
    private TextView mSpeedValue;
    private TextView mSpeedAccuracyValue;
    private TextView mHorizontalAccuracyValue;
    private TextView mVerticalAccuracyValue;
    private TextView mTimestampValue;
    private TextView mTimestampReadableValue;
    private TextView mTimestampSincebootValue;

    @Override
    protected void onCreate(Bundle savedInstanceState) {

        // ...

        try {
            locationEngine = new LocationEngine();
        } catch (InstantiationErrorException e) {
            throw new RuntimeException("Initialization failed: " + e.getMessage());
        }

        mLatitudeValue = findViewById(R.id.lat_value);
        mLongitudeValue = findViewById(R.id.lon_value);
        mHorizontalAccuracyValue = findViewById(R.id.hor_accuracy_value);
        mAltitudeValue = findViewById(R.id.alt_value);
        mVerticalAccuracyValue = findViewById(R.id.ver_accuracy_value);
        mBearingValue = findViewById(R.id.bearing_value);
        mBearingAccuracyValue = findViewById(R.id.bearing_accuracy_value);
        mSpeedValue = findViewById(R.id.speed_value);
        mSpeedAccuracyValue = findViewById(R.id.speed_accuracy_value);
        mTimestampValue = findViewById(R.id.timestamp_value);
        mTimestampReadableValue = findViewById(R.id.timestamp_readable_value);
        mTimestampSincebootValue = findViewById(R.id.timestamp_since_boot_value);

        // Request permissions from the user
        handleAndroidPermissions();
    }

    private void handleAndroidPermissions() {
        permissionsRequestor = new PermissionsRequestor(this);
        permissionsRequestor.request(new ResultListener(){

            @Override
            public void permissionsGranted() {
                // We start location updates once al permissions have been granted
                startLocating();
            }

            @Override
            public void permissionsDenied() {
                Log.e(TAG, "Permissions denied by user.");
            }
        });
    }

    private final LocationListener locationListener = new LocationListener() {
        @Override
        public void onLocationUpdated(@NonNull Location location) {
            // Populate the TextViews with the received location information.
            populate(location);
        }
    };

    public void populate(Location location) {
        mLatitudeValue.setText(String.format(Locale.US, "%.5f %s", location.coordinates.latitude, "°"));
        mLongitudeValue.setText(String.format(Locale.US, "%.5f %s", location.coordinates.longitude, "°"));
        mAltitudeValue.setText(location.coordinates.altitude != null ? String.format(Locale.US, "%.5f %s", location.coordinates.altitude, "meters") : "-");
        mBearingValue.setText(location.bearingInDegrees != null ? String.format(Locale.US, "%.5f %s", location.bearingInDegrees, "°") : "-");
        mBearingAccuracyValue.setText(location.bearingAccuracyInDegrees != null ? String.format(Locale.US, "%.5f %s", location.bearingAccuracyInDegrees, "°") : "-");
        mSpeedValue.setText(location.speedInMetersPerSecond != null ? String.format(Locale.US, "%.5f %s", location.speedInMetersPerSecond, "m/s") : "-");
        mSpeedAccuracyValue.setText(location.speedAccuracyInMetersPerSecond != null ? String.format(Locale.US, "%.5f %s", location.speedAccuracyInMetersPerSecond, "m/s") : "-");
        mHorizontalAccuracyValue.setText(location.horizontalAccuracyInMeters != null ? String.format(Locale.US, "%.5f %s", location.horizontalAccuracyInMeters, "meters") : "-");
        mVerticalAccuracyValue.setText(location.verticalAccuracyInMeters != null ? String.format(Locale.US, "%.5f %s", location.verticalAccuracyInMeters, "meters") : "-");
        mTimestampValue.setText(String.format(Locale.US, "%d %s", TimeUnit.MILLISECONDS.toSeconds(location.timestamp.getTime()), "seconds"));
        mTimestampReadableValue.setText(String.format(Locale.US, "%tc", location.timestamp));
        mTimestampSincebootValue.setText(location.timestampSinceBoot != null ? String.format(Locale.US, "%d %s", location.timestampSinceBoot.toMillis(), "milliseconds") : "-");
    }
この例は、位置情報信号をデバッグするのに役立ちます。このコードは「Positioning」サンプルアプリの一部として、GitHub (Java版およびKotlin版) で公開されています。
2 か月前の更新