

ナビゲーションの使用を開始する
HERE SDKを使用すると、包括的なターン・バイ・ターンナビのエクスペリエンスを構築できます。この機能では、アプリはデバイスの現在の位置情報を計算されたルートと照合して確認し、ジャストインタイムのナビゲーション指示を取得できます。
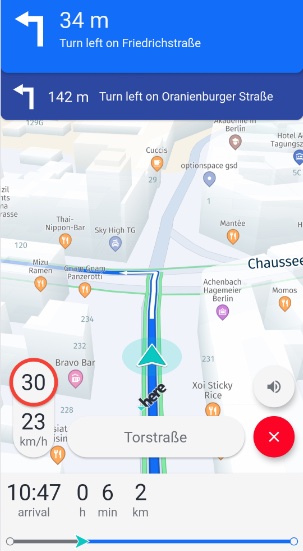
Screenshot: An application running guidance - empowered by the HERE SDK.
次のような主要機能があります。
-
自動レンダリング:カスタマイズされたナビゲーション マップ ビューは、必要に応じて
VisualNavigatorを使用してレンダリングできます。startRendering()が呼び出されると、現在の方向を示す事前設定された矢印型のMapMarker3Dインスタンスが追加され、着信した位置情報の更新がスムーズに補間されます。また、マップの向きが最適なデフォルト値に変更されます。 -
トラッキング モード:追随するルートがない場合でも、HERE SDK ではトラッキング モードがサポートされており、現在の道路、マップマッチングした場所の他、制限速度などの補足情報が提供されます。
-
リアルタイムの指示:音声ガイダンスは運転操作通知として提供され、任意のプラットフォームのTTS (音声合成) ソリューションに
Stringとして送信できます。 -
警告のサポート:制限速度、トラック制約、道路標識などの警告を含む包括的な警告システムを使って、常に注意を促すことができます。
-
オフライン サポート:オフライン マップ データがキャッシュ、インストール、またはプリロードされている場合、ほぼすべてのナビゲーション機能はインターネット接続なしでも動作します。オンライン接続を必要とする機能は、
DynamicRouteEngineを使用して交通状況に最適化されたルートをオンラインで検索するなど、ごく一部です。
ターン・バイ・ターンナビの基本原理は、速度と方位の値を含めて位置情報を頻繁に受信することです。これらの値は道路と照合され、希望するルートと比較されます。運転操作指示が与えられ、現在地から次の目的地まで案内します。
ルートを離れると、逸脱がメートル単位で通知されます。この通知は、新しいルートを計算するかどうかを決定するうえで役立ちます。最後に、位置シミュレーターを使用すると、開発フェーズでルート ナビゲーションをテストできます。
注ターン・バイ・ターンナビを使用するアプリケーション開発者は、安全で正確な動作を確実に提供できるよう、予想されるすべての使用シナリオでアプリケーションを徹底的にテストする必要があります。アプリケーション開発者は、以下のような義務をアプリケーション ユーザーに告知する責任があります。
- 危険または違法な状況につながる可能性のある指示には従わないでください。
- 現地のすべての法律に従ってください。
- 運転中の携帯電話やその一部の機能の使用が禁止されている場合があります。
- 運転中は常に両手で車を運転できる状態でいる必要があります。
- 運転中は交通安全を最優先してください。
仕組み
- ナビゲーションを開始する主なエントリー ポイントは 2 つあります。
Navigatorクラスは、Locationデータに対応するすべての機能を提供します。これは、ルート案内を表示してルートを追随しながら、一般道路に沿ってあらゆる種類の情報を取得できる広範な警告システムを提供します。後者は、ルートを追随せずにトラッキング モードでも使用できます。VisualNavigatorクラスは、ヘッドレスNavigatorと同じ機能を提供しますが、上部では事前設定された 3D マップ ビュー エクスペリエンスを提供します。上部には、交差点表示とその他のオプションの視覚要素が表示されます。
Locationデータを提供する必要があります。独自のソリューションを使用するか、HERE SDK を使用します。詳細については、「Get Locations」 (位置情報を取得する) ガイドをご覧ください。- 音声ガイダンスは、オプションの音素サポートと Natural Guidance 情報を使用してテキストの指示を表示することでサポートされます。これらの文字列は利用可能なTTS機能 (サードパーティまたはネイティブOS) で使用できます。
RoutePrefetcherを使用して、接続が不安定な状況でのエクスペリエンスを最適化するか、オフラインマップをダウンロードおよびインストールすると、インターネット接続がなくてもナビゲートできます。マップデータのプリフェッチの詳細については、こちらを参照してください。
NavigatorまたはVisualNavigatorを初期化する
VisualNavigator を使用すると HERE SDK は、既存のビジュアル エクスペリエンスを提供してルート案内を開始できます。このコンポーネントは、ルートを進んでいる間の進行状況を示すために必要なすべてのビットを含むマップ ビューを作成します。オプションで、ビューをカスタマイズしたり、ヘッドレス Navigator を使用してレンダリングしたりできます。
VisualNavigator と同様に Navigator を次のように初期化できます。
try {
    visualNavigator = new VisualNavigator();
} catch (InstantiationErrorException e) {
    throw new RuntimeException("Initialization of VisualNavigator failed: " + e.error.name());
}
try {
visualNavigator = VisualNavigator()
} catch (e: InstantiationErrorException) {
throw RuntimeException("Initialization of VisualNavigator failed: " + e.error.name)
}ナビゲーション イベントをリッスンする
目的地へのナビゲートを開始するには、次の 2 つのことが必要です。
- 追随する
Route。ナビゲーションを開始するには、RouteをNavigatorまたはVisualNavigatorインスタンスに設定する必要があります。 - ドライバーの現在地を
NavigatorまたはVisualNavigatorインスタンスに定期的に知らせる位置情報ソース。
ルートを計算済みでない場合は作成します。Route インスタンスの取得については、こちらを参照してください。トラッキング モードのみでアプリを起動する場合は、この手順を省略できます。
注ターン・バイ・ターンナビ中は、
NavigatorまたはVisualNavigatorインスタンスからのすべてのManeuver情報が取得され、現在のLocationと同期されます。ナビゲーション中は、ManueverデータをRouteオブジェクトから直接取得しないようにしてください。
以下のコード スニペットは、Route から取得された、シミュレートされた Location イベントを使用してシミュレートされたルート案内を開始するために必要なすべてのコードを示しています。これは、VisualNavigator インスタンス使用しているため、stopRendering() が呼び出されるまで、HERE SDK がレンダリング部分を引き継ぎます。
private void startGuidance(Route route) {
    try {
        // Without a route set, this starts tracking mode.
        visualNavigator = new VisualNavigator();
    } catch (InstantiationErrorException e) {
        throw new RuntimeException("Initialization of VisualNavigator failed: " + e.error.name());
    }

    // This enables a navigation view including a rendered navigation arrow.
    visualNavigator.startRendering(mapView);

    // Hook in one of the many listeners. Here we set up a listener to get instructions on the maneuvers to take while driving.
    // For more details, please check the "Navigation" example app and the Developer Guide.
    visualNavigator.setEventTextListener((EventText eventText) -> {
        Log.d("ManeuverNotifications", eventText.text);
    });

    // Set a route to follow. This leaves tracking mode.
    visualNavigator.setRoute(route);

    // VisualNavigator acts as LocationListener to receive location updates directly from a location provider.
    // Any progress along the route is a result of getting a new location fed into the VisualNavigator.
    setupLocationSource(visualNavigator, route);
}

private void setupLocationSource(LocationListener locationListener, Route route) {
    try {
        // Provides fake GPS signals based on the route geometry.
        locationSimulator = new LocationSimulator(route, new LocationSimulatorOptions());
    } catch (InstantiationErrorException e) {
        throw new RuntimeException("Initialization of LocationSimulator failed: " + e.error.name());
    }

    locationSimulator.setListener(locationListener);
    locationSimulator.start();
}
private fun startGuidance(route: Route?) {
try {
// Without a route set, this starts tracking mode.
visualNavigator = VisualNavigator()
} catch (e: InstantiationErrorException) {
throw RuntimeException("Initialization of VisualNavigator failed: " + e.error.name)
}
// This enables a navigation view including a rendered navigation arrow.
visualNavigator!!.startRendering(mapView!!)
// Hook in one of the many listeners. Here we set up a listener to get instructions on the maneuvers to take while driving.
// For more details, please check the "Navigation" example app and the Developer's Guide.
visualNavigator!!.eventTextListener = EventTextListener { eventText: EventText -> Log.d("Maneuver text", eventText.text) }
// Set a route to follow. This leaves tracking mode.
visualNavigator!!.route = route
// VisualNavigator acts as LocationListener to receive location updates directly from a location provider.
// Any progress along the route is a result of getting a new location fed into the VisualNavigator.
setupLocationSource(visualNavigator!!, route)
}
private fun setupLocationSource(locationListener: LocationListener, route: Route?) {
try {
// Provides fake GPS signals based on the route geometry.
locationSimulator = LocationSimulator(route!!, LocationSimulatorOptions())
} catch (e: InstantiationErrorException) {
throw RuntimeException("Initialization of LocationSimulator failed: " + e.error.name)
}
locationSimulator!!.listener = locationListener
locationSimulator!!.start()
}このコードの引用例では、ガイダンス ビューが開始され、指定した route で定義された目的地に到達するまでの運転指示がコンソールに表示されます (宣言を含む全コードについては、NavigationQuickStart のサンプル アプリを参照してください)。運転指示はドライバーに話しかけるようにできており、「Turn left onto Invalidenstraße in 500 meters」(500 m 先で左折してインヴァリーデン通りに入ります) というような文字列が含まれている場合があります。より詳細な運転指示も提供でき、それらについては、以下のセクションで説明しています。
上の例では、HERE SDK のシミュレーション機能を使用して位置の更新を取得しています。もちろん、実際の位置情報の更新を VisualNavigator にフィードすることもできます。
注他のエンジンとは異なり、
VisualNavigatorまたはNavigatorは、事前にキャッシュ、インストール、またはプリロードされていない地域に到達すると自動的にオンライン データをダウンロードしようとします。その逆に、デバイスでオフラインマップデータを利用できる場合は、オンライン接続できるときでも、この地図データを使用します。
位置情報をナビゲーターにフィードする
上に示したとおり、Locationインスタンスを提供する必要があります。これは、現在地を頻繁に更新して取得しないとナビゲーションができないためです。シミュレートされていないデータとシミュレートされた Location データをシステムにフィードする方法をもう一度見てみましょう。
ナビゲーションコンポーネントはポジショニングから切り離されます。プラットフォーム固有のポジショニングソリューションを実装するか、HERE SDKのHEREポジショニング機能を使用するか、あるいはロケーションシミュレーターを設定することにより、新しい位置情報を提供できます。
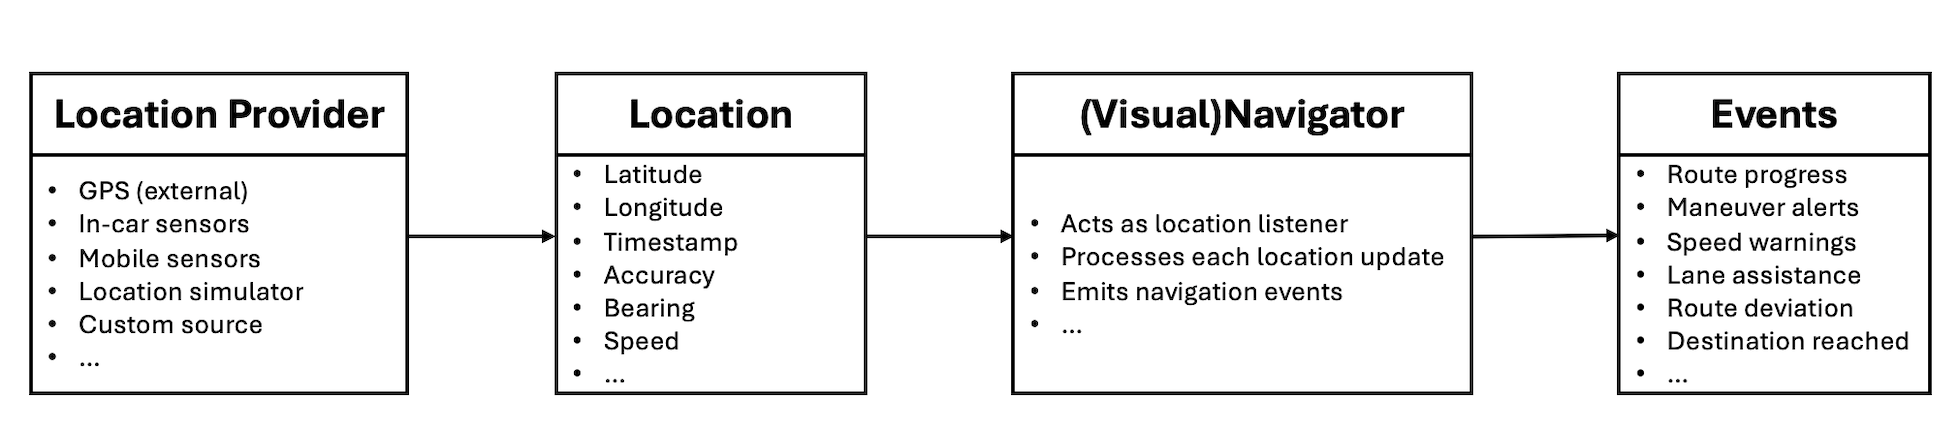
Screenshot: Location flow from provider to application events via Location and (Visual) Navigator.
Locationソースは、位置情報プロバイダーとして設定できます。Navigator または VisualNavigator で呼び出す必要があるのは、onLocationUpdated() のみです。
VisualNavigator に有効な位置情報をフィードするのは、ディベロッパーの責任です。VisualNavigator は、受信した位置情報ごとに、運転操作や予定ルートからの逸脱など、ルート上の進行状況を示す適切なイベントで応答します。結果のイベントは、提供される位置情報信号の精度とバンドによって異なります。
HERE Positioningを使用する場合は、LocationAccuracy.NAVIGATIONを使用することをお勧めします。これは、ナビゲーションコンテキストで最良の結果が得られるためです。
すべてのイベントはマップマッチングした場所に基づいて行われます。これは、未処理の場所の信号を一番近い一般道路に一致させるための
MapMatcherコンポーネントの呼び出しを組み込んだHERE SDKによって自動的に行われます。MapMatcherを適切に動作させるには、Location.timeパラメーターを設定する必要があります。このパラメーターが設定されていない場合、場所は無視されます。また、Locationオブジェクトごとにbearingパラメーターとspeedパラメーターを指定することが推奨されています。
HERE Positioningを使用した位置情報プロバイダーの実装は、GitHubにJava版およびKotlin版の両方があります。これは、HEREPositioningSimulatorクラスを使用してシミュレーションされたLocationイベントを提供し、HEREPositioningProviderクラスを使用してシミュレーションされていないLocationイベントを提供します。
サポートされているすべての HERE Positioning 機能の詳細については、「Positioning」ガイドに従うことをお勧めします。
Navigator および VisualNavigator の両クラスは、位置情報を受信する onLocationUpdated() メソッドを定義する LocationListener インターフェースに準じます。
// Now visualNavigator will receive locations from the HEREPositioningProvider.
// Choose a suitable accuracy for the navigation use case.
herePositioningProvider.startLocating(visualNavigator, LocationAccuracy.NAVIGATION);
// Now visualNavigator will receive locations from the HEREPositioningProvider.
// Choose a suitable accuracy for the navigation use case.
herePositioningProvider.startLocating(visualNavigator, LocationAccuracy.NAVIGATION)トラッキング モードで開始する予定がない場合は、必要に応じて、追随するルートを設定します。
visualNavigator.setRoute(route);visualNavigator.route = routeルート案内を開始および停止する
ターン・バイ・ターンナビは、route が設定され、herePositioningProvider が開始されると自動的に開始しますが、ナビゲーションの停止は想定シナリオによって異なります。
ナビゲーションを停止してトラッキング モードに切り替え (以下参照)、パスを追随しながらマップマッチングした場所を受信するか、トラッキング モードに戻らずにナビゲーションを停止します。前者の場合は、現在の route を null に設定します。これにより、ターン・バイ・ターンナビ関連のすべてのイベントの伝播だけが停止され、マップマッチングした場所の更新や速度警告情報などを受信するためのイベントは停止されません。希望の目的地に到達すると、ターン・バイ・ターンナビの伝播は自動的に停止します。route を再度設定すると、ターン・バイ・ターンナビ関連のすべてのイベントが再び伝播されます。
トラッキング モードに戻らずにナビゲーションを停止する場合、たとえば、マップマッチングしなかった場所の更新のみを位置情報プロバイダーから直接取得する場合は、VisualNavigator からのイベントの取得をすべて停止することをお勧めします。この場合は、すべてのリスナーを個別に null に設定してください。
位置情報プロバイダーの実装を再利用して、アプリで位置情報の更新を消費できます。HERE Positioning を使用すると、複数の LocationListener インスタンスを設定できます。
VisualNavigator を使用する場合は stopRendering() を呼び出します。一度呼び出すと、MapView は VisualNavigator でコントロールできなくなります。
- レンダリング中に変わった可能性のある地図の向き、カメラの距離、傾きなどの設定は更新されません。これらは
stopRendering()が呼び出される前の最後の状態に保たれます。たとえば、ガイド中に地図が斜めに表示されていたのであれば、地図は斜めのままになります。そのため、stopRendering()を呼び出した後に、カメラ設定を指定して適用することをお勧めします。 - 新しい位置情報を引き続き
VisualNavigatorにフィードしても、地図は現在の位置に移動しなくなります。 VisualNavigatorが所有するデフォルトまたはカスタムの位置情報インジケーターは再び非表示になります。RouteProgressなどの位置情報関連のイベントは、null のリスナーを設定してサブスクリプションを解除しない限り、すべて配信され続けます。上記を参照してください。
注
VisualNavigatorはMapViewインスタンスで動作するため、MapViewを無効化する前にstopRendering()を呼び出すことをお勧めします。また、LocationSimulatorおよびDynamicRoutingEngineが開始される前にこれらを停止することをお勧めします。ただし、MapViewが一時停止された場合、VisualNavigatorも停止する必要はありません。VisualNavigatorは、MapViewが一時停止されるとレンダリングを自動的に停止しMapViewが再開されるとレンダリングを開始します (前にレンダリングがVisualNavigatorで行われていた場合)。
トラッキングを開始および停止する
VisualNavigator クラスを使用するとターン・バイ・ターンナビを開始、停止することができ、追随するルートを必要としないトラッキング モードに切り替えることもできます。このモードはドライバー アシスタンス モードとも呼ばれます。公共交通機関を除くすべての移動モードで利用できます。公共交通機関のルートをトラッキングに使用すると、安全ではない予期せぬ結果につながる可能性があります。他のすべての移動モードに対応していますが、トラッキングは車の移動モードに最適です。
トラッキングを有効にするには、以下を呼び出します。
visualNavigator.setRoute(null);
herePositioningProvider.startLocating(visualNavigator, LocationAccuracy.NAVIGATION)
visualNavigator.route = route
herePositioningProvider.startLocating(visualNavigator, LocationAccuracy.NAVIGATION)ここでは実際の GPS 位置情報の取得を有効にしていますが (上の例を参照)、LocationSimulator を使用した任意ルートからでも位置を再生できます。
もちろん、route インスタンスを設定せずに VisualNavigator を初期化することも可能です。トラッキング モードのみを使用する場合は、ルートを明示的に null に設定する必要はありません。
注トラッキング モードでは、追随するルートを必要とせずに起動できる
NavigableLocationListenerやSpeedWarningListenerなどのリスナーのイベントのみを取得できます。一般に、すべての警告がサポートされています。RouteProgressListenerなどの他のリスナーは、ルートが設定されていない場合はイベントを配信しません。これにより、リスナーを有効に保ち、フリー トラッキングとターン・バイ・ターンナビをすぐに切り替えることができます。
トラッキング モードで動作するリスナーの概要については、「API リファレンス」を参照してください。
トラッキングは、ドライバーが経路をすでに知っているが、現在の道路名や走行中の制限速度などの追加情報を取得する場合に役立ちます。
トラッキングを有効にしている場合は、SpeedBasedCameraBehavior も有効にすることをお勧めします。
visualNavigator.setCameraBehavior(new SpeedBasedCameraBehavior());visualNavigator.cameraBehavior = SpeedBasedCameraBehavior()このカメラ モードはカメラの位置を自動的に調整して、現在の運転速度に基づいてマップ ビューを最適化します。
カメラの追跡を停止するには、以下を呼び出します。
visualNavigator.setCameraBehavior(null);visualNavigator.cameraBehavior = nullこれは、ガイダンス中にジェスチャー処理を一時的に有効にする場合にも役立ちます。ターン・バイ・ターンナビが実行されている場合は、ドライバーの注意をそらすことのないように、トラッキングに自動的に切り替わるようにすることをお勧めします。
運転操作の進行状況イベントを取得する
ナビゲーション中は、通常、いくつかのリスナーを添付して、ルートの進行状況、現在の位置、次の運転操作について通知されるようにします。HERE SDK では、目的に応じて多数のリスナーを利用できます。
以下に、進行状況のイベントを取得する方法を示します。
// Notifies on the progress along the route including maneuver instructions.
visualNavigator.setRouteProgressListener(new RouteProgressListener() {
    @Override
    public void onRouteProgressUpdated(@NonNull RouteProgress routeProgress) {
        List<SectionProgress> sectionProgressList = routeProgress.sectionProgress;
        // sectionProgressList is guaranteed to be non-empty.
        SectionProgress lastSectionProgress = sectionProgressList.get(sectionProgressList.size() - 1);
        Log.d(TAG, "Distance to destination in meters: " + lastSectionProgress.remainingDistanceInMeters);
        Log.d(TAG, "Traffic delay ahead in seconds: " + lastSectionProgress.trafficDelay.getSeconds());

        // Contains the progress for the next maneuver ahead and the next-next maneuvers, if any.
        List<ManeuverProgress> nextManeuverList = routeProgress.maneuverProgress;

        ManeuverProgress nextManeuverProgress = nextManeuverList.get(0);
        if (nextManeuverProgress == null) {
            Log.d(TAG, "No next maneuver available.");
            return;
        }

        int nextManeuverIndex = nextManeuverProgress.maneuverIndex;
        Maneuver nextManeuver = visualNavigator.getManeuver(nextManeuverIndex);
        if (nextManeuver == null) {
            // Should never happen as we retrieved the next maneuver progress above.
            return;
        }

        ManeuverAction action = nextManeuver.getAction();
        String roadName = getRoadName(nextManeuver, visualNavigator.getRoute());
        String logMessage = action.name() + " on " + roadName +
                " in " + nextManeuverProgress.remainingDistanceInMeters + " meters.";

        // Angle is null for some maneuvers like Depart, Arrive and Roundabout.
        Double turnAngle = nextManeuver.getTurnAngleInDegrees();
        if (turnAngle != null) {
            if (turnAngle > 10) {
                Log.d(TAG, "At the next maneuver: Make a right turn of " + turnAngle + " degrees.");
            } else if (turnAngle < -10) {
                Log.d(TAG, "At the next maneuver: Make a left turn of " + turnAngle + " degrees.");
            } else {
                Log.d(TAG, "At the next maneuver: Go straight.");
            }
        }

        // Angle is null when the roundabout maneuver is not an enter, exit or keep maneuver.
        Double roundaboutAngle = nextManeuver.getRoundaboutAngleInDegrees();
        if (roundaboutAngle != null) {
            // Note that the value is negative only for left-driving countries such as UK.
            Log.d(TAG, "At the next maneuver: Follow the roundabout for " +
                    roundaboutAngle + " degrees to reach the exit.");
        }

        if (previousManeuverIndex != nextManeuverIndex) {
            messageView.setText("New maneuver: " + logMessage);
        } else {
            // A maneuver update contains a different distance to reach the next maneuver.
            messageView.setText("Maneuver update: " + logMessage);
        }

        previousManeuverIndex = nextManeuverIndex;
    }
});
// Notifies on the progress along the route including maneuver instructions.
visualNavigator.routeProgressListener =
RouteProgressListener { routeProgress: RouteProgress ->
// Contains the progress for the next maneuver ahead and the next-next maneuvers, if any.
val nextManeuverList = routeProgress.maneuverProgress
val nextManeuverProgress = nextManeuverList[0]
if (nextManeuverProgress == null) {
Log.d(TAG, "No next maneuver available.")
return@RouteProgressListener
}
val nextManeuverIndex = nextManeuverProgress.maneuverIndex
val nextManeuver = visualNavigator.getManeuver(nextManeuverIndex)
?: // Should never happen as we retrieved the next maneuver progress above.
return@RouteProgressListener
val action = nextManeuver.action
val roadName = getRoadName(nextManeuver, visualNavigator.route)
val logMessage = action.name + " on " + roadName + " in " + nextManeuverProgress.remainingDistanceInMeters + " meters."
// Angle is null for some maneuvers like Depart, Arrive and Roundabout.
val turnAngle = nextManeuver.turnAngleInDegrees
if (turnAngle != null) {
if (turnAngle > 10) {
Log.d(TAG, "At the next maneuver: Make a right turn of $turnAngle degrees.")
} else if (turnAngle < -10) {
Log.d(TAG, "At the next maneuver: Make a left turn of $turnAngle degrees.")
} else {
Log.d(TAG, "At the next maneuver: Go straight.")
}
}
// Angle is null when the roundabout maneuver is not an enter, exit or keep maneuver.
val roundaboutAngle = nextManeuver.roundaboutAngleInDegrees
if (roundaboutAngle != null) {
// Note that the value is negative only for left-driving countries such as UK.
Log.d(TAG, "At the next maneuver: Follow the roundabout for " + roundaboutAngle + " degrees to reach the exit."
)
}
previousManeuverIndex = nextManeuverIndex
}routeProgress イベントを使用すると、進行方向の先の次の運転操作にアクセスできます。これには、maneuverIndex を使用します。
// Contains the progress for the next maneuver ahead and the next-next maneuvers, if any.
List<ManeuverProgress> nextManeuverList = routeProgress.maneuverProgress;

ManeuverProgress nextManeuverProgress = nextManeuverList.get(0);
if (nextManeuverProgress == null) {
    Log.d(TAG, "No next maneuver available.");
    return;
}

int nextManeuverIndex = nextManeuverProgress.maneuverIndex;
Maneuver nextManeuver = visualNavigator.getManeuver(nextManeuverIndex);
// Contains the progress for the next maneuver ahead and the next-next maneuvers, if any.
val nextManeuverList = routeProgress.maneuverProgress
val nextManeuverProgress = nextManeuverList[0]
if (nextManeuverProgress == null) {
Log.d(TAG, "No next maneuver available.")
return@RouteProgressListener
}
val nextManeuverIndex = nextManeuverProgress.maneuverIndex
val nextManeuver = visualNavigator.getManeuver(nextManeuverIndex)nextManeuver.getAction()を使用すると、ユーザーが実行する必要のある運転操作を特定できます。サポートされているManeuverAction列挙型 (enum) のすべてのリストについては、「APIリファレンス」をご覧ください。
注ナビゲーション中は、
ManeuverAction列挙型 (enum) で示されている運転操作アイコンを視覚的インジケーターとして表示することをお勧めします。一方、Maneuver指示テキスト (nextManeuver.getText()) は、移動を開始する前に運転操作をプレビューするリストでの使用により適しています。これらのローカライズされた指示は説明的であり、進行中のガイダンスのコンテキスト外で理解できます。ただし、通常は、オープンソースの HERE アイコン ライブラリにある、対応するManeuverActionアイコンとともに表示されます。詳細については、ルート検索のセクションを参照してください。
RouteProgressListener によって提供されたデータを使って、渡された Route インスタンスの Section ごとに進行状況の詳細情報にアクセスできます。
ルートは、経由地の数と移動モードに基づいて複数のセクションに分割される場合があります。remainingDistanceInMeters と trafficDelay.getSeconds() はセクションごとにすでに累積されています。SectionProgress リストの最後のアイテムを確認し、目的地までの全体的な残りの距離と全体的な推定交通遅延時間を取得します。
trafficDelay.getSeconds() は Route データが計算された時間に基づいているため、ガイダンス中は交通の遅延が更新されません。この値は、初期データに基づいて進行したセクション上でのみ更新されます。DynamicRoutingEngineを使用すると、現在の交通状況に基づいて最適化されたルートを定期的にリクエストできます。
visualNavigator から取得された maneuver 情報は、次のアクションを示すドライバーへの表示や、このアクションが実行されるまでの距離など役に立つ情報を生成するために使用されます。上の例に示されたようにデバッグ目的でない限り、テキスト表現には使用しないことをお勧めします。代わりに音声ルート案内を使用します。
運転操作から道路情報を取得する
visualNavigator または navigator から Maneuver を取得した後、Maneuver クラスで、ローカライズされた道路名または道路番号 (高速道路番号など) を表示すると役立つ可能性があります。
次の運転操作の一般道路テキストは、ターン・バイ・ターン運転操作から次のように取得できます。
// Helper enum to classify road types.
public enum RoadType {
    HIGHWAY,
    RURAL,
    URBAN
}

private String getRoadName(Maneuver maneuver, Route route) {
    RoadTexts currentRoadTexts = maneuver.getRoadTexts();
    RoadTexts nextRoadTexts = maneuver.getNextRoadTexts();

    String currentRoadName = currentRoadTexts.names.getDefaultValue();
    String currentRoadNumber = currentRoadTexts.numbersWithDirection.getDefaultValue();
    String nextRoadName = nextRoadTexts.names.getDefaultValue();
    String nextRoadNumber = nextRoadTexts.numbersWithDirection.getDefaultValue();

    String roadName = nextRoadName == null ? nextRoadNumber : nextRoadName;

    // On highways, we want to show the highway number instead of a possible road name,
    // while for inner city and urban areas road names are preferred over road numbers.
    if (getRoadType(maneuver, route) == RoadType.HIGHWAY) {
        roadName = nextRoadNumber == null ? nextRoadName : nextRoadNumber;
    }

    if (maneuver.getAction() == ManeuverAction.ARRIVE) {
        // We are approaching the destination, so there's no next road.
        roadName = currentRoadName == null ? currentRoadNumber : currentRoadName;
    }

    if (roadName == null) {
        // Happens only in rare cases, when also the fallback is null.
        roadName = "unnamed road";
    }

    return roadName;
}

// Determines the road type for a given maneuver based on street attributes.
// Returns the road type classification (HIGHWAY, URBAN or RURAL).
private RoadType getRoadType(Maneuver maneuver, Route route) {
    Section sectionOfManeuver = route.getSections().get(maneuver.getSectionIndex());
    List<Span> spansInSection = sectionOfManeuver.getSpans();

    // If attributes list is empty then the road type is rural.
    if (spansInSection.isEmpty()) {
        return RoadType.RURAL;
    }

    Span maneuverSpan;

    // Arrive maneuvers are placed after the last span of the route
    // and the span index for them would be greater than the span's list size.
    if (maneuver.getAction() == ManeuverAction.ARRIVE) {
        maneuverSpan = spansInSection.get(spansInSection.size() - 1);
    } else {
        maneuverSpan = spansInSection.get(maneuver.getSpanIndex());
    }

    List<StreetAttributes> streetAttributes = maneuverSpan.getStreetAttributes();

    // If attributes list contains either CONTROLLED_ACCESS_HIGHWAY, or MOTORWAY or RAMP then the road type is highway.
    // Check for highway attributes.
    if (streetAttributes.contains(StreetAttributes.CONTROLLED_ACCESS_HIGHWAY)
            || streetAttributes.contains(StreetAttributes.MOTORWAY)
            || streetAttributes.contains(StreetAttributes.RAMP)) {
        return RoadType.HIGHWAY;
    }

    // If attributes list contains BUILT_UP_AREA then the road type is urban.
    // Check for urban attributes.
    if (streetAttributes.contains(StreetAttributes.BUILT_UP_AREA)) {
        return RoadType.URBAN;
    }

    // If the road type is neither urban nor highway, default to rural for all other cases.
    return RoadType.RURAL;
}
enum class RoadType { HIGHWAY, RURAL, URBAN }
private fun getRoadName(maneuver: Maneuver, route: Route?): String {
val currentRoadTexts = maneuver.roadTexts
val nextRoadTexts = maneuver.nextRoadTexts
val currentRoadName = currentRoadTexts.names.getDefaultValue()
val currentRoadNumber = currentRoadTexts.numbersWithDirection.getDefaultValue()
val nextRoadName = nextRoadTexts.names.getDefaultValue()
val nextRoadNumber = nextRoadTexts.numbersWithDirection.getDefaultValue()
var roadName = nextRoadName ?: nextRoadNumber
// On highways, we want to show the highway number instead of a possible road name,
// while for inner city and urban areas road names are preferred over road numbers.
route?.let {
if (getRoadType(maneuver, it) == RoadType.HIGHWAY) {
roadName = nextRoadNumber ?: nextRoadName
}
}
if (maneuver.action == ManeuverAction.ARRIVE) {
// We are approaching the destination, so there's no next road.
roadName = currentRoadName ?: currentRoadNumber
}
if (roadName == null) {
// Happens only in rare cases, when also the fallback is null.
roadName = "unnamed road"
}
return roadName
}
// Determines the road type for a given maneuver based on street attributes.
// Returns the road type classification (HIGHWAY, URBAN or RURAL).
private fun getRoadType(maneuver: Maneuver, route: Route): RoadType {
val sectionOfManeuver: Section = route.sections[maneuver.sectionIndex]
val spansInSection: List<Span> = sectionOfManeuver.spans
// If attributes list is empty then the road type is rural.
if (spansInSection.isEmpty()) {
return RoadType.RURAL
}
// Arrive maneuvers are placed after the last span of the route
// and the span index for them would be greater than the span's list size.
val maneuverSpan =
if (maneuver.action == ManeuverAction.ARRIVE) {
spansInSection.last()
} else {
spansInSection[maneuver.spanIndex]
}
val streetAttributes = maneuverSpan.streetAttributes
// If attributes list contains either CONTROLLED_ACCESS_HIGHWAY, or MOTORWAY or RAMP then the road type is highway.
// Check for highway attributes.
if (streetAttributes.contains(StreetAttributes.CONTROLLED_ACCESS_HIGHWAY)
|| streetAttributes.contains(StreetAttributes.MOTORWAY)
|| streetAttributes.contains(StreetAttributes.RAMP)
) {
return RoadType.HIGHWAY
}
// If attributes list contains BUILT_UP_AREA then the road type is urban.
// Check for urban attributes.
if (streetAttributes.contains(StreetAttributes.BUILT_UP_AREA)) {
return RoadType.URBAN
}
// If the road type is neither urban nor highway, default to rural for all other cases.
return RoadType.RURAL
}デフォルトの道路テキストは、上に示したように currentRoadTexts.names.getDefaultValue() 経由で直接取得できます。ほとんどの場合、これは現地の標識に示されている道路名になります。
あるいは、currentRoadTexts.names.getPreferredValueForLocales(locales) 経由で優先言語のリストに基づいてローカライズされた道路名のテキストを取得することもできます。利用可能な言語がない場合は、デフォルトの言語が返されます。
注
RoadTextsListenerを使用すると、トラッキング モード時など、走行している現在のRoadTextsに関する通知を受け取ることができます。
デバイスの GPS センサーから取得する位置情報が不正確である場合があるため、VisualNavigator は、NavigableLocation オブジェクトの一部として取得されるマップマッチングした場所を内部的に計算します。たとえば、道路の位置情報は、ナビゲーション可能なパス上にあると想定されます。ただし、ユーザーが道路から離れたときや、GPS 信号が弱すぎてマップマッチングする場所を見つけることができない場合は、軌道から外れてしまうことがあります。
マップマッチングした場所を使用して、ユーザーに視覚的なフィードバックを提供することをお勧めします。たとえば、マップマッチングした場所に基づいて現在のマップ ビューを更新します。ユーザーが道路外にいるときなど、位置情報がマップマッチングできなかった場合にのみ、マッチングしなかった originalLocation にフォールバックすると役立ちます。以下では、VisualNavigator のレンダリング機能を使用して、マップ ビューを自動的に更新するようにしています。
注メソッド
nextManeuver.getRoadTexts()、nextManeuver.getNextRoadTexts()、nextManeuver.getExitSignTexts()は、ナビゲーション中に経路誘導運転操作の一部として表示されることを意図しています。ManeuverがNavigatorまたはVisualNavigatorから取得された場合には空になりません。Routeインスタンスから取得した場合は、これらの属性は常に空になります。
高速道路などの一部の道路には、道路名がありません。代わりに、道路番号を取得できる可能性があります。国によっては、道路に名前がない場合もあります。
以下の表は、運転操作の属性の使用方法を示しています。
| 運転操作の属性 | RoutingEngine | Navigator/VisualNavigator | 例 |
|---|---|---|---|
| maneuver.getText() | 空でない文字列を提供します。 | 空でない文字列を提供します。 | getText() の出力例:「Turn right onto Detmolder Straße towards A100. (右折してデットモルダー通りに入り、A100 に向かいます)」 |
| maneuver.getRoadTexts() | 空の文字列を提供します。 | 空でない文字列を提供します。 | getRoadTexts().names.getDefaultValue() の出力例:"Stadtring" (シュタットリング)。 |
| maneuver.getNextRoadTexts() | 空の文字列を提供します。 | 空でない文字列を提供します。 | getNextRoadTexts().names.getDefaultValue() の出力例:"Halenseestraße" (ハレンゼー)。 |
| maneuver.getExitSignTexts() | 空の文字列を提供します。 | 空でない文字列を提供します。 | getExitSignTexts().getDefaultValue() の出力例:"Hamburg" (ハンブルク)。 |
注上のイベントを自分でトリガーする必要はありません。代わりに
VisualNavigatorは、位置情報プロバイダーの実装から提供された位置情報に反応します。
ナビゲーション中のETAおよび交通情報を更新する
到着予定時刻 (ETA) は、TrafficOnRouteオブジェクトをNavigatorまたはVisualNavigatorに設定することで更新できます。このため、routingEngine.calculateTrafficOnRoute(...)を定期的に呼び出すことをお勧めします。
詳細については、TrafficOnRouteの「交通情報を更新する」セクションを参照してください。
サポートされている移動モード
ナビゲーションは、PUBLIC_TRANSIT を除き、利用可能なすべての移動モードでサポートされています。公共交通機関のルートをナビゲーションに使用することは、安全ではない予期せぬ結果につながる可能性があります。
移動モードは Route によって異なり、たとえば、徒歩で公園を抜けて観光スポットに行く場合は車を置いて行かなければなりません。ルートが計算されると、移動モードは Route オブジェクトの各 Section に添付されます。
普通車、トラック、タクシー、バス、スクーターのルートではデバイスの位置情報が道路にマップマッチングされますが、歩行者ルートなどの他のモードでは位置情報が未舗装の道路や車ではアクセスできない他のパスにもマッチングされる場合があります。逆に、高速道路のような特定の道路には歩行者はナビゲートされません。自転車ルートでは、高速道路を除き、利用可能なすべてのパスを使用できます。
ナビゲーションサンプルアプリを試す
- 以下のセクションのすべてのコードスニペットは、Navigationサンプルアプリの一部としてJava版およびKotlin版がGitHubでも入手できます。このアプリは、接続されているコードを表示し、検証可能なドライブ体験に加えてガイダンス中に画面をアクティブに保つなどのベストプラクティスを提供します。
- バックグラウンドでの位置情報の更新については、「Positioning」ガイドの関連セクションを確認してください。位置情報の更新を提供する限り、デバイスの画面がロックされている場合やマップ ビューが一時停止されている場合も、すべてのナビゲーション イベントがシームレスに継続して配信されます。
また、GitHub で「NavigationQuickStart」サンプル アプリを確認できます。シミュレートされた位置情報ソースを使用してすばやく開始する方法を確認できます。
GitHubで公開されている「NavigationCustom」サンプルアプリ (Java版およびKotlin版) もご覧ください。このサンプルアプリでは、HERE SDKをセットアップして、カスタムLocationIndicatorで位置をナビゲートすることができます。デフォルトの歩行者およびナビゲーション LocationIndicator アセットの使用状況を示します。また、アプリはカスタム ズーム レベルと傾斜を設定してルート案内ビューをカスタマイズする方法も示します。
2 か月前の更新