

ルート上の交通状況を視覚化する
HERE SDKは、ルートポリライン上に交通状況を直接視覚化できます。リアルタイムの交通流レイヤーに隣接して地図上にルートをレンダリングする方法と、route自体から取得した予測交通データを使用してカスタムの交通情報オーバーレイを描画する2つ方法から選択できます。
リアルタイム交通データと予測交通データのデータソースの違いと各方法の使い分けを理解するには、「トラフィック」を参照してください。
交通流に隣接するポリラインをレンダリングする
デフォルトでHERE SDKは交通流レイヤーをカラーエンコーディングして交通状況を示します。MapMeasureDependentRenderSizeを使用すると、MapMeasure.Kindに応じてレンダリングするポリラインの幅が決定され、交通ポリラインに隣接するようにレンダリングします。
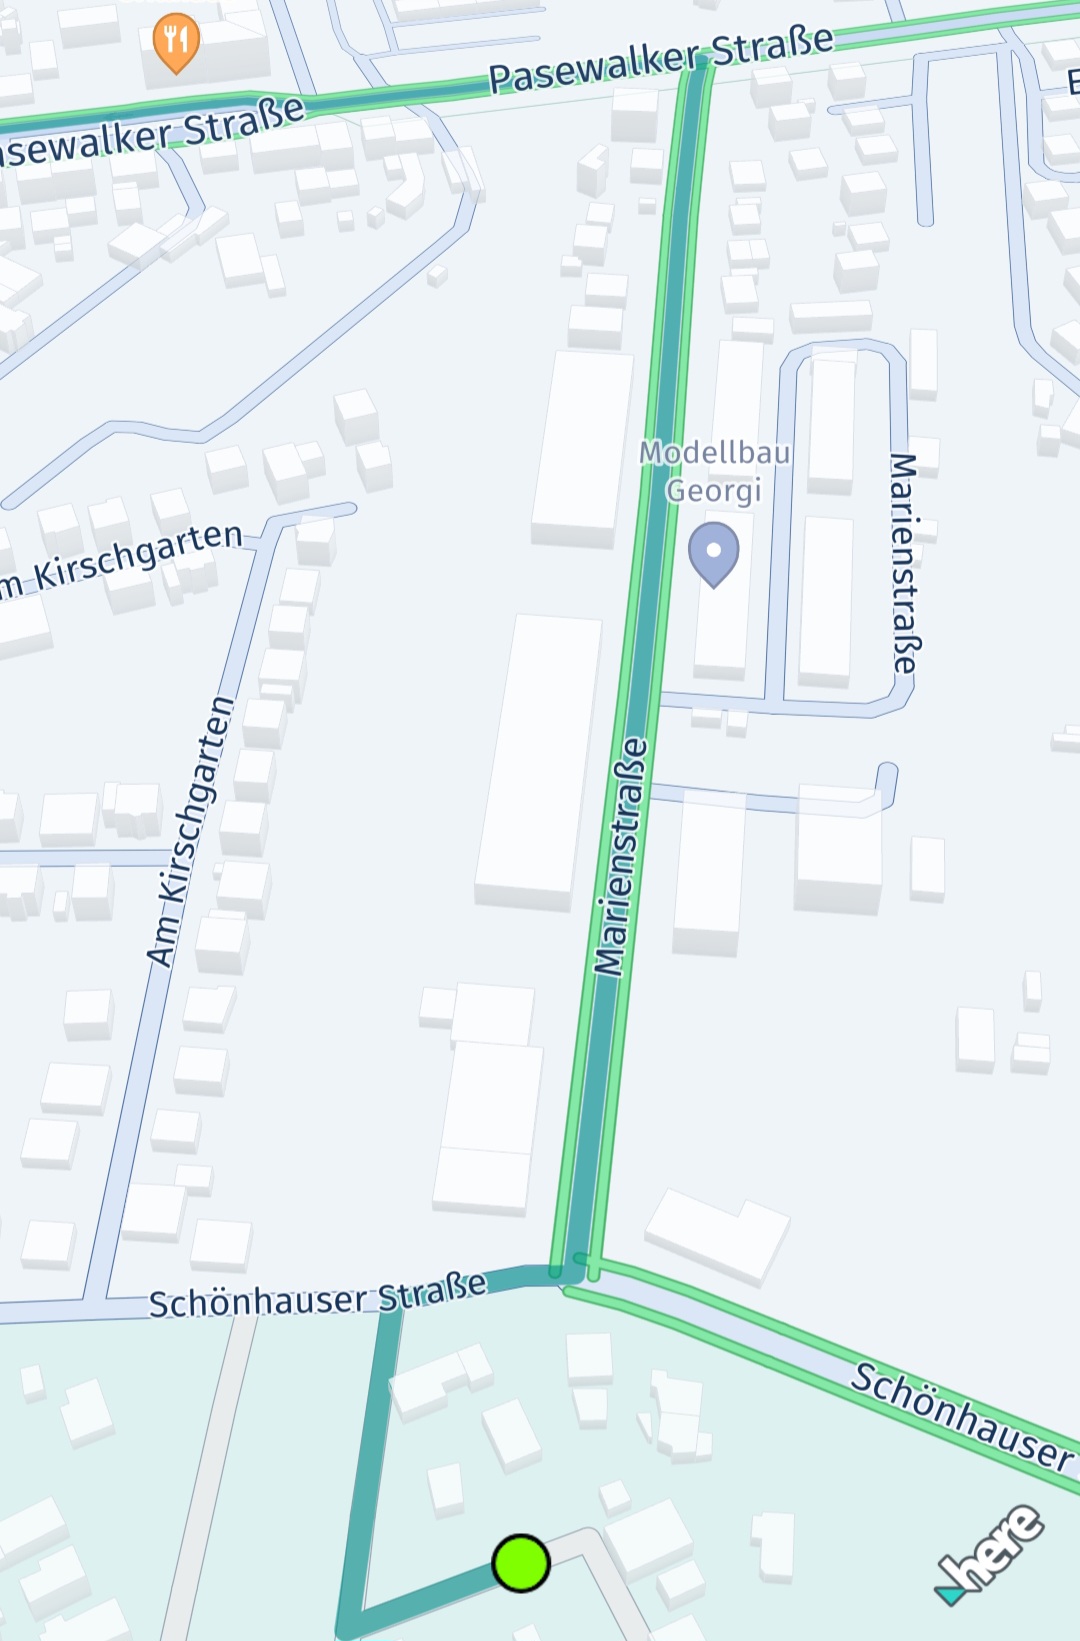
Screenshot: Polyline adjacent to traffic flow.
これを実装する例は次のとおりです。
// Show route as polyline.
let routeGeoPolyline = route.geometry
let polylineColor = UIColor(red: 0.051, green: 0.380, blue: 0.871, alpha: 1)
let outlineColor = UIColor(red: 0.043, green: 0.325, blue: 0.749, alpha: 1)
do {
    // Below, we're creating an instance of MapMeasureDependentRenderSize. This instance will use the scaled width values to render the route polyline.
    // We can also apply the same values to MapArrow.setMeasureDependentTailWidth().
    // The parameters for the constructor are: the kind of MapMeasure (in this case, ZOOM_LEVEL), the unit of measurement for the render size (PIXELS), and the scaled width values.
    let mapMeasureDependentLineWidth = try MapMeasureDependentRenderSize(measureKind: MapMeasure.Kind.zoomLevel, sizeUnit: RenderSize.Unit.pixels, sizes: getDefaultLineWidthValues())

    // We can also use MapMeasureDependentRenderSize to specify the outline width of the polyline.
    let outlineWidthInPixel = 1.23 * mapView.pixelScale
    let mapMeasureDependentOutlineWidth = try MapMeasureDependentRenderSize(sizeUnit: RenderSize.Unit.pixels, size: outlineWidthInPixel)
    let routeMapPolyline =  try MapPolyline(geometry: routeGeoPolyline,
                                            representation: MapPolyline.SolidRepresentation(
                                                lineWidth: mapMeasureDependentLineWidth,
                                                color: polylineColor,
                                                outlineWidth: mapMeasureDependentOutlineWidth,
                                                outlineColor: outlineColor,
                                                capShape: LineCap.round))

    mapView.mapScene.addMapPolyline(routeMapPolyline)
    mapPolylineList.append(routeMapPolyline)
} catch let error {
    fatalError("Failed to render MapPolyline. Cause: \(error)")
}MapMeasureDependentRenderSizeに指定された幅の値は、2つの連続する各データポイントの間に直線で補間されます。次のように生成できます。
Exploreに適用可能なコード:
// Returns a dictionary where the key is the zoom level and the value is the corresponding scaled width.
private func getDefaultLineWidthValues() -> [Double:Double] {
    var widthsPerZoomLevel : [Double:Double] = [:]
    let pixelScale = mapView.pixelScale
    // Here width value will remain 2.18 from 0.0 zoom level to 6.0.
    // From 6.0 the updated value 2.48 will be used.
    widthsPerZoomLevel[0.0] = 2.18 * pixelScale
    widthsPerZoomLevel[6.0] = 2.48 * pixelScale
    widthsPerZoomLevel[7.0] = 2.78 * pixelScale
    widthsPerZoomLevel[11.0] = 3.1 * pixelScale
    widthsPerZoomLevel[16.0] = 3.15 * pixelScale
    widthsPerZoomLevel[17.0] = 3.35 * pixelScale
    widthsPerZoomLevel[18.0] = 3.78 * pixelScale
    widthsPerZoomLevel[19.0] = 6.5 * pixelScale
    widthsPerZoomLevel[20.0] = 10.2 * pixelScale
    widthsPerZoomLevel[24.0] = 77.5 * pixelScale
    return widthsPerZoomLevel
}
VisualNavigatorを使用してポリラインをレンダリングする (Navigateでのみ使用可能)
経路誘導ガイダンス中は、VisualNavigatorのデフォルト値を使用します。これらの値はdefaultRouteManeuverArrowMeasureDependentWidthsを使用して取得します。幅の値をさらにスケーリングすると、さまざまなデバイス間ですっきりと一貫した表示が可能になります。
// Retrieves the default widths of a route polyline and maneuver arrows from VisualNavigator,
// scaling them based on the screen's pixel density.
private func getDefaultLineWidthValues() -> [Double:Double] {
    var widthsPerZoomLevel: [Double: Double] = [:];
    for defaultValues in VisualNavigator.defaultRouteManeuverArrowMeasureDependentWidths() {
            let key = defaultValues.key.value
            let value = defaultValues.value * mapView.pixelScale
            widthsPerZoomLevel[key] = value
        }
    return widthsPerZoomLevel
}
ルートに沿ってカスタムトラフィックをレンダリングする
交通流に隣接してルートのポリラインをレンダリングする代わりに、Routeオブジェクトの一部として利用可能な交通データを使用して、自身で交通状況をレンダリングすることもできます。これは、実際のガイダンスを開始する前のルートプレビューのユースケースに適しています。
このアプローチの場合、交通情報には交通流スキームによって提供されるリアルタイム情報ではなく、ルートからの予測データが含まれるため、精度が低くなる可能性があります。ただし、交通流レイヤーに使用されるカラーエンコーディングと同様に、0 (交通量なし) から10 (道路が通行止め) までの範囲を持つdynamicSpeedInfo.calculateJamFactor()を使用して、ルート上の交通量を示すことができます。各RouteのSectionには、さまざまなDynamicSpeedInfoインスタンスを含めることができます。これらは、Spanに沿って次のSpanまで有効です。各Spanジオメトリーは、ルート全体のポリライン形状の一部であるポリラインで表されます。
次のコード スニペットは、Section の最初の Span の DynamicSpeedInfo 要素を取得する方法を示しています。
let firstSection = route.sections[0]
let dynamicSpeed = firstSection.spans[0].dynamicSpeedInfo
DynamicSpeedInfo には、予想されるデフォルトの移動速度である baseSpeedInMetersPerSecond が含まれています。これは、道路の現在の制限速度と同じではない場合があることに注意してください。道路状況が悪い場合は、より遅い移動速度が妥当である場合があります。さらに、trafficSpeedInMetersPerSecondを使用すると、現在の交通状況に基づいて推定される実際の移動速度を取得できます。
この値を適切な色にマッピングする方法の例を以下に示します。
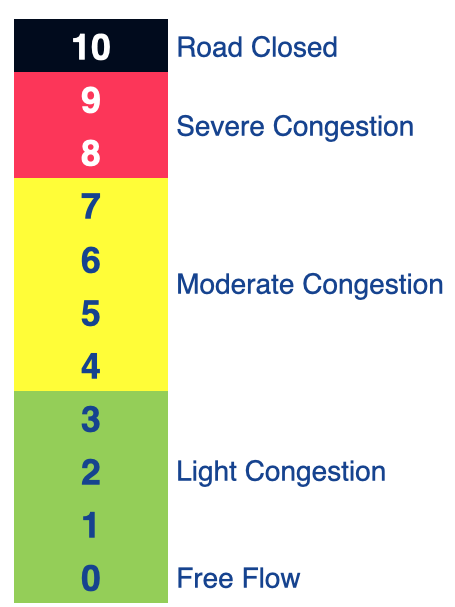
Illustration: Traffic jam factors.
通常、渋滞要因は次のように解釈します。
- 0 <=渋滞要因< 4:交通量がないか少ない。
- 4 <=渋滞要因< 8:交通量が中程度、または交通の流れが遅い。
- 8 <=渋滞要因< 10:激しい渋滞。
- 渋滞要因= 10:道路が封鎖されており、通行不可。
注
DynamicSpeedInfoから取得できる渋滞要因は、trafficSpeedInMetersPerSecond/baseSpeedInMetersPerSecondの比率から区分線形的に算出されており、道路タイプやその他のパラメーターは考慮されていない点に注意してください。そのため、提供される渋滞要因は、マップビュー上の交通流の視覚要素 (有効な場合) と正確に一致するとは限りません。さらに、RoutingEngineは予測型位置情報サービスを使用して、ルート上を走行しながら今後の交通状況を予測します。一方、交通流の視覚要素は現時点 (リアルタイム) の情報のみを表示します。事前にレンダリングされた交通流では、現在のズームレベルに基づいて異なる色表現が使用される可能性があることにも注意してください。指定された到着予測時刻に一致するルートに沿った予測交通量を優先するか、代わりにリアルタイムの交通状況を表示するかはアプリで決定されます。この場合、将来目的地に到着した時点で正確ではなくなる可能性があります。
後者の場合に推奨されるアプローチは、ルート自体に交通状況を追加でレンダリングするのではなく、ルートのポリラインに地図メジャー依存の幅を使用して、ルートと交通流を並べて表示することです。
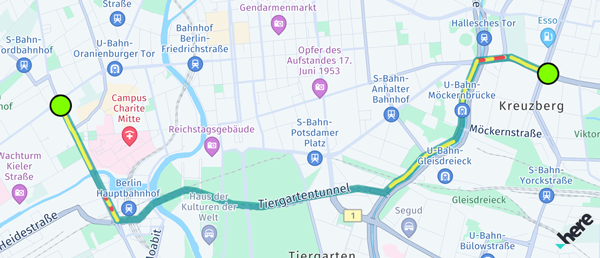
Screenshot: Traffic visualized on a route using jam factor.
ルートに沿って交通状況を視覚化する場合は、複数の色のMapPolylineオブジェクトをセクションの各スパンにレンダリングすることを検討してください。
// This renders the traffic jam factor on top of the route as multiple MapPolylines per span.
private func showTrafficOnRoute(_ route: Route) {
    if route.lengthInMeters / 1000 > 5000 {
      print("Skip showing traffic-on-route for longer routes.");
      return
    }

    for section in route.sections {
        for span in section.spans {
            let dynamicSpeedInfo : DynamicSpeedInfo? = span.dynamicSpeedInfo
            guard let lineColor = getTrafficColor(dynamicSpeedInfo?.calculateJamFactor()) else {
                // Skip rendering low traffic.
                continue
            }

            let trafficSpanMapPolyline = nil
            let widthInPixels = 10.0
            do {
                let trafficSpanMapPolyline =  try MapPolyline(geometry: span.geometry,
                                                  representation: MapPolyline.SolidRepresentation(
                                                    lineWidth: MapMeasureDependentRenderSize(
                                                        sizeUnit: RenderSize.Unit.pixels,
                                                        size: widthInPixels),
                                                    color: lineColor,
                                                    capShape: LineCap.round))

                mapView.mapScene.addMapPolyline(trafficSpanMapPolyline)
                mapPolylineList.append(trafficSpanMapPolyline)
            } catch let error {
                fatalError("Failed to render MapPolyline. Cause: \(error)")
            }
    }
  }
}

// Define a traffic color scheme based on the route's jam factor.
// 0 <= jamFactor < 4: No or light traffic.
// 4 <= jamFactor < 8: Moderate or slow traffic.
// 8 <= jamFactor < 10: Severe traffic.
// jamFactor = 10: No traffic, that is the road is blocked.
// Returns nil in case of no or light traffic.
private func getTrafficColor(_ jamFactor: Double?) -> UIColor? {
    guard let jamFactor = jamFactor else {
        return nil
    }
    if jamFactor < 4 {
        return nil
    } else if jamFactor >= 4 && jamFactor < 8 {
      return UIColor(red: 1, green: 1, blue: 0, alpha: 0.63) // Yellow
    } else if jamFactor >= 8 && jamFactor < 10 {
      return UIColor(red: 1, green: 0, blue: 0, alpha: 0.63) // Red
    }
    return UIColor(red: 0, green: 0, blue: 0, alpha: 0.63) // Black
}
この例では、交通状況がある各スパンが個別のポリラインとしてレンダリングされているため、パフォーマンス上の理由から、長いルートの交通状況レンダリングがスキップされることに注意してください。
2 か月前の更新