
警告を使用して常に注意を払う
NavigatorとVisualNavigatorでは広範な警告システムが提供されるため、トラッキング中またはターン・バイ・ターンナビ中に特定のイベントの通知を受け取ることができます。警告を実装する方法の例については、「NavigationWarners」サンプルアプリを参照してください。サンプルアプリはGitHubにあります。警告は、安全な運転や、事前に知っておくと役立つ情報の受信に役立ちます。
すべての警告が危険な状況を通知するわけではありません。多くの警告は、現在の道路の属性を知るなどの情報提供を目的としています。
最も一般的な警告イベントは次のとおりです。
TruckRestrictionWarning:設定されたトラックの仕様 (高さ、重量など) に照らして事故につながるおそれのあるトラック障害物が近づいている場合や、トラックの通行が許可されていない場合に通知します。SafetyCameraWarning:安全スポット (レーダー式速度違反取締カメラ) に近づいている場合に通知します。SpeedLimit:現在の道路の制限速度が変わったときに通知を受け取ります。SpeedWarningStatus:制限速度を超えたときに通知します。SchoolZoneWarning:制限速度が走行中の道路のデフォルトの制限速度よりも低いスクール ゾーンが前方にあることを通知する警告です。BorderCrossingWarning:国境または国内の州境に近づいたときに通知します。国または州で適用される一般的な制限速度についても通知します。RailwayCrossingWarning:先にある鉄道踏切を通知します。EnvironmentalZoneWarning:排気ガス規制ゾーンに近づいたときに通知します。DangerZoneWarning:ドライバーの注意が必要な危険ゾーンに近づいたときに通知します。LowSpeedZoneWarning:ドライバーの注意が必要な低速ゾーンに近づいたときに通知します。TollStop:近づいている料金所、料金所ブースに到達するための車線を通知します。RealisticViewWarning:近づいている合流地点を標識で示す SVG コンテンツを提供します。RoadSignWarning:停止標識など、近づいている交通標識を通知します。RoadAttributes:現在の道路の属性が変更された場合 (トンネル、橋、有料道路に到達した場合など) に通知します。ManeuverViewLaneAssistance:合流地点が複雑であるかどうかに関係なく、次のルート運転操作が合流地点で行われる場合に推奨するLaneのリストを提供します。JunctionViewLaneAssistance:運転操作が合流地点で行われるかどうかに関係なく、合流地点が複雑な場合にのみ推奨するLaneのリストを提供します。このイベントは、複雑でない合流地点に関しては配信されません。CurrentSituationLaneView:ユーザーが現在走行している道路の車線のアクセス、タイプ、方向に関するレーンベースの情報を受信します。TrafficMergeWarning:現在の道路に合流してくる交通に対する、差し迫った警告を通知します。
通知距離を設定する
デフォルトでは、各WarningTypeに対して警告を送信する通知距離は次のように設定されます。
warningNotificationDistances.slowSpeedDistanceInMeters:低速走行が想定される都市部の道路では、イベントはデフォルトで、500メートル手前で送信されます。warningNotificationDistances.regularSpeedDistanceInMeters:通常の走行速度が想定される地方の道路では、イベントはデフォルトで、750メートル手前で送信されます。warningNotificationDistances.fastSpeedDistanceInMeters:高速道路などの高速走行が想定される道路では、イベントはデフォルトで、1000メートル手前で送信されます。
注
TimingProfileは高速、通常、低速に分類される速度範囲を定義します。
警告を送信する距離はVisualNavigatorを使用して設定できます。これを行うには、visualNavigator.setWarningNotificationDistances(..)を呼び出し、指定されたWarningTypeと、WarningNotificationDistancesのインスタンスを受け入れます。次の例は、RoadSignWarningに対する通知距離の設定方法を示しています。
// Get notification distances for road sign alerts from visual navigator.
var warningNotificationDistances = visualNavigator.getWarningNotificationDistances(warningType: WarningType.roadSign)

// The distance in meters for emitting warnings when the speed limit or current speed is fast. Defaults to 1500.
warningNotificationDistances.fastSpeedDistanceInMeters = 1600;
// The distance in meters for emitting warnings when the speed limit or current speed is regular. Defaults to 750.
warningNotificationDistances.regularSpeedDistanceInMeters = 800;
// The distance in meters for emitting warnings when the speed limit or current speed is slow. Defaults to 500.
warningNotificationDistances.slowSpeedDistanceInMeters = 600;

// Set the warning distances for road signs.
visualNavigator.setWarningNotificationDistances(warningType: WarningType.roadSign, warningNotificationDistances: warningNotificationDistances)
注
WarningNotificationDistancesはルートに沿った特定の位置情報またはエリアに関する警告にのみ適用されます。これは、位置情報に依存せず、制限速度を超過したときや制限範囲内に戻ったときに動作するSpeedLimitListenerには影響しません。
ほとんどの警告では、通知のしきい値を設定できます。詳細については、「通知頻度」を参照してください。
注
- すべての警告は、アクティブなルートの有無にかかわらずサポートされています。つまり、ルート走行中だけでなく、トラッキングモードでのフリー走行中にも、各警告タイプのイベントを受信できます。
- ルートを外れた後や目的地に到着した後も、警告は引き続きイベントを配信します。
また明示的に言及されない限り、(トラックの制限速度など) すべての警告はルートまたはRouteOptionsセットに固有ではありません。たとえば、歩行者ルートを追随している間、希望する場合は TruckRestrictionWarning イベントを受信できます。通常、警告イベントは、ナビゲーターにフィードされたマップマッチングした場所に基づいて生成されます。たとえば歩行者ルートはほとんどの場合、GPS 信号の精度により、横方向を無視する他の移動モードのように、道路の同じ側にマップマッチングされます。
注アプリケーションは、場合により特定の危険スポットについて警告する可能性があります。たとえば、車の前方にある障害物までの距離を表示する場合です。このような場合は、便利なメソッドである
navigator.calculateRemainingDistanceInMeters(GeoCoordinates coordinates)を使用することを検討してください。ルートの先に障害物がある場合に、ルート上のユーザーの現在地と指定されたcoordinatesの間の距離が提供されます。coordinatesがすでに後方にある場合、またはルート上にない場合は、nullが返されます。この方法では、問題となる前方のスポットのcoordinatesをアプリが認識している必要があります。
各警告の詳細については、以下のセクションを参照してください。
制限速度の警告を取得する
SpeedLimitDelegate を実装すると、道路上の制限速度に関するイベントを受け取ることができます。これらは、現地の標識に示されている制限速度や、特定の気象条件にのみ適用される制限速度など、特別な速度状況に関する警告の場合があります。
条件付きとしてマークされている制限速度は、時間による可能性があります。たとえば、スクール ゾーンの制限速度は、1 日の特定の時間にのみ適用されます。このような場合、HERE SDK はデバイスの時刻と制限速度の時間範囲を比較します。制限速度がその時点で適用されている場合はイベントとして伝播され、適用されていない場合はイベントとして伝播されません。
実装例はGitHubにある「NavigationWarners」のサンプルアプリで確認できます。
// Conform to SpeedLimitDelegate.
// Notifies on the current speed limit valid on the current road.
func onSpeedLimitUpdated(_ speedLimit: SpeedLimit) {
    let speedLimit = getCurrentSpeedLimit(speedLimit)

    if speedLimit == nil {
        print("Warning: Speed limits unknown, data could not be retrieved.")
    } else if speedLimit == 0 {
        print("No speed limits on this road! Drive as fast as you feel safe ...")
    } else {
        print("Current speed limit (m/s): \(String(describing: speedLimit))")
    }
}

private func getCurrentSpeedLimit(_ speedLimit: SpeedLimit) -> Double? {
    // Note that all values can be nil if no data is available.

    // The regular speed limit if available. In case of unbounded speed limit, the value is zero.
    print("speedLimitInMetersPerSecond: \(String(describing: speedLimit.speedLimitInMetersPerSecond))")

    // A conditional school zone speed limit as indicated on the local road signs.
    print("schoolZoneSpeedLimitInMetersPerSecond: \(String(describing: speedLimit.schoolZoneSpeedLimitInMetersPerSecond))")

    // A conditional time-dependent speed limit as indicated on the local road signs.
    // It is in effect considering the current local time provided by the device's clock.
    print("timeDependentSpeedLimitInMetersPerSecond: \(String(describing: speedLimit.timeDependentSpeedLimitInMetersPerSecond))")

    // A conditional non-legal speed limit that recommends a lower speed,
    // for example, due to bad road conditions.
    print("advisorySpeedLimitInMetersPerSecond: \(String(describing: speedLimit.advisorySpeedLimitInMetersPerSecond))")

    // A weather-dependent speed limit as indicated on the local road signs.
    // The HERE SDK cannot detect the current weather condition, so a driver must decide
    // based on the situation if this speed limit applies.
    print("fogSpeedLimitInMetersPerSecond: \(String(describing: speedLimit.fogSpeedLimitInMetersPerSecond))")
    print("rainSpeedLimitInMetersPerSecond: \(String(describing: speedLimit.rainSpeedLimitInMetersPerSecond))")
    print("snowSpeedLimitInMetersPerSecond: \(String(describing: speedLimit.snowSpeedLimitInMetersPerSecond))")

    // For convenience, this returns the effective (lowest) speed limit between
    // - speedLimitInMetersPerSecond
    // - schoolZoneSpeedLimitInMetersPerSecond
    // - timeDependentSpeedLimitInMetersPerSecond
    return speedLimit.effectiveSpeedLimitInMetersPerSecond()
}
制限速度は、指定した移動モードによって異なります。現在、HERE SDK は、各国の事業用自動車法的規制 (CVR) に基づいて普通車とトラックを区別しています。つまり、上の例の SpeedLimit イベントでは、トラックを対象としたより低速の制限速度を示すことができます。たとえば、ドイツの高速道路での制限速度は最高80 km/時ですが、普通車では制限速度が 130 km/時以上で示される可能性があります。CVR の制限速度を取得するには、マップ バージョン 32 以上を使用してください。それ以下のマップ バージョンでは、トラックも普通車と同じ制限速度通知を受け取ります。マップ バージョンは MapUpdater で更新できます。ダウンロードされた地域がない場合も、ナビゲーションはマップ キャッシュに現在保存されているのと同じバージョンのマップ データのみをリクエストします。そのため、これはオンラインとオフラインの両方の使用に適用されます。
注トラックの場合は、
RouteOptions内でTruckSpecificationsを指定することもお勧めします。プロパティgrossWeightInKilogramsはトラックの制限速度に影響する可能性があります。ほとんどの国では、これは法的に許可される制限速度に影響します。重量が設定されていない場合、HERE SDK はトラックの重量が軽量であると想定し、法的に許可されているトラックの最高制限速度のみが転送されます。トラックの制限速度は、現地の事業用自動車規制 (CVR) に従って決定されます。日本など一部の国では、これが異なることに注意してください。ただし、トラック用に計算されたルートでは、普通車に適した制限速度が提供されません。たとえば、トラックの重量が 3.5 トン未満の場合は、代わりに普通車のルートを計算することを検討してください。
トラッキング モードの場合は、navigator.trackingTransportProfile(vehicleProfile) を呼び出し、VehicleProfile を設定します。たとえば、トラック ドライバーであれば truck 移動モードで、重量など車の他の属性も対象の車に応じて指定してください。このプロフィールを設定すると speedLimit.effectiveSpeedLimitInMetersPerSecond() が決定されますが、通常の制限速度 (speedLimit.speedLimitInMetersPerSecond) には影響しません。
注日本のルートでは、
TruckSpecificationsで特別なフラグisLightTruckを設定できます。このフラグは、トラックが普通車として分類される軽さであるかどうかを示します。このフラグは日本以外の国では使用しないようにしてください。なお、これはこの機能のベータ版です。
スピードオーバーの警告を取得する
新しい制限速度イベント (上のセクションを参照) を受信すると、いつ制限速度を超えたかを検知できますが、アプリに速度警告機能を実装するのに役立つ、さらに便利なソリューションがあります。
注天候による制限速度などの一時的な制限速度を超えても警告は送信されません。
onSpeedWarningStatusChanged() はドライバーが現在許容されている制限速度を超えるとすぐに通知します。また、ドライバーが制限速度を超えてから減速した場合にもすぐに通知します。
// Conform to SpeedWarningDelegate.
// Notifies when the current speed limit is exceeded.
func onSpeedWarningStatusChanged(_ status: SpeedWarningStatus) {
    if status == SpeedWarningStatus.speedLimitExceeded {
        // Driver is faster than current speed limit (plus an optional offset).
        // Play a notification sound to alert the driver.
        // Note that this may not include temporary special speed limits, see SpeedLimitDelegate.
        AudioServicesPlaySystemSound(SystemSoundID(1016))
    }

    if status == SpeedWarningStatus.speedLimitRestored {
        print("Driver is again slower than current speed limit (plus an optional offset).")
    }
}
注使用可能な制限速度データがない場合、
onSpeedWarningStatusChanged()は通知しません。この情報は、NavigableLocationインスタンスの一部としてのみ提供されます。
SpeedWarningStatus は、現在の速度を超えた場合、または速度が元に戻った場合にのみ配信されます。たとえば、ドライバーが常にスピードを出しすぎている場合は 1 つのイベントのみが発生します。
onSpeedWarningStatusChanged() は現在の道路の制限速度とドライバーの運転速度に応じて通知します。つまり、ルートに関係なく、トラッキング モードでも速度警告イベントを取得できます。そのため、ドライバーが再び速度を落とした後にルートが変更された場合も、speedLimitRestored イベントを受け取ります。
必要に応じて、制限速度値に付加するオフセットを定義できます。オフセットを含めて制限速度を超えた場合にのみ通知されます。以下では 2 つのオフセットを定義しています。1 つは制限速度より低速の場合で、もう 1 つは制限速度より高速の場合です。境界は highSpeedBoundaryInMetersPerSecond によって定義されます。
private func setupSpeedWarnings() {
    let speedLimitOffset = SpeedLimitOffset(lowSpeedOffsetInMetersPerSecond: 2,
                                            highSpeedOffsetInMetersPerSecond: 4,
                                            highSpeedBoundaryInMetersPerSecond: 25)
    visualNavigator.speedWarningOptions = SpeedWarningOptions(speedLimitOffset: speedLimitOffset)
}
この例では highSpeedBoundaryInMetersPerSecond を 25 m/秒に設定しています。制限速度標識で 25 m/秒を超える値が表示されている場合に使用されるオフセットは highSpeedOffsetInMetersPerSecond です。25 m/秒未満の場合に使用されるオフセットは lowSpeedOffsetInMetersPerSecond です。
上のオフセットで使用されている値の例として
-
道路の制限速度が 27 m/秒の場合、使用される (高) 速度のオフセットは 4 m/秒です。つまり、運転速度が 31 m/秒 = 27 m/秒 + 4 m/秒を超えている場合にのみ警告通知を受け取ります。現在の制限速度の数値が
highSpeedBoundaryInMetersPerSecondより大きいため、highSpeedOffsetInMetersPerSecondが使用されます。 -
道路の制限速度が 20 m/秒の場合、使用される (低) 速度のオフセットは 2 m/秒です。つまり、運転速度が 22 m/秒 = 20 m/秒 + 2 m/秒を超えている場合にのみ警告通知を受け取ります。現在の制限速度の数値が
highSpeedBoundaryInMetersPerSecondより小さいため、lowSpeedOffsetInMetersPerSecondが使用されます。
負のオフセット値も設定できます。これは、制限速度に達する前にバッファを用意して、制限速度を超えないようにする場合に有効です。以前の速度警告が復元されていない限り、定義したオフセットよりもスピードが遅いなど、運転速度が遅すぎる場合は通知を受け取ることはありません。
注車両仕様については、上で説明した制限速度と同じルールが適用されます。
道路標識の警告を取得する
道路上にはさまざまな標識があります。RoadSignWarningDelegate を設定すると、運転中にこれらの標識に関する詳細な通知を受け取ることができます。
その結果の RoadSignWarning イベントには、RoadSignType や RoadSignCategory のような標識に関する情報が含まれます。
HERE SDKにはさまざまなRoadSignType値があり、RoadSignWarningイベントから取得できます。一般に、道路標識の外観は国によって異なりますが、stopSignなど、一部の標識は標準化されているため、ほとんどすべての国で同じような外観となります。使用可能なRoadSignType値のリストは、こちらを参照してください。
実際の道路標識アイコンは HERE SDK によって提供されません。このイベントでは、標識のイメージそのものではなく、標識のタイプに関する情報のみが提供されます。また、交通標識の正確な位置は提供されませんが、前方の距離情報が提供されるため、標識に到達したときにアプリケーションによって通知できます。たとえば、RouteProgress イベントは、車の走行距離に関する情報を常に提供します。
RoadSignWarningOptions では、通知を受け取る標識のフィルターを設定できます。

Some examples of priority road signs (not included in the HERE SDK).
すべての道路標識が含まれているわけではありません。RoadSignTypeにサポートされているすべての型が一覧表示されます。たとえば、制限速度を示す道路標識は専用のSpeedLimitDelegateで検出されるため、除外されます。
以下のコードスニペットは、使用状況の例を示しています。
private func setupRoadSignWarnings() {
    var roadSignWarningOptions = RoadSignWarningOptions()
    // Set a filter to get only road signs relevant for trucks and heavyTrucks.
    roadSignWarningOptions.vehicleTypesFilter = [RoadSignVehicleType.trucks, RoadSignVehicleType.heavyTrucks]
    visualNavigator.roadSignWarningOptions = roadSignWarningOptions
}

...

// Conform to the RoadSignWarningDelegate.
// Notifies on road signs as they appear along the road.
func onRoadSignWarningUpdated(_ roadSignWarning: RoadSignWarning) {
    let roadSignType: RoadSignType = roadSignWarning.type
    if (roadSignWarning.distanceType == DistanceType.ahead) {
        print("A RoadSignWarning of road sign type: \(roadSignType) ahead in (m): \(roadSignWarning.distanceToRoadSignInMeters)")
    } else if (roadSignWarning.distanceType == DistanceType.passed) {
        print("A RoadSignWarning of road sign type: \(roadSignType) just passed.")
    }

    if let signValue = roadSignWarning.signValue {
        // Optional text as it is printed on the local road sign.
        print("Road sign text: " + signValue.text)
    }

    // For more road sign attributes, please check the API Reference.
}
RoadSignWarning イベントが発行されるのは完全に 2 回です。
DistanceTypeがAHEADの場合は、distanceToRoadSignInMetersは 0 より大きくなります。DistanceTypeがPASSEDの場合は、distanceToRoadSignInMetersは 0 です。
注安全監視カメラ、道路標識、リアリスティック ビューなど、道路上の 1 つの地物について通知する位置警告の場合、一度に発生するアクティブな警告は常に 1 つのみです。つまり、1 つの地物に対して 2 つの
ahead警告が同時にアクティブになるのを回避するために、それぞれのaheadイベントの後には常にpassedイベントが続きます。
通行料金収受ポイントの警告を取得する
警告のもう 1 つのタイプは、近づいている料金所ブースに関してイベントを提供する TollStopWarningDelegate です。
これには、窓に張るステッカーや道路税などのビネットの支払いの詳細に関する情報も含まれます。
このイベントは他の警告と同じ距離しきい値で起動されます。
- 高速道路では、このイベントは約 2000 m 手前で起動されます。
- 地方道路では、このイベントは約 1500 m 手前で起動されます。
- 市街地では、このイベントは約 1000 m 手前で起動されます。
すべての警告と同様に、このイベントはトラッキング モードで、ターン・バイ・ターンナビ中に発行されます。
TollBoothLaneクラス内では、車両タイプに適した料金所の車線の他、利用可能な支払い方法などの情報を見つけることができます。
// Conform to TollStopWarningDelegate.
// Notifies on upcoming toll stops. Uses the same notification
// thresholds as other warners and provides events with or without a route to follow.
func onTollStopWarning(_ tollStop: TollStop) {
    let lanes = tollStop.lanes

    // The lane at index 0 is the leftmost lane adjacent to the middle of the road.
    // The lane at the last index is the rightmost lane.
    let laneNumber = 0
    for tollBoothLane in lanes {
        // Log which vehicles types are allowed on this lane that leads to the toll booth.
        logLaneAccess(laneNumber, tollBoothLane.access)
        let tollBooth = tollBoothLane.booth
        let tollCollectionMethods = tollBooth.tollCollectionMethods
        let paymentMethods = tollBooth.paymentMethods
        // The supported collection methods like ticket or automatic / electronic.
        for collectionMethod in tollCollectionMethods {
            print("This toll stop supports collection via: \(collectionMethod).")
        }
        // The supported payment methods like cash or credit card.
        for paymentMethod in paymentMethods {
            print("This toll stop supports payment via: \(paymentMethod).")
        }
        laneNumber += 1
    }
}

func logLaneAccess(_ laneNumber: Int, _ laneAccess: LaneAccess) {
    print("Lane access for lane \(laneNumber).")
    print("Automobiles are allowed on this lane: \(laneAccess.automobiles).")
    print("Buses are allowed on this lane: \(laneAccess.buses).")
    print("Taxis are allowed on this lane: \(laneAccess.taxis).")
    print("Carpools are allowed on this lane: \(laneAccess.carpools).")
    print("Pedestrians are allowed on this lane: \(laneAccess.pedestrians).")
    print("Trucks are allowed on this lane: \(laneAccess.trucks).")
    print("ThroughTraffic is allowed on this lane: \(laneAccess.throughTraffic).")
    print("DeliveryVehicles are allowed on this lane: \(laneAccess.deliveryVehicles).")
    print("EmergencyVehicles are allowed on this lane: \(laneAccess.emergencyVehicles).")
    print("Motorcycles are allowed on this lane: \(laneAccess.motorcycles).")
}
正確な支払い価格および料金所ブースの位置など、その他の情報は Route オブジェクトの一部として提供されます。このような情報は、移動を開始する前にルートから抽出する際に役立ちます。たとえば、タップ可能な MapMarker アイテムは、ルート上の料金所を示すために使用できます。ガイダンス中は、このような詳細な情報によってドライバーの注意がそらされる可能性があります。そのため、このような情報は事前に提供することをお勧めします。
安全監視カメラの警告を取得する
安全監視カメラは、一般的にスピード違反取締カメラや交通監視カメラと呼ばれ、監視し道路交通法を施行して、道路の安全を向上させるために使用するツールです。これらは通常、交差点、混雑した一般道路沿い、交通違反や事故が頻繁に起こる地域に設置されます。
安全監視カメラの警告のテキスト通知を設定するには、SafetyCameraWarningOptionsクラスを使用します。これらの通知は今後の安全監視カメラに関する有用な情報を提供します(「A safety camera is ahead in 500 meters.」(安全監視カメラは500メートル先にあります) など)。このテキストは、音声合成 (TTS) エンジンで処理でき、ManeuverNotificationOptionsでローカライズできます。SafetyCameraWarningOptionsを有効化するだけでなく、テキスト通知を受信して処理するためにEventTextListenerも設定する必要があります。EventTextListenerの詳細については、こちらを参照してください。
var safetyCameraWarningOptions = SafetyCameraWarningOptions()
safetyCameraWarningOptions.enableTextNotification = true
visualNavigator.safetyCameraWarningOptions = safetyCameraWarningOptions-
SafetyCameraWarningListenerをNavigatorまたはVisualNavigatorに添付すると、ドライバーの速度を検出するカメラの情報を通知するSafetyCameraWarningイベントの通知を受け取ることができます。 -
ほとんどの国では、この対象となるのは恒久的に設置されたカメラのみです。HERE SDK は、カメラが現在アクティブかどうかについては通知しません。
注地域の法律や規制により、安全カメラ (「速度違反取締カメラ」とも呼ばれる) に関する通知はすべての国で提供できるわけではありません。フランスやドイツなど一部の国では、速度違反取締カメラの正確な位置に関する情報は法律で禁止されています。これらの国は除外され、イベントを受信しません。フランスのユーザーは、代わりに
DaneZoneWarningイベントの利用を検討してください。ただしほとんどの国では、正確な位置情報が利用可能であり、許可されています。
以下のようにSafetyCameraWarningDelegateを設定することで、運転中に安全監視カメラで通知を受信できます。
// Notifies on safety camera warnings as they appear along the road.
func onSafetyCameraWarningUpdated(_ safetyCameraWarning: SafetyCameraWarning) {
  // Safety camera warning GeoCoordinates can only be fetched in non-tracking mode.
  guard let currentRoute = visualNavigator.route else {
      fatalError("Route cannot be nil")
  }

  let safetyCameraGeoCoordinates: GeoCoordinates = getGeocoordinatesForRemainingDistance(
      routeProgress: currentRouteProgress!,
      remainingObjectDistanceInMeters: safetyCameraWarning.distanceToCameraInMeters,
      currentRoute: currentRoute
  )

  if safetyCameraWarning.distanceType == .ahead {
      print("Safety camera warning \(safetyCameraWarning.type) ahead in: " +
            "\(safetyCameraWarning.distanceToCameraInMeters) m " +
            "with speed limit = \(safetyCameraWarning.speedLimitInMetersPerSecond) m/s " +
            "at geo-coordinates: \(geoCoordinatesToString(safetyCameraGeoCoordinates))")
  } else if safetyCameraWarning.distanceType == .passed {
      print("Safety camera warning \(safetyCameraWarning.type) passed: \(safetyCameraWarning.distanceToCameraInMeters) with speed limit = \(safetyCameraWarning.speedLimitInMetersPerSecond)m/s")
  } else if safetyCameraWarning.distanceType == .reached {
      print("Safety camera warning \(safetyCameraWarning.type) reached at: \(safetyCameraWarning.distanceToCameraInMeters) with speed limit = \(safetyCameraWarning.speedLimitInMetersPerSecond)m/s")
  }
}
HERE SDKはgeopolyline.coordinatesAtOffsetInMeters()を提供しており、これは安全監視カメラなどのポリライン上のオブジェクトの正確な座標を返します。このメソッドはメートル単位のオフセット距離とGeoPolylineDirectionを受け取り、ポリラインのジオメトリを走査してそのオフセットでの緯度と経度を計算します。これにより、ルートに沿った前方の距離に基づいて今後のオブジェクトの位置を以下のように特定できます。
// Returns the GeoCoordinates for an object located at the end of the remaining distance.
private func getGeocoordinatesForRemainingDistance(
    routeProgress: RouteProgress,
    remainingObjectDistanceInMeters: Double,
    currentRoute: Route
) -> GeoCoordinates {
    let currentCCPOffsetInMeters = getOffsetOfCCPOnRouteInMeters(routeProgress: routeProgress, currentRoute: currentRoute)

    // Calculate the offset along the route for the given object.
    let remainingDistanceOffsetInMeters = currentCCPOffsetInMeters + remainingObjectDistanceInMeters

    return getGeoCoordinatesFromOffsetInMeters(
        geoPolyline: currentRoute.geometry,
        offsetInMeters: remainingDistanceOffsetInMeters
    )
}

// Returns the offset of the current camera position (CCP) on the route in meters.
private func getOffsetOfCCPOnRouteInMeters(
    routeProgress: RouteProgress,
    currentRoute: Route
) -> Double {
    let totalLength = Double(currentRoute.lengthInMeters)

    // SectionProgress is guaranteed to be non-empty.
    guard let lastSectionProgress = routeProgress.sectionProgress.last else {
        return 0.0
    }

    let remainingDistance = Double(lastSectionProgress.remainingDistanceInMeters)
    return totalLength - remainingDistance
}

// Converts an offset in meters along a GeoPolyline to GeoCoordinates using HERE SDK's coordinatesAtOffsetInMeters.
private func getGeoCoordinatesFromOffsetInMeters(
    geoPolyline: GeoPolyline,
    offsetInMeters: Double
) -> GeoCoordinates {
    return geoPolyline.coordinatesAt(offsetInMeters: offsetInMeters, direction: .fromBeginning)
}
現在、以下に記載した国でサポートされています。
安全カメラの対象国
- ベトナム
- アメリカ合衆国
- 英国 (グレートブリテンおよび北アイルランド)
- アラブ首長国連邦
- ウクライナ
- トルコ
- タイ
- 台湾
- スウェーデン
- スペイン
- 南アフリカ
- スロベニア
- スロバキア
- シンガポール
- セルビア
- サウジアラビア
- ロシア連邦
- ルーマニア
- カタール
- ポルトガル
- ポーランド
- オマーン
- ノルウェー
- ニュージーランド
- オランダ
- メキシコ
- マルタ
- マレーシア
- マカオ
- ルクセンブルク
- リトアニア
- ラトビア
- クウェート
- 大韓民国
- カザフスタン
- インドネシア
- イタリア
- イスラエル
- マン島
- アイスランド
- ハンガリー
- 香港
- ギリシャ
- フィンランド
- エストニア
- デンマーク
- チェコ共和国
- キプロス
- クロアチア
- チリ
- カナダ
- カンボジア
- ブルガリア
- ブラジル
- ボスニア・ヘルツェゴビナ
- ベルギー
- ベラルーシ
- バーレーン
- アゼルバイジャン
- オーストリア
- オーストラリア
- アルゼンチン
- アンドラ
TTSエンジンを使用した車線推奨を有効にする
車線推奨はEventText通知の一部として提供され、距離ベースの運転操作通知を強化します。たとえば、「250メートル先で右折」という通知を受け取るのではなく、「250メートル先で、右側2車線に入り右折」といった、より具体的な指示を受け取ることができます。
- まだ設定していない場合は、こちらで示すように
EventTextDelegateを設定します。 - 必要に応じて、
ManeuverNotificationOptionsを指定してテキストをローカライズします。同じ設定がイベントテキストにも適用されます。 - 受信したイベントテキストは任意のTTSエンジンにフィードして、音声ガイダンスによりドライバーをサポートできます。
車線推奨を有効にするには、以下のようにManeuverNotificationOptionsを使用します。
private func setupManeuverNotificationOptions() {
        var maneuverNotificationOptions = ManeuverNotificationOptions()

        maneuverNotificationOptions.enableLaneRecommendation = true
        visualNavigator.maneuverNotificationOptions = maneuverNotificationOptions
}車線推奨通知のタイミングはManeuverNotificationTimingOptionsで制御されます。車線推奨はManeuverNotificationType.distance通知タイプに対してのみ提供されるため、関連するタイミングパラメーターは以下になります。
distanceNotificationDistanceInMeters:車線推奨をトリガーする距離しきい値を制御します。デフォルト値は移動モードとタイミングプロファイルによって異なります。distanceNotificationTimeInSeconds:車線推奨をトリガーする時間しきい値を制御します。デフォルト値は18秒です。
ManeuverNotificationTimingOptionsの詳細については、こちらを参照してください。
スクールゾーンの警告を取得する
他の警告のように、専用のSchoolZoneWarningDelegateを設定できます。
// Conform to SchoolZoneWarningDelegate.
// Notifies on school zones ahead.
func onSchoolZoneWarningUpdated(_ schoolZoneWarnings: [heresdk.SchoolZoneWarning]) {
    // The list is guaranteed to be non-empty.
    for schoolZoneWarning in schoolZoneWarnings {
      if schoolZoneWarning.distanceType == DistanceType.ahead {
        print("A school zone ahead in: \(schoolZoneWarning.distanceToSchoolZoneInMeters) meters.")
        // Note that this will be the same speed limit as indicated by SpeedLimitDelegate, unless
        // already a lower speed limit applies, for example, because of a heavy truck load.
        print("Speed limit restriction for this school zone: \(schoolZoneWarning.speedLimitInMetersPerSecond) m/s.")
          if let timeRule = schoolZoneWarning.timeRule {
              if timeRule.appliesTo(dateTime: Date()) {
              // For example, during night sometimes a school zone warning does not apply.
              // If schoolZoneWarning.timeRule is nil, the warning applies at anytime.
              print("Note that this school zone warning currently does not apply.")
          }
        }
      } else if schoolZoneWarning.distanceType == DistanceType.reached {
        print("A school zone has been reached.")
      } else if schoolZoneWarning.distanceType == DistanceType.passed {
        print("A school zone has been passed.")
      }
    }
}
この警告は、前方の道路にスクール ゾーンがあり、制限速度がデフォルトの制限速度よりも低い場合にのみ通知します。それ以外は、前方に学校があってもアラートは発生しません。
通知のしきい値はすべての地域に適用され、次のように SchoolZoneWarningOptions により設定できます。
private func setupSchoolZoneWarnings() {
    var schoolZoneWarningOptions = SchoolZoneWarningOptions()
    schoolZoneWarningOptions.filterOutInactiveTimeDependentWarnings = true
    schoolZoneWarningOptions.warningDistanceInMeters = 150
    visualNavigator.schoolZoneWarningOptions = schoolZoneWarningOptions
}
デフォルトの距離しきい値は、「API リファレンス」で確認できます。
国境検問所の警告を取得する
他の警告のように、国境を越えたときに通知する、専用の BorderCrossingWarning 通知を受け取ることができます。必要に応じて、国の州境を越えたときにもイベントが通知されます。
// Conform to BorderCrossingWarningDelegate.
// Notifies whenever a country border is crossed and optionally, by default, also when
// a state borders are crossed within a country.
func onBorderCrossingWarningUpdated(_ borderCrossingWarning: BorderCrossingWarning) {
    // Since the border crossing warning is given relative to a single location,
    // the .reached case will never be given for this warning.
    if borderCrossingWarning.distanceType == .ahead {
        print("BorderCrossing: A border is ahead in: \(borderCrossingWarning.distanceToBorderCrossingInMeters) meters.")
        print("BorderCrossing: Type (such as country or state): \(borderCrossingWarning.type)")
        print("BorderCrossing: Country code: \(borderCrossingWarning.countryCode)")

        // The state code after the border crossing. It represents the state / province code.
        // It is a 1 to 3 upper-case characters string that follows the ISO 3166-2 standard,
        // but without the preceding country code (e.g., for Texas, the state code will be TX).
        // It will be nil for countries without states or countries in which the states have very
        // similar regulations (e.g., for Germany, there will be no state borders).
        if let stateCode = borderCrossingWarning.stateCode {
            print("BorderCrossing: State code: \(stateCode)")
        }

        // The general speed limits that apply in the country / state after border crossing.
        let generalVehicleSpeedLimits = borderCrossingWarning.speedLimits
        print("BorderCrossing: Speed limit in cities (m/s): \(String(describing: generalVehicleSpeedLimits.maxSpeedUrbanInMetersPerSecond))")
        print("BorderCrossing: Speed limit outside cities (m/s): \(String(describing: generalVehicleSpeedLimits.maxSpeedRuralInMetersPerSecond))")
        print("BorderCrossing: Speed limit on highways (m/s): \(String(describing: generalVehicleSpeedLimits.maxSpeedHighwaysInMetersPerSecond))")
    } else if borderCrossingWarning.distanceType == .passed {
        print("BorderCrossing: A border has been passed.")
    }
}BorderCrossingWarningOptionsでは境界に対する通知のフィルターを指定できます。
private func setupBorderCrossingWarnings() {
    var borderCrossingWarningOptions = BorderCrossingWarningOptions()
    // If set to true, all the state border crossing notifications will not be given.
    // If the value is false, all border crossing notifications will be given for both
    // country borders and state borders. Defaults to false
    borderCrossingWarningOptions.filterOutStateBorderWarnings = true
    visualNavigator.borderCrossingWarningOptions = borderCrossingWarningOptions
}
危険地帯の警告を取得する
他の警告のように、危険ゾーンに近づいたときに通知する、専用の DangerZoneWarning 通知を受け取ることができます。
危険ゾーンとは、交通事案のリスクが高い地域のことです。これらのゾーンは、ドライバーに対して潜在的な危険を警告し、より安全な運転行動を促すように指定されています。
特定のデバイスでは、危険ゾーンにいることを合法的に警告でき、典型例としては速度違反取締カメラの存在を示すことができます。適用される法律および業界標準に従い、これらの警告は、通常、高速道路では 4 km、市街地外では 2 km、市街地外内では 300 m の範囲内の道路で提供されます.
HERE SDK は、危険ゾーンに近づくときの他、危険ゾーンを離れるときにも警告します。危険ゾーンには、速度違反取締カメラが 1 台以上ある場合とそうでない場合があります。そのような速度違反取締カメラの正確な位置は提供されません。
危険ゾーンは、フランスなどの一部の国にのみ該当します。
// Conform to DangerZoneWarningDelegate.
// Notifies on danger zones.
_visualNavigator.dangerZoneWarningListener = DangerZoneWarningListener((DangerZoneWarning dangerZoneWarning) {
  if (dangerZoneWarning.distanceType == DistanceType.ahead) {
    print("A danger zone ahead in: " + dangerZoneWarning.distanceInMeters.toString() + " meters.");
    // isZoneStart indicates if we enter the danger zone from the start.
    // It is false, when the danger zone is entered from a side street.
    // Based on the route path, the HERE SDK anticipates from where the danger zone will be entered.
    // In tracking mode, the most probable path will be used to anticipate from where
    // the danger zone is entered.
    print("isZoneStart: " + dangerZoneWarning.isZoneStart.toString());
  } else if (dangerZoneWarning.distanceType == DistanceType.reached) {
    print("A danger zone has been reached. isZoneStart: " + dangerZoneWarning.isZoneStart.toString());
  } else if (dangerZoneWarning.distanceType == DistanceType.passed) {
    print("A danger zone has been passed.");
  }
});
低速ゾーンの警告を取得する
他の警告のように、低速ゾーンに近づいたときに通知する、専用の LowSpeedZoneWarning 通知を受け取ることができます。
「低速ゾーン」とは、安全性を高めて特定の条件に対応するために、制限速度を意図的に周囲のエリアより低く設定するエリアのことです。多くの場合、低速ゾーンは歩行者、自転車、その他の道路利用者にとって高速走行がより大きなリスクをもたらす場所に実装されます。このようなゾーンは MapFeatures.lowSpeedZones を表示することにより、マップ ビューで視覚化することもできます。
HERE SDK は低速ゾーンに近づいているときや、低速ゾーンを出入りするときに警告します。
// Conform to LowSpeedZoneWarningDelegate.
// Notifies on low speed zones ahead - as indicated also on the map when
// MapFeatures.lowSpeedZones is set.
func onLowSpeedZoneWarningUpdated(_ lowSpeedZoneWarning: heresdk.LowSpeedZoneWarning) {
    if (lowSpeedZoneWarning.distanceType == DistanceType.ahead) {
        print("A low speed zone ahead in: \(lowSpeedZoneWarning.distanceToLowSpeedZoneInMeters) meters.")
        print("Speed limit in low speed zone (m/s):  \(lowSpeedZoneWarning.speedLimitInMetersPerSecond)")
    } else if (lowSpeedZoneWarning.distanceType == DistanceType.reached) {
        print("A low speed zone has been reached.")
        print("Speed limit in low speed zone (m/s):  \(lowSpeedZoneWarning.speedLimitInMetersPerSecond)")
    } else if (lowSpeedZoneWarning.distanceType == DistanceType.passed) {
        print("A low speed zone has been passed.")
    }
}
一般道路属性の変更を取得する
RoadAttributesDelegate を実装すると、道路属性に関するイベントを受け取ることができます。このイベントは、その道路を走行している間、属性が変更されるたびに起動します。
// Conform to the RoadAttributesDelegate.
// Notifies on the attributes of the current road including usage and physical characteristics.
func onRoadAttributesUpdated(_ roadAttributes: RoadAttributes) {
    // This is called whenever any road attribute has changed.
    // If all attributes are unchanged, no new event is fired.
    // Note that a road can have more than one attribute at the same time.
    print("Received road attributes update.")

    if (roadAttributes.isBridge) {
      // Identifies a structure that allows a road, railway, or walkway to pass over another road, railway,
      // waterway, or valley serving map display and route guidance functionalities.
        print("Road attributes: This is a bridge.")
    }
    if (roadAttributes.isControlledAccess) {
      // Controlled access roads are roads with limited entrances and exits that allow uninterrupted
      // high-speed traffic flow.
        print("Road attributes: This is a controlled access road.")
    }
    if (roadAttributes.isDirtRoad) {
      // Indicates whether the navigable segment is paved.
        print("Road attributes: This is a dirt road.")
    }
    if (roadAttributes.isDividedRoad) {
      // Indicates if there is a physical structure or painted road marking intended to legally prohibit
      // left turns in right-side driving countries, right turns in left-side driving countries,
      // and U-turns at divided intersections or in the middle of divided segments.
        print("Road attributes: This is a divided road.")
    }
    if (roadAttributes.isNoThrough) {
      // Identifies a no through road.
        print("Road attributes: This is a no through road.")
    }
    if (roadAttributes.isPrivate) {
      // Private identifies roads that are not maintained by an organization responsible for maintenance of
      // public roads.
        print("Road attributes: This is a private road.")
    }
    if (roadAttributes.isRamp) {
      // Range is a ramp: connects roads that do not intersect at grade.
        print("Road attributes: This is a ramp.")
    }
    if (roadAttributes.isRightDrivingSide) {
      // Indicates if vehicles have to drive on the right-hand side of the road or the left-hand side.
      // For example, in New York it is always true and in London always false as the United Kingdom is
      // a left-hand driving country.
        print("Road attributes: isRightDrivingSide = \(roadAttributes.isRightDrivingSide)")
    }
    if (roadAttributes.isRoundabout) {
      // Indicates the presence of a roundabout.
        print("Road attributes: This is a roundabout.")
    }
    if (roadAttributes.isTollway) {
      // Identifies a road for which a fee must be paid to use the road.
        print("Road attributes change: This is a road with toll costs.")
    }
    if (roadAttributes.isTunnel) {
      // Identifies an enclosed (on all sides) passageway through or under an obstruction.
        print("Road attributes: This is a tunnel.")
    }
}実装例はGitHubにある「NavigationWarners」のサンプルアプリで確認できます。
roadAttributes.isTunnelが真であれば、アプリケーションは夜間マップスキームに切り替える判断を下す可能性があります。これはHERE SDKによって自動的に行われません。通常、トンネル内では GPS 信号が非常に弱いか、失われてしまうこともあるため、HERE SDK は内部的にトンネル補間アルゴリズムを使用してトンネル内でガイダンスを提供します。
交通合流の警告を取得する
他の警告と同様に、現在の道路と合流する道路が近づいたときに通知する、専用のTrafficMergeWarning通知を受け取ることができます。
TrafficMergeWarningイベントには、高速道路、進入路、アクセスが制限された道路などの現在の道路に合流するRoadTypeについて記載されています。
HERE SDKは、合流する道路に近づくときと離れるときに警告します。このイベントはRoute上の単一の位置に対して相対的に与えられるため、この警告にはreaching距離タイプは使用されません。
// Conform to TrafficMergeWarningDelegate.
// Notifies about merging traffic to the current road.
func onTrafficMergeWarningUpdated(_ trafficMergeWarning: TrafficMergeWarning) {
    if trafficMergeWarning.distanceType == .ahead {
        print("There is a merging \(trafficMergeWarning.distanceType) ahead in: \(trafficMergeWarning.distanceToTrafficMergeInMeters) meters, merging from the \(trafficMergeWarning.side) side, with lanes = \(trafficMergeWarning.laneCount)")
    } else if trafficMergeWarning.distanceType == .passed {
        print("A merging \(trafficMergeWarning.distanceType) passed: \(trafficMergeWarning.distanceToTrafficMergeInMeters) meters, merging from the \(trafficMergeWarning.side) side, with lanes = \(trafficMergeWarning.laneCount)")
    } else if trafficMergeWarning.distanceType == .reached {
        // Since the traffic merge warning is given relative to a single position on the route,
        // DistanceType.reached will never be given for this warning.
    }
}
TTS音声ガイダンスに役立つテキスト通知 ("前方の道路に合流"など) は、必要に応じてEventTextListener経由のこの警告と一緒に送信できます。これは、TrafficMergeWarningOptionsを使用して有効または無効にできます。
リアル ビューの警告を取得する
RealisticViewWarningDelegateを使用すると、道路標識や複雑な合流地点の3DビューのSVG文字列データを受け取ることができます。RealisticViewWarning イベントには、道路標識と合流地点の両ビューの SVG データが含まれます。警告は複雑な合流地点に対してのみ配信されます (上を参照)。
private func setupRealisticViewWarnings() {
    var realisticViewWarningOptions = RealisticViewWarningOptions(aspectRatio: AspectRatio.aspectRatio3X4, darkTheme: false)
    visualNavigator.realisticViewWarningOptions = realisticViewWarningOptions

    visualNavigator.realisticViewWarningDelegate = self
}

// Notifies on signposts together with complex junction views.
// Signposts are shown as they appear along a road on a shield to indicate the upcoming directions and
// destinations, such as cities or road names.
// Junction views appear as a 3D visualization (as a static image) to help the driver to orientate.
//
// Optionally, you can use a feature-configuration to preload the assets as part of a Region.
//
// The event matches the notification for complex junctions, see JunctionViewLaneAssistance.
// Note that the SVG data for junction view is composed out of several 3D elements,
// a horizon and the actual junction geometry.
func onRealisticViewWarningUpdated(_ realisticViewWarning: RealisticViewWarning) {
    let distance = realisticViewWarning.distanceToRealisticViewInMeters
    let distanceType: DistanceType = realisticViewWarning.distanceType

    // Note that DistanceType.reached is not used for Signposts and junction views
    // as a junction is identified through a location instead of an area.
    if distanceType == DistanceType.ahead {
        print("A RealisticView ahead in: " + String(distance) + " meters.")
    } else if distanceType == DistanceType.passed {
        print("A RealisticView just passed.")
    }

    let realisticView = realisticViewWarning.realisticViewVectorImage
    guard let signpostSvgImageContent = realisticView?.signpostSvgImageContent,
          let junctionViewSvgImageContent = realisticView?.junctionViewSvgImageContent
    else {
        print("A RealisticView just passed. No SVG data delivered.")
        return
    }

    // The resolution-independent SVG data can now be used in an application to visualize the image.
    // Use a SVG library of your choice to create an SVG image out of the SVG string.
    // Both SVGs contain the same dimension and the signpostSvgImageContent should be shown on top of
    // the junctionViewSvgImageContent.
    // The images can be quite detailed, therefore it is recommended to show them on a secondary display
    // in full size.
    print("signpostSvgImage: \(signpostSvgImageContent)")
    print("junctionViewSvgImage: \(junctionViewSvgImageContent)")
}
realisticView.signpostSvgImageContent は realisticView.junctionViewSvgImageContent の上にオーバーレイされることになります。両方の画像を同じアスペクト比でリクエストできます。そうすると両方の画像の寸法が同じになり、左上の同じ位置にレンダリングできます。
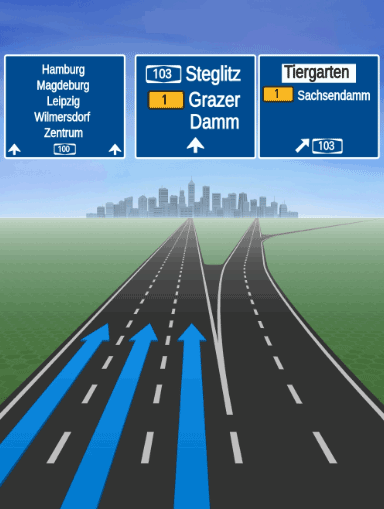
Screenshot: A junction view overlayed with a signpost image.
HERE SDK は SVG を文字列でのみ提供するため、SvgView などのサードパーティ ライブラリを使用して SVG 文字列のコンテンツをレンダリングする必要があります。正しいフォントを使用できるようにするために、HERE SDK は無料で使用できるフォント パッケージを提供しています。以下を参照してください。
注合流地点ビューのデータは、占有サイズが2MB程度に留まるように最適化されており、道路標識データの占有サイズはわずか数 KB です。ただし、利用可能な機能構成を使用して事前に画像データをプリロードしておくことをお勧めします。詳細については、「最適化に関するガイド」を参照してください。
16:9 の解像度は横向きフォーマットで使用でき、縦向きモードでも全画面を覆わずに使用できます。ただし、SVG アセットは非常に詳細であるため、第 2 画面で全画面表示することをお勧めします。
注安全監視カメラ、道路標識、リアリスティックビューなど、道路上の1つの地物について通知する位置警告の場合、一度に発生するアクティブな警告は常に1つのみです。つまり、1つの地物に対して2つの
ahead警告が同時にアクティブになるのを回避するために、それぞれのaheadイベントの後には常にpassedイベントが続きます。
使用例はGitHubの「NavigationWarners」サンプルアプリを参照してください。
注
RealisticViewVectorImage機能はベータ リリースとしてリリースされているため、いくつかのバグや予期しない動作が発生する可能性があります。関連するAPIは、廃止のプロセスを経ずに、新しいリリースに変更される可能性があります。
SVG レンダラーと HERE フォントを統合する
標識の SVG (上記を参照) をレンダリングするために、SvgView プラグインを使用することをお勧めします。さらに、SVG コンテンツでフォント ファミリーとして定義されている TTF 必須フォントも必要です。これらのフォントは、HERE SDK ディストリビューション パッケージに含まれています。
-
プラグイン ベンダーの手順に従って
SVGViewを統合します。ベンダーのライセンスで問題がないことを確認してください。CocoaPods を使用してpod 'SVGView'を実行するか、プラグインを手動で統合します。 -
コードに
import SVGViewステートメントを追加し、プラグインの統合が成功したかどうかを確認します。 -
HERE SDK ディストリビューション パッケージ (HERE SDK のバイナリも含まれているパッケージ) にある
SignpostFonts.zipアーカイブを抽出します。コンテンツを Xcode プロジェクトのフォルダーにコピーします。次に、Xcode で左側のプロジェクト ペインを右クリックして [Add files to [your project] ...]([プロジェクト] にファイルを追加...) を選択し、含める TTF フォント ファイルを選択します。これでフォントが自動的にターゲットに追加されます。 -
plistファイルを変更し、追加したフォントを指定します。
<key>UIAppFonts</key>
<array>
    <string>FiraGO-Map.ttf</string>
    <string>SignText-Bold.ttf</string>
    <string>SignTextNarrow-Bold.ttf</string>
    <string>SourceHanSansSC-Normal.ttf</string>
</array>- SVG コンテンツをレンダリングします。
private func showRealisticViews(signpostSvgImageContent: String,
                                junctionViewSvgImageContent: String) {
    var signpostSvgImageContent = signpostSvgImageContent

    // Create a View from the SVG strings with the SVGView library.
    let signpostSvgImage = SVGView(string: signpostSvgImageContent)
    let junctionViewSvgImage = SVGView(string: junctionViewSvgImageContent)

    if (signpostSvgImage.svg == nil || junctionViewSvgImage.svg == nil) {
        print("Unexpectedly, the SVG string could not be parsed.")
        return
    }

    // Define the layout for the realistic view.
    struct SVGUIView: View {
        var junctionViewSvgImage: SVGView?
        var signpostSvgImage: SVGView?
        var width: CGFloat = 0
        var height: CGFloat = 0
        var body: some View {
            ZStack {
                // Show the signpost image on top of the junction view image.
                junctionViewSvgImage
                signpostSvgImage
            }.frame(width: width, height: height)
        }
    }

    // Set the content for the realistic view.
    // We use the hosting view's frame to show the content fullscreen.
    //
    // Attention: In a production-app, be careful to not distract a driver.
    // It is recommended to show this on a secondary display that resets
    // automatically after some time or when the junction was passed.
    var realisticView = SVGUIView()
    realisticView.signpostSvgImage = signpostSvgImage
    realisticView.junctionViewSvgImage = junctionViewSvgImage
    realisticView.width = view.frame.size.width
    realisticView.height = view.frame.size.height

    // The SVGView library supports only iOS 14 and Swift UI:
    // Therefore, here we optionally need to convert the View to a UIView
    // by using a hosting controller.
    let uiView = UIHostingController(rootView: realisticView).view!

    // ... now show the view.
}
注SVG コンテンツのラスター化は、アプリ側で行う必要があります。モバイル機器の GPU によって全画面画像のレンダリングに時間がかかる場合があります。UI スレッドをブロックしないように、これをワーカー スレッドに移動することを検討してください。
現在、HERE SDK では以下の TTF フォントが提供されています。これらは、独自の商用および非商用プロジェクトで無料で使用できます。各フォントの使用にあたっては、SignpostFonts.zip アーカイブに含まれているライセンス ファイルを必ず確認してください。
- **SourceHanSansSC-Normal.ttf:**このフォントは主にマカオ、台湾、香港で使用されます。
- **FiraGO-Map.ttf:**このフォントは主にイスラエルで使用されます。
- **SignText - Bold.ttf:**このフォントは主にベトナムで使用されます。
- **SignTextNarrow-Bold.ttf:**このフォントは、上記の国を除くすべての国で使用されます。
注SVG コンテンツで指定されているフォント ファミリーが見つからない場合、通常、選択した SVG プラグインでデフォルトのフォントがレンダリングされますが、想定どおりに表示されない場合があります。
環境ゾーンの警告を取得する
環境ゾーンとは空気の質を改善し大気汚染を減らすために特定の制約や規制が施行されている市内または地域内の指定区域のことで、低排気ガス規制ゾーン (LEZ) やクリーン エア ゾーン (CAZ) とも呼ばれます。これらのゾーンは、二酸化窒素 (NO2) や粒子状物質 (PM) といった高レベルの汚染物質を排出する車の進入を阻止または制限することを目的としています。
環境ゾーンの具体的な規則や規制は、市や国によって異なる可能性があります。通常、一定の排出基準を満たさない車はゾーンへの進入を禁止されるか、料金を支払う必要があります。
環境ゾーンの指定とそれに付随する規則は、通常、運輸局や環境局と連携して、地方自治体または地域当局によって決定されます。
HERE SDK では、次のような先にある環境ゾーンを通知します。
// Conform to EnvironmentalZoneWarningDelegate.
func onEnvironmentalZoneWarningsUpdated(_ environmentalZonesWarnings: [heresdk.EnvironmentalZoneWarning]) {
    // The list is guaranteed to be non-empty.
    environmentalZonesWarnings.forEach { environmentalZoneWarning in
        let distanceType = environmentalZoneWarning.distanceType
        if distanceType == .ahead {
            print("A EnvironmentalZone ahead in: \(environmentalZoneWarning.distanceInMeters) meters.")
        } else if distanceType == .reached {
            print("A EnvironmentalZone has been reached.")
        } else if distanceType == .passed {
            print("A EnvironmentalZone just passed.")
        }

        // The official name of the environmental zone (example: "Zone basse émission Bruxelles").
        let name = environmentalZoneWarning.name
        // The description of the environmental zone for the default language.
        let description = environmentalZoneWarning.description.defaultValue
        // The environmental zone ID - uniquely identifies the zone in the HERE map data.
        let zoneID = environmentalZoneWarning.zoneId
        // The website of the environmental zone, if available - nil otherwise.
        let websiteUrl = environmentalZoneWarning.websiteUrl
        print("environmentalZoneWarning: description: \(String(describing: description))")
        print("environmentalZoneWarning: name: \(name)")
        print("environmentalZoneWarning: zoneID: \(zoneID)")
        print("environmentalZoneWarning: websiteUrl: \(websiteUrl ?? "nil")")
    }
}
2 か月前の更新