

Try requests in the Tour Planning API demo tool
The HERE Tour Planning API demo tool is an interactive, browser-based playground for visualizing and experimenting with tour planning requests. You can build a problem from scratch, or load a ready-made sample straight from this documentation with the Open in Demo Tool button.
With the demo tool, you can perform the following actions:
- Build a problem from scratch by placing jobs and shifts on the map.
- Edit the JSON of a preloaded problem and submit it to the HERE Tour Planning API.
- Inspect the resulting or a preloaded solution on an interactive map, with per-stop details and route polylines.
- Download the resulting problem or solution JSON for use in your own integration.
Note
Viewing a solution works without credentials as the demo tool only renders an earlier API response. Submitting a problem to the API (to compute a fresh solution) requires a HERE API key that you enter in the demo tool.
Prerequisites
- A modern browser with JavaScript enabled.
- Required to submit problems: A HERE API key. For information on how to create an API key on the HERE platform, see How to authorize with an API key.
Interface overview
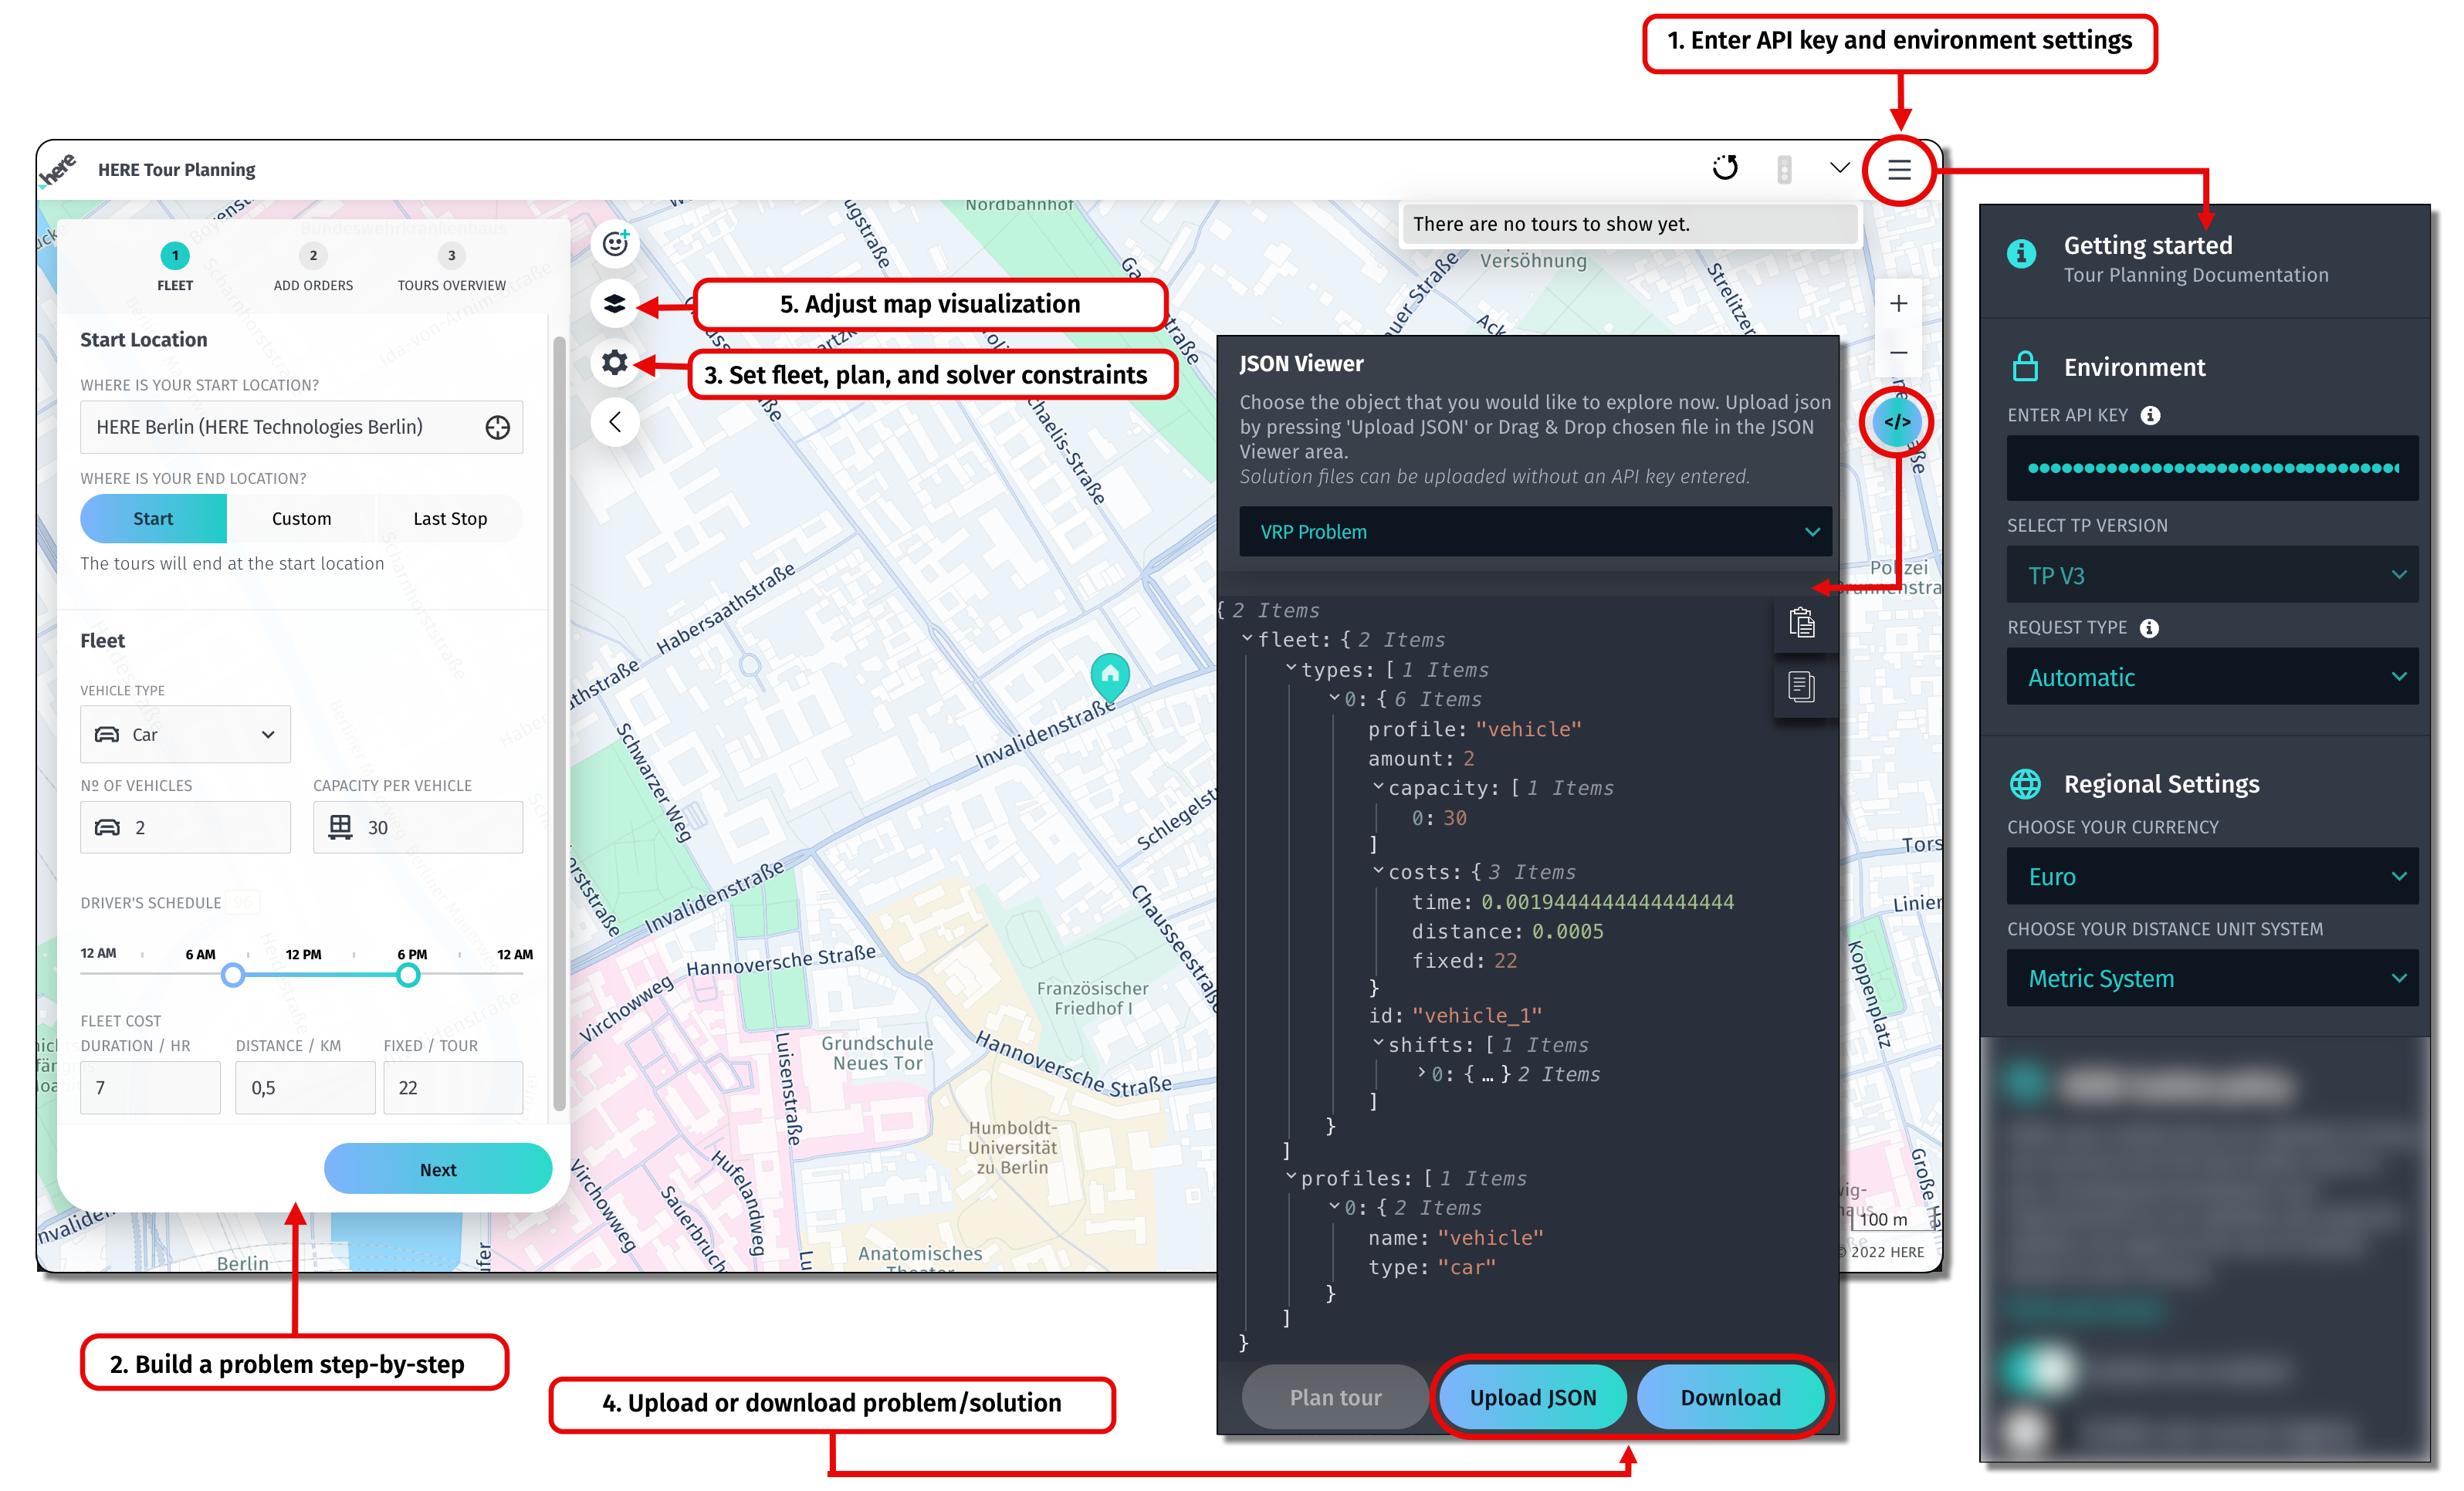
The following diagram labels every control that is referenced in the sections that follow. Use it to orient yourself before completing any specific workflows.
Provide credentials in the demo tool
Before you can submit a problem to the HERE Tour Planning API, add your API key in the demo tool.
- Click the menu icon in the top-right corner of the header to open the Environment panel.
- Paste your key into the Enter API Key field.
- Optional: Adjust the adjacent settings if needed:
- Select TP Version - pick the Tour Planning API version to target (currently only V3 is supported).
- Request Type - leave on Automatic to let the tool choose synchronous or asynchronous based on problem size, or force one explicitly.
- Regional Settings - choose your currency and distance unit system.
- Close the panel. Your key is stored in your browser session.
Build a problem from scratch
To experiment with your own data instead of a sample from the documentation, open the demo tool directly and build a problem in its 3-step wizard.
Tip
You can skip the wizard if you already have a HERE Tour Planning problem JSON from an earlier session or your own integration. To use your problems in the demo system, open the JSON Viewer (the
</>icon next) and click Upload JSON.
Follow these steps to build a problem step-by-step:
- Go to https://demo.tourplanning.ext.here.com/ in your browser.
- Make sure your API key is entered (see Provide credentials in the demo tool).
- Work through the wizard in the left panel:
-
1. Fleet - Set your start and end location, choose vehicle type, number of vehicles, capacity per vehicle, driver's schedule, and fleet cost model, as shown in the following example:
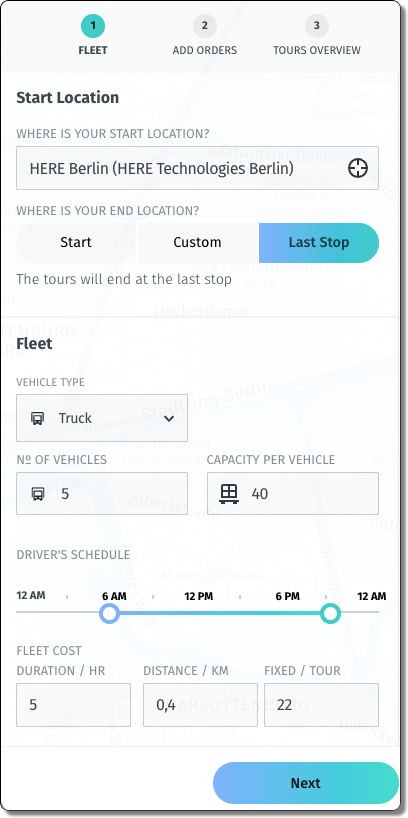
For more information on each setting and its impact, see Fleet.
-
2. Add orders - Populate the orders (jobs) your fleet needs to fulfill by using any of the available methods. For more information, see Ways to add orders.
-
3. Tours Overview - Submit the problem and inspect the resulting tours on the map. For more information, see Review your tours.
-
- Optional: Download the problem and solution JSON from the demo tool to reuse in your own integration or share with your team.
For more information, see Follow best practices for problem formulation.
Ways to add orders
Step 2 of the wizard offers multiple methods for populating orders. You can mix them as needed, for example, you can prefill orders with Demo and then add a few more with Manual or by right-clicking on the map.
Bulk-load orders from a CSV file.
Important
Do not use real end user or customer data. Upload only test or anonymized data.
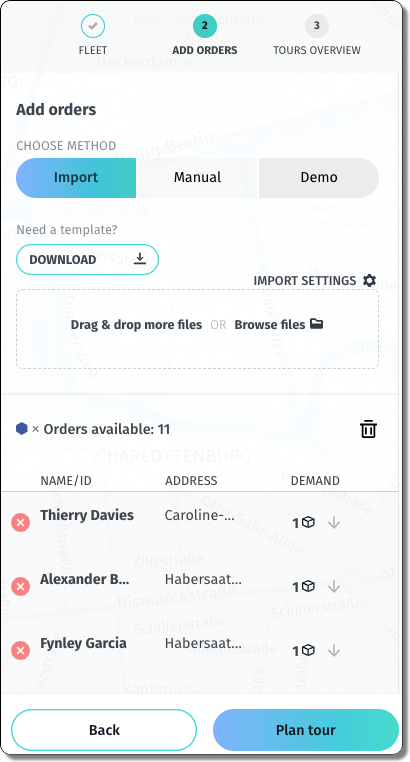
- Under Choose method, select Import.
- Click Download to grab a CSV template if you don't already have one that matches the expected schema.
- Drag your CSV into the drop zone, or click Browse files to select it. You can use the Import settings option to map columns from your CSV file to the properties required by the API.
- Optional: Modify the resulting orders, as needed. For example, you can:
- Adjust order location by dragging it on the map, or you can modify any of its properties (such as
time,duration, and so on) in the JSON Viewer. - Add an order by right-clicking on a map.
- Remove an order by right-clicking that order.
- Click Plan tour to submit your problem to the HERE Tour Planning API.
See the following figure for reference:
Enter orders one at a time using a form.
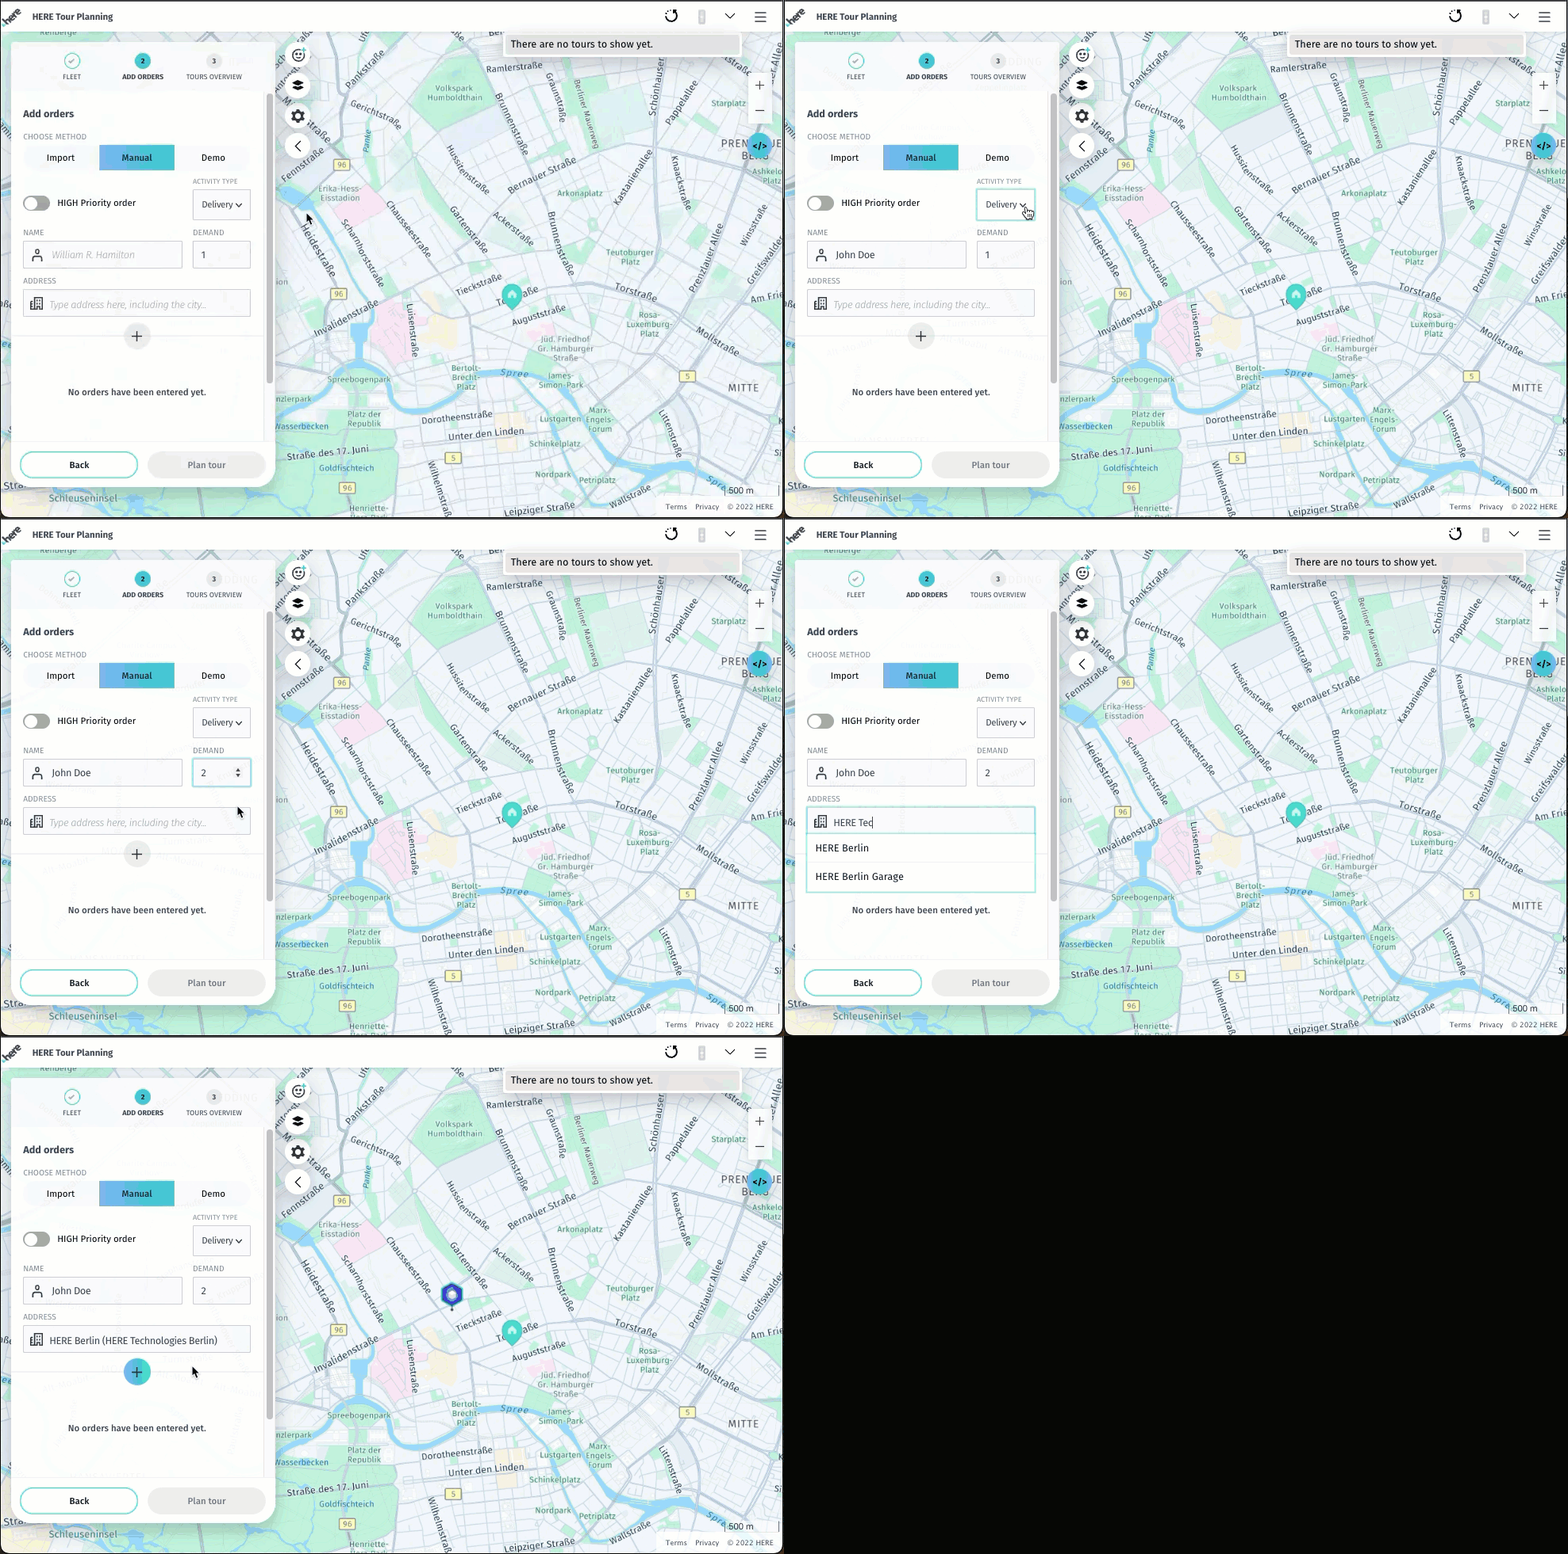
- Under Choose method, select Manual.
- For each order, set:
- Name - Enter a name or a label for the order, for example John Doe.
- Activity type - Select either Pickup or Delivery.
- Demand - Specify the quantity for the vehicle to pick up or drop off.
- Address - Set the order location.
- HIGH Priority order (optional) - Toggle on to prioritize this order.
- Click the + button to add the order to the list. Repeat this step to add more orders, as needed.
- Optional: Modify the resulting orders, as needed. For example, you change order location by dragging it on the map, or you can modify any of its properties (such as
time,duration, and so on) in the JSON Viewer. You can also add or remove orders. - Click Plan tour to submit your problem to the HERE Tour Planning API.
See the following figure for reference:
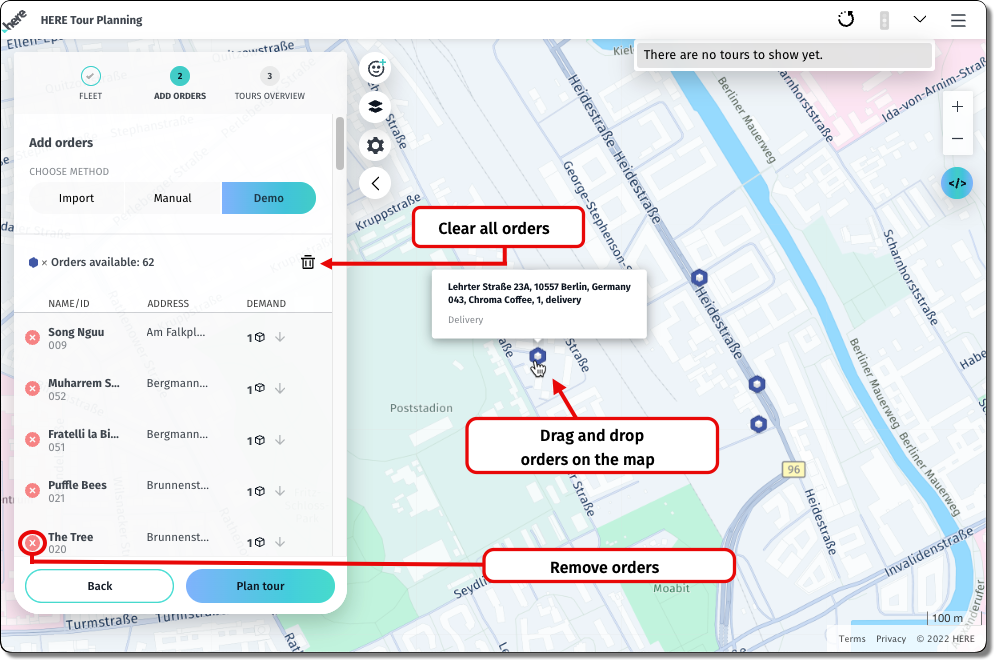
Load a preset batch of sample orders to experiment without preparing data.
- Under Choose method, select Demo.
- The demo tool populates a ready-made list of sample orders on the map and in the orders panel.
- Optional: Modify the resulting orders, as needed. For example, you change order location by dragging it on the map, or you can modify any of its properties (such as
time,duration, and so on) in the JSON Viewer. You can also add or remove orders. - Click Plan tour to submit your problem to the HERE Tour Planning API.
See the following figure for reference:
Turn any point on the map into an order.
- Right-click anywhere on the map. The demo tool resolves the point to an address and shows a context menu.
- Choose the activity type:
- Add Address as Pickup
- Add Address as Delivery
- Add Address as PUDO - Enter a PUDO ID, duration, and the position in the tour sequence to assign it to (for example, Assign at first stop).
For more information, see Job groups with PUDOs. - Add Address as Reload - Enter the reload duration.
For more information, see Reloads in VehicleType.
- Alternatively, choose Copy Address to copy the resolved address for use elsewhere. For example, you can use the copied address when adding orders manually.
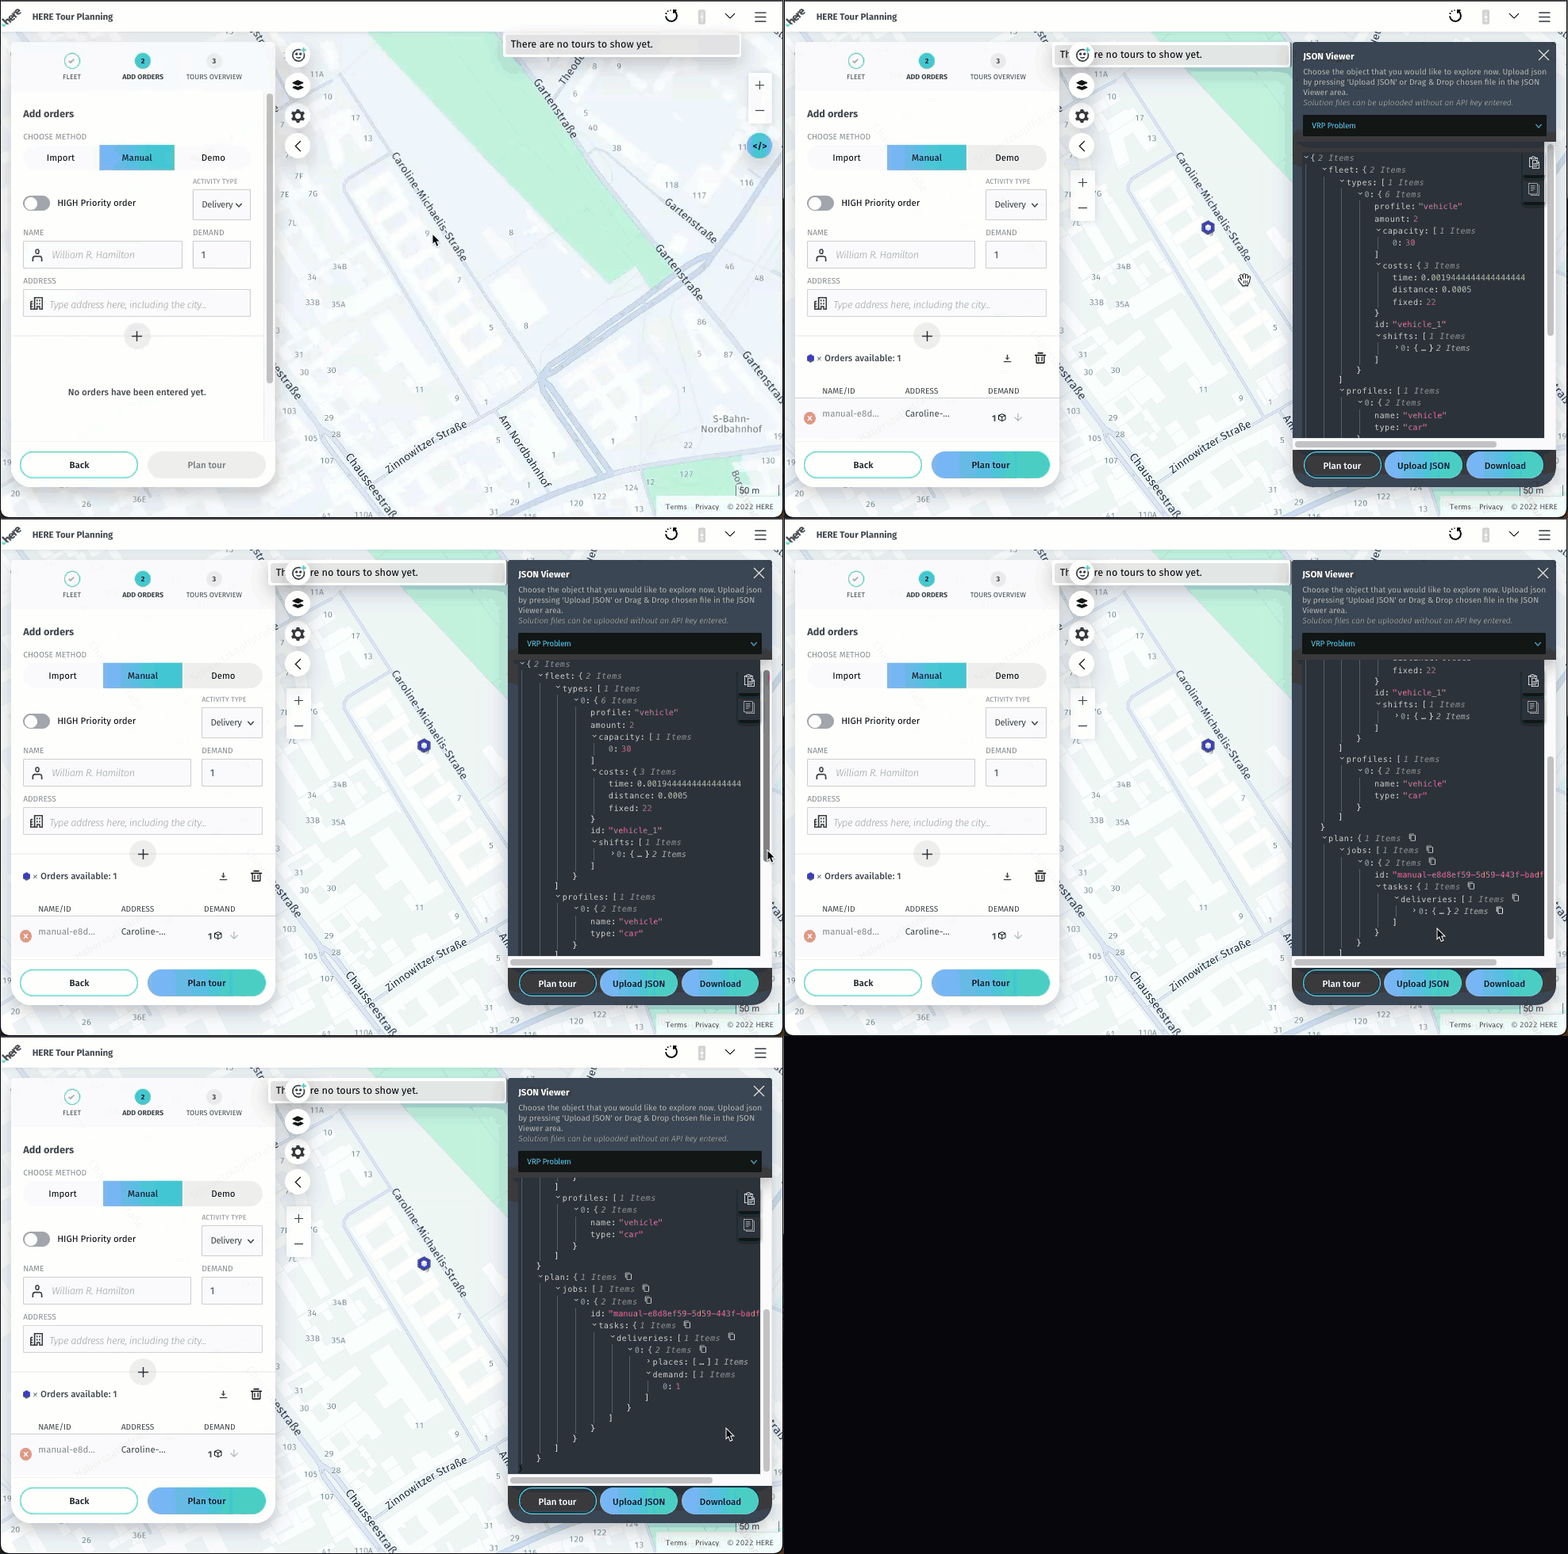
- Optional: Modify the resulting orders, as needed. For example, you change order location by dragging it on the map, or you can modify any of its properties (such as
time,duration, and so on) in the JSON Viewer. You can also add or remove orders. - Click Plan tour to submit your problem to the HERE Tour Planning API.
The following figure shows how to add orders by right-clicking on a map as well as the ability to subsequently edit the new order in JSON Viewer:
Review your tours
Step 3 of the wizard, Tours Overview, is where you inspect the API's response to the problem you submitted. After you click Plan tour in the previous step, the wizard is replaced by the Tours overview panel and the map renders each vehicle's tour with color-coded numbered stops connected by route polylines.
From here, you can review your solution at two levels of detail:
- Tours overview - Aggregate statistics for the full solution.
- Tour details - A drill-down into one specific vehicle's tour.
Tours overview
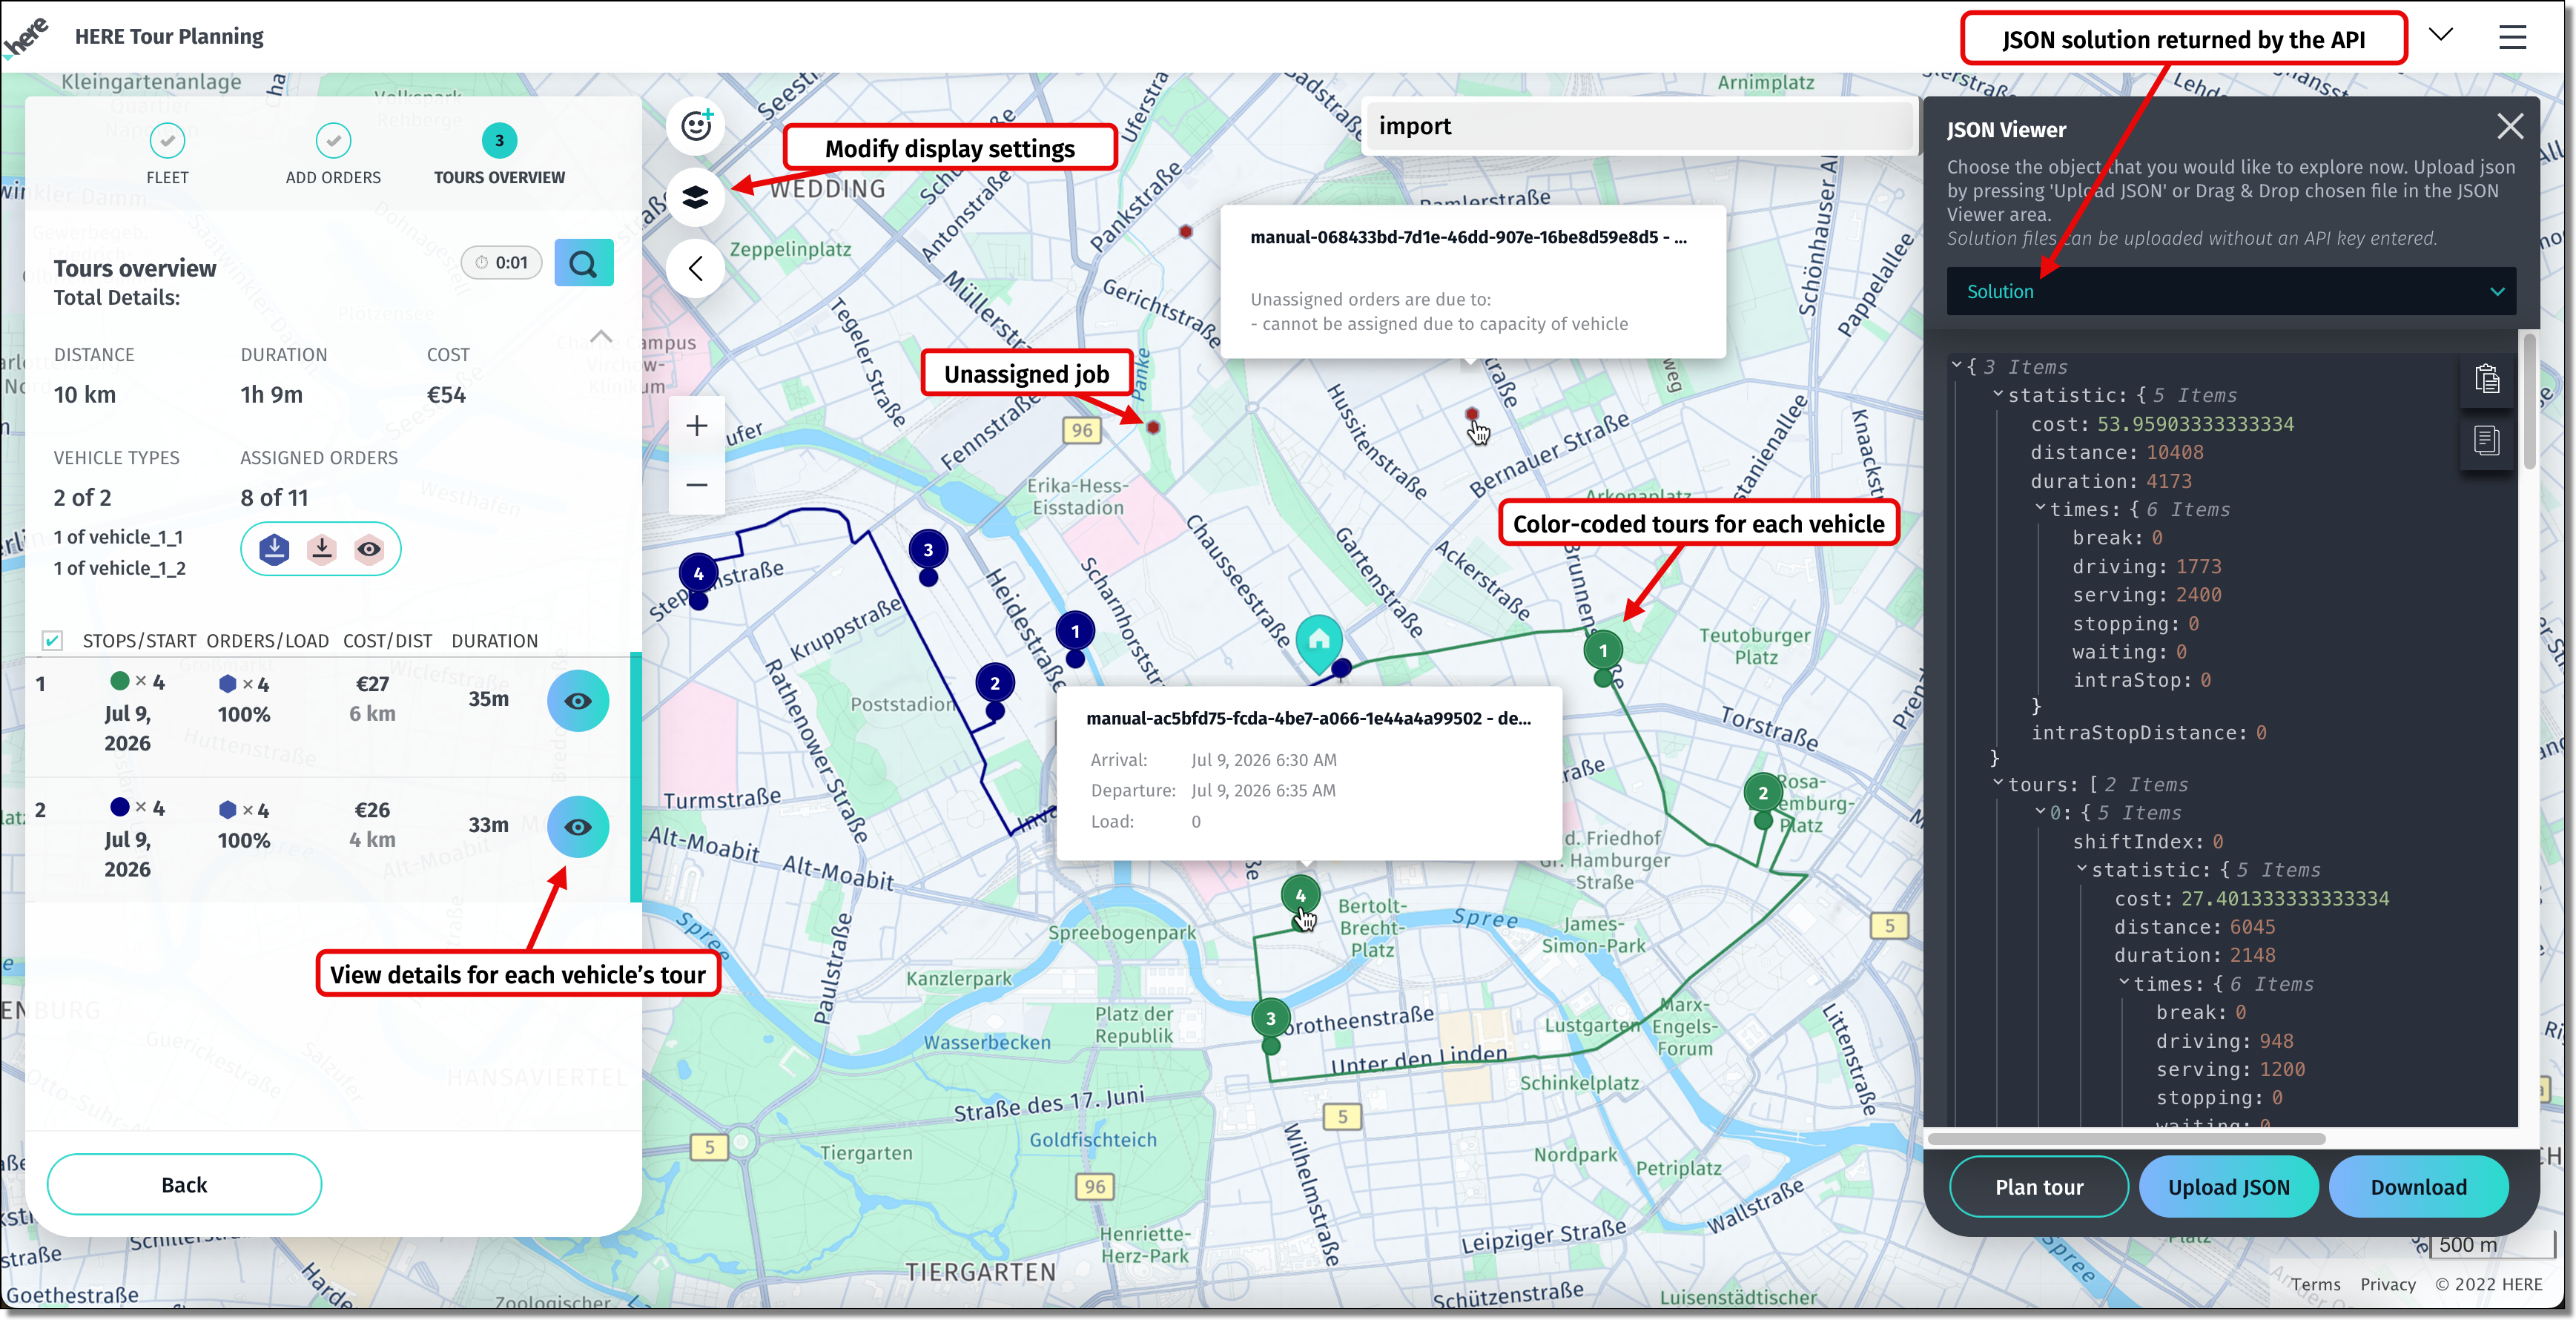
The Tours overview panel summarizes the whole solution:
- Total Details - Combined distance, duration, and cost across every tour.
- Vehicle types and Assigned orders - Counters that show how many vehicles the API used out of the fleet (for example, 2 of 2) and how many orders it fulfilled out of those requested (for example, 8 of 11). A gap in either counter indicates that the API either used fewer vehicles than provided or could not assign some jobs.
- Per-tour list - One row per tour with STOPS/START, ORDERS/LOAD, COST/DIST, and DURATION columns for side-by-side comparison.
Click the Eye icon on a tour row to drill into its full Tour details.
Unassigned jobs appear directly on the map as separate markers. Click a marker to see the reason the API could not assign it (for example, "cannot be assigned due to capacity of vehicle"). For more information, see Troubleshoot unassigned jobs.
See the following figure for reference:
Tour details
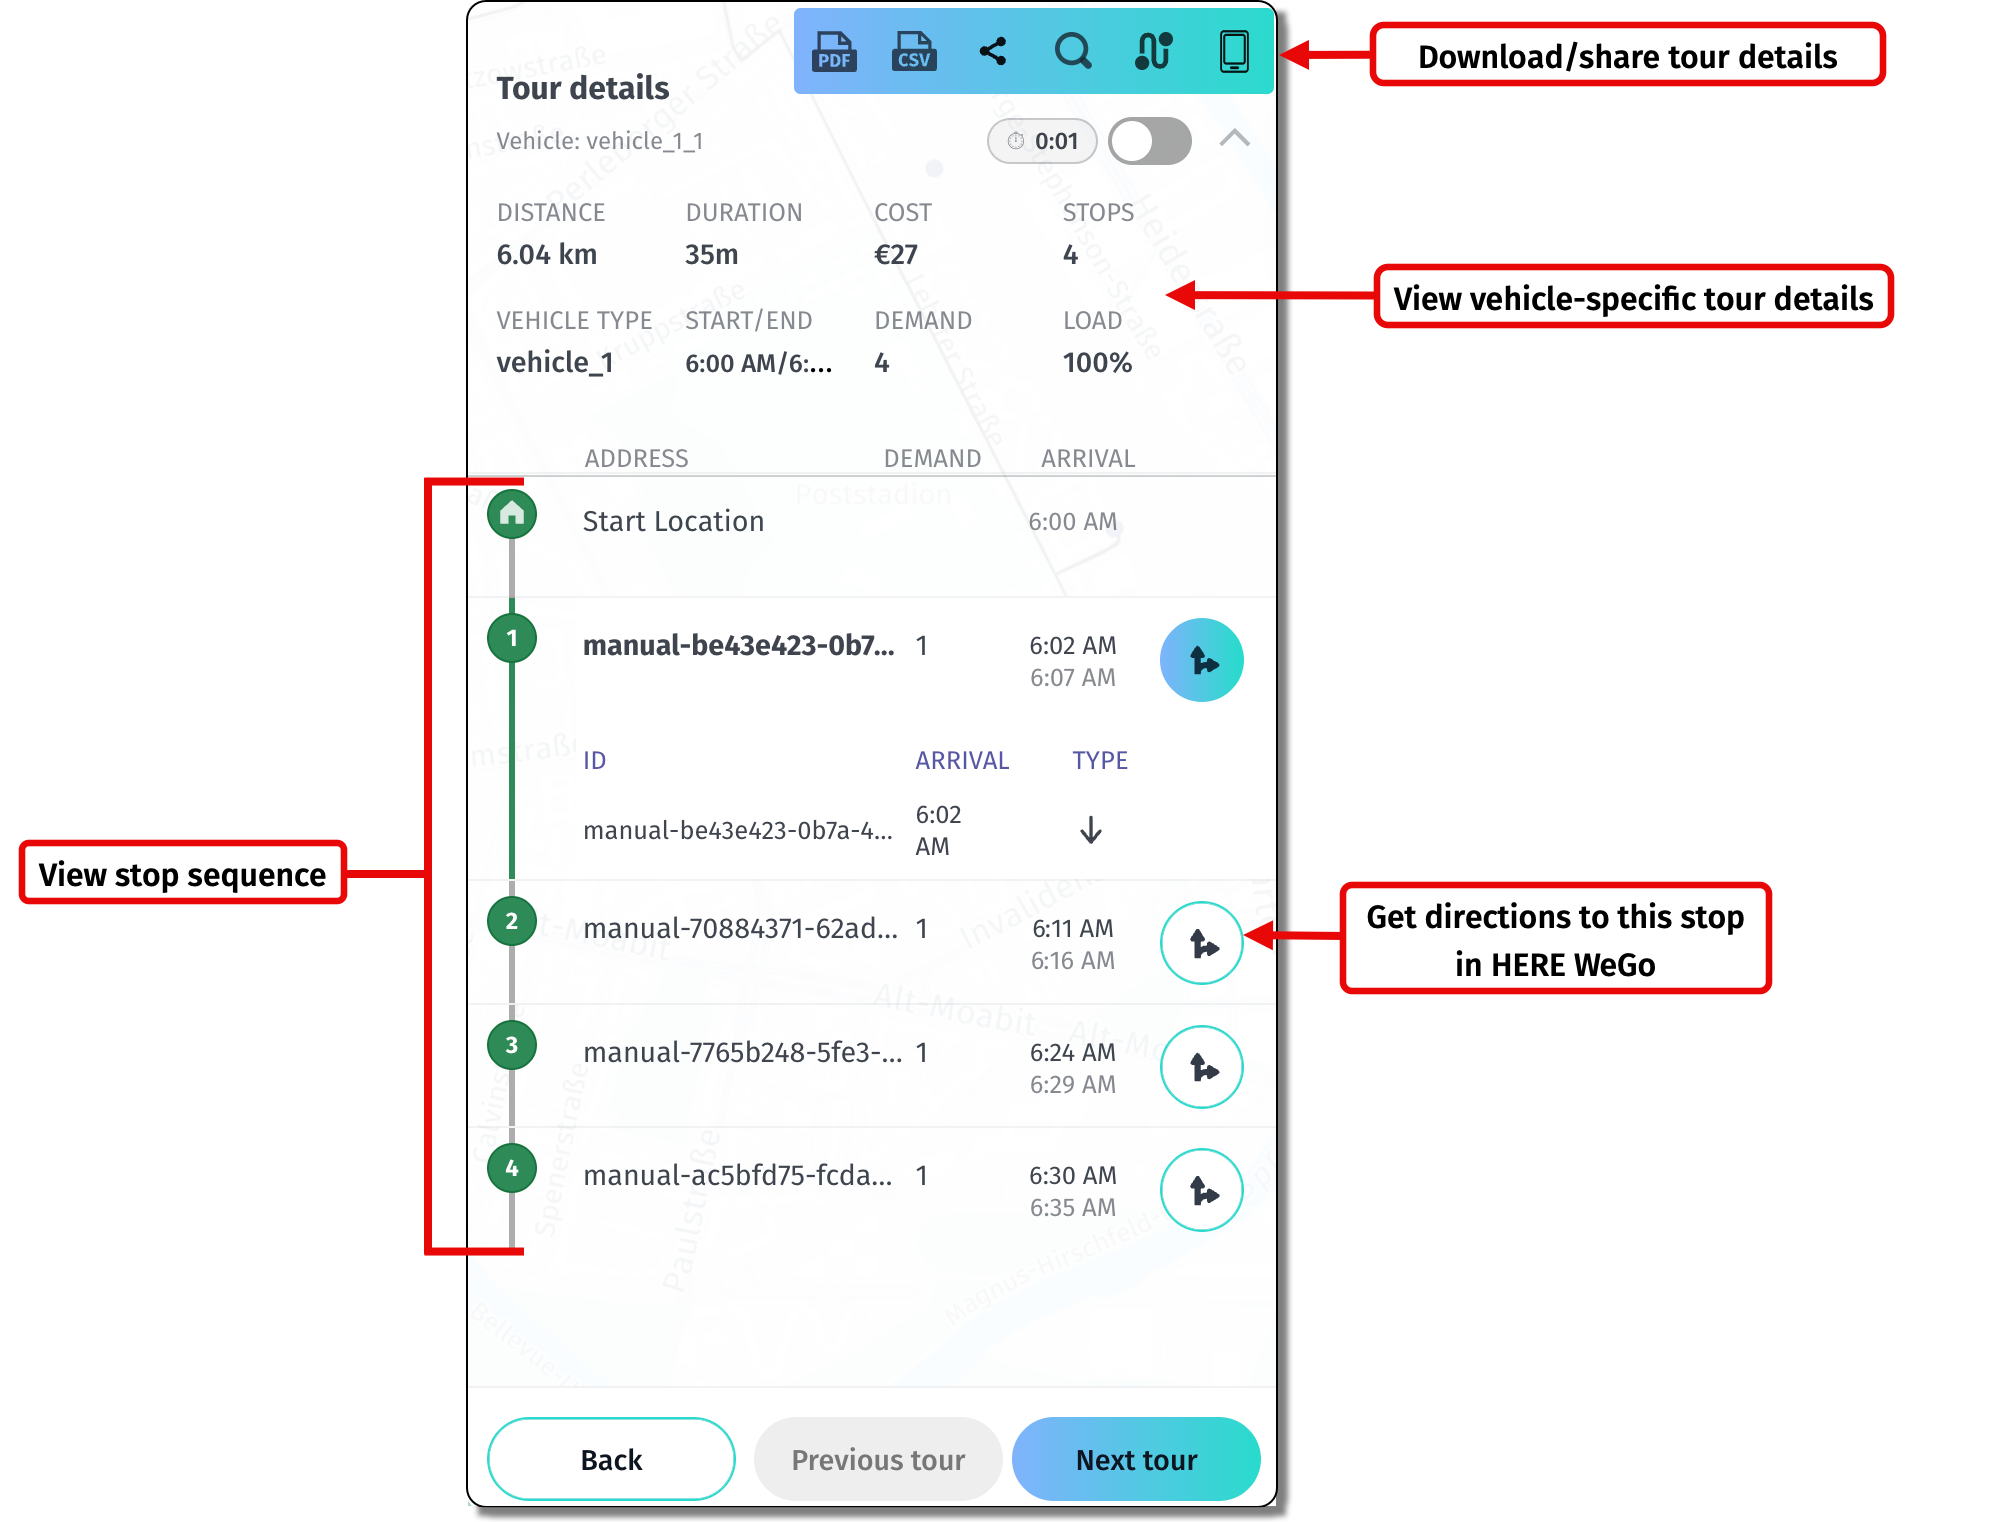
Clicking the Eye icon on a tour opens the Tour details view for that vehicle:
- Header statistics - DISTANCE, DURATION, COST, STOPS, VEHICLE TYPE, START/END, DEMAND, and LOAD.
- Stop sequence - A scrollable list of every stop with its ID, arrival time, and departure time.
- Directions icon (next to each stop) - Opens turn-by-turn directions to that stop from the previous one in HERE WeGo.
- Previous tour / Next tour - Navigate between the tours in the solution. Click Back to return to the Tours overview.
See the following figure for reference showing the main Tour details panel components:
Export, save, or iterate
Use the toolbar above the Tour details panel to export the result as PDF or CSV, share the tour, or search stops. Click Download in the JSON Viewer to save the raw solution JSON.
To iterate on the same problem, adjust constraints via the Advanced tour settings, or edit the JSON directly in the JSON Viewer, then click Plan tour again to run the solver on the updated payload.
Open a sample from the docs
Wherever you see a sample JSON payload in this documentation, look for the Open in Demo Tool button directly below the JSON block:

This button lets you gain hands-on experience with the use cases demonstrated in the product documentation. For example, you can test new features or adjust sample problems and solutions to meet your specific business needs.
To use the button, follow these steps:
- Click Open in Demo Tool. A new browser tab opens at
https://demo.tourplanning.ext.here.com/. - Wait for the demo tool to finish loading. The sample loads automatically as soon as the tool is ready.
- Explore the loaded payload in the Tours overview, Tour details, and JSON Viewer panels as described in previous sections.
- For problem JSON files: Expand JSON Viewer and then click Plan P
Supported payload types
The Open in Demo Tool button works with both kinds of JSON samples in the documentation:
| Payload type | What the demo tool does | Credentials needed |
|---|---|---|
Problem JSON (a fleet + plan) | Loads the jobs, shifts, and vehicles onto the map for editing. Click Plan tour in the JSON Viewer to submit it to the Tour Planning API. | Required. Enter your API key in the Environment panel first. |
Solution JSON (a statistic + tours) | Renders the computed tours on the map and shows per-stop timing, load, and distance. | None |
Adjust advanced settings
You can refine what the demo tool shows and how the API plans tours by modifying the map display settings as well the operational constraints (or objectives) that the optimization algorithm uses to produce solutions. Using the settings is optional as the defaults produce a working plan.
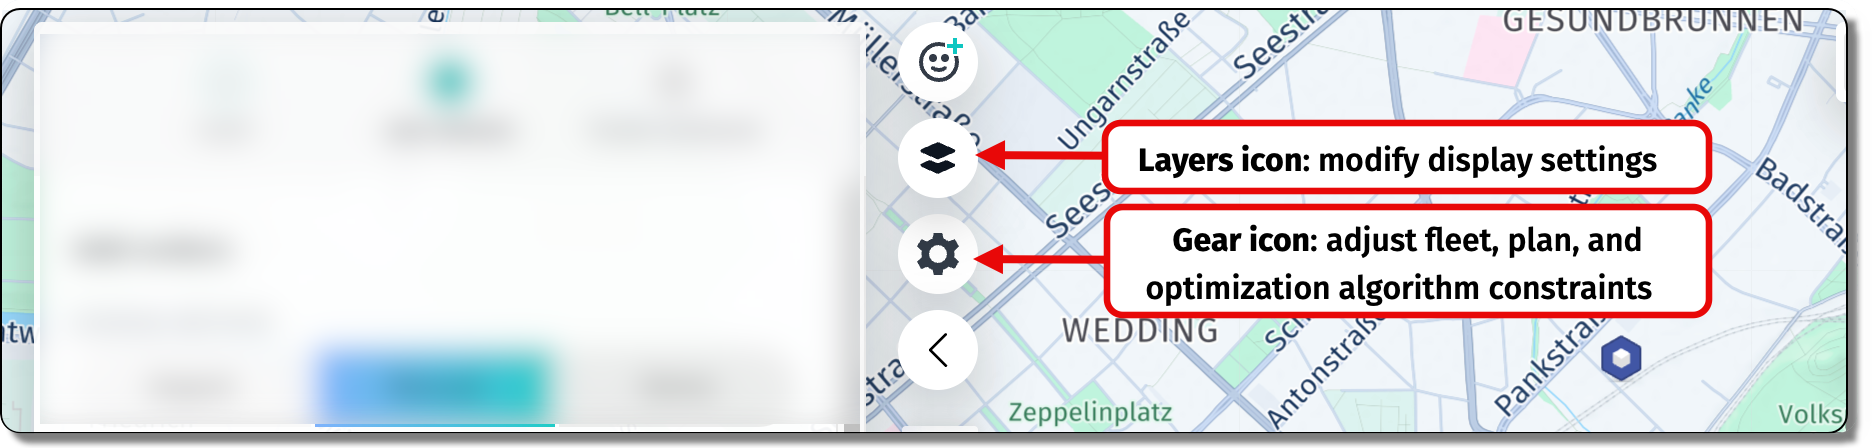
See the following figure for reference:
Modify display settings
Click the Layers icon in the map toolbar to open Map Settings. Options are split across two tabs:
- General - Control the base map behavior. Toggle Cluster Job Map Markers to group nearby markers, or switch to Satellite View.
- Solution - Adjust how tours render on the map. These options allow you to:
- toggle visibility of stops and routes
- cluster stop markers
- apply gradient coloring for direction
- switch between real polylines and straight lines
- animate travel direction
- draw convex or concave hulls around tour stops
- hide all route polylines
- show intersections
- hide non-highlighted tours
Click Done to apply, or Reset Default to revert. For background on the underlying route geometry, see Obtain route polylines for the tour.
Adjust fleet, plan, and optimization algorithm constraints
Click the Gear icon to open Tell us how we can better plan your trips section that provides the advanced tour settings. The following tabs cover fleet constraints, plan requirements, and optimization algorithm behavior:
- Fleet - Control vehicle-level constraints:
- Territories - Restrict vehicles to geographic zones. For more information, see Optimize tours by territories.
- Skills - Match jobs to vehicles by skill tag. For more information, see Assign jobs based on skills.
- Categories - Group vehicles by category, used with mixed-load restrictions. For more information, see Define mixed load restrictions.
- Speed Factor - Adjust the multiplier on default vehicle speeds (for example,
1= default). - Traffic - Set the traffic mode (default:
Automatic). For more information, See Understand traffic modes. - Add Vehicle Limit - Cap the number of vehicles the API is allowed to use.
- Plan - Adjust plan-level requirements:
- Positions - Control task order on the job or tour-level. For more information, see Control job task position.
- Groups - Group jobs that must be served together. For more information, see Assign jobs to groups.
- Priority - Allow priority ordering. For more information, see Prioritize jobs.
- Max Time On Vehicle - Cap how long an item can stay on a vehicle. For more information, see Limit maximum shift time.
- Config - Adjust the optimization algorithm behavior:
- Termination criteria - Set Max Time / Sec (total solve time cap) and Stagnation Time / Sec (stop early if no improvement). For more information, see Configuration.
- Objectives - Choose what the solver optimizes for: minimize unassigned jobs, cost, or distance; minimize/maximize tour count; optimize task order. See Use objective functions for specific optimization goals for the full list and semantics.
Click Done to apply, or Reset Default to revert.
Note
These UI settings map to fields in the Tour Planning problem JSON. After configuring them in the panels, open the JSON Viewer to see the equivalent structure - a useful way to learn the API by example.
Troubleshooting demo tool issues
You need to enter an apiKey to upload orders.
Your API key is missing, expired, or not entitled to the Tour Planning API. Verify the key on the HERE platform and re-enter it in the Environment panel.
Pasted content is not a valid JSON.
Check your JSON syntax for common issues, for example:
- Excess commas: Remove trailing commas before closing brackets
]or braces} - Missing quotes: Ensure all property names and string values are enclosed in quotes
- Mismatched brackets: Verify that all opening
[and{have corresponding closing]and} - Single quotes: JSON requires double quotes
", not single quotes'
Tip: You can use a JSON validation tool to identify and fix syntax errors before pasting.
Object has properties not allowed by the schema or missing required properties.
Check that all property names match the API schema exactly:
- Property names are case-sensitive, for example,
durationis different fromDuration - Review the error message for the exact property names that the API expected
See the API reference to verify the correct property names and structure.
A pop-up blocker prevented the demo tool from opening
Allow pop-ups for the documentation origin, then click Open in Demo Tool again.
Next steps
- For credential setup and your first API call, see Get started with HERE Tour Planning API.
- Learn how to visualize tour geometry once you have a solution in Obtain route polylines for the tour.
- Explore a full end-to-end scenario for HERE Tour Planning in Optimize routes with side-of-street preferences.
Updated 2 months ago