Migrate to the HARP engine
Migrate to the HARP engine.
Note
The 3.1 version of this API has been deprecated. For continued support and feature development, upgrade to the latest 3.2 version.
The HARP engine in the HERE Maps API for JavaScript is a powerful tool for developers, offering a consistent 3D map rendering experience across web and native platforms. With direct integration into the explore base map style, user-friendly customization options, and support for all POI categories, HARP empowers developers to create engaging and up-to-date map-based applications that meet the evolving needs of their users.
Overview
The HARP engine offers a range of customer benefits, enhancing the map rendering experience for developers and end-users alike:
-
Alignment with native HERE SDK: The HARP rendering engine in the Web SDK (HERE Maps API for JavaScript) aligns seamlessly with its counterpart in the native HERE SDK. This alignment encompasses style specification and interpretation, ensuring a consistent and uniform map rendering experience across both web and native environments. This ensures that maps both look and behave consistently regardless of the platform.
-
Directly connected to the
explorebase map style: HARP is directly connected to theexplorebase map style, offering a modern and up-to-date map style. This eliminates the need to rely on oldermiami-based map styles, which are now in maintenance mode. By using HARP, developers can provide users with a contemporary and visually appealing map experience. -
User-friendly HERE Style Editor: To further enhance customization, developers have access to an intuitive HERE Style Editor. This web-based tool simplifies the process of customizing the base map style, allowing for easy adjustments of colors, labels, and symbols. This allows developers to tailor maps to their specific application needs without the complexity of manual styling.
-
Comprehensive POI categories: HARP elevates the map experience by providing a diverse range of Points of Interest (POI) categories. This functionality empowers users to seamlessly explore various places and services directly on the map, ensuring a comprehensive navigation experience. To further enhance user interaction, incorporating additional POIs from the Advanced Points of interest category can significantly enrich their exploration.
-
Introduction of New Features: HARP is continually evolving to introduce new features and enhancements. Developers can take advantage of these updates to keep up with the map-based application development trends, delivering innovative and feature-rich solutions.
-
Full 3D rendering engine (planned): HARP will provide a full-fledged 3D rendering engine, well-equipped to handle the rendering of 3D geographic content. This capability will open up new possibilities for creating immersive and visually engaging map-based applications in the future.
-
CSP-compliant: Integrated into Maps API for JavaScript, the library NPM bundle containing the HARP engine (
mapsjs.harp.bundle.js) is compliant with the following Content Security Policy directives:script-src: self: Specifies the valid sources for JavaScript files that can be executed on a web page.worker-src: blob: Specifies the valid sources for web workers to prevent security threats, for example, cross-site scripting.
Switch to the HARP engine
Follow these steps to change the rendering engine type from PD2 or WEBGL to HARP. These steps apply to use cases involving the default layers to initialize the map.
-
In your HTML file, import the
mapsjs-harp.jslibrary by including the following element:<script type="text/javascript" src="https://js.api.here.com/v3/3.1/mapsjs-harp.js"></script> -
In the
<script>element of your HTML file, define a variable to hold the HARP engine type, as shown in the following example:const engineType = H.Map.EngineType['HARP']; -
Ensure that the default map types are generated with the HARP rendering engine by passing the
engineTypevariable within thecreateDefaultLayers()method:const defaultLayers = platform.createDefaultLayers({ engineType }); -
Set the engine type for the
H.Mapinstance:const map = new H.Map( document.getElementById("mapContainer"), // Select a map style defaultLayers.vector.normal.map, { engineType, zoom: 10, center: { lat: 52.5, lng: 13.4 } });
Note
- Ensure that the style you selected is available when using the HARP engine. For more information, see the
createDefaultLayers()method documentation in the API Reference.- For convenience, such as filling the
platform.createDefaultLayers()method and maintaining backward compatibility during the migration period, the HERE Maps API for JavaScript sends/inforequests to services like the end-of-life Map Tile API 2.1 service, for examplehttps://1.base.maps.ls.hereapi.com/maptile/2.1/info?output=json. After you switch to the HARP engine as described in this document, ignore these/inforequests, which are scheduled for removal in the future.
Sample map rendered with the HARP engine
The following code snippets provide working samples for both the HTML file and the embedded JavaScript code that involve HARP as the underlying engine:
HTML file
<!DOCTYPE html>
<html>
  <head>
    <script type="text/javascript"
        src="https://js.api.here.com/v3/3.1/mapsjs-core.js"></script>
    <script type="text/javascript"
        src="https://js.api.here.com/v3/3.1/mapsjs-harp.js"></script>
    <script type="text/javascript"
        src="https://js.api.here.com/v3/3.1/mapsjs-service.js"></script>
    <script type="text/javascript"
        src="https://js.api.here.com/v3/3.1/mapsjs-mapevents.js"></script>
    <script type="text/javascript" charset="utf-8"
        src="https://js.api.here.com/v3/3.1/mapsjs-ui.js" ></script>
    <link rel="stylesheet" type="text/css"
        href="https://js.api.here.com/v3/3.1/mapsjs-ui.css" />
  </head>
  <body>
    <div style="width: 800px; height: 400px" id="mapContainer"></div>
    <script>
     // JavaScript code goes here.
    </script>
  </body>
</html>
JavaScript code
// Initiate and authenticate your connection to the HERE platform:
const platform = new H.service.Platform({
    'apikey': 'YOUR_HERE_APIKEY'
});

// Initialize the engine type:
const engineType = H.Map.EngineType['HARP'];

// Obtain the default map types from the platform object:
const defaultLayers = platform.createDefaultLayers({
    engineType
});

// Instantiate (and display) a map:
const map = new H.Map(
    document.getElementById("mapContainer"),
    defaultLayers.vector.normal.map, {
        engineType,
        zoom: 10,
        center: {
            lat: 52.5,
            lng: 13.4
        }
    });

// MapEvents enables the event system.
// The behavior variable implements default interactions for pan/zoom (also on mobile touch environments).
const behavior = new H.mapevents.Behavior(new H.mapevents.MapEvents(map));

// Enable dynamic resizing of the map, based on the current size of the enclosing cntainer
window.addEventListener('resize', () => map.getViewPort().resize());

// Create the default UI:
const ui = H.ui.UI.createDefault(map, defaultLayers)
Sample map
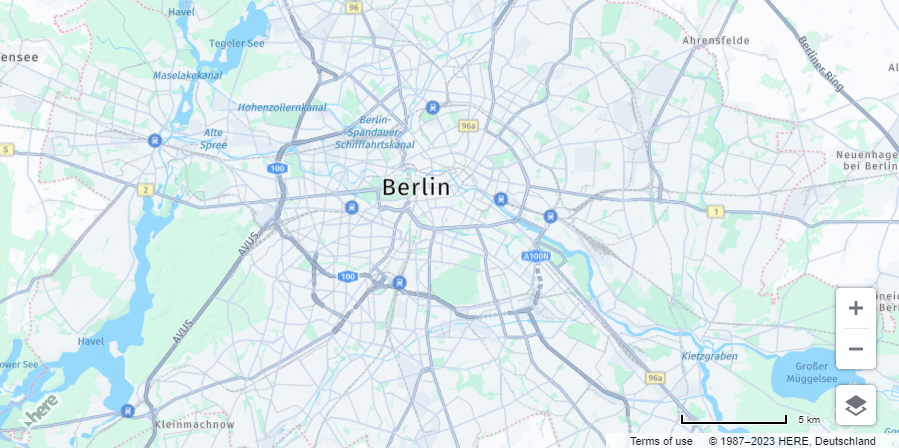
The following figure shows the map rendered by using the configuration from the preceding samples:
Note
As a result of the migration to the HARP engine, the
MapSettingsControlcomponent used to toggle the satellite view, display traffic conditions, and view incidents, automatically switches to the following services:
- HERE Traffic Vector Tile API v2 for traffic flow and incident data.
- HERE Vector Tile API v2 and HERE Raster Tile API v3 for the hybrid-based satellite view, in which:
- HERE Vector Tile API provides features and labels to render over the satellite map.
- HERE Raster Tile API provides background satellite map images.
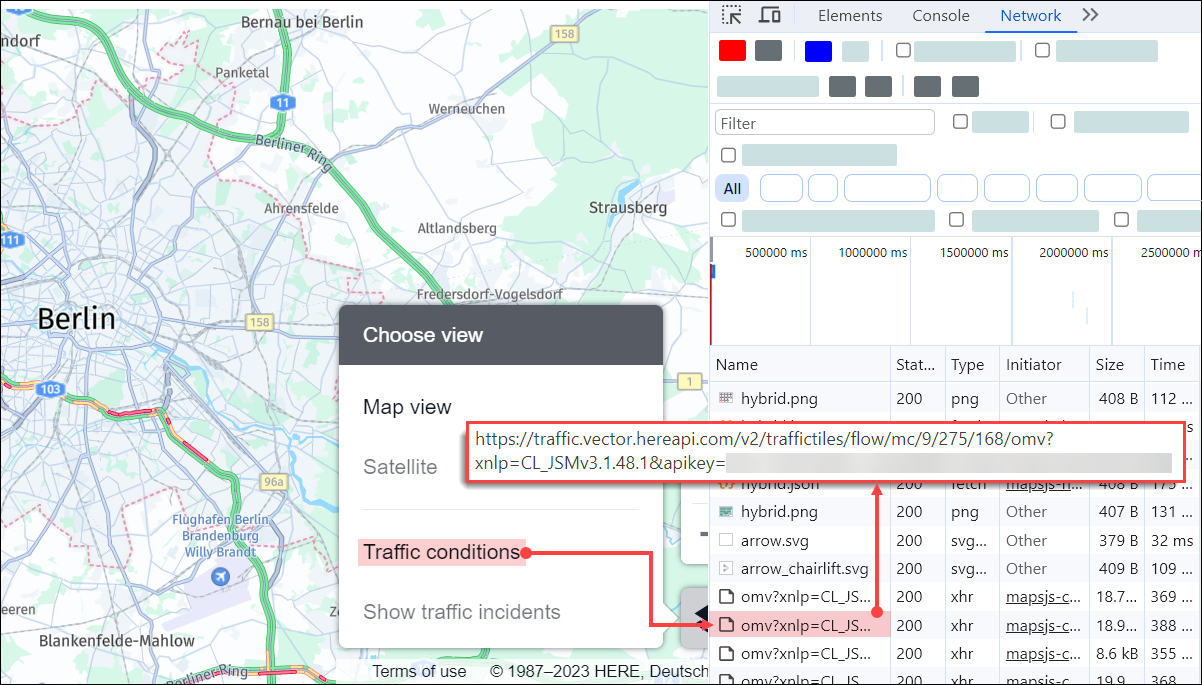
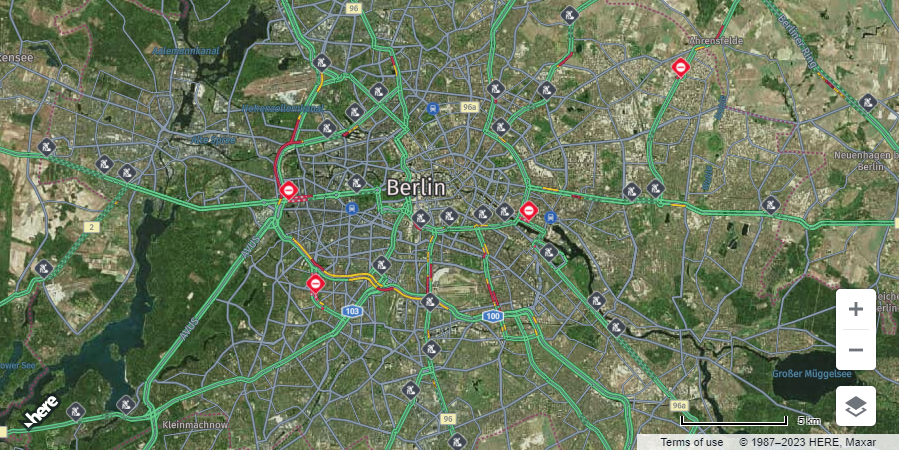
The following figure demonstrates a sample call to the HERE Traffic Vector Tile API after enabling the Traffic conditions view from the control of a map that was instantiated with the HARP engine:
Apply hybrid styles
The HARP engine enables you to take advantage of hybrid maps that combine the strengths of both raster and vector map styles to create a more versatile mapping experience.
In the HERE Maps API for JavaScript, a hybrid map consists of raster satellite base layer and vector layers on top. Raster satellite imagery provides detailed, real-world visuals of the Earth's surface. However, it lacks the ability to convey specific details or information about geographic features. Vector layers, on the other hand, allow you to overlay various data types such as roads, boundaries, points of interest, and more. By combining them, you get the visual context of satellite imagery and the informative detail of vector data.
Use a default hybrid layer
The createDefaultLayers() method enables you to quickly compose a map by selecting any of the dedicated hybrid raster and vector map layers.
For example, you can use the hybrid.liteday.raster layer for the base satellite imagery together with hybrid.liteday.vector to display map features.
Note
As the starting point, the following steps use the configuration from the Sample map rendered with the HARP engine section.
-
In the
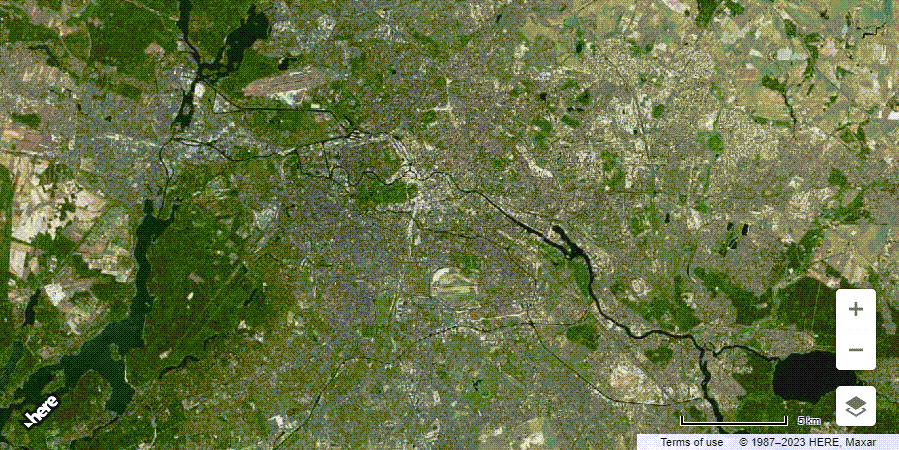
mapvariable definition, switch the existing style to one of the available hybrid raster styles to create the base map layer, as shown in the following example:const map = new H.Map( document.getElementById("mapContainer"), defaultLayers.hybrid.liteday.raster, { engineType, zoom: 10, center: { lat: 52.5, lng: 13.4 } })The preceding example sets the base layer to
defaultLayers.hybrid.liteday.raster, which is a satellite map style without features and labels with the color correction applied.Result: The map now displays the satellite imagery only as the base map, with no geometries, features, or labels:
-
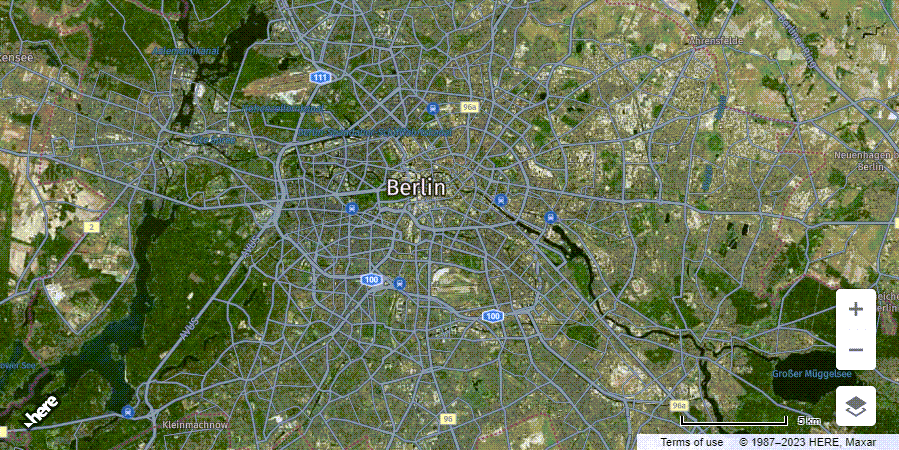
Superimpose a vector layer over the base raster layer as shown in the following example:
map.addLayer(defaultLayers.hybrid.liteday.vector);Result: The map displays vector data over the raster layer, as shown in the following figure:
-
Optional: To add more layers, repeat the previous step. For example, you can add a vector map layer with traffic data:
map.addLayer(defaultLayers.hybrid.liteday.traffic)Result: The map now displays traffic data in addition to the previously configured layers:
Layer compatibility in HARP
To maintain coherence and consistency in presenting geographic data within your mapping application, it's essential to use map layers that are compatible with each other and offer a seamless user experience. In the following table, each row presents a set of layers that you can combine on a map without causing conflicts or visual inconsistency:
| Base Layer | Layer 1 | Layer 2 |
|---|---|---|
| vector.normal.map | vector.traffic.map | |
| vector.normal.mapnight | vector.traffic.mapnight | |
| vector.normal.lite | vector.traffic.lite | |
| vector.normal.litenight | vector.traffic.litenight | |
| vector.normal.logistics | vector.traffic.logistics | |
| hybrid.day.raster | hybrid.day.vector | hybrid.day.traffic |
| hybrid.night.raster | hybrid.night.vector | hybrid.night.traffic |
| hybrid.liteday.raster | hybrid.liteday.vector | hybrid.liteday.traffic |
| hybrid.litenight.raster | hybrid.litenight.vector | hybrid.litenight.traffic |
For example, consider the hybrid.day.raster + hybrid.day.vector + hybrid.day.traffic set of compatible layers. In that set:
hybrid.day.rasterincludes image-based satellite imagery for daytime viewing that serves as the background for vector data.hybrid.day.vectorincludes vector data representing roads, boundaries, points of interest, and so on, optimized for daytime viewing.hybrid.day.trafficoverlays such data as traffic flow or congestion levels on the map, designed for daytime viewing.
When you combine these compatible layers, you create a hybrid map designed for daytime use that incorporates raster imagery for visual context, vector data for detailed geographic features, and, optionally, traffic information for better situational awareness.
For more information on map layers available in the HARP engine, see the createDefaultLayers() method documentation in the API Reference.
Customize the hybrid map style
You can use the HERE Style Editor to tailor the appearance of either vector layers or raster layers in hybrid map styles. You can then save the customized style and apply it programmatically through the createHybridLayers() method to achieve the desired map rendering.
Note
As the starting point, the following steps use the configuration from the Sample map rendered with the HARP engine section.
-
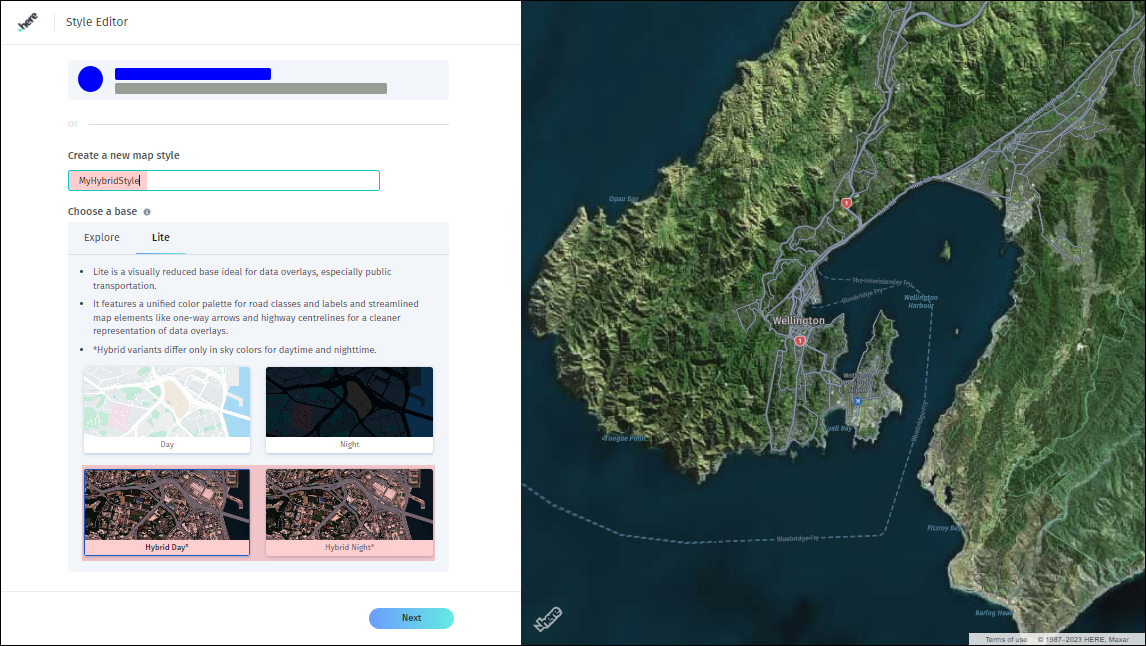
In the HERE Style Editor, create a hybrid map style:
-
In the Create a new map style field, provide the name of the hybrid style.
-
In the Choose a base section select a hybrid map style. You can select
hybrid.dayorhybrid.nightstyles for theexploreorlitebases.Note
Hybrid variants differ only in sky colors for day time and night time.
-
Click Next. See the following figure for reference:
-
-
Adjust the hybrid style to your needs. In the following example, the
lite.hybrid.daystyle is adjusted by modifying the colors for highways, primary roads, and secondary roads: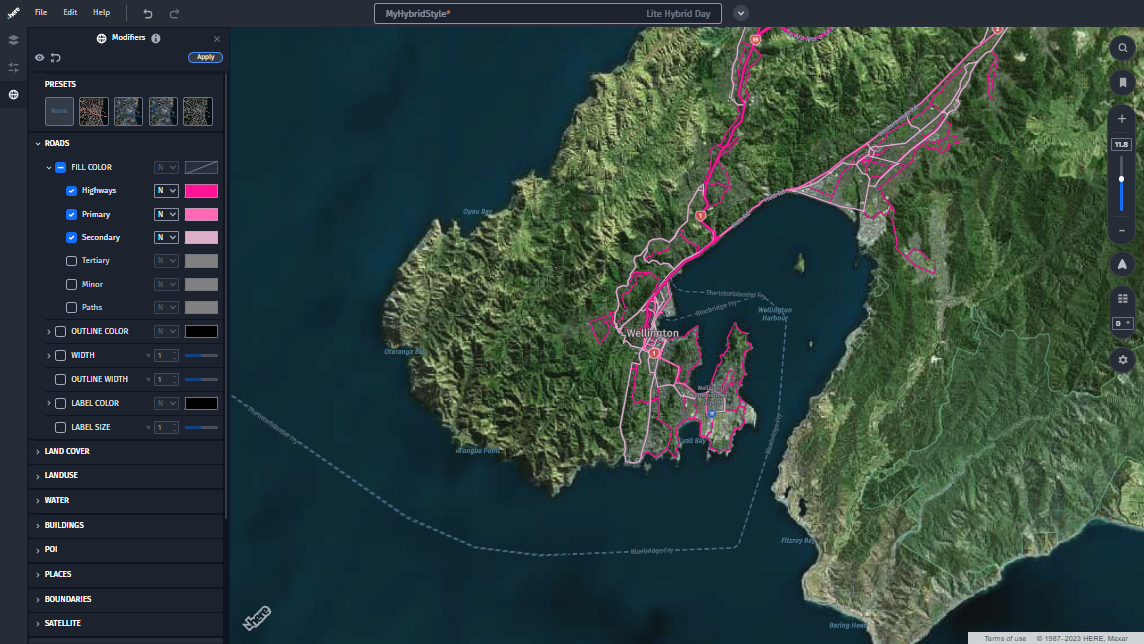
-
Export the style configuration by clicking File -> Export Map Style. The exported file contains the style changes in the JSON format:
{ "editorVersion": "1.4.0", "base": { "style": "oslo", "scheme": "lite.hybrid.day" }, "definitions": { "Street.Category0.Color": "#FF1493", "Street.Category0.Unpaved.Color": "#FF1493", "Street.Category1.Color": "#FF69B4", "Street.Category1.Unpaved.Color": "#FF69B4", "Street.Category2.Color": "#DEAFC9", "Street.Category2.Unpaved.Color": "#DEAFC9", "Street.Category0.Tunnel.Color": "#FF1493", "Street.Category1.Tunnel.Color": "#FF69B4", "Street.Category2.Tunnel.Color": "#DEAFC9" } } -
Within your JavaScript code, after map variable instantiation, add a variable that contains the exported hybrid style configuration, in the JSON format:
const hybridStyleConfig = { "editorVersion": "1.4.0", "base": { "style": "oslo", "scheme": "lite.hybrid.day" }, "definitions": { "Street.Category0.Color": "#FF1493", "Street.Category0.Unpaved.Color": "#FF1493", "Street.Category1.Color": "#FF69B4", "Street.Category1.Unpaved.Color": "#FF69B4", "Street.Category2.Color": "#DEAFC9", "Street.Category2.Unpaved.Color": "#DEAFC9", "Street.Category0.Tunnel.Color": "#FF1493", "Street.Category1.Tunnel.Color": "#FF69B4", "Street.Category2.Tunnel.Color": "#DEAFC9" } }; -
Instantiate a hybrid map with the updated style by using the
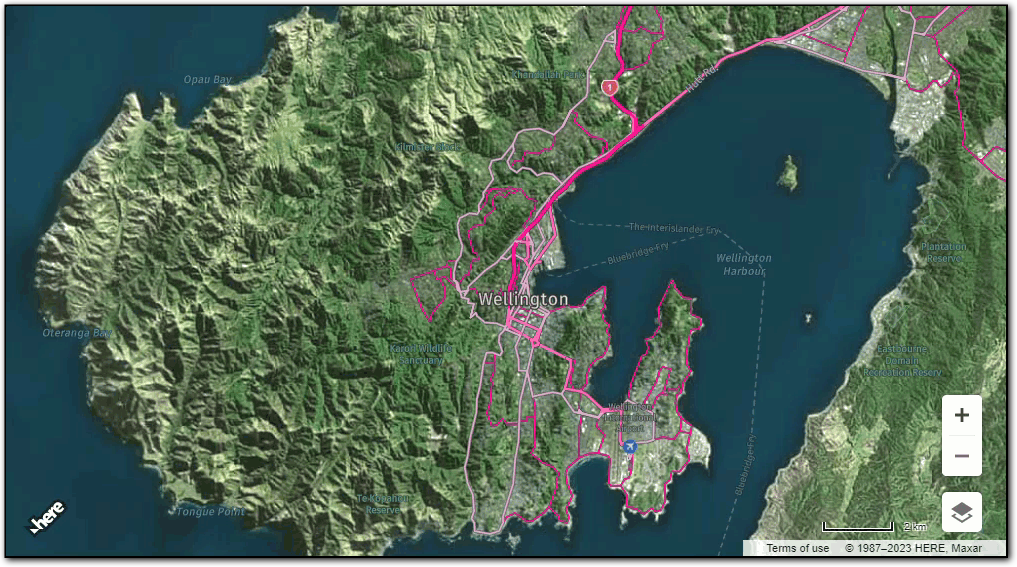
createHybridLayers()method, as shown in the following example:platform.createHybridLayers(hybridStyleConfig, (layers) => { map.setBaseLayer(layers.raster); map.addLayer(layers.vector); }, console.error);
Result: The map now reflects the style updates:
Add a style from the HERE Style Editor
Setting HARP as the map engine in the HERE Maps API for JavaScript, enables you to import custom styles that you developed in the HERE Style Editor.
With custom styles, you can tailor the map appearance to match your brand or website design or emphasize specific map features, data points, or locations that are most relevant to your application, making it easier for users to find the information they need.
Before you begin
Create a custom style in the HERE Style Editor and then export the JSON file containing the style configuration. For more information, see the HERE Style Editor documentation.
Set a map style exported from the HERE Style Editor
The following steps provide a basic example of how you can apply a style exported from the HERE Style Editor to a map using the HERE Maps API for JavaScript.
-
Create a HTML file to serve as the map container. For more information, see Sample map rendered with the HARP engine.
-
Within the
<script>element of your HTML file, initialize the HERE platform by creating a newH.service.Platformobject:const platform = new H.service.Platform({ 'apikey': 'YOUR_HERE_APIKEY' }); -
Call the
platform.getOMVService()method to create avectorTileServiceinstance. This service is used for obtaining vector map tiles.const vectorTileService = platform.getOMVService(); -
Specify the engine type variable and set its value to
HARP:const engineType = H.Map.EngineType.HARP; -
Create a variable containing a style definition, in the JSON format, as shown in the following example:
const myStyleDefinition = { "editorVersion": "1.4.0", "base": { "style": "oslo", "scheme": "normal.night" }, "definitions": { "Street.Category0.Tunnel.Color": "#FF0000", "Street.Category1.Tunnel.Color": "#FF0000", "Street.Category0.Color": "#FF0000", "Street.Category1.Color": "#FF0000", "Street.Category1.Unpaved.Color": "#FF0000", "Street.Category0.Unpaved.Color": "#FF0000" } } -
Specify the style variable and set its value to an instance of the
H.map.render.harp.Styleclass with an object containing the style configuration as an argument, as shown in the following example:const style = new H.map.render.harp.Style(myStyleDefinition)Hint
H.map.render.harp.Styleaccepts either an object or a URL containing a valid style definition in the JSON format. -
Create a
vectorTileProvideras an instance of theH.service.omv.Providerclass, as shown in the following example:const vectorTileProvider = new H.service.omv.Provider(vectorTileService, style, { engineType }); -
Create a vector layer as an instance of the
H.map.layer.TileLayerclass, as shown in the following example:const vectorTileLayer = new H.map.layer.TileLayer(vectorTileProvider); -
Initialize the map:
const map = new H.Map( document.getElementById("map"), vectorTileLayer, { engineType, zoom: 13, center: { lat: -33.8651, lng: 151.2099 } }); -
Enable panning and zooming:
const behavior = new H.mapevents.Behavior(new H.mapevents.MapEvents(map)); -
Save your configuration, and then open the HTML file in a browser window.
Result: The browser displays the map with the selected style configuration, as shown in the following figure:
Using the HARP engine from the HERE Maps API for JavaScript NPM package bundle
If you want to use the HARP engine with the HERE Maps API for JavaScript through the npm package manager, make sure to choose application bundles that already include the HARP engine. This ensures that you have all the necessary components for map rendering and interaction, allowing your application to use the HARP engine seamlessly.
The HERE Maps API for JavaScript provides two bundles: the default bundle, which includes the WebGL engine, and another bundle that features the HARP engine. The Build HERE maps with React tutorial demonstrates how to use the default bundle, which relies on the default vector render engine of type H.Map.EngineType['WEBGL'].
Now, if you want to work with the HARP engine instead, you can start from the Build HERE maps with React tutorial and follow these steps to make the switch.
-
When adding a React component that renders the map within a
<div>element, you need to adjust the import statement to retrieve the bundle containing the HARP engine. The following snippets provide an example of how to do it:Before adjustment:
import H from '@here/maps-api-for-javascript';After adjustment:
import H from '@here/maps-api-for-javascript/bin/mapsjs.bundle.harp.js';By making this adjustment, you ensure that your React component can utilize the HARP engine for map rendering.
-
Adjust the code that generates the map object by specifying the map engine type and other parameters that the HARP engine requires.
The following example shows how to change the code in Build HERE maps with React to create a map instance that uses the HARP engine:
Before adjustment:
// Obtain the default map types from the platform object:
const defaultLayers = platform.current.createDefaultLayers(
    {pois: true}
  );
// Create a new map instance with the Tile layer, center and zoom level
// Instantiate (and display) a map:
const newMap = new H.Map(
    mapRef.current,
    defaultLayers.vector.normal.map, {
        zoom: 14,
        center: userPosition,
    }
);
After adjustment:
// Instantiate the engine type variable
const engineType = H.Map.EngineType['HARP'];

// Specify the engine type as HARP when creating default layers
const defaultLayers = platform.current.createDefaultLayers({
    engineType,
    pois: true
});
const newMap = new H.Map(
    mapRef.current,
    defaultLayers.vector.normal.map, {
        zoom: 14,
        center: userPosition,
        // Set the map engine type to HARP
        engineType
    }
);
Result: The map engine changes to HARP. You can now make the most of the updated engine type, for example, by switching the map style to a hybrid one, benefiting from updated service types for the Map Settings control, and so on.
The following figure shows the React components as described in the Build HERE maps with React tutorial, except that the HARP engine is used for map rendering:
Next steps
To explore the design and other features of the HERE Maps API for JavaScript, see the API Reference.
Updated last month