ルートと経路を計算する
ルートのプランニングとナビゲーションは、位置情報関連のサービスで最も一般的なアプリケーションです。HERE Maps API for Javascriptを使用すると、特定の条件に基づいて最適なルートを計算できます。これらのルートは現在のマップデータから導き出され、リアルタイム交通情報を考慮します。
このAPIは道路ネットワークを広範囲にカバーしており、fastest、shortest、avoiding toll roadsなどのカスタム設定に準拠したルートを生成できます。また、APIは1日のさまざまな移動条件を考慮して、ルート最適化のための過去の速度データの使用もサポートします。
サービスモジュール (mapsjs-service.js) を使用すると、APIによりHERE Routing APIに直接アクセスして、詳細なルート形状などのルート情報を取得できます。HERE Routing APIから取得されたルートデータは、さまざまなアプリ要件に適合するように調整できます。以下の例は基本的なシナリオが網羅されていますが、可能性は多岐にわたり、広範です。
APIライブラリをインポートする
次の例に示すように、Maps API for JavaScriptでマップを表示するために必要なライブラリをインポートして、マップのHTMLコンテナを作成します。
<!DOCTYPE html>
<html>
  <head>
    <script type="text/javascript" src="https://js.api.here.com/v3/3.2/mapsjs-core.js"></script>
    <script type="text/javascript" src="https://js.api.here.com/v3/3.2/mapsjs-service.js"></script>
    <script type="text/javascript" src="https://js.api.here.com/v3/3.2/mapsjs-mapevents.js"></script>
    <script type="text/javascript" charset="utf-8" src="https://js.api.here.com/v3/3.2/mapsjs-ui.js" ></script>
    <link rel="stylesheet" type="text/css" href="https://js.api.here.com/v3/3.2/mapsjs-ui.css" />
    <meta name="viewport" content="initial-scale=1.0, width=device-width" />
  </head>
  <body>
    <div style="width: 100vw; height: 100vh" id="mapContainer"></div>
    <script>
    // Your JavaScript code goes here
    </script>
  </body>
</html>
マップにルートを表示する
出発地と目的地のマーカー間のサンプルルートを表示する基本的なHEREマップをレンダリングするJavaScriptコードを作成します。
// Initiate and authenticate your connection to the HERE platform:
const platform = new H.service.Platform({
  apikey: "YOUR_HERE_APIKEY",
});

// Obtain the default map types from the platform object:
const defaultLayers = platform.createDefaultLayers();

// Instantiate (and display) a map:
// Zoom and center parameters are overridden by the bounding box
// that contains the route and marker objects
const map = new H.Map(
  document.getElementById("mapContainer"),
  defaultLayers.vector.normal.map,
  {
    zoom: 7,
    center: { lat: 56.97, lng: 24.09 },
    // Add space around the map edges to ensure markers are not cut off:
    padding: { top: 50, right: 50, bottom: 50, left: 50 },
  }
);

const origin = { lat: 56.97, lng: 24.09 };
const destination = { lat: 54.7, lng: 25.24 };

// Create the parameters for the routing request:
const routingParameters = {
  routingMode: "fast",
  transportMode: "car",
  // The start point of the route:
  origin: `${origin.lat},${origin.lng}`,
  // The end point of the route:
  destination: `${destination.lat},${destination.lng}`,
  // Include the route shape in the response
  return: "polyline",
};

// Define a callback function to process the routing response:
const onResult = function (result) {
  // Ensure that at least one route was found
  if (result.routes.length) {
    const lineStrings = [];
    result.routes[0].sections.forEach((section) => {
      // Create a linestring to use as a point source for the route line
      lineStrings.push(H.geo.LineString.fromFlexiblePolyline(section.polyline));
    });

    // Create an instance of H.geo.MultiLineString
    const multiLineString = new H.geo.MultiLineString(lineStrings);

    // Create a polyline to display the route:
    const routeLine = new H.map.Polyline(multiLineString, {
      style: {
        strokeColor: "blue",
        lineWidth: 3,
      },
    });

    // Create a marker for the start point:
    const startMarker = new H.map.Marker(origin);

    // Create a marker for the end point:
    const endMarker = new H.map.Marker(destination);

    // Create a H.map.Group to hold all the map objects and enable us to obtain
    // the bounding box that contains all its objects within
    const group = new H.map.Group();
    group.addObjects([routeLine, startMarker, endMarker]);
    // Add the group to the map
    map.addObject(group);

    // Set the map viewport to make the entire route visible:
    map.getViewModel().setLookAtData({
      bounds: group.getBoundingBox(),
    });
  }
};

// Get an instance of the routing service version 8:
const router = platform.getRoutingService();

// Call the calculateRoute() method with the routing parameters,
// the callback, and an error callback function (called if a
// communication error occurs):
router.calculateRoute(routingParameters, onResult, function (error) {
  alert(error.message);
});

// MapEvents enables the event system.
// The behavior variable implements default interactions for pan/zoom (also on mobile touch environments).
const behavior = new H.mapevents.Behavior(new H.mapevents.MapEvents(map));

// Enable dynamic resizing of the map, based on the current size of the enclosing container
window.addEventListener("resize", () => map.getViewPort().resize());
前の例のコードは、次の操作を実行します。
- プラットフォームの初期化:HERE プラットフォームへの接続を初期化して認証します。これは
H.service.Platformのインスタンスを作成し、API キーを提供することによって実行されます。 - デフォルトのマップ タイプ:
platform.createDefaultLayers()メソッドを使用して、プラットフォーム オブジェクトからデフォルトのマップ タイプを取得します。これらのデフォルト レイヤーには、さまざまな目的のためのベクター マップが含まれています。 - 地図の初期化:
H.Mapのインスタンスを作成して地図をインスタンス化して表示します。地図、マップ タイプ (この場合はベクター マップ) を表示する HTML 要素を指定し、ズーム レベル、中心座標、パディングなどの初期プロパティを設定して、地図境界内でマーカーが完全に表示されるようにします。 - 出発地と目的地:ルートの出発地と目的地の地理座標を定義します。これらの地理座標は、ルート計算の開始点と終了点を表します。
- ルート検索パラメーター:
routingParametersオブジェクトにルート検索リクエストのパラメーターを作成します。これらのパラメーターは、ルート検索モード (fastなど)、転送モード (carなど)、出発地と目的地の座標を指定し、レスポンスにルート形状を含めるようリクエストします。 - ルート検索コールバック関数:
onResultというコールバック関数を定義し、ルート検索レスポンスを処理します。この関数は HERE Routing API v8 から取得したルート データを処理します。ルート形状の抽出、ルートを表すポリラインの作成、始点と終点のマーカーの追加、ルート全体を表示するためのマップ ビューの調整を行います。 - ルート検索サービスの初期化:
platform.getRoutingService(null, 8)を使用して、HERE Routing サービス バージョン 8 のインスタンスを取得します。このサービスを使用すると、ルートの計算とルート情報の取得ができます。 - ルートの計算:ルート検索サービスの calculateRoute() メソッドを呼び出し、ルート検索パラメーター、
onResultコールバック関数、エラー コールバック関数を渡します。これにより、指定されたパラメーターに基づいてルート計算が開始されます。 - マップ イベントの処理:地図操作と地図の動的なサイズ変更のイベント処理を有効にします。これには、パンやズームなどのマップイベントの動作の追加、コンテナサイズの変更に合わせた地図のサイズ変更などが含まれます。
注
routingParametersオブジェクト リテラルのメンバー要素は、HERE Routing API が必要とする URL パラメーターに直接マッピングされます。パラメーター オブジェクトには、Routing API で認識される任意のパラメーターを含めることができます。そのため、ルート計算リクエストを定義する際の柔軟性が非常に高くなります。
前の例の設定に基づいて、次のルート検索リクエストが生成されます。https://router.hereapi.com/v8/routes ?apikey={YOUR_API_KEY} &routingMode=fast &transportMode=car &origin=56.97,24.09 &destination=54.70,25.24 &return=polyline詳細については、HERE Routing API v8開発者ガイドの「ルートを計算する」を参照してください。
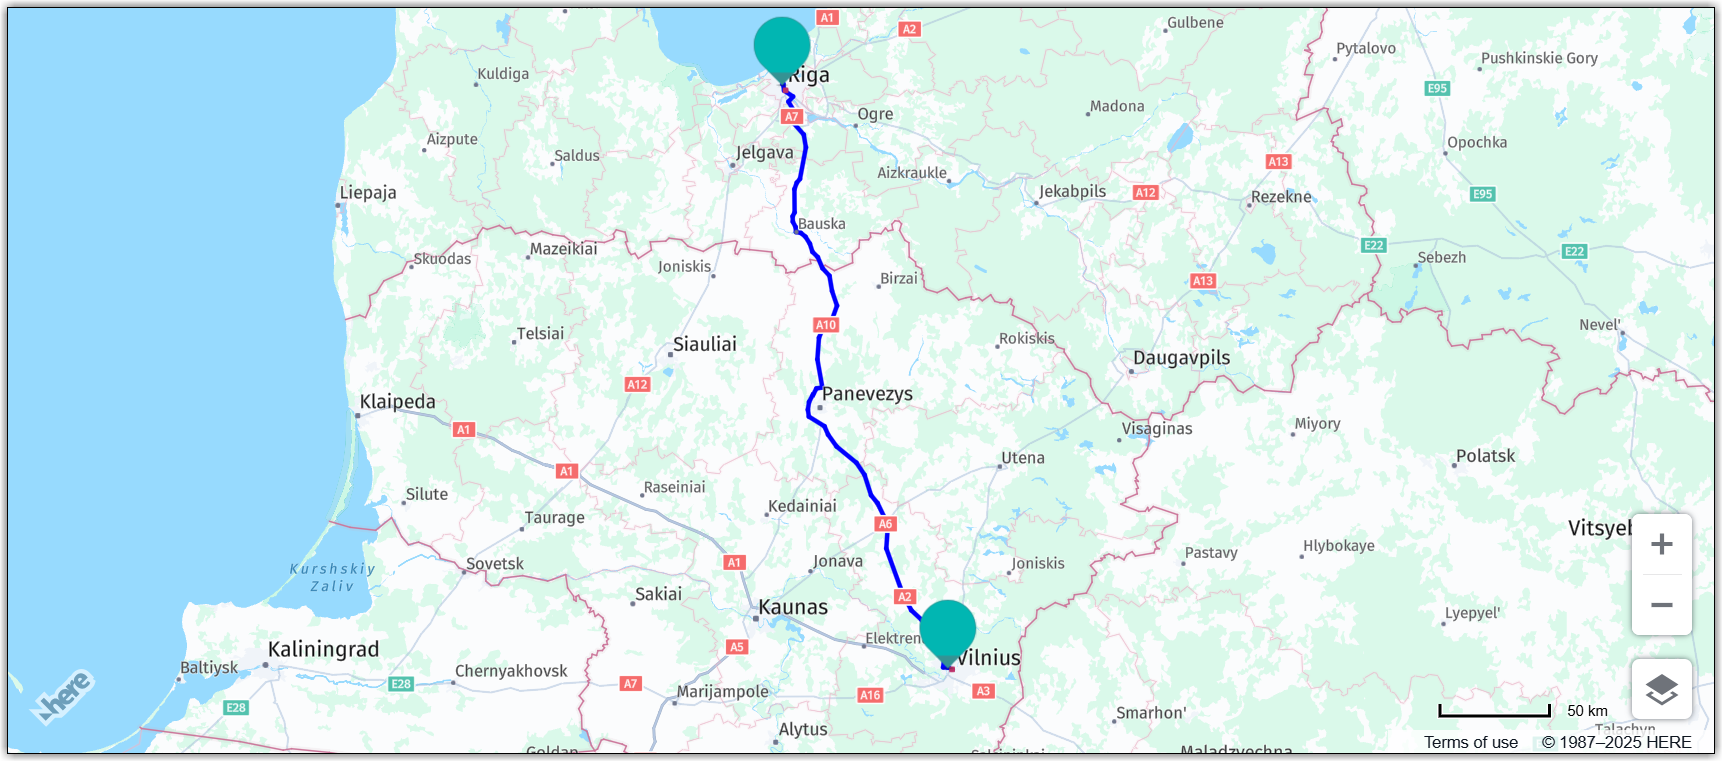
結果:次の地図はルート計算の結果を示したものです。ルートの始点はリトアニアのビリニュス、ルートの終点はラトビアのリガで、デフォルト アイコンを使用したマーカーで示されています。ルート自体は青色のポリラインで表示されています。
複数の経由地を追加する
ルートのプランニングとナビゲーションを行うアプリで経由地マーカーを使用すると、ルートをより効果的に視覚化して理解できます。このようなマーカーでは、ルートが特定の施設情報を通過または停止する場所が明確に示されます。
次の手順では、前述のルート検索例に基づいて経由地マーカーを追加する方法について説明します。
-
地図に追加マーカーを配置する座標を指定して、経由地オブジェクトを追加します。
const waypoints = [ // Liepaja, Latvia { lat: 56.5, lng: 21.01 }, // Klajpeda, Lithuania { lat: 55.7, lng: 21.2 }, ]; -
経由地マーカーを格納する空の配列を作成します。
const waypointMarkers = []; -
HERE Routing API v8 クエリを更新して、経由地変数で定義された座標でvia 経由地を含めます。
const routingParameters = { routingMode: "fast", transportMode: "car", origin: `${origin.lat},${origin.lng}`, destination: `${destination.lat},${destination.lng}`, return: "polyline", // Add a via parameter to the query for each coordinate pair: via: new H.service.Url.MultiValueQueryParameter( waypoints.map((wp) => `${wp.lat},${wp.lng}`) ), }; -
onResultコールバック関数内で各経由地のマーカーを追加し、それらのマーカーを地図に追加します。// Create waypoint markers: waypoints.forEach((waypoint) => { const waypointMarker = new H.map.Marker({ lat: waypoint.lat, lng: waypoint.lng, }); // Populate the waypointMarkers array: waypointMarkers.push(waypointMarker); }); -
マップ オブジェクト グループに経由地マーカーを追加します。
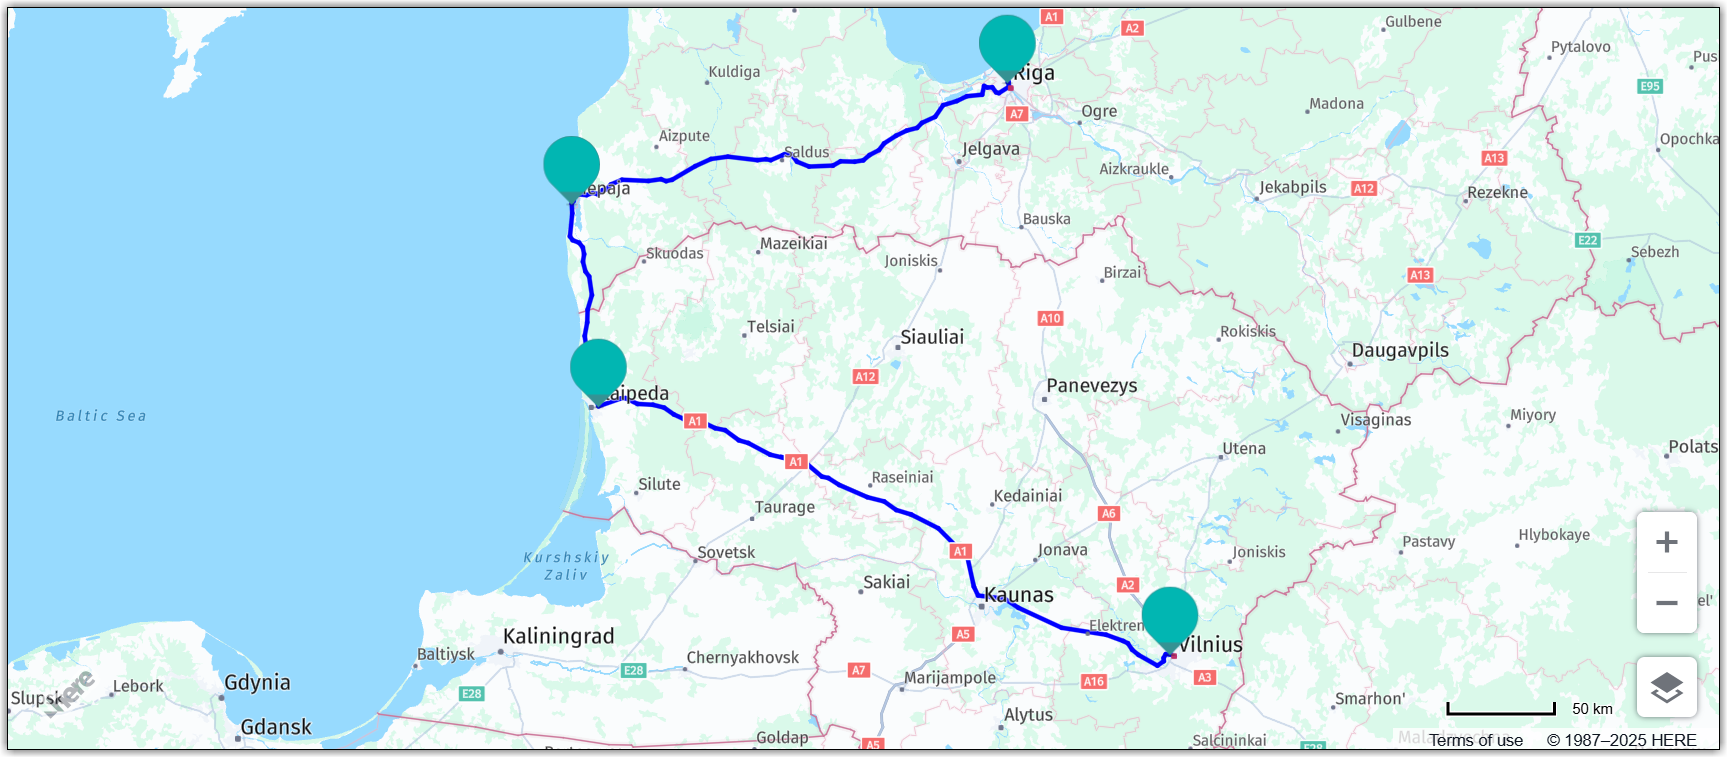
// Add ...waypointMarkers as an argument: group.addObjects([routeLine, startMarker, endMarker, ...waypointMarkers]);結果:地図に経由地マーカーと
via経由地を通過するルートが表示されます。
マーカーのスタイルをカスタマイズする
HERE Maps API for Javascriptでは、定義済みのマーカーアイコンの代わりにカスタムマーカーを使用できます。たとえば、カスタムSVGスタイルを使用して、独自性の高い特徴的な外観のマーカーを作成できます。これは、マーカーをブランドやデザインの要件に合わせる場合や、さまざまなマーカー タイプ (開始、停止、経由地など) をユーザーが区別しやすくする場合に特に便利です。
-
マーカー アイコンのスタイルを定義します。
// Define the marker style const commonSvgStyle = ( fill ) => `<svg xmlns="http://www.w3.org/2000/svg" width="48" height="48" viewBox="0 0 48 48"> <path d="M24 0C12.955 0 4 9.075 4 20.075C4 28.35 24 48 24 48S44 28.35 44 20.075C44 9.075 35.045 0 24 0Z" fill="${fill}"/> </svg>`; // Define the fill colors for start, end, and waypoint markers: const startFill = "red"; const endFill = "green"; const waypointFill = "purple"; // Create SVG icons for start, end, and waypoint markers using the common style and the corresponding fill color: const startIconSvg = commonSvgStyle(startFill); const endIconSvg = commonSvgStyle(endFill); const waypointIconSvg = commonSvgStyle(waypointFill); -
次の例に示すように、
onResultコールバック関数内でstartMarker、endMarker、waypointMarker変数を対応するSVGスタイル定義で更新します。// Origin marker (red): const startMarker = new H.map.Marker(origin, { icon: new H.map.Icon(startIconSvg, { size: { w: 32, h: 32, }, }), }); // Destination marker (green): const endMarker = new H.map.Marker(destination, { icon: new H.map.Icon(endIconSvg, { size: { w: 32, h: 32, }, }), }); // Waypoint markers (purple): waypoints.forEach((waypoint) => { const waypointMarker = new H.map.Marker({ lat: waypoint.lat, lng: waypoint.lng}, { icon: new H.map.Icon(waypointIconSvg, { size: { w: 24, h: 24 } }) }); waypointMarkers.push(waypointMarker); });
ヒント
アイコンのサイズは
w(幅) とh(高さ) パラメーターで変更できます。たとえば、経由地マーカーを開始マーカーや終了マーカーよりも目立たなくすることができます。
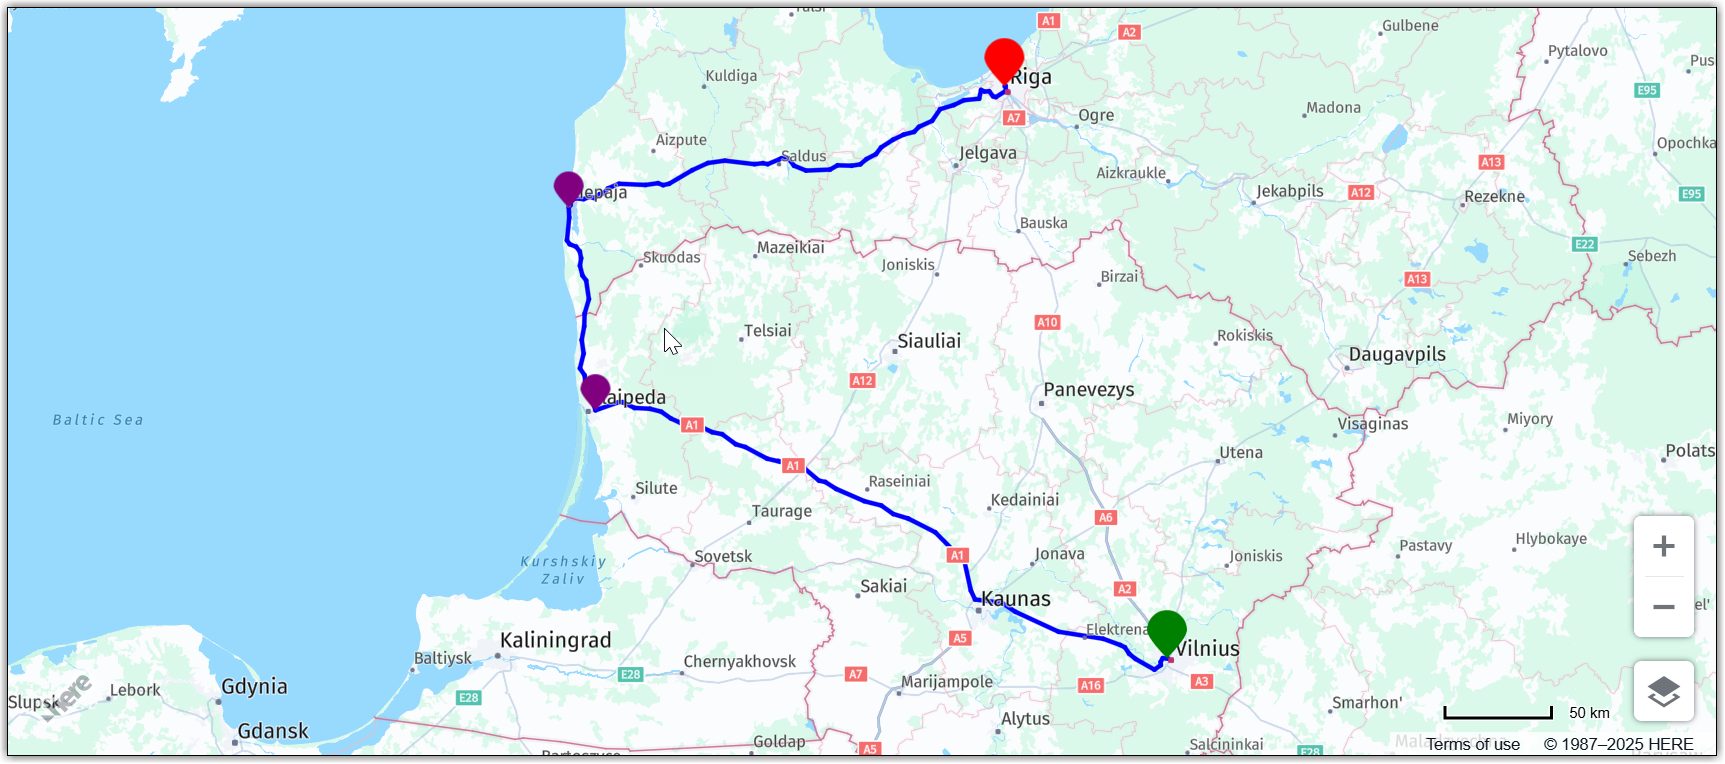
結果:次の図に示すように、各マーカー タイプに個別のスタイルが設定されました。
ルートの方向矢印を表示する
HERE Maps API for JavaScriptを使用すると、移動の方向を示すための矢印をルートのポリライン上にレンダリングできます。次のコードでは、先ほどの例にあったonResultコールバックが拡張され、H.map.SpatialStyleクラスを通じてポリラインの破線を記述するスタイルが追加されています。
ルートを方向矢印の形式でレンダリングするには、既存のrouteLine定義を次のコードに置き換えます。
const routeLine = new H.map.Polyline(multiLineString, {
  style: {
    strokeColor: 'blue',
    lineWidth: 4,
    lineDash: [1.5, 0.3],
    lineDashImage: H.map.SpatialStyle.DashImage.ARROW
    },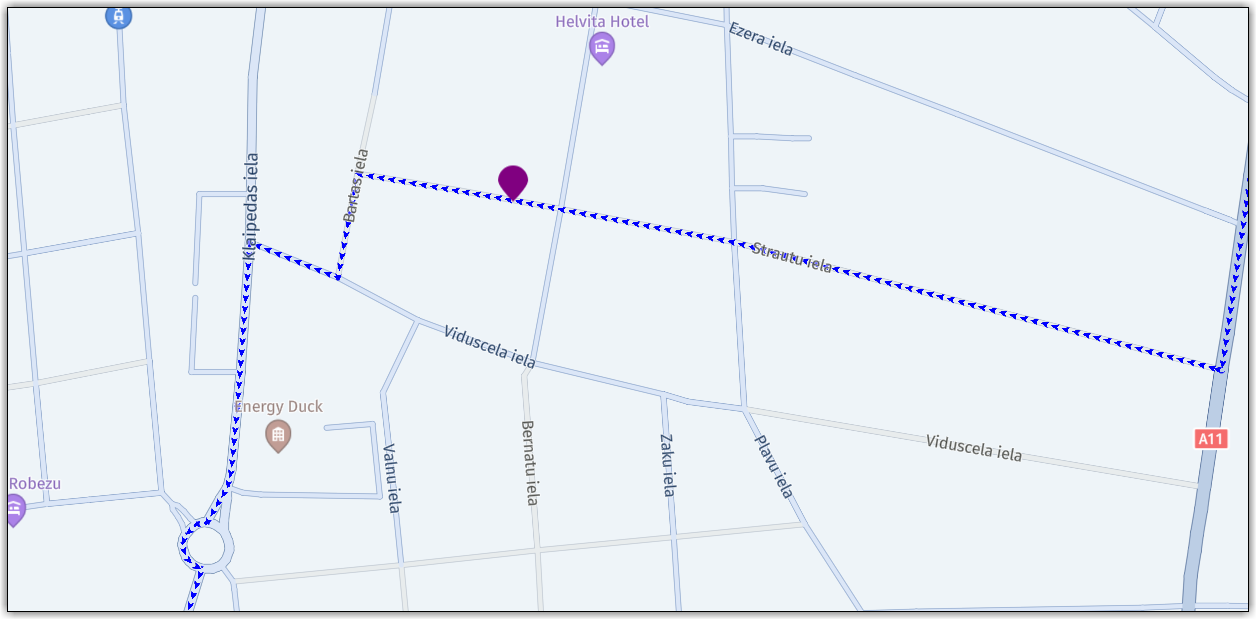
});結果:次の図は、ルートが地図にどのように表示されるかを示したものです。
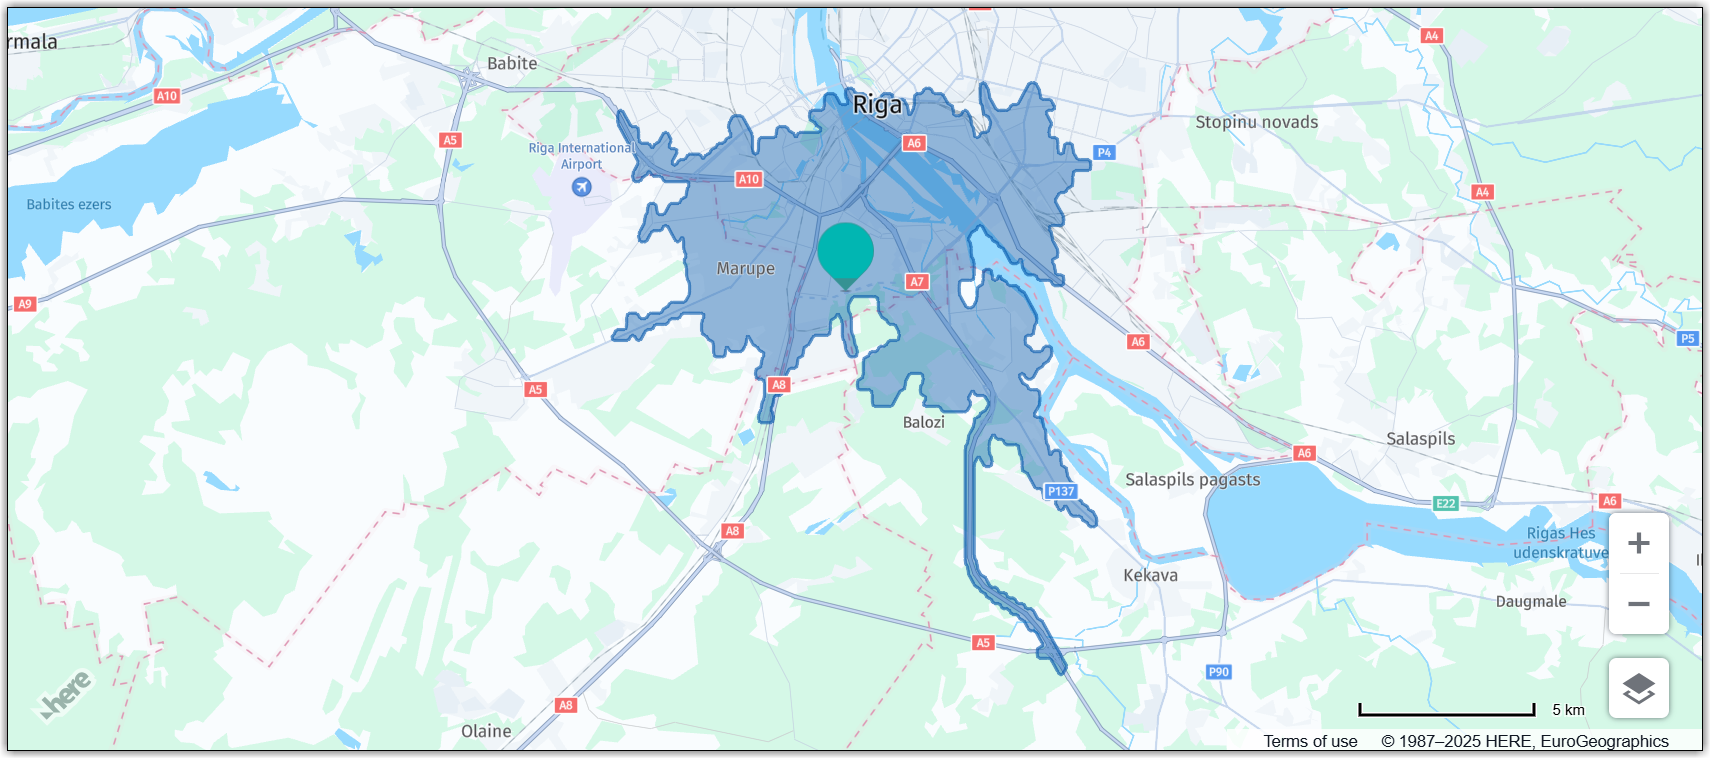
等値線を表示する
等値線とは、特定の交通手段に基づいて、特定のポイントから特定の時間または距離内に到達できる領域を表す地図の線のことです。
次のコードサンプルは、リガの中心部から車で15分以内の移動距離を表す等値線を計算する方法を示したものです。この例では、RoutingServiceクラスを使用して等値線を取得し、「HERE Maps API for Javascriptの使用を開始する」で説明したベースマップを基盤として、コードを追加する方法を説明します。
var routingParams = {
  transportMode: "car",
  origin: "56.9,24.1",
  "range[values]": "900",
  "range[type]": "time",
  routingMode: "fast",
  optimizeFor: "quality",
};

// Define a callback function to process the isoline response.
var onResult = function (result) {
  var isolines = result.isolines[0],
    objects = [new H.map.Marker(result.departure.place.location)];

  isolines.polygons.forEach((section) => {
    let lineString = H.geo.LineString.fromFlexiblePolyline(section.outer);

    // Create a polygon to display the area
    objects.push(new H.map.Polygon(new H.geo.Polygon(lineString)));
  });

  // Add the polygon and marker to the map:
  map.addObjects(objects);

  // Center and zoom the map so that the whole isoline polygon is
  // in the viewport:
  map.getViewModel().setLookAtData({ bounds: objects[1].getBoundingBox() });
};

// Get an instance of the routing service:
var router = platform.getRoutingService(null, 8);

// Call the Routing API to calculate an isoline:
router.calculateIsoline(routingParams, onResult, function (error) {
  alert(error.message);
});
前の例のコードは、次の操作を実行します。
- ルート検索パラメーター:車での最速ルートを計算するための
routingParamsオブジェクトを定義し、出発地と時間を設定します。 - ルート検索コールバック関数:ルート検索リクエストの結果が参照可能になったときに呼び出されるコールバックを定義します。このコールバック関数は、計算された等値線のポイントを使用してポリゴンを作成し、そのポリゴンと、等値線ポリゴンの中心を示すマーカーを地図に追加して、等値線全体が表示されるようにマップ ビュー ポートを設定します。
- ルート検索サービスの初期化:Routing Service v8 をインスタンス化します。
- 等値線の計算と表示:Routing Service の
calculateIsoline()メソッドを呼び出します。その際、パラメーター オブジェクトと成功およびエラー時のコールバックを渡します。
結果:次の図に示すように、リクエストされたパラメーターを含む等値線が地図に表示されます。
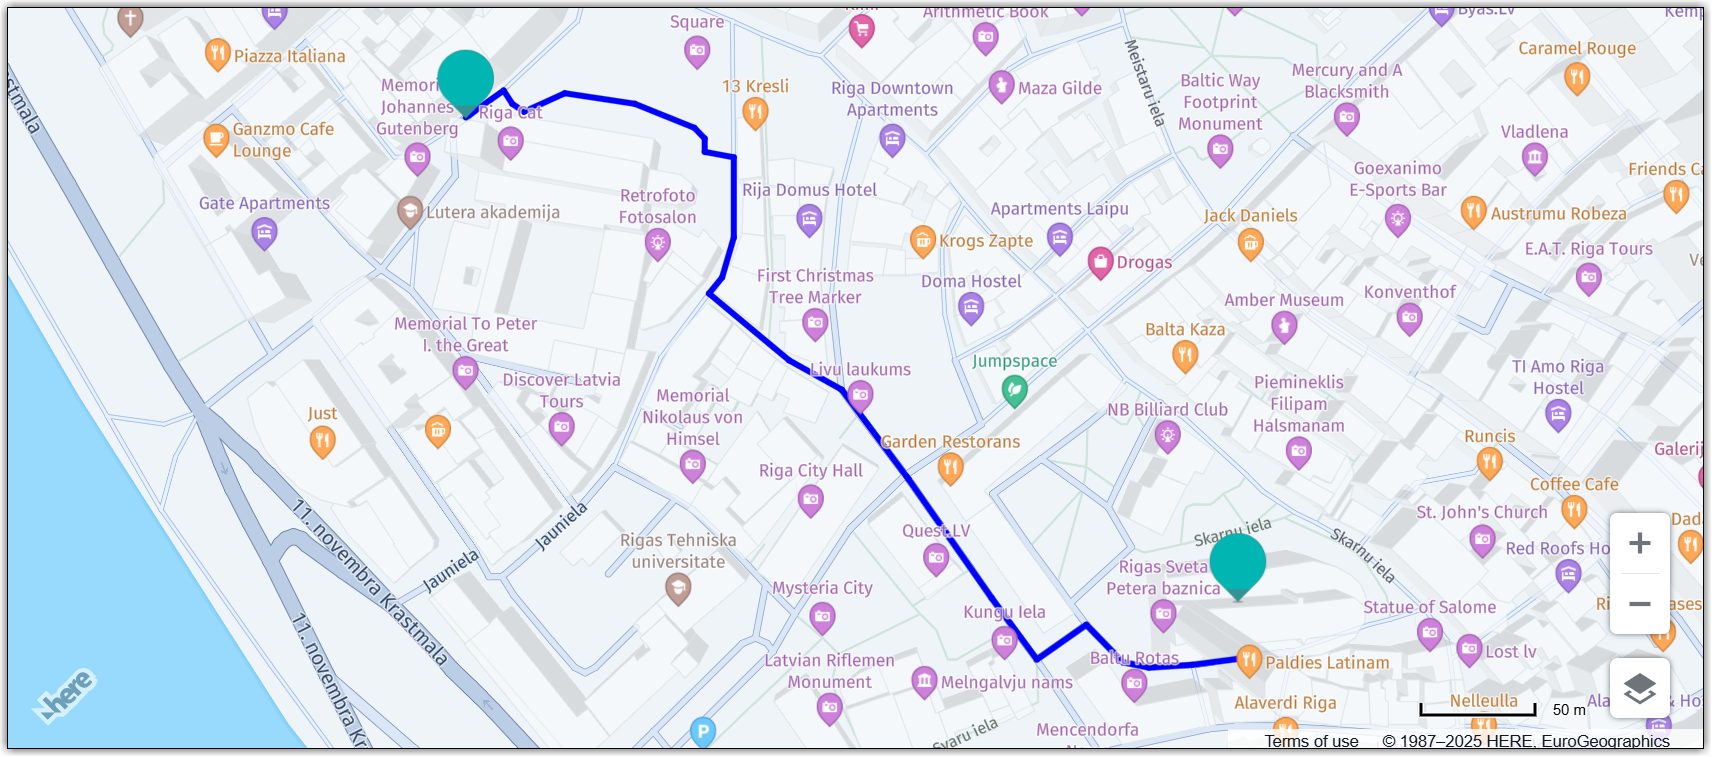
住所を入力としてルートを決定する
一部のユースケースでは、最初に住所をジオコーディングしてルート検索座標を決定する必要があります。次のコード例では、検索サービスを使用して出発地ポイントと目的地ポイントの住所をジオコーディングしています。これにより、Routing サービスはこれらのポイント間の歩行者ルートを計算し、結果のルートを地図に表示できます。ジオコーディングやルート検索の計算などの非同期操作はプロミスを使用して処理され、コードが正しくフローするようになっています。
次のコードサンプルは、「HERE Maps API for Javascriptの使用を開始する」で説明したベースマップを基盤として、コードを追加する方法を説明します。
-
次の例に示すように、マップを検索サービスに接続します。
const searchService = platform.getSearchService(); -
出発地と目的地の検索クエリを定義します。
const originAddress = "Sv. Pētera baznīca, Riga"; const destinationAddress = "Doma Laukums"; -
HERE Geocoding & Search APIに基づいてSearchサービスを使用して、非同期式の住所のジオコーディングを有効にします。
// Geocode an address using the search service:
function geocodeAddress(address) {
  return new Promise((resolve, reject) => {
    searchService.geocode(
      {
        q: address,
      },
      (result) => {
        /*
            Access the geographic position information of
            the first (presumably most relevant) result
            obtained from the geocoding process:
            */
        const location = result.items[0].position;
        resolve(location);
      },
      (error) => {
        console.error(
          `Error fetching geocoding data for ${address}:`,
          error
        );
        reject(error);
      }
    );
  });
}
前述の例の
geocodeAddress()関数は、非同期ジオコーディングの呼び出しを組み込むことで、ジオコーディングが成功した場合に住所を渡して対応する緯度と経度を含むオブジェクトに解決するプロミスを受け取ることができます。あるいは、ジオコーディングが失敗した場合はエラーで拒否します。この関数は引数としてaddress文字列を取り、HERE Geocoding & Search API v7 にリクエストを送信します。たとえば、次のようになります。https://geocode.search.hereapi.com/v1/geocode?xnlp=CL_JSMv3.2.0.0&apikey={YOUR_HERE_APIKEY}&q=Sv.%20P%C4%93tera%20bazn%C4%ABca%2C%20Rigaジオコーディング操作が成功した場合、関数は指定された住所クエリに対する最も関連性の高い結果から
position属性値の値を抽出します。HERE Geocoding & Search APIのリクエストとレスポンスの詳細については、対応する開発者ガイドの「利用開始」を参照してください。 -
次の例に示すように、
Promise.allを使用して出発地と目的地の住所をジオコーディングします。// Use Promise.all to geocode both origin and destination addresses Promise.all([geocodeAddress(originAddress), geocodeAddress(destinationAddress)]) .then(([origin, destination]) => { // Create routing parameters for calculating the route const routingParameters = { routingMode: "fast", transportMode: "pedestrian", origin: `${origin.lat},${origin.lng}`, destination: `${destination.lat},${destination.lng}`, return: "polyline", }; const onResult = function(result) { if (result.routes.length) { const lineStrings = []; result.routes[0].sections.forEach((section) => { lineStrings.push( H.geo.LineString.fromFlexiblePolyline(section.polyline) ); }); const multiLineString = new H.geo.MultiLineString(lineStrings); const routeLine = new H.map.Polyline(multiLineString, { style: { strokeColor: "blue", lineWidth: 4, }, }); const startMarker = new H.map.Marker(origin); const endMarker = new H.map.Marker(destination); const group = new H.map.Group(); group.addObjects([routeLine, startMarker, endMarker]); map.addObject(group); map.getViewModel().setLookAtData({ bounds: group.getBoundingBox(), }); } }; const router = platform.getRoutingService(null, 8); router.calculateRoute(routingParameters, onResult, function(error) { alert(error.message); }); }) .catch((error) => { console.error("Error fetching coordinates:", error); });このメソッドは
geocodeAddress()を2回呼び出し、ジオコーディング操作ごとにプロミスを返します。Promise.all()はこれらのプロミスの両方が解決されるのを待ち、.then()ブロックでそれらの組み合わせ結果 (両方のプロミスの解決された値) を処理できるようにします。
次の図は、住所ジオコーディングで取得した座標に配置された出発地マーカーと目的地マーカー、およびこれらのマーカー間の計算されたルートが表示された、結果の地図を示しています。
次のステップ
- HERE Routing API v8 の詳細については、対応するドキュメントを参照してください。
- HERE Geocoding & Search API v7の詳細については、対応するドキュメントを参照してください。
2 か月前の更新