Integrate the HERE SDK
In this tutorial, you will develop a Flutter application that displays a map.
- To integrate the HERE SDK into an existing application, you can skip the initial steps of setting up a new project from scratch.
- If you prefer to start by running an example app that demonstrates some of the features of the HERE SDK, take a look at this tutorial.
Prerequisites
Make sure you have access to your credentials and the HERE SDK framework. To learn more, see Get started.
Create a new project
If you are new to Flutter, please follow the guides on flutter.dev to help you get started with the first steps.
NoteThe resulting code is available from GitHub.
You don't need any advanced Flutter or Android or iOS experience to follow this step-by-step instruction.
Start Android Studio (this guide is based on version Android Studio Quail 1 | 2026.1.1 Patch 2 and Xcode version 26.5) and create a new project by selecting:
- Flutter 3.41.9
- Dart 3.11.5
Note that all example apps have been also tested with Flutter 3.41.9 and Dart 3.11.5.
Newer versions may also work, but are not guaranteed to work. It is recommended to use the Dart version that is bundled with Flutter.
NoteThis guide does not cover changes that might be needed when you are migrating your app from a Flutter version that is older than the minimum supported Flutter version 3.41.9.
First, create a new Flutter project, we have called it "hello_map". Make sure you can run your new Flutter project on an Android and iOS device of your choice to make sure that your Flutter SDK is configured correctly. If it does not work, please refer to the Flutter documentation.
For this tutorial, we have selected Gradle as build system, Groovy as Gradle DSL and Java as Android language. As platforms, we have selected Android and iOS.
NoteIf you don't want to support both platforms, you can skip the steps for either iOS or Android. Note that the HERE SDK for Flutter does not support web and desktop apps.
Enable Flutter Skia rendering engine
The HERE SDK may encounter issues on some devices due to a known Flutter issue related to the new Impeller rendering engine. For more details, see Flutter issue #152653. Impeller is the default rendering engine in recent Flutter releases. Consider switching to Skia as the default rendering engine.
- To disable
Impellerfor Android devices, add the following tag to your project'sAndroidManifest.xmlfile under the<application>tag:
  <meta-data
      android:name="io.flutter.embedding.android.EnableImpeller"
android:value="false" />- To disable
Impellerfor iOS devices, add the following key to your project'sInfo.plistfile:
  <key>FLTEnableImpeller</key>
  <false />
NoteThe "hello_map_app" on GitHub shows how this can be done. Note that other example apps do not use this workaround and therefore make use the default
Impellerengine.
Integrate the HERE SDK Flutter plugin
As soon as you have verified that everything is set up correctly, it's time to integrate the HERE SDK for Flutter.
NoteNote that the HERE SDK is only available as a separate download without SDK Dependency Management. Artifactory support via Maven / Gradle, CocoaPods or pub.dev is not yet available.
Unzip the downloaded HERE SDK for Flutter package. This package contains various files including this documentation:
- A license file.
- The Developer Guide.
- The API Reference.
- The changelog.
- A TAR file containing the HERE SDK for Flutter plugin. The file is named like this:
here_sdk-<edition>-<version>.release.tar.gz.
Unzip the TAR file, then rename the folder to here_sdk. The content of the plugin folder looks similar like below:
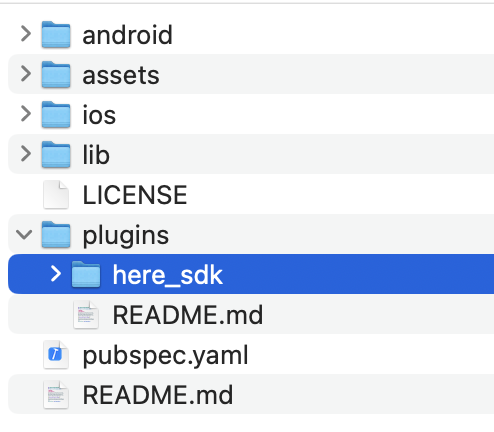
Now create a plugins folder inside your project and copy the renamed plugin folder to this new folder. With this, the content of the plugin folder is contained in hello_map/plugins/here_sdk.
Open the pubspec.yaml file of your Flutter project and add the path from above to the dependencies section. If you are not sure where to add this, it should look as follows:
dependencies:
  flutter:
    sdk: flutter

  # The following adds the Cupertino Icons font to your application.
  # Use with the CupertinoIcons class for iOS style icons.
  cupertino_icons: ^1.0.8

  # The following adds the HERE SDK for Flutter plugin folder to your application.
  here_sdk:
    path: plugins/here_sdk
Of course, if you want, you can rename the plugin folder and adjust the path.
If the path is specified correctly, you can execute flutter pub get from within Android Studio or from your terminal and the HERE SDK should appear in your project tree. For example, if you are using Android Studio, it will appear under External Libraries -> Flutter Plugins.
Update the project for iOS development
After you have executed flutter pub get (or clicked the respective "Pub get" button in Android Studio or any other IDE), a new Podfile is created for iOS. Open hello_map/ios/Podfile and set the platform to the minimum supported iOS version.
Uncomment this line to define a global platform for your project:
platform :ios, '15.2'
Then open hello_map/ios/Runner.xcodeproj with Xcode and set the deployment target to the same iOS version (via Xcode: General -> Minimum Deployments -> Target). This step is needed if you want to build your app later on with flutter build ios from the terminal for release.
Update the project for Android development
Now, adjust the minimum supported Android SDK version (minSdk) and use the minimum supported HERE SDK version or higher. In addition, specify compileSdk and optionally targetSdk to be compatible with HERE SDK 4.27.0.0:
compileSdk= 36minSdk= 24targetSdk= 36
For this, open /hello_map/android/app/build.gradle and adjust the versions accordingly in the android and defaultConfig closures:
android {
    compileSdk = see above
    ...

    defaultConfig {
        minSdk = see above
        targetSdk = see above
        ...
    }
}
Note that compileSdk needs to match with the version the HERE SDK is compiled against. This is also recommend for the targetSdk version.
If the android closure contains the following line, remove it:
ndkVersion = flutter.ndkVersion // Remove this line.Alternatively, you may need to use the NDK version that is indicated by the logs. The NDK is not needed when building apps with the HERE SDK.
Lastly, depending on your configuration, you may need to specify a suitable AGP and Gradle version for Android devices.
Open hello_map/android/settings.gradle and verify the versions. A possible configuration is shown below:
plugins {
    id "dev.flutter.flutter-plugin-loader" version "1.0.0"
    id "com.android.application" version '8.7.2' apply false
    id "org.jetbrains.kotlin.android" version "1.9.23" apply false
}
Open hello_map/android/gradle/wrapper/gradle-wrapper.properties and verify the version. For the example configuration above, you would need to choose:
distributionUrl=https\://services.gradle.org/distributions/gradle-8.9-all.zipThe minimum supported Gradle version for AGP 8.7.2 is Gradle 8.9. Make sure that the AGP plugin and Gradle versions do match.
Set your credentials
When using the HERE SDK, your application must be authenticated with a set of credentials.
Once you have your credentials at hand, add your set of credentials programmatically when initializing the HERE SDK (see next step).
The credentials are not tied to the package name, but to the account used to obtain the credentials. When you plan to use the same credentials for multiple apps, then you also need to set a scope to differentiate your apps in our system.
Initialize the HERE SDK
The HERE SDK is not initialized automatically. Instead, you can freely decide at which point in time the HERE SDK should be initialized. Initialization happens synchronously on the main thread and takes around 100 ms.
NoteInitialization of the HERE SDK will be successful even if your credentials are invalid. The best way to check if your credentials are valid is to try a feature engine like, for example, the
SearchEngine: invalid credentials will result in a dedicated error enum value. Note that certain features may require more rights than others. For example, the credentials obtained for Explore will result in an error when being used with theOfflineSearchEngine- which is not part of the subset of Explore.
Initialize the HERE SDK by executing the _initializeHERESDK() method before you want to use any feature of the HERE SDK, for example, in your main.dart file:
import 'package:here_sdk/core.dart';
import 'package:here_sdk/core.engine.dart';
import 'package:here_sdk/core.errors.dart';

void main() async {
  // Usually, you need to initialize the HERE SDK only once during the lifetime of an application.
  // Make sure to wait until the HERE SDK is initialized.
  await _initializeHERESDK();
}

Future<void> _initializeHERESDK() async {
  // Needs to be called before accessing SDKOptions to load necessary libraries.
  SdkContext.init(IsolateOrigin.main);

  // Set your credentials for the HERE SDK.
  String accessKeyId = "YOUR_ACCESS_KEY_ID";
  String accessKeySecret = "YOUR_ACCESS_KEY_SECRET";
  AuthenticationMode authenticationMode =
      AuthenticationMode.withKeySecret(accessKeyId, accessKeySecret);
  SDKOptions sdkOptions = SDKOptions.withAuthenticationMode(authenticationMode);

  try {
    await SDKNativeEngine.makeSharedInstance(sdkOptions);
  } on InstantiationException {
    throw Exception("Failed to initialize the HERE SDK.");
  }
}
Make sure to insert correct credentials for key and secret. By calling makeSharedInstance() you initialize all what is needed to use the HERE SDK. The core class of the HERE SDK is called SDKNativeEngine. Under the hood, this instance is used by any other engine that is offered by the HERE SDK.
The HERE SDK requires initialization of its native libraries via SdkContext, which should happen before your app widget is started.
Above we show an example how to call _initializeHERESDK() in the main() method. Always call _initializeHERESDK() on the main isolate and before accessing any HERE SDK code such as the MapView. Initialization completes in just a few milliseconds, but it's important to wait until the process has fully finished.
In the Engines section you can find more ways to initialize the HERE SDK.
Now is a good time to build the project to see if everything is configured correctly. In case of errors, try to compare your project with the example apps provided on GitHub.
Add a map view
Currently, the app shows the default home page created by the Flutter template generator offered by the IDE. Let's start to make use of the HERE SDK.
Below you can see how to show a HERE map view.
In addition, we implement the MaterialApp as the root of our StatefulWidget, which hosts the HereMap view as home.
Remove all the code from your main.dart file and replace it with the following:
import 'package:flutter/material.dart';
import 'package:here_sdk/core.dart';
import 'package:here_sdk/core.engine.dart';
import 'package:here_sdk/core.errors.dart';
import 'package:here_sdk/mapview.dart';

void main() async {
  // Usually, you need to initialize the HERE SDK only once during the lifetime of an application.
  _initializeHERESDK();

  runApp(MyApp());
}

void _initializeHERESDK() async {
  // Needs to be called before accessing SDKOptions to load necessary libraries.
  SdkContext.init(IsolateOrigin.main);

  // Set your credentials for the HERE SDK.
  String accessKeyId = "YOUR_ACCESS_KEY_ID";
  String accessKeySecret = "YOUR_ACCESS_KEY_SECRET";
  AuthenticationMode authenticationMode =
    AuthenticationMode.withKeySecret(accessKeyId, accessKeySecret);
  SDKOptions sdkOptions = SDKOptions.withAuthenticationMode(authenticationMode);

  try {
    await SDKNativeEngine.makeSharedInstance(sdkOptions);
  } on InstantiationException {
    throw Exception("Failed to initialize the HERE SDK.");
  }
}

class MyApp extends StatefulWidget {
  @override
  _MyAppState createState() => _MyAppState();
}

class _MyAppState extends State<MyApp> {
  late final AppLifecycleListener _appLifecycleListener;

  @override
  Widget build(BuildContext context) {
    return MaterialApp(
      title: 'HERE SDK for Flutter - Hello Map!',
      home: HereMap(onMapCreated: _onMapCreated),
    );
  }

  void _onMapCreated(HereMapController hereMapController) {
    // The camera can be configured before or after a scene is loaded.
    const double distanceToEarthInMeters = 8000;
    MapMeasure mapMeasureZoom = MapMeasure(MapMeasureKind.distanceInMeters, distanceToEarthInMeters);
    hereMapController.camera.lookAtPointWithMeasure(GeoCoordinates(52.530932, 13.384915), mapMeasureZoom);

    // Load the map scene using a map scheme to render the map with.
    hereMapController.mapScene.loadSceneForMapScheme(MapScheme.normalDay, (MapError? error) {
      if (error != null) {
        print('Map scene not loaded. MapError: ${error.toString()}');
      }
    });
  }

  @override
  void initState() {
    super.initState();
    _appLifecycleListener = AppLifecycleListener(
      onDetach: () =>
      // Sometimes Flutter may not reliably call dispose(),
      // therefore it is recommended to dispose the HERE SDK
      // also when the AppLifecycleListener is detached.
      // See more details: https://github.com/flutter/flutter/issues/40940
      { print('AppLifecycleListener detached.'), _disposeHERESDK() },
    );
  }

  @override
  void dispose() {
    _disposeHERESDK();
    super.dispose();
  }

  void _disposeHERESDK() async {
    // Free HERE SDK resources before the application shuts down.
    await SDKNativeEngine.sharedInstance?.dispose();
    SdkContext.release();
    _appLifecycleListener.dispose();
  }
}
Since the HereMap is already implemented as a stateful widget, you can set it directly as the home for your app. The private _onMapCreated callback notifies us when the HereMapController instance is created. The HereMapController allows you to interact with the map.
NoteNote that multiple
MapViewinstances can be created and rendered on the same screen.
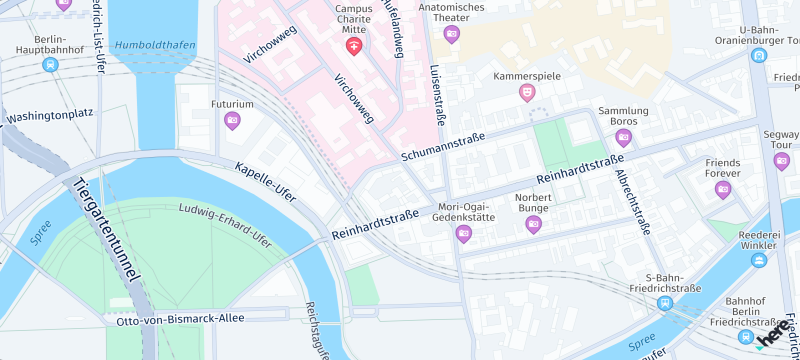
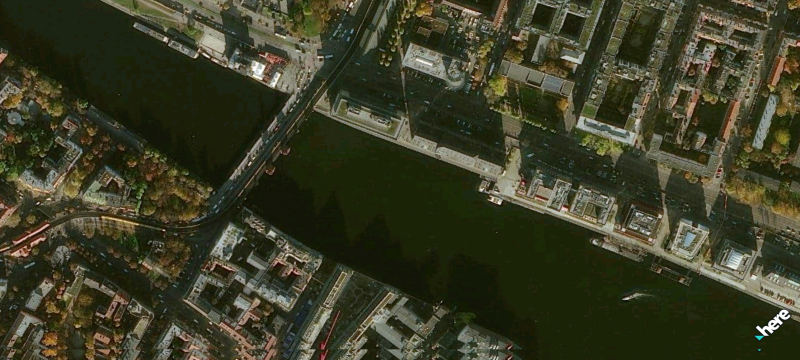
Before you can see any vector tiles on the map, we must load a map scheme. Here we load MapScheme.normalDay. As an exercise, you can try to replace the above map scheme with the following: MapScheme.satellite. What do you get? Try out also other map schemes, like the normal night scheme.
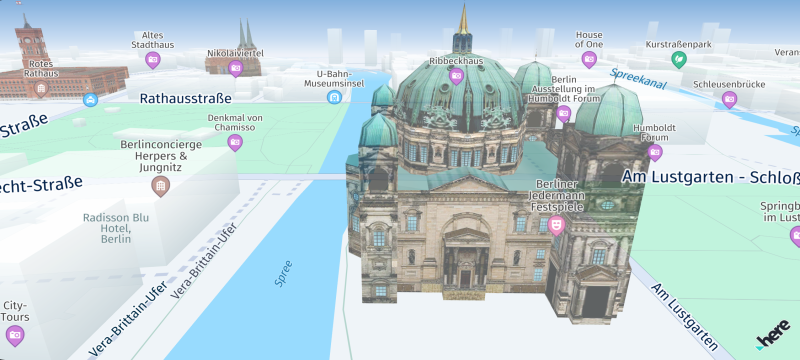
Or experiment with one of the available map layers (only available for Navigate). For example, to enable textured 3D models of prominent landmarks, add the following line of code to your app:
hereMapController.mapScene.enableFeatures({MapFeatures.landmarks: MapFeatureModes.landmarksTextured});The view onto the map can be defined via the camera object. In the example above we show a location in Berlin, Germany.
Handle the lifetime
In addition, it is recommended to free resources when leaving the app by calling SDKNativeEngine.sharedInstance?.dispose() and SdkContext.release(). The SDKNativeEngine is implicitly created and set when the HERE SDK is automatically initialized. This can be done in the overridden dispose() method of a stateful widget. More information on initialization can be found here.
Note that when an app is shutting down anyways, then it is not mandatory to dispose of the SDKNativeEngine, but it doesn't do harm to do it and it is considered good practice to cancel ongoing requests and shut down the HERE SDK services. On the other hand, be careful to not dispose the HERE SDK too early when only one of your widgets is destroyed and other parts of your app still need the HERE SDK. In general, it is also possible to init / dispose the HERE SDK for each widget individually.
Build and run
Now, it's time to build and run the app. Attach a device or start an emulator or simulator and execute flutter run from the app's directory - or run the app from within your IDE. If all goes well, you should see a HERE map covering the screen.
Next steps
- Learn more about the features of the HERE SDK. See the Feature list topic.
- Learn how to use the HERE SDK to develop for CarPlay and Android Auto. See Integration with CarPlay and Android Auto.
Updated 15 days ago