

Add UI building blocks
This section presents various UI elements and related code snippets that are already available as part of the HERE SDK offering. From maneuver instructions and maneuver icon assets to visual route representation, discover how to integrate these elements into your application interface. More reusable UI building blocks are planned for the future.
Get maneuver instructions
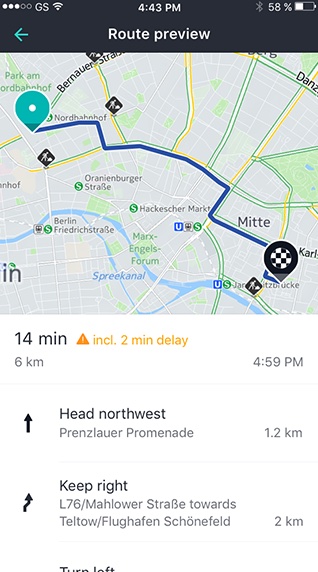
Each Section of a Route object contains maneuver instructions a user may need to follow to reach the destination. For each turn, a Maneuver object contains an action and the location where the maneuver must be taken. The action may indicate actions like "depart" or directions such as "turn left".
// Log maneuver instructions per route section.
List<Section> sections = route.getSections();
for (Section section : sections) {
    logManeuverInstructions(section);
}
// Log maneuver instructions per route section.
val sections: List<Section> = route.sections
for (section in sections) {
logManeuverInstructions(section)
}And here is the code to access the maneuver instructions per section:
private void logManeuverInstructions(Section section) {
    Log.d(TAG, "Log maneuver instructions per route section:");
    List<Maneuver> maneuverInstructions = section.getManeuvers();
    for (Maneuver maneuverInstruction : maneuverInstructions) {
        ManeuverAction maneuverAction = maneuverInstruction.getAction();
        GeoCoordinates maneuverLocation = maneuverInstruction.getCoordinates();
        String maneuverInfo = maneuverInstruction.getText()
                + ", Action: " + maneuverAction.name()
                + ", Location: " + maneuverLocation.toString();
        Log.d(TAG, maneuverInfo);
    }
}
private fun logManeuverInstructions(section: Section) {
Log.d(TAG, "Log maneuver instructions per route section:")
val maneuverInstructions: List<Maneuver> = section.maneuvers
for (maneuverInstruction in maneuverInstructions) {
val maneuverAction: ManeuverAction = maneuverInstruction.action
val maneuverLocation: GeoCoordinates = maneuverInstruction.coordinates
val maneuverInfo: String = (maneuverInstruction.text
+ ", Action: " + maneuverAction.name
+ ", Location: " + maneuverLocation.toString())
Log.d(TAG, maneuverInfo)
}
}This may be useful to easily build maneuver instructions lists describing the whole route in written form. For example, the ManeuverAction enum can be used to build your own unique routing experience.
Note (HERE SDK for Android Navigate)
Note that the
Maneuverinstruction text (maneuverInstruction.getText()) is empty during navigation when it is taken fromNavigatororVisualNavigator. It only contains localized instructions when taken from aRouteinstance. TheManeuverActionenum is supposed to be used to show a visual indicator during navigation, and textual instructions fit more into a list to preview maneuvers before starting a trip.In opposition,
maneuverInstruction.getRoadTexts(),maneuverInstruction.getNextRoadTexts()andmaneuverInstruction.getExitSignTexts()are meant to be shown as part of turn-by-turn maneuvers during navigation, so they are only non-empty when theManeuveris taken fromNavigatororVisualNavigator. If taken from aRouteinstance, these attributes are always empty.
Note (HERE SDK for Android Explore)
The attributes
maneuverInstruction.getRoadTexts(),maneuverInstruction.getNextRoadTexts()andmaneuverInstruction.getExitSignTexts()are only available for users of licenses such as Navigate as they are meant to be shown as part of turn-by-turn maneuvers during navigation. If taken from aRouteinstance, these attributes are always empty.
In the API Reference you can find an overview of the available maneuver actions.
The below table shows all ManeuverAction items with a preview description and an asset example. Note that the HERE SDK itself does not ship with maneuver icons. The assets are available as SVGs or solid PNGs in different densities as part of the open-source HERE Icon Library.
The available maneuver actions are sorted in the order as they appear in the API Reference:
| Maneuver Action | Description Example | Icon Example |
|---|---|---|
| ARRIVE | Arrival maneuver, such as "Arrive at". Example description for in-between waypoint(s): "Arrive at <road name | waypoint>". For the destination of a route: "Arrive at <road name | destination name | destination>". |

|
| CONTINUE_ON | Continue maneuver, such as "Continue on <road name>". |

|
| DEPART | Departure maneuver, such as "Start at <road name>". |

|
| ENTER_HIGHWAY_FROM_LEFT | Merge onto a highway from the left side, which effectively means the driver has to move right to enter the highway. Such a maneuver occurs only in countries that drive on the left side of the road (left-hand traffic) |

|
| ENTER_HIGHWAY_FROM_RIGHT | Merge onto a highway from the right side, which effectively means the driver has to move left to enter the highway. Such a maneuver occurs only in countries that drive on the right side of the road (right-hand traffic). |

|
| LEFT_EXIT | Left exit maneuver, such as "Take the left exit to <next road name>". |

|
| LEFT_FORK | Left fork maneuver, such as "Take the left fork onto <next road name>". |

|
| LEFT_RAMP | Left ramp maneuver, such as "Take the left ramp onto". |

|
| LEFT_ROUNDABOUT_ENTER | Roundabout maneuver (left-hand traffic), such as "Enter the roundabout". |

|
| LEFT_ROUNDABOUT_EXIT1 | Roundabout maneuver (left-hand traffic), such as "Take the first exit of the roundabout". |

|
| LEFT_ROUNDABOUT_EXIT10 | Roundabout maneuver (left-hand traffic), such as "Take the tenth exit of the roundabout". |

|
| LEFT_ROUNDABOUT_EXIT11 | Roundabout maneuver (left-hand traffic), such as "Take the eleventh exit of the roundabout". |

|
| LEFT_ROUNDABOUT_EXIT12 | Roundabout maneuver (left-hand traffic), such as "Take the twelfth exit of the roundabout". |

|
| LEFT_ROUNDABOUT_EXIT2 | Roundabout maneuver (left-hand traffic), such as "Take the second exit of the roundabout". |

|
| LEFT_ROUNDABOUT_EXIT3 | Roundabout maneuver (left-hand traffic), such as "Take the third exit of the roundabout". |

|
| LEFT_ROUNDABOUT_EXIT4 | Roundabout maneuver (left-hand traffic), such as "Take the fourth exit of the roundabout". |

|
| LEFT_ROUNDABOUT_EXIT5 | Roundabout maneuver (left-hand traffic), such as "Take the fifth exit of the roundabout". |

|
| LEFT_ROUNDABOUT_EXIT6 | Roundabout maneuver (left-hand traffic), such as "Take the sixth exit of the roundabout". |

|
| LEFT_ROUNDABOUT_EXIT7 | Roundabout maneuver (left-hand traffic), such as "Take the seventh exit of the roundabout". |

|
| LEFT_ROUNDABOUT_EXIT8 | Roundabout maneuver (left-hand traffic), such as "Take the eighth exit of the roundabout". |

|
| LEFT_ROUNDABOUT_EXIT9 | Roundabout maneuver (left-hand traffic), such as "Take the ninth exit of the roundabout". |

|
| LEFT_ROUNDABOUT_PASS | Roundabout maneuver (left-hand traffic), such as "Pass the roundabout". |

|
| LEFT_TURN | Left turn maneuver, such as "Turn left on <next road name>". |

|
| LEFT_U_TURN | Left-hand U-turn maneuver, such as "Make a U-turn at <next road name>". |

|
| MIDDLE_FORK | Middle fork maneuver, such as "Take the middle fork onto <next road name>". |

|
| RIGHT_EXIT | Right exit maneuver, such as "Take the right exit to <next road name>". |

|
| RIGHT_FORK | Right fork maneuver, such as "Take the right fork onto <next road name>". |

|
| RIGHT_RAMP | Right ramp maneuver, such as "Take the right ramp onto". |

|
| RIGHT_ROUNDABOUT_ENTER | Roundabout maneuver (right-hand traffic), such as "Enter the roundabout". |

|
| RIGHT_ROUNDABOUT_EXIT1 | Roundabout maneuver (right-hand traffic), such as "Take the first exit of the roundabout". |

|
| RIGHT_ROUNDABOUT_EXIT10 | Roundabout maneuver (right-hand traffic), such as "Take the tenth exit of the roundabout". |

|
| RIGHT_ROUNDABOUT_EXIT11 | Roundabout maneuver (right-hand traffic), such as "Take the eleventh exit of the roundabout". |

|
| RIGHT_ROUNDABOUT_EXIT12 | Roundabout maneuver (right-hand traffic), such as "Take the twelfth exit of the roundabout". |

|
| RIGHT_ROUNDABOUT_EXIT2 | Roundabout maneuver (right-hand traffic), such as "Take the second exit of the roundabout". |

|
| RIGHT_ROUNDABOUT_EXIT3 | Roundabout maneuver (right-hand traffic), such as "Take the third exit of the roundabout". |

|
| RIGHT_ROUNDABOUT_EXIT4 | Roundabout maneuver (right-hand traffic), such as "Take the fourth exit of the roundabout". |

|
| RIGHT_ROUNDABOUT_EXIT5 | Roundabout maneuver (right-hand traffic), such as "Take the fifth exit of the roundabout". |

|
| RIGHT_ROUNDABOUT_EXIT6 | Roundabout maneuver (right-hand traffic), such as "Take the sixth exit of the roundabout". |

|
| RIGHT_ROUNDABOUT_EXIT7 | Roundabout maneuver (right-hand traffic), such as "Take the seventh exit of the roundabout". |

|
| RIGHT_ROUNDABOUT_EXIT8 | Roundabout maneuver (right-hand traffic), such as "Take the eighth exit of the roundabout". |

|
| RIGHT_ROUNDABOUT_EXIT9 | Roundabout maneuver (right-hand traffic), such as "Take the ninth exit of the roundabout". |

|
| RIGHT_ROUNDABOUT_PASS | Roundabout maneuver (right-hand traffic), such as "Pass the roundabout". |

|
| RIGHT_TURN | Right turn maneuver, such as "Turn right on <next road name>". |

|
| RIGHT_U_TURN | Right u-turn maneuver, such as "Make a right U-turn at <next road name>". |

|
| SHARP_LEFT_TURN | Sharp left turn maneuver, such as "Make a hard left turn onto <next road name>". |

|
| SHARP_RIGHT_TURN | Sharp right turn maneuver, such as "Make a hard right turn onto <next road name>". |

|
| SLIGHT_LEFT_TURN | Slight left turn maneuver, such as "Bear left onto <next road name>". |

|
| SLIGHT_RIGHT_TURN | Slight right turn maneuver, such as "Bear right onto <next road name>". |

|
Note that for now, the HERE assets for LEFT_ROUNDABOUT_PASS and RIGHT_ROUNDABOUT_PASS are only available as SVGs - and some maneuver assets are only available in the sub-folder "wego-fallback-roundabout".
Get road shield icons
With iconProvider.createRoadShieldIcon(...) you can asynchronously create a Bitmap that depicts a road number such as "A7" or "US-101" - as it already appears on the map view.
The creation of road shield icons happens offline and does not require an internet connection. The data you need to create the icons is taken solely from the Route itself, but can be filled out also manually.

You can find a usage example as part of the "Rerouting" example app on GitHub. Note that this app requires the HERE SDK (Navigate), but the code for the IconProvider can be also used by other editions, for example, to show road shield icons as part of a route preview. You can get more information on the IconProvider in the Get road shield icons chapter.
Reusable maneuver panel and speed limit view (Navigate Only)
The following example apps show reusable UI building blocks that you can adapt to your own navigation experience.
- Maneuver panel view: See the Rerouting (Android Java) example app. It shows turn instructions, maneuver icons, and road shield icons during guidance.
- Speed limit view: See the TruckGuidance (Android Java) example app. It shows current truck and car speed limits as part of the guidance UI.
Use a maneuver panel view
To show the next maneuver during turn-by-turn navigation, create a custom view that can render a maneuver icon, a distance text, and a road name. Place that view on top of the map and update it from the VisualNavigator.
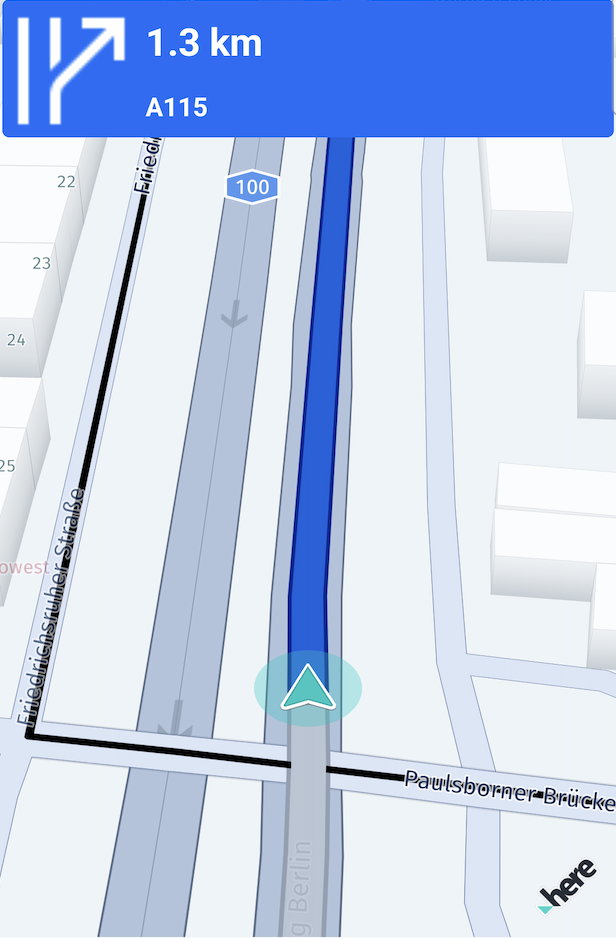
The full ManeuverView class implementation is available in the Rerouting example app on GitHub.
In the Android example app, the navigator logic is separated from the UI. The navigation layer sends maneuver updates to the activity through a small callback interface, and the activity forwards those values to the custom view.
The callback interface looks like this:
public interface UICallback {
  void onManeuverEvent(ManeuverAction action, String distanceText, String roadName);
  void onRoadShieldEvent(Bitmap maneuverIcon);
  void onHideRoadShieldIcon();
  void onHideManeuverPanel();
}
Your activity can then forward the maneuver data to the view:
reroutingExample.setUICallback(new UICallback() {
  @Override
  public void onManeuverEvent(ManeuverAction action, String message1, String message2) {
    Bitmap maneuverIcon = maneuverIconProvider.getManeuverIcon(action);
    String maneuverIconText = action.name();
    maneuverView.onManeuverEvent(maneuverIcon, maneuverIconText, message1, message2);
  }

  @Override
  public void onRoadShieldEvent(Bitmap maneuverIcon) {
    maneuverView.onRoadShieldEvent(maneuverIcon);
  }

  @Override
  public void onHideRoadShieldIcon() {
    maneuverView.onHideRoadShieldIcon();
  }

  @Override
  public void onHideManeuverPanel() {
    maneuverView.onHideManeuverPanel();
  }
});
The maneuver data itself comes from routeProgress.maneuverProgress. From there, resolve the next Maneuver, extract the action, remaining distance, and road name, and then update the custom view.
The following code shows the essential step of retrieving the next maneuver and updating the UI model:
private String parseManeuver(ManeuverProgress nextManeuverProgress) {
  int nextManeuverIndex = nextManeuverProgress.maneuverIndex;
  Maneuver nextManeuver = visualNavigator.getManeuver(nextManeuverIndex);

  if (nextManeuver == null) {
    return "Error: No next maneuver.";
  }

  ManeuverAction action = nextManeuver.getAction();
  String roadName = getRoadName(nextManeuver, visualNavigator.getRoute());
  String distanceText = convertDistance(nextManeuverProgress.remainingDistanceInMeters);

  uiCallback.onManeuverEvent(action, distanceText, roadName);
  return action.name() + " on " + roadName + " in " + distanceText;
}
Use a speed limit view
To show the current legal speed limit, create a small custom view that displays one formatted value, for example, 50, NSL, or n/a. Place that view on top of the map and update it from speed limit events delivered by the navigator.
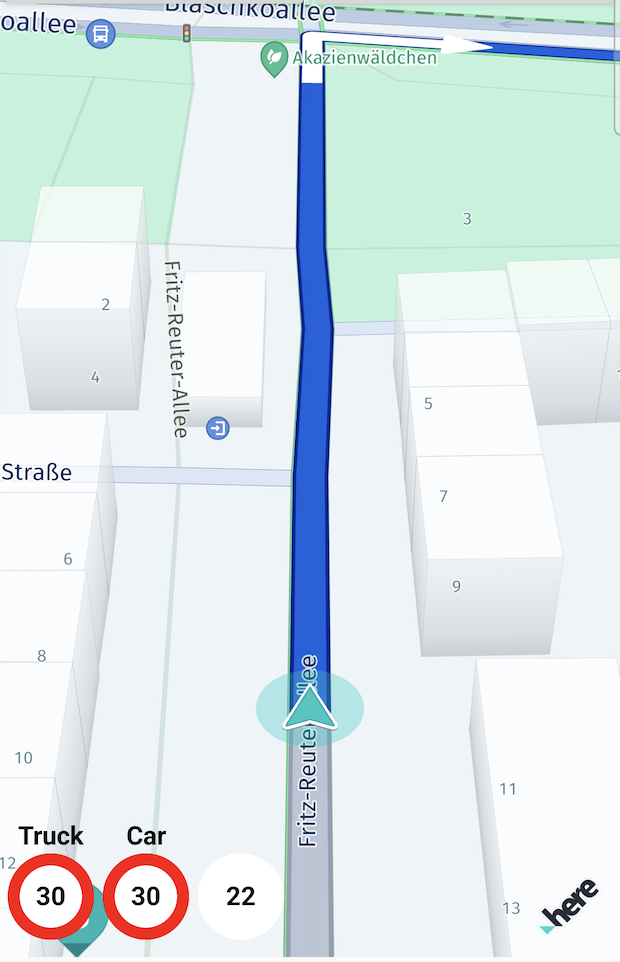
The TruckGuidance example app uses the same callback-based pattern. This keeps the HERE SDK integration code independent from the concrete view implementation.
The full SpeedView class implementation is available in the TruckGuidance example app on GitHub.
The callback interface looks like this:
public interface UICallback {
  void onTruckSpeedLimit(String speedLimit);
  void onCarSpeedLimit(String speedLimit);
  void onDrivingSpeed(String drivingSpeed);
}
Your activity can then forward the formatted values to the view:
truckGuidanceExample.setUICallback(new UICallback() {
  @Override
  public void onTruckSpeedLimit(String speedLimit) {
    truckSpeedLimitView.setSpeedLimit(speedLimit);
  }

  @Override
  public void onCarSpeedLimit(String speedLimit) {
    carSpeedLimitView.setSpeedLimit(speedLimit);
  }

  @Override
  public void onDrivingSpeed(String drivingSpeed) {
    drivingSpeedView.setSpeedLimit(drivingSpeed);
  }
});
The speed limit update logic itself is straightforward: read speedLimit.effectiveSpeedLimitInMetersPerSecond(), convert the value to the unit you want to show, and update the custom view. When the returned value is 0, you can show NSL. When the value is unavailable, you can show n/a.
The following example shows the minimal integration logic:
visualNavigator.setSpeedLimitListener(speedLimit -> {
  Double currentSpeedLimit = speedLimit.effectiveSpeedLimitInMetersPerSecond();
  if (currentSpeedLimit == null) {
    uiCallback.onTruckSpeedLimit("n/a");
  } else if (currentSpeedLimit == 0) {
    uiCallback.onTruckSpeedLimit("NSL");
  } else {
    int kmh = (int) metersPerSecondToKilometersPerHour(currentSpeedLimit);
    uiCallback.onTruckSpeedLimit("" + kmh);
  }
});
If your application distinguishes between truck and car speed limits, you can use the same pattern as the TruckGuidance example app: use the VisualNavigator that follows the truck route for truck-specific limits, and a second Navigator in tracking mode to receive the corresponding car speed limits for the same location.
Show the route on the map
Below is a code snippet that shows how to show a route on the map by using a MapPolyline that is drawn between each coordinate of the route including the starting point and the destination:
GeoPolyline routeGeoPolyline = route.getGeometry();
float widthInPixels = 20;
Color polylineColor = Color.valueOf(0, 0.56f, 0.54f, 0.63f);
MapPolyline routeMapPolyline = null;

try {
    routeMapPolyline = new MapPolyline(routeGeoPolyline, new MapPolyline.SolidRepresentation(
            new MapMeasureDependentRenderSize(RenderSize.Unit.PIXELS, widthInPixels),
            polylineColor,
            LineCap.ROUND));
} catch (MapPolyline.Representation.InstantiationException e) {
    Log.e("MapPolyline Representation Exception:", e.error.name());
} catch (MapMeasureDependentRenderSize.InstantiationException e) {
    Log.e("MapMeasureDependentRenderSize Exception:", e.error.name());
}

mapView.getMapScene().addMapPolyline(routeMapPolyline);
val routeGeoPolyline: GeoPolyline = route.geometry
val widthInPixels = 20f
val polylineColor = Color(0f, 0.56.toFloat(), 0.54.toFloat(), 0.63.toFloat())
var routeMapPolyline: MapPolyline? = null
try {
routeMapPolyline = MapPolyline(
routeGeoPolyline, MapPolyline.SolidRepresentation(
MapMeasureDependentRenderSize(RenderSize.Unit.PIXELS, widthInPixels.toDouble()),
polylineColor,
LineCap.ROUND
)
)
} catch (e: MapPolyline.Representation.InstantiationException) {
Log.e("MapPolyline Representation Exception:", e.error.name)
} catch (e: MapMeasureDependentRenderSize.InstantiationException) {
Log.e("MapMeasureDependentRenderSize Exception:", e.error.name)
}
mapView.mapScene.addMapPolyline(routeMapPolyline)The first screenshot below shows a route without additional waypoints - and therefore only one route section. Starting point and destination are indicated by green-circled map marker objects. Note that the code for drawing the circled objects is not shown here, but can be seen from the example's source code, if you are interested.
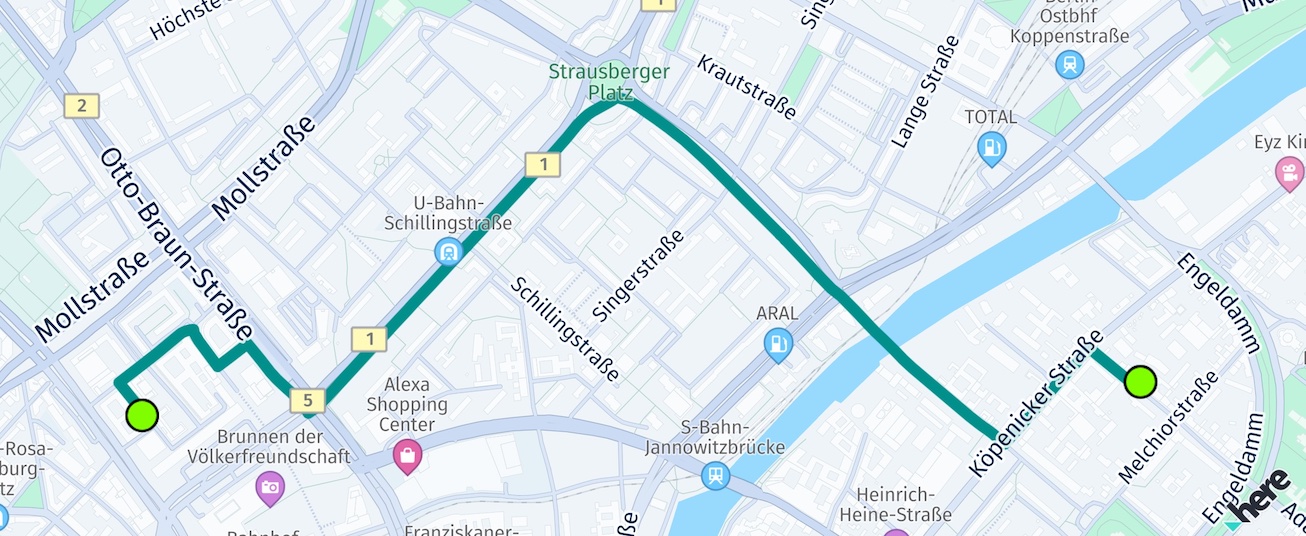
The second screenshot shows the same route as above, but with two additional STOPOVER-waypoints, indicated by red-circled map marker objects. The route therefore, contains three route sections.
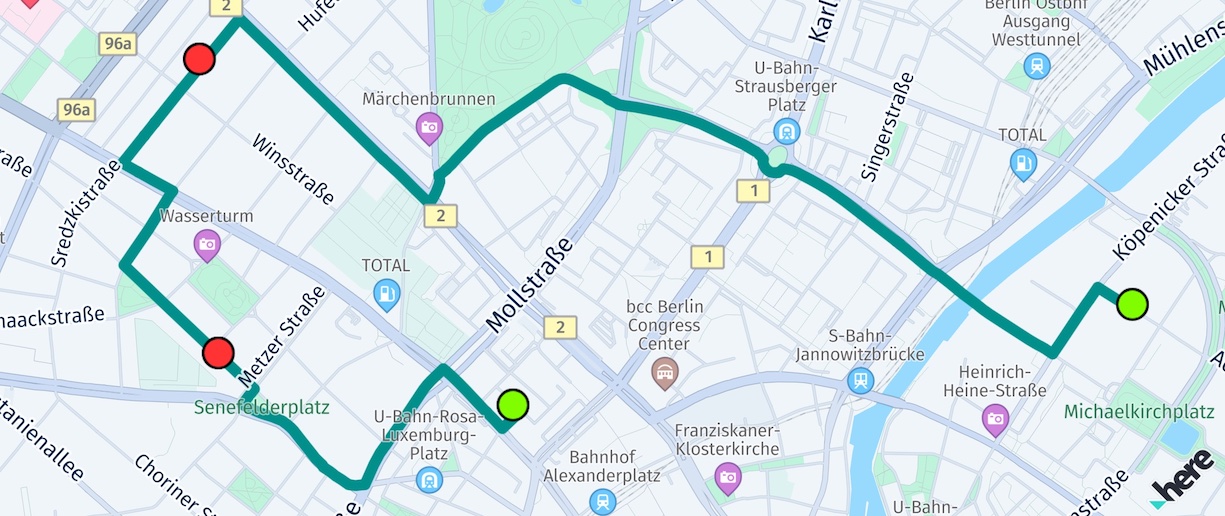
Additional stopover-waypoints split a route into separate sections and force the route to pass these points and to generate a maneuver instruction for each point.
Note that internally, rendering of the MapPolyline is optimized for very long routes. For example, on a higher zoom level, not every coordinate needs to be rendered, while for lower zoom levels, the entire route is not visible. The algorithm for this is not exposed, but the basic principle can be seen in the flexible-polyline open-source project from HERE.
Zoom to the route
For some use cases, it may be useful to zoom to the calculated route. The camera class provides a convenient method to adjust the viewport so that a route fits in:
GeoBox routeGeoBox = route.getBoundingBox();
// Set null values to keep the default map orientation.
camera.lookAt(routeGeoBox, new GeoOrientationUpdate(null, null));
Here we use the enclosing bounding box of the route object. This can be used to instantly update the camera: zoom level and target point of the camera will be changed, so that the given bounding rectangle fits exactly into the viewport. Additionally, we can specify an orientation to specify more camera parameters - here we keep the default values. Note that calling lookAt() will instantly change the view.
For most use cases, a better user experience is to zoom to the route with an animation. Below you can see an example that zooms to a GeoBox plus an additional padding of 50 pixels:
private void animateToRoute(Route route) {
    // The animation should result in an untilted and unrotated map.
    double bearing = 0;
    double tilt = 0;
    // We want to show the route fitting in the map view with an additional padding of 50 pixels
    Point2D origin = new Point2D(50, 50);
    Size2D sizeInPixels = new Size2D(mapView.getWidth() - 100, mapView.getHeight() - 100);
    Rectangle2D mapViewport = new Rectangle2D(origin, sizeInPixels);

    // Animate to the route within a duration of 3 seconds.
    MapCameraUpdate update = MapCameraUpdateFactory.lookAt(
            route.getBoundingBox(),
            new GeoOrientationUpdate(bearing, tilt),
            mapViewport);
    MapCameraAnimation animation =
            MapCameraAnimationFactory.createAnimation(update, Duration.ofMillis(3000), new Easing(EasingFunction.IN_CUBIC));
    mapView.getCamera().startAnimation(animation);
}
The CameraKeyframeTracks example app shows how this can look like.
Show traffic with routes
For information on how to visualize traffic conditions on routes, including rendering polylines adjacent to traffic flow and custom traffic overlays, see Visualize traffic on routes.
Updated 2 days ago