Optimize navigation
This section explores additional features and customization options that help you tailor the navigation process to meet specific user needs and scenarios, providing a seamless and robust navigation experience.
Update the map view during navigation
During navigation, whether following a predetermined route or not, it's important to maintain an accurate and informative map view. Key tasks include:
- Following the current location: Keep the map centered on the user's current position.
- Showing a location arrow: Indicate the user's current direction with an arrow.
- Rotating the map: Align the map orientation with the user's current direction.
- Adding visual assets: Incorporate additional elements such as maneuver icons for clearer guidance.
You can manage these tasks by either responding to location updates manually or leveraging the VisualNavigator to automate these processes.
Each new location event results in a new NavigableLocation that holds a map-matched location calculated out of the original GPS signal that we have fed into the VisualNavigator. This map-matched location can then be consumed to update the map view.
One caveat is that getting location updates happens in most cases frequently, but nevertheless in discrete steps - this means that between each location may lie a few hundred meters. When updating the camera to the new location, this may cause a little jump.
On the other hand, when using the rendering capabilities of the VisualNavigator, you can benefit from smoothly interpolated movements: depending on the speed of the driver, the missing coordinates between two location updates are interpolated and the target map location is automatically updated for you.
In addition, the VisualNavigator tilts the map, rotates the map into the heading direction and shows a 3D location arrow and a LocationIndicator. All of this can be activated with one line of code:
visualNavigator.startRendering(mapView: mapView)
In addition, you can stop following the current location with:
visualNavigator.cameraBehavior = nilAnd enable it again with:
// Alternatively, use DynamicCameraBehavior to auto-zoom the camera during guidance.
visualNavigator.cameraBehavior = FixedCameraBehavior()
By default, camera tracking is enabled. And thus, the map is always centered on the current location. This can be temporarily disabled to allow the user to pan away manually and to interact with the map during navigation or tracking. The 3D location arrow will then keep moving, but the map will not move. Once the camera tracking mode is enabled again, the map will jump to the current location and smoothly follow the location updates again.
To stop any ongoing navigation, call visualNavigator.route = nil, reset the above delegates to nil or simply call stop() on your location provider. More information can be found in the Start and stop guidance section.
For the full source code, please check the corresponding navigation example app.
Customize the navigation experience
The "NavigationCustom" example app shows how to switch to a custom LocationIndicator and to a different type when navigation has stopped. It also shows how the navigation perspective can be customized. Find the example apps on GitHub.
- With the
CameraBehavioryou can customize how the map view will look like during guidance. It allows to set an auto-zoom behavior with theDynamicCameraBehavioror a static tilt and zoom orientation with theFixedCameraBehaviorthat can be updated programmatically. It allows also other options like changing the principal point. TheSpeedBasedCameraBehavioralso provides customization options and it is the best choice during tracking mode. - With
ManeuverNotificationOptionsyou can specify when TTS voice commands should be forwarded.
With the headless Navigator, you get no default or customizable render options - instead, you can render the whole map view on your own - for example, if you want to have bigger route lines or any other visual customization, you can use the general rendering capabilities of the HERE SDK. However, you may also need to implement interpolation - which is already incorporated in the VisualNavigator.
When using the VisualNavigator you can disable certain render features, like route rendering or showing the default LocationIndicator: in order to still render a smooth map experience, you have to take care to update the map view's current target location yourself: a location provider will send new location updates only in discrete steps, which will - even when delivered with a high frequency - lead to a "jumping" map view. Therefore, consider to use the InterpolatedLocationListener to get the same smoothened location updates as by default.
By default, the MapView renders at 60 frames per second (fps). When turn-by-turn navigation is enabled via the VisualNavigator, the frame rate is reduced to 30 fps. This value can be customized; for example, it is set to 60 fps below.
visualNavigator.guidanceFrameRate = 60Customize the location indicator
The preconfigured MapMarker3D instance can also be customized by setting your own model - or it can be disabled. Internally, the VisualNavigator uses a LocationIndicator instance and thus you can set also a custom LocationIndicator to the VisualNavigator. When this is done, you also need to manually add, remove and update the instance. Similar, as when you already use a LocationIndicator instance on the map view, see the related map items section.
By default, the style of the LocationIndicator will be determined from the transport mode that can be set for the VisualNavigator. If a route is set, then it is taken from the route instance instead. If a custom asset is used, then the style must be switched directly via the LocationIndicator class.
NoteThe "NavigationCustom" example app shows how to switch to a custom
LocationIndicatorand to a different type when navigation has stopped. It also shows how the navigation perspective can be customized.
Route eat-up
By default, the VisualNavigator renders a Route with different colors to visually separate the travelled part behind the current location from the part ahead of the user. This can disabled or customized. By default, the same colors are used as for the HERE WeGo mobile application.
If you want to disable the route eat-up visualization, call:
visualNavigator.isRouteProgressVisible = falseDefault VisualNavigatorColors are available for day & night mode. For example, to switch colors depending on the daytime. The default colors can be customized like shown below:
private func customizeVisualNavigatorColors() {
    let routeAheadColor = UIColor.blue
    let routeBehindColor = UIColor.red
    let routeAheadOutlineColor = UIColor.yellow
    let routeBehindOutlineColor = UIColor.gray
    let maneuverArrowColor = UIColor.green

    let visualNavigatorColors = VisualNavigatorColors.dayColors()
    let routeProgressColors = RouteProgressColors(
        ahead: routeAheadColor,
        behind: routeBehindColor,
        outlineAhead: routeAheadOutlineColor,
        outlineBehind: routeBehindOutlineColor
    )

    // Sets the color used to draw maneuver arrows.
    visualNavigatorColors.maneuverArrowColor = maneuverArrowColor
    // Sets route color for a single transport mode. Other modes are kept using defaults.
    visualNavigatorColors.setRouteProgressColors(sectionTransportMode: SectionTransportMode.car, routeProgressColors: routeProgressColors)
    // Sets the adjusted colors for route progress and maneuver arrows based on the day color scheme.
    visualNavigator?.colors = visualNavigatorColors
}
Note that this also allows to change the colors of maneuver arrows that are rendered along to path to indicate the next turns.
Get UI assets
With a few exceptions like for the VisualNavigator, the HERE SDK does not provides UI or UI assets for building your own apps - and most guidance information that is available along a route is given as simple data types.
-
However, reusable assets for use in your own applications can be found in the official HERE Icon Library.
-
A reusable UI building block for showing a basic maneuver panel including open source assets for maneuver actions taken from the HERE Icon Library can be found as part of the Rerouting example app you can found on GitHub.
Adjust the notification frequency
All events, such as RouteProgress or the several warning events, are sent in response to a location update. When using the LocationEngine, use at least LocationAccuracy.navigation for which the update frequency is as close to one second as possible.
Exceptions from this rule are event-driven notifications such as for RouteDeviation, RoadAttributes, RoadTexts, Milestone, or ManeuverViewLaneAssistance events: after each location update there is a check if such events need to be delivered. Usually, this happens when the attribute changes on the current road.
For some events, the threshold is configurable, such as for maneuver notification texts via ManeuverNotificationTimingOptions.
The warning notification distance for warners can be configured as described in configure notification distances.
Get waypoint events
The VisualNavigator / Navigator classes provide more useful notifications. Below is an example of how to receive notifications on passed waypoints. Note that it is possible to be notified at the destination waypoint in two alternative ways:
- The first delegate below notifies when the destination is reached - and therefore navigation can be stopped.
- Whereas the second delegate below shows how to get notified on all types of waypoints including the destination waypoint.
// Conform to DestinationReachedDelegate.
// Notifies when the destination of the route is reached.
func onDestinationReached() {
    showMessage("Destination reached.")
    // Guidance has stopped. Now consider to, for example,
    // switch to tracking mode or stop rendering or locating or do anything else that may
    // be useful to support your app flow.
    // If the DynamicRoutingEngine was started before, consider to stop it now.
}

// Conform to MilestoneStatusDelegate.
// Notifies when a waypoint on the route is reached or missed.
func onMilestoneStatusUpdated(milestone: Milestone, status: MilestoneStatus) {
    if milestone.waypointIndex != nil && status == MilestoneStatus.reached {
        print("A user-defined waypoint was reached, index of waypoint: \(String(describing: milestone.waypointIndex))")
        print("Original coordinates: \(String(describing: milestone.originalCoordinates))")
    } else if milestone.waypointIndex != nil && status == MilestoneStatus.missed {
        print("A user-defined waypoint was missed, index of waypoint: \(String(describing: milestone.waypointIndex))")
        print("Original coordinates: \(String(describing: milestone.originalCoordinates))")
    } else if milestone.waypointIndex == nil && status == MilestoneStatus.reached {
        // For example, when transport mode changes due to a ferry a system-defined waypoint may have been added.
        print("A system-defined waypoint was reached, index of waypoint: \(String(describing: milestone.mapMatchedCoordinates))")
    } else if milestone.waypointIndex == nil && status == MilestoneStatus.missed {
        // For example, when transport mode changes due to a ferry a system-defined waypoint may have been added.
        print("A system-defined waypoint was missed, index of waypoint: \(String(describing: milestone.mapMatchedCoordinates))")
    }
}
The onMilestoneStatusUpdated() method provides a Milestone instance that contains the information about the passed or missed waypoints along the route. Note that only stopover waypoints are included. Also, the destination waypoint is included and any other stopover waypoint that was added by a user. In addition, waypoints added by the HERE SDK are included, for example, when there is a need to take a ferry. However, the first waypoint - which is the starting point of your trip - is excluded. Waypoints of type passThrough are also excluded by default, but can be included by setting a corresponding flag in the Navigator or VisualNavigator.
A Milestone includes an index that refers to the waypoint list set by the user when calculating the route. If it is not available, then the Milestone refers to a waypoint that was set during the route calculation - for example, when an additional stopover was included by the routing algorithm to indicate that a ferry must be taken.
The MilestoneStatus enum indicates if the corresponding Milestone has been reached or missed.
Handle missing milestone events when starting navigation
The following considerations apply when a route contains overlapping sections.
If a user starts navigation and their current location is before the starting waypoint on an overlapping section, all milestones with a sectionIndex lower than or equal to this section will be notified with either a missed or reached status.
This happens because the HERE SDK attempts to identify nearby sections based on the current location provided by the application. Due to the overlap, the first matching sectionIndex may not be 0 but instead a higher value.
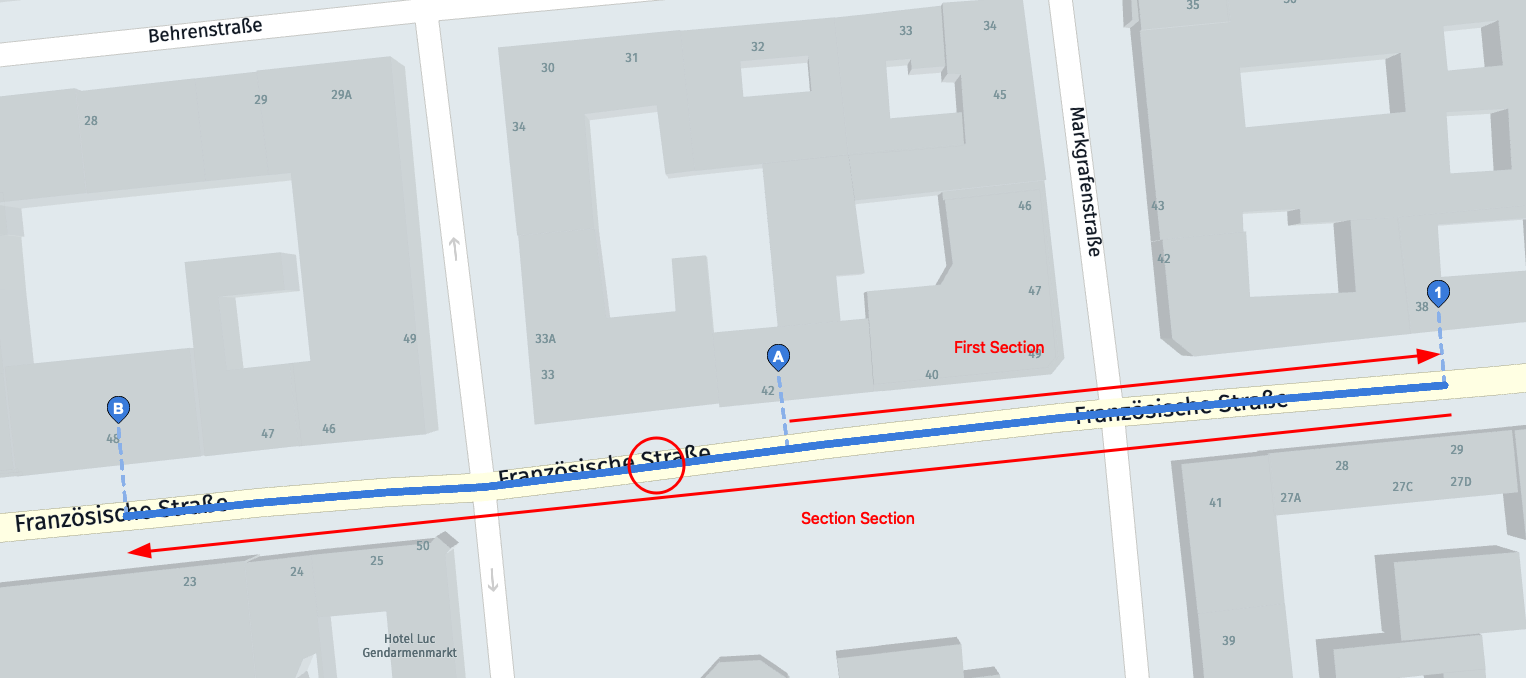
For example, if a route goes from waypoint "A" to waypoint "1" to waypoint "B", as shown in the screenshot, and the user starts navigation between "B" and "A" omitting waypoint "1", a notification will be made that waypoint "1" is a MISSED milestone. The HERE SDK will notify about missed milestones only once. Additionally, a missed milestone event will be triggered if the first location update does not fall within the first section of the route.
If you detect that the user is not starting at "A", consider recalculating the entire route when the user reaches "A" to avoid a missed milestone event for "1" after navigation starts.
In general, if you receive a missed milestone event, consider recalculating the route, just as you would when detecting a route deviation.
Get road shield icons
With iconProvider.createRoadShieldIcon(...) you can asynchronously create a UIImage that depicts a road number such as "A7" or "US-101" - as it already appears on the map view.
The creation of road shield icons happens offline and does not require an internet connection. The data you need to create the icons is taken solely from the Route itself, but can be filled out also manually.
Below we show how to retrieve the data on-the-fly while following a route. Note that not every road, especially smaller roads, can be visualized by a route shield icon. In general, you can show the icons as part of a route preview before starting guidance or, for example, during guidance for the next maneuver to provide a visual hint where the maneuver takes place.
All required information to generate a road shield icon is part of a Route object.
The icon itself is generated from RoadShieldIconProperties that require parameters such as RouteType and LocalizedRoadNumber. These parameters can be retrieved from the Span of a Route object.
Use span.getShieldText(..) to get the shieldText for use with the RoadShieldIconProperties. With span.roadNumbers you can get a list of LocalizedRoadNumber items with additional information such as RouteType (level 1 to 6, indicating whether a road is a major road or not) and CardinalDirection (such as in "101 West").
With IconProvider.IconCallback you can receive the resulting image - or an error.
NoteNote that this is a beta release of this feature, so there could be a few bugs and unexpected behaviors. Related APIs may change for new releases without a deprecation process.
As an example, below you can find a possible solution how to show / hide a road shield icon from with in the RouteProgress event:
// Conform to RouteProgressDelegate.
func onRouteProgressUpdated(_ routeProgress: heresdk.RouteProgress) {
    let maneuverProgressList = routeProgress.maneuverProgress
    guard let nextManeuverProgress = maneuverProgressList.first else {
        print("No next maneuver available.")
        return
    }

    // ...
    // Here you can extract maneuver information from nextManeuverProgress.
    // ...

    let nextManeuverIndex = nextManeuverProgress.maneuverIndex
    let nextManeuver = visualNavigator.getManeuver(index: nextManeuverIndex)

    if previousManeuver == nextManeuver {
        // We are still trying to reach the next maneuver.
        return;
    }
    previousManeuver = nextManeuver;

    // A new maneuver takes places. Hide the existing road shield icon, if any.
    uiCallback?.onHideRoadShieldIcon()

    guard let maneuverSpan = getSpanForManeuver(route: visualNavigator.route!,
                                                maneuver: nextManeuver!) else {
        return
    }
    createRoadShieldIconForSpan(maneuverSpan)
}
For this example, , we use on app-side a uiCallback mechanism to update our view. This code is not relevant here, so it is omitted, but it can be found in accompanying Rerouting example app on GitHub.
You can get the span for a maneuver like so:
private func getSpanForManeuver(route: Route, maneuver: Maneuver) -> Span? {
    let index = Int(maneuver.sectionIndex)
    let sectionOfManeuver = route.sections[index]
    let spansInSection = sectionOfManeuver.spans

    // The last maneuver is located on the last span.
    // Note: Its offset points to the last GeoCoordinates of the route's polyline:
    // maneuver.offset = sectionOfManeuver.geometry.vertices.last.
    if maneuver.action == ManeuverAction.arrive {
        return spansInSection.last
    }

    let indexOfManeuverInSection = maneuver.offset
    for span in spansInSection {
        // A maneuver always lies on the first point of a span. Except for the
        // the destination that is located somewhere on the last span (see above).
        let firstIndexOfSpanInSection = span.sectionPolylineOffset
        if firstIndexOfSpanInSection >= indexOfManeuverInSection {
            return span
        }
    }

    // Should never happen.
    return nil
}
Below you can find the code how to extract the information to generate the road shield icon:
private func createRoadShieldIconForSpan(_ span: Span) {
    guard !span.roadNumbers.items.isEmpty else {
        // Road shields are only provided for roads that have route numbers such as US-101 or A100.
        // Many streets in a city like "Invalidenstr." have no route number.
        return
    }

    // For simplicity, we use the first item as fallback. There can be more numbers you can pick per desired language.
    guard var localizedRoadNumber = span.roadNumbers.items.first else {
        // First time should not be nil when list is not empty.
        return
    }

    // Desired locale identifier for the road shield text.
    let desiredLocale = Locale(identifier: "en_US")
    for roadNumber in span.roadNumbers.items {
        if roadNumber.localizedNumber.locale == desiredLocale {
            localizedRoadNumber = roadNumber
            break
        }
    }

    // The route type indicates if this is a major road or not.
    let routeType = localizedRoadNumber.routeType
    // The text that should be shown on the road shield.
    let shieldText = span.getShieldText(roadNumber: localizedRoadNumber)
    // This text is used to additionally determine the road shield's visuals.
    let routeNumberName = localizedRoadNumber.localizedNumber.text

    if lastRoadShieldText == shieldText {
        // It looks like this shield was already created before, so we opt out.
        return
    }

    lastRoadShieldText = shieldText

    // Most icons can be created even if some properties are empty.
    // If countryCode is empty, then this will result in an IconProviderError.ICON_NOT_FOUND. Practically,
    // the country code should never be null, unless when there is a very rare data issue.
    let countryCode = span.countryCode ?? ""
    let stateCode = span.countryCode ?? ""

    let roadShieldIconProperties = RoadShieldIconProperties(
        routeType: routeType,
        countryCode: countryCode,
        stateCode: stateCode,
        routeNumberName: routeNumberName,
        shieldText: shieldText
    )

    // Set the desired constraints. The icon will fit in while preserving its aspect ratio.
    let widthConstraintInPixels: UInt32 = ManeuverView.roadShieldDimConstraints
    let heightConstraintInPixels: UInt32 = ManeuverView.roadShieldDimConstraints

    // Create the icon offline. Several icons could be created in parallel, but in reality, the road shield
    // will not change very quickly, so that a previous icon will not be overwritten by a parallel call.
    iconProvider.createRoadShieldIcon(properties: roadShieldIconProperties,
                                      mapScheme: MapScheme.normalDay,
                                      assetType: IconProviderAssetType.ui,
                                      widthConstraintInPixels: widthConstraintInPixels,
                                      heightConstraintInPixels: heightConstraintInPixels,
                                      callback: handleIconProviderCallback)
}
Note that we use an additional flag lastRoadShieldText to check if the icon was already created.
The handleIconProviderCallback we can implement like shown below:
private func handleIconProviderCallback(image: UIImage?,
                                        description: String?,
                                        error: IconProviderError?) {
    if let iconProviderError = error {
        print("Cannot create road shield icon: \(iconProviderError.rawValue)")
        return
    }

    // If iconProviderError is nil, it is guaranteed that bitmap and description are not nil.
    guard let roadShieldIcon = image else {
        return
    }

    // A further description of the generated icon, such as "Federal" or "Autobahn".
    let shieldDescription = description ?? ""
    print("New road shield icon: \(shieldDescription)")

    // An implementation can now decide to show the icon, for example, together with the
    // next maneuver actions.
    uiCallback?.onRoadShieldEvent(roadShieldIcon: roadShieldIcon)
}
Again, we use on app-side a uiCallback mechanism to update our view. This code is not relevant here, so it is omitted, but it can be found in accompanying Rerouting example app on GitHub.
Map matching locations
Raw GPS coordinates often differ from the actual road position. Map matching aligns location signals to the road network, improving accuracy during navigation and enabling access to road-specific information.
There are two ways to get map-matched locations with the HERE SDK:
- MapMatcher: a standalone component for manually matching individual locations.
- NavigableLocationListener: an event-driven listener that provides continuous map-matched locations during active navigation (internally uses the MapMatcher).
Get map-matched locations with the MapMatcher
The MapMatcher aligns location signals to the road network, improving accuracy during navigation. Raw coordinates often differ from actual road positions, so the MapMatcher uses past locations, speed, and bearing data to refine results and provide more accurate positioning.
NoteThis is a beta release of this feature, so there could be a few bugs and unexpected behaviors. Related APIs may change for new releases without a deprecation process.
To create a MapMatcher, initialize it with your SDKNativeEngineInstance. You can optionally specify whether to use rendering layers for segment geometry data retrieval.
do {
    try mapMatcher = MapMatcher(sdkEngine: sdkNativeEngineInstance, useRenderingLayers: useRenderingLayers)
} catch let InstantiationError {
    fatalError("Initialization failed. Cause: \(InstantiationError)")
}
By calling match(location) with a Location object, you receive a MapMatchedLocation containing the refined coordinates and road segment information. It's required to set time parameter for each Location object for the MapMatcher to work properly. In case no time is provided, null is returned and an error message is logged. It is used to calculate the distance in time between consecutive matches. Together with speed parameter, this allows to calculate how likely a match is consistent with a previous match. To improve matching accuracy, it is recommended to provide bearing and speed parameters for each Location object.
private func matchLocation(geoCoordinates: GeoCoordinates) {
      let location = Location(coordinates: geoCoordinates, time: Date())

      guard let mapMatcher = mapMatcher else {
          print("MapMatcher is not available")
          return
      }

      let mapMatchedLocation = mapMatcher.match(location: location)

      // A null mapMatchedLocation indicates that the location could not be matched to the road network.
      // This means the location is offroad or the data is not in the cache.
      if let matchedLocation = mapMatchedLocation {
          showDialog(title: "MapMatcher", message: "Map-matched location is highlighted with red dot on the map. Check logs for more information on matched location.")

          // Show the map-matched location on the map.
          if let marker = addMapMarker(geoCoordinates: matchedLocation.coordinates, imageName: "map_matched_location_dot.png") {
              mapMatcherMapMarker = marker
          }

          // Fetch IDs from mapMatchedLocation and convert them into OCMSegmentID required by loadSegmentData method.
          let mapMatchedSegmentId: OCMSegmentId = OCMSegmentId(tilePartitionId: Int32(matchedLocation.segmentReference.tilePartitionId), localId: Int32(matchedLocation.segmentReference.localId!))

          loadSegmentData(ocmSegmentId: mapMatchedSegmentId)
      } else {
          print("Location could not be map-matched. Check if the picked location is within 50-meter radius of a road.")
      }
  }
If mapMatchedLocation is nil, it means the location could not be matched to the road network. This can happen if the location is offroad (currently, matching is performed within a 50-meter radius of the provided location) or if the required map data is not available in the cache.
Once you have accurate map-matched locations, you can leverage them to access detailed road segment information using the SegmentDataLoader. This combination allows you to retrieve precise road attribute for the exact road segments your users are traveling on. For more information on accessing this detailed map data, see Access map data on-the-fly.
The MapMatcher requires OCM tile data through caching, prefetching, or installed offline maps. If necessary tiles are missing, it initiates a silent background download and returns nil immediately. Later calls can use the cached data once available.
A tile covers a larger area, so future matches often benefit from previously downloaded data.
The MapMatcher maintains an internal state across location updates to ensure consistency between consecutive matches and detect unrealistic position jumps due to low-accuracy locations.
You can find an example implementation for this in the RoutingWithAvoidanceOptions example app on GitHub.
Get map-matched locations during navigation
While the standalone MapMatcher provides flexible map-matching capabilities for individual location points, during active navigation you can receive continuous map-matched locations through the NavigableLocationDelegate. It uses MapMatcher internally.
visualNavigator.navigableLocationDelegate = self

...

// Conform to NavigableLocationDelegate.
// Notifies on the current map-matched location and other useful information while driving or walking.
func onNavigableLocationUpdated(_ navigableLocation: NavigableLocation) {
    guard navigableLocation.mapMatchedLocation != nil else {
        print("The currentNavigableLocation could not be map-matched. Are you off-road?")
        return
    }

    lastMapMatchedLocation = navigableLocation.mapMatchedLocation!

    let latitude = mapMatchedLocation.coordinates.latitude
    let longitude = mapMatchedLocation.coordinates.longitude
    print("MapMatchedLocation - Lat: \(latitude), Lon: \(longitude)")

    if (navigableLocation.mapMatchedLocation?.isDrivingInTheWrongWay == true) {
        // For two-way streets, this value is always false. This feature is supported in tracking mode and when deviating from a route.
        print("This is a one way road. User is driving against the allowed traffic direction.");
    }

    let speed = navigableLocation.originalLocation.speedInMetersPerSecond
    let accuracy = navigableLocation.originalLocation.speedAccuracyInMetersPerSecond
    print("Driving speed: \(String(describing: speed)) plus/minus accuracy of \(String(describing: accuracy)).")
}
Each provided location update that is fed in from your location source of choice will result in navigable locations that are matched to the road network. Naturally, raw location signals vary across the real location of a device. Map-matching ensures that the raw location is not jumping across the screen. On top, during turn-by-turn navigation, the geometry of the route is taken into account, for example during tunnel extrapolation.
In addition, the event provides the current speed of the user and it indicates if a user is driving into the wrong direction.
Handle off-road destinations
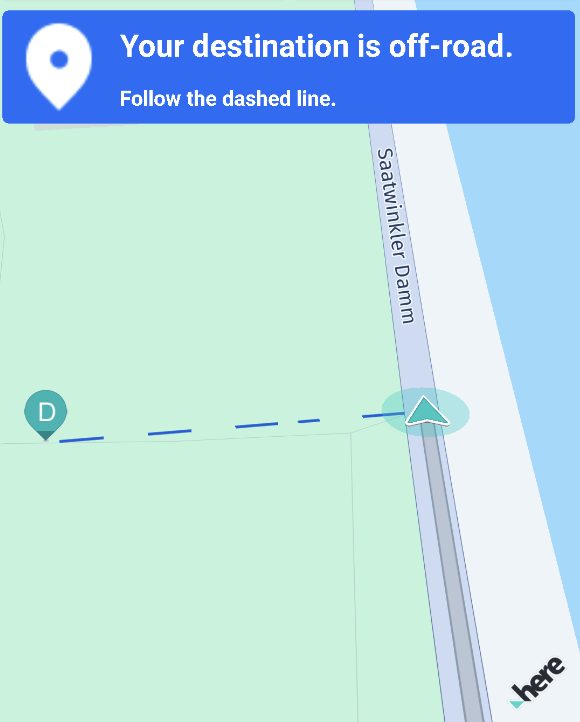
With off-road guidance you can help customers to reach a destination that lies off-road. Usually, guidance stops at the map-matched destination. A destination is considered to be off-road when it can't be map-matched to a road network - for example, when the destination lies in the middle of a forest.
Note that this feature supports only off-road destinations. If the starting point is off-road, then the nearest map-matched location is used for route calculation as starting point, that is the next road - optionally with access points. If the starting point is too far away from a road network, then route calculation will eventually fail with a couldNotMatchOrigin error.
You can detect if the destination is off-road or not and inform the user when the map-matched destination is reached - like shown below:
// Conform to DestinationReachedDelegate.
// Notifies when the destination of the route is reached.
func onDestinationReached() {
    guard let lastSection = lastCalculatedRoute?.sections.last else {
        // A new route is calculated, drop out.
        return
    }
    if lastSection.arrivalPlace.isOffRoad() {
        print("End of navigable route reached.")
        let message1 = "Your destination is off-road."
        let message2 = "Follow the dashed line with caution."
        // Note that for this example we inform the user via UI.
        uiCallback?.onManeuverEvent(action: ManeuverAction.arrive,
                                   message1: message1,
                                   message2: message2)
    } else {
        print("Destination reached.")
        let distanceText = "0 m"
        let message = "You have reached your destination."
        uiCallback?.onManeuverEvent(action: ManeuverAction.arrive,
                                   message1: distanceText,
                                   message2: message)
    }
}
For this example, we use on app-side a uiCallback mechanism to update our view. This code is not relevant here, so it is omitted. It can be found in the accompanying Rerouting example app on GitHub.
If the map-matched destination - for example, the road that leads to a forest - is not reached, then a user will get no off-road guidance. Off-road guidance is only started after receiving the onDestinationReached() event.
NoteWhen off-road events start, then there is no way to go back to the normal guidance mode to receive
RouteProgressevents - unless a new route is set.
Add the following code to provide guidance to the off-road destination:
// Conform to OffRoadProgressDelegate.
// Notifies on the progress when heading towards an off-road destination.
// Off-road progress events will be sent only after the user has reached
// the map-matched destination and the original destination is off-road.
// Note that when a location cannot be map-matched to a road, then it is considered
// to be off-road.
func onOffRoadProgressUpdated(_ offRoadProgress: heresdk.OffRoadProgress) {
    let distanceText = convertDistance(meters: offRoadProgress.remainingDistanceInMeters)
    // Bearing of the destination compared to the user's current position.
    // The bearing angle indicates the direction into which the user should walk in order
    // to reach the off-road destination - when the device is held up in north-up direction.
    // For example, when the top of the screen points to true north, then 180° means that
    // the destination lies in south direction. 315° would mean the user has to head north-west, and so on.
    let message = "Direction of your destination: \(round(offRoadProgress.bearingInDegrees))°"
    uiCallback?.onManeuverEvent(action: ManeuverAction.arrive,
                                message1: distanceText,
                                message2: message)
}

// Conform to OffRoadDestinationReachedDelegate.
// Notifies when the off-road destination of the route has been reached (if any).
func onOffRoadDestinationReached() {
    print("Off-road destination reached.")
    let distanceText = "0 m"
    let message = "You have reached your off-road destination."
    uiCallback?.onManeuverEvent(action: ManeuverAction.arrive,
                                message1: distanceText,
                                message2: message)
}
For this example, we use on app-side a convertDistance() method to convert distances to meters and kilometers. This code is not relevant for use with the HERE SDK, so its implementation is omitted above.
Note that off-road guidance does not provide help before the user has reached the map-matched destination. Also, there is no support for off-road passages during a trip, for example, when a user deviates from a road or moves on unknown roads. Only when a user reaches the last point of the route that can be reached with the known road network, then off-road guidance is started.
By default, the dashed line that leads to the off-road destination is shown on the map - even if none of the above code is present. This can be controlled like so:
// Enable off-road visualization (if any) with a dotted straight-line
// between the map-matched and the original destination (which is off-road).
// Note that the color of the dashed line can be customized, if desired.
// The line will not be rendered if the destination is not off-road.
// By default, this is enabled.
visualNavigator.isOffRoadDestinationVisible = true
NoteThis feature does not guide a user along a path or provides any kind of maneuver information. Please make sure that the provided information is handled with care: only a straight line is drawn from the current location of the user to the off-road destination. In reality, the destination may be unreachable or may lie in dangerous territory that is impossible to be travelled by pedestrians. Make sure to notify your users accordingly.
If a device supports compass data, an application can decide to improve the user experience, so that the device can be rotated to match the off-road visualization - which is only given in form of a dashed line to the destination. Note that such a compass feature would be a pure app-side implementation, as the HERE SDK does not provide support for this.
Find better routes
Use the DynamicRoutingEngine to periodically request optimized routes based on the current traffic situation. This engine searches for new routes that are faster (based on ETA) than the current route you are driving on.
The DynamicRoutingEngine requires an online connection and a RouteHandle. When trying to search for a better route offline or when the RouteHandle is not enabled, a routing error is propagated:
// Enable route handle.
var routingOptions = RoutingOptions()
routingOptions.routeOptions.enableRouteHandle = true
By setting DynamicRoutingEngineOptions, you can define the minTimeDifference before getting notified on a better route. The minTimeDifference is compared to the remaining ETA of the currently set route. The DynamicRoutingEngineOptions also allow to set a pollInterval to determine how often the engine should search for better routes.
private class func createDynamicRoutingEngine() -> DynamicRoutingEngine {
    // Both, minTimeDifference and minTimeDifferencePercentage, will be checked:
    // When the poll interval is reached, the smaller difference will win.
    let minTimeDifferencePercentage = 0.1
    let minTimeDifferenceInSeconds: TimeInterval = 1
    // Below, we use 10 minutes. A common range is between 5 and 15 minutes.
    let pollIntervalInSeconds: TimeInterval = 10 * 60

    let dynamicRoutingOptions =
        DynamicRoutingEngineOptions(minTimeDifferencePercentage: minTimeDifferencePercentage,
                                    minTimeDifference: minTimeDifferenceInSeconds,
                                    pollInterval: pollIntervalInSeconds)

    do {
        // With the dynamic routing engine you can poll the HERE backend services to search for routes with less traffic.
        // This can happen during guidance - or you can periodically update a route that is shown in a route planner.
        //
        // Make sure to call dynamicRoutingEngine.updateCurrentLocation(...) to trigger execution. If this is not called,
        // no events will be delivered even if the next poll interval has been reached.
        return try DynamicRoutingEngine(options: dynamicRoutingOptions)
    } catch let engineInstantiationError {
        fatalError("Failed to initialize DynamicRoutingEngine. Cause: \(engineInstantiationError)")
    }
}
Note that by setting a minTimeDifference of 0, you will get no events. The same applies for minTimeDifferencePercentage. Make sure to set a value >= 0 in order to get events.
NoteThe
DynamicRoutingEngineinitiates periodic calls to the HERE Routing backend. Depending on your contract, each call may be charged separately. It is the application's responsibility to decide how often this code should be executed.
When receiving a better route, the difference to the original route is provided in meters and seconds:
private func startDynamicSearchForBetterRoutes(_ route: Route) {
    do {
        // Note that the engine will be internally stopped, if it was started before.
        // Therefore, it is not necessary to stop the engine before starting it again.
        try dynamicRoutingEngine.start(route: route, delegate: self)
    } catch let instantiationError {
        fatalError("Start of DynamicRoutingEngine failed: \(instantiationError). Is the RouteHandle missing?")
    }
}

// Conform to the DynamicRoutingDelegate.
// Notifies on traffic-optimized routes that are considered better than the current route.
func onBetterRouteFound(newRoute: Route,
                        etaDifferenceInSeconds: Int32,
                        distanceDifferenceInMeters: Int32) {
    print("DynamicRoutingEngine: Calculated a new route.")
    print("DynamicRoutingEngine: etaDifferenceInSeconds: \(etaDifferenceInSeconds).")
    print("DynamicRoutingEngine: distanceDifferenceInMeters: \(distanceDifferenceInMeters).")

    // An implementation needs to decide when to switch to the new route based
    // on above criteria.
}

// Conform to the DynamicRoutingDelegate.
func onRoutingError(routingError: RoutingError) {
    print("Error while dynamically searching for a better route: \(routingError).")
}
Based on the provided etaDifferenceInSeconds and distanceDifferenceInMeters in comparison to the current route, an application can decide if the newRoute should be used. If so, it can be set to the Navigator or VisualNavigator at any time.
NoteNote that the
DynamicRoutingEnginewill not be aware of newly set routes: that means, if you are detecting a route deviation and try to calculate a new route in parallel, for example, by callingroutingEngine.returnToRoute(...), then you need to inform theDynamicRoutingEngineafter a new route is set to thenavigatorinstance. In order to do so, callstop()and thenstart(...)on thedynamicRoutingEngineinstance to start it again with the new route. This can be done right after the route was set to thenavigator- outside of theonBetterRouteFound()callback. TheRouteDeviationevent allows you to calculate how far a user has deviated from a route (see Return to a Route After Deviation).
For simplicity, the recommended flow to set new routes looks like this:
- Decide if a new route should be set.
- If yes, stop the
DynamicRoutingEngine. - Set the new route:
navigator.route = newRoute. - Start the
DynamicRoutingEnginewith the new route.
Make sure to call these steps outside of the onBetterRouteFound() event: use a local flag and follow the above steps when receiving a new location update - for example, before calling dynamicRoutingEngine.updateCurrentLocation(..), see below.
Note that passing a new route during guidance can have an impact on the user experience - it is recommended, to inform users about the change. And it is also recommended to let a user define the criteria upfront. For example, not any etaDifferenceInSeconds may justify to follow a new route.
NoteAlthough the
DynamicRoutingEnginecan be used to update traffic information and ETA periodically, there is no guarantee that the new route is not different. In addition, theDynamicRoutingEngineinforms ondistanceDifferenceInMeters- but an unchanged route length does not necessarily mean that the route shape is the same. However, if only the ETA has changed and length is the same, then it is likely that only the ETA got updated due to an updated traffic situation: if it is crucial for you to stay on the original route, you need to compare the coordinates of the route shape - or consider to calculate a new route on your own withroutingEngine.refreshRoute(). CallingrefreshRoute()will not change the route shape. See Routing section for more details. In opposition, keep in mind that the intended use of theDynamicRoutingEngineis to find better routes and for this it is most often desired to follow a new route shape to bypass any traffic obstacles. Also, a better route can only be found when traffic obstacles are present (or gone) in the route ahead.
Make sure to update the last map-matched location of the driver and set it to the DynamicRoutingEngine as soon as you get it - for example, as part of the RouteProgress or NavigableLocation update. This is important, so that a better route always starts close to the current location of the driver:
dynamicRoutingEngine.updateCurrentLocation(mapMatchedLocation: lastMapMatchedLocation,
                                           sectionIndex: routeProgress.routeMatchedLocation.sectionIndex)
The DynamicRoutingEngine requires a map matched location that lies on the route. If the user has deviated from the route, then you will receive a RoutingError.couldNotMatchOrigin.
The lastMapMatchedLocation you can get from the NavigableLocationListener and sectionIndex from the RouteProgressListener. It is recommended to call updateCurrentLocation() when receiving events from the RouteProgressListener.
Note that after reaching the destination, the engine will not be automatically stopped from running. Therefore, it is recommended to call stop() when the engine is no longer needed.
An example implementation for this can be found in the corresponding navigation example app.
Update traffic information
It is crucial to provide updated arrival times (ETA) including traffic delay time and to inform on traffic obstacles ahead of the current route. How to update traffic information on your trip?
There can be two scenarios:
- Stay on the existing route: In this case, use the
RoutingEngineto callrefreshRoute()periodically. - Find better route alternatives to bypass traffic obstacles: Use the
DynamicRouteEngine. If users should follow the newRoute, you need to set it to theNavigatororVisualNavigatorinstance.
You can take the updated ETA, traffic delay and traffic jam information directly from the Route object.
Note that traffic visualization on the route itself is supported when you render the route polyline on your own. You can find an example for this in the Routing section. This section also explains how to extract traffic information from a Route object.
NoteAlternatively, you can enable the traffic flow layer on the map. With the default settings of the
VisualNavigator, the traffic flow lines will still be visible besides the route polyline on any zoom level. For example, the HERE WeGo application uses this approach to visualize the current traffic situation.
Use prefetched data
You can prepare a trip with prefetched data that is dynamically loaded into the map cache.
This allows to improve the user experience - for example, during turn-by-turn navigation to handle temporary network losses gracefully. More on this feature can be found in the prefetching section.
Navigate offline
Almost all navigation features work also without an internet connection when offline map data has been cached, installed or preloaded: only a few features require an online connection, for example, when using the DynamicRouteEngine to search online for traffic-optimized routes.
Unlike for other engines, the VisualNavigator or the Navigator will automatically try to download online data when reaching regions that have not been cached, installed or preloaded beforehand. And vice versa, both components will make use of offline map data when it is available on a device - even if an online connection is available.
Navigate tunnels
The HERE SDK uses road map-matching and the base speed limit for the current road segment to automatically estimate the location of your vehicle inside a tunnel. With turn-by-turn navigation also the route path is used. This happens only when no strong enough GPS signal is perceived. If a vehicle needs to stop in a tunnel due to a traffic jam, then it may happen that the location arrow would still move forward, because the visualized location is only estimated.
- The
NavigableLocationevent in a tunnel will contain the estimatedLocation, but its time stamp and speed properties will benullintentionally to not provide misleading information. - The estimated
Locationis also accessible through theInterpolatedLocationListener. This listener can be useful even outside of a tunnel, as it continuously provides a calculated location between the discrete GPS signals that are fed in. This listener can be useful when you want to know which location is used by theVisualNavigatorto render theLocationIndicator- or when you want to render it on your own. Usually, location updates arrive with a frequency of 1 Hz. This frequency is too low to achieve a smooth animation as usually the map view is rendered with 60 Hz. Note that the frame rate can be adjusted for theMapView- in that case, also theInterpolatedLocationListenerwill be adjusted accordingly.
An application can detect if (and which) Location updates are fed into the Navigator or VisualNavigator, but as of now there is no API that helps to precisely determine if a NavigableLocation is estimated or not.
It is also possible to disable tunnel extrapolation. By default, tunnel extrapolation is enabled. Use the isEnableTunnelExtrapolation property with the Navigator and VisualNavigator to change this.
Note that with the isExtrapolationEnabled property you can control whether to enable or disable extrapolation logic for location updates. By default, this is enabled. This feature is useful to mitigate issues with a lagging LocationIndicator and it can be used independent from tunnels.