Optimize Positioning
Below, we present additional options for obtaining precise and reliable location data for a variety of applications.
Specify location options
If you want more control over what options are taken into account when generating the locations, you can create a LocationOptions object, configure it to your liking, and start the engine with it.
// ...

// Create a new LocationOptions object. By default all options are enabled.
LocationOptions locationOptions = new LocationOptions();

// Use WiFi and satellite (GNSS) positioning only.
locationOptions.wifiPositioningOptions.enabled = true
locationOptions.satellitePositioningOptions.enabled = true
locationOptions.sensorOptions.enabled = false;
locationOptions.sensorOptions.vdrEnabled = false;
locationOptions.cellularPositioningOptions.enabled = false

// Receive a location approximately every minute, but not more often than every 30 seconds.
locationOptions.notificationOptions.smallestIntervalMilliseconds = TimeUnit.SECONDS.toMillis(30);
locationOptions.notificationOptions.desiredIntervalMilliseconds = TimeUnit.SECONDS.toMillis(60);

locationEngine.start(locationOptions);

// ...
The table below shows an overview of the available LocationAccuracy modes, and how they are internally translated to LocationOptions:
| LocationAccuracy | LocationOptions |
|---|---|
| BEST_AVAILABLE |
cellularPositioningOptions.enabled = true satellitePositioningOptions.enabled = true wifiPositioningOptions.enabled = true sensorOptions.enabled = true sensorOptions.vdrEnabled = false notificationOptions.desired_interval_millisec = 30000 (30s) notificationOptions.smallest_interval_millisec = 900 (0.9s) |
| NAVIGATION |
cellularPositioningOptions.enabled = false satellitePositioningOptions.enabled = true wifiPositioningOptions.enabled = true sensorOptions.enabled = true sensorOptions.vdrEnabled = false notificationOptions.desired_interval_millisec = 1000 (1.0s) notificationOptions.smallest_interval_millisec = 900 (0.9s) |
| SUB_METER_NAVIGATION |
cellularPositioningOptions.enabled = false satellitePositioningOptions.enabled = true satellitePositioningOptions.hdEnabled = true wifiPositioningOptions.enabled = true sensorOptions.enabled = true sensorOptions.vdrEnabled = true notificationOptions.desired_interval_millisec = 1000 (1.0s) notificationOptions.smallest_interval_millisec = 900 (0.9s) |
| TENS_OF_METERS |
cellularPositioningOptions.enabled = false satellitePositioningOptions.enabled = false wifiPositioningOptions.enabled = true sensorOptions.enabled = true sensorOptions.vdrEnabled = false notificationOptions.desired_interval_millisec = 30000 (30s) notificationOptions.smallest_interval_millisec = 900 (0.9s) |
| HUNDREDS_OF_METERS |
cellularPositioningOptions.enabled = true satellitePositioningOptions.enabled = false wifiPositioningOptions.enabled = true sensorOptions.enabled = false notificationOptions.desired_interval_millisec = 30000 (30s) notificationOptions.smallest_interval_millisec = 900 (0.9s) |
| KILOMETERS |
cellularPositioningOptions.enabled = true satellitePositioningOptions.enabled = false wifiPositioningOptions.enabled = false sensorOptions.enabled = false sensorOptions.vdrEnabled = false notificationOptions.desired_interval_millisec = 30000 (30s) notificationOptions.smallest_interval_millisec = 900 (0.9s) |
NoteThe desired interval is not guaranteed by the
LocationEngine, so it is possible that the locations will be delivered more or less often. The smallest interval, on the other hand, guarantees that the locations are not provided more often than the defined value.
Use vehicle GNSS and movement sensors with Android Auto
The LocationEngine, running in the mobile phone that is connected to a vehicle through Android Auto, can use the vehicle's GNSS and movement sensor data. This can improve location accuracy and availability compared to relying solely on the device GNSS and sensors, especially in urban canyons and tunnels.
Enable vehicle sensors
To enable usage of vehicle GNSS and movement sensor data, obtain a CarHardwareManager instance from the CarContext and pass it to LocationEngine.enableVehicleSensors():
CarHardwareManager hwManager = (CarHardwareManager) carContext.getCarService(CarContext.HARDWARE_SERVICE);
locationEngine.enableVehicleSensors(hwManager);
To stop using vehicle GNSS and sensor data, call:
locationEngine.disableVehicleSensors();
NoteThe quality of GNSS and movement sensor data from the vehicle can vary significantly depending on conditions and vehicle capabilities. It is recommended to provide users with an option in your application UI to toggle the use of vehicle sensor data on or off.
Handle car session state changes
When the car session state changes to 'started', you must re-enable vehicle sensors by calling LocationEngine.enableVehicleSensors(). This is typically done in the lifecycle observer’s onStart() method:
    @Override
    public void onStart(@NonNull LifecycleOwner owner) {
        super.onStart(owner);
		 CarHardwareManager hwManager = (CarHardwareManager) carContext.getCarService(CarContext.HARDWARE_SERVICE);
        locationEngine.enableVehicleSensors(hwManager);
    }
This step is required because the registration is lost when the session state transitions to stopped, and must be re-registered when the session resumes.
Enable VDR (Vehicle Dead Reckoning)
NoteBy default, VDR is not enabled and requires a VDR license to authorize your credentials. Contact us to activate the VDR.
VDR can complement GNSS by providing positions while GNSS signals are blocked.
If you are targeting Android devices, you can enable VDR either for standard GNSS or HD GNSS. By default, the feature is disabled but it can be enabled from LocationOptions by setting sensorOptions.setVDREnabled(true). With VDR, a maximum 10 Hz location interval is supported. To enable the 10 Hz interval, set the desired_interval_millisec and smallest_interval_millisec to 100.
Before starting, ensure that the following prerequisites for the used device are met:
- Your Android device must provide 3-axis accelerometer and 3-axis gyroscope measurements to enable the use of IMU (Inertial Measurement Unit). As of now, most smartphones have sufficient sensor support to enable the use of IMU.
- The device must be placed firmly into a phone holder.
NoteThe device requires several minutes of calibration until the VDR is operational. If the device is removed from the holder, recalibration is needed.
Troubleshooting
Why are IMU measurements not used?
- Ensure that GNSS signals are visible. Calibration may not succeed in environments where GNSS signals are blocked, for example in tunnels or urban canyons.
- The device must be placed firmly into a phone holder that is attached to the vehicle.
- Ensure that sensors are calibrated. Do the following: Get a GNSS position available, then drive for a few minutes, and make several turns while driving.
- Note that the use of IMU measurements will stop if no GNSS positions have been available for a while.
Add sub-meter precision
NoteBy default, HD precision is not enabled and requires a HD license to authorize your credentials. Contact us to activate HD GNSS.
The HD GNSS feature can provide accurate positioning using GNSS and IMU measurements of the device.
If you are targeting Android devices, starting the LocationEngine with LocationAccuracy.subMeterNavigation mode will enable HERE HD GNSS positioning. The HD GNSS (High Definition Global Navigation Satellite System) feature will enable high definition positioning for various use cases from lane assistance and turn-by-turn guidance to augmented reality. HD GNSS is a correction data service for mass market devices to achieve sub-meter accuracy across the globe.
Before starting, ensure that the following prerequisites for the used device are met:
- Your Android device supports GNSS raw measurements. Android version 12+ (API 31) is required.
- GNSS raw measurements include carrier phase measurements aka ADR (Accumulated Delta Range).
- Your Android device supports dual-frequency GNSS (L1+L5).
- Your Android device supports multi-constellation GNSS (GPS, Galileo, Beidou, Glonass).
To find a suitable device:
- Search the GNSS database to find compatible devices. For example, use the GPSTest Database. Most Google Pixel devices support HD GNSS, for example: Pixel 7, Pixel 7 Pro, Pixel 8, Pixel 8 Pro.
- Verify your device by using a freeware GNSS app and check the above information. One example of such a tool is GNSSLogger.
See also the Android sensor documentation for more details.
It is the responsibility of the user to ensure conditions above hold with the used device. If not, the desired accuracy level may not be reached.
NoteEven if
LocationAccuracy.subMeterNavigationis set, this does not ensure that it will be always used. At times, other positioning sources and technologies may be used instead. For more information about device capabilities and measurement quality, set aLocationIssueListener. Check the API Reference for more information on potential issues.
Troubleshooting sub-meter positioning
If you are not seeing HD GNSS positions:
- Ensure that
LocationAccuracy.subMeterNavigationhas been enabled for the app and used credentials are authorized for HD access. - Ensure that the
ACCESS_FINE_LOCATIONlocation permission has been granted for the app. - Ensure device compatibility. See guidelines above.
- Ensure GNSS signal reception. Go outdoors to open sky conditions.
- Ensure that an internet connection is available.
Why my HD GNSS performance is not always sub-meter accurate?
- Ensure device compatibility. See guidelines above.
- Ensure GNSS signal reception. Go outdoors to an open area with good visibility to the sky (no trees, buildings, etc. in vicinity) and let the application run for some minutes to verify accuracy.
- Check device placement. It is recommended to place an Android device vertically.
Generally, the performance is mostly affected by the device capabilities and the user environment. This will set the signal reception conditions and rule measurement quality.
Optimize GNSS battery consumption
You can manage the update rate of GNSS (Global Navigation Satellite System) through the smallest interval setting. This setting defines the smallest time interval between GNSS location updates requested from the Android OS.
In scenarios where high-frequency GNSS updates (such as 1 Hz) are not required, increasing the time between location updates can reduce battery consumption. The device's GNSS system uses less power while still providing location data at a rate suitable to the application's needs.
For example, if an application does not need precise real-time tracking, increasing the interval between updates can offer significant power savings, extending the battery life of the device.
Handle location accuracy
Except for the coordinates and the timestamp, all other Location fields are optional. For example, the received Location object may contain the information about the bearing angle, as well as the current speed, but this is not guaranteed to be available. Unavailable values will be returned as null. What kind of sources are used for positioning (as defined by the above mentioned LocationOptions), and the device's capabilities affect what fields will be available.
if (location.speedInMetersPerSecond != null) {
    Log.d(TAG, "Speed (m/s): " + location.speedInMetersPerSecond);
} else {
    Log.d(TAG, "Speed (m/s): Not available");
}
The horizontalAccuracyInMeters field, which is present in the Location object, also known as the "radius of uncertainty", provides an estimate of the area within which the true geographic coordinates are likely to lie with a 68% probability. This is used to draw a halo indicator around the current location. The illustration below depicts the inner green circle as the location.coordinates and the surrounding circle as the accuracy circle with a radius of horizontalAccuracyInMeters. The true geographical coordinates may lie inside (68%) or outside (32%) the accuracy circle.
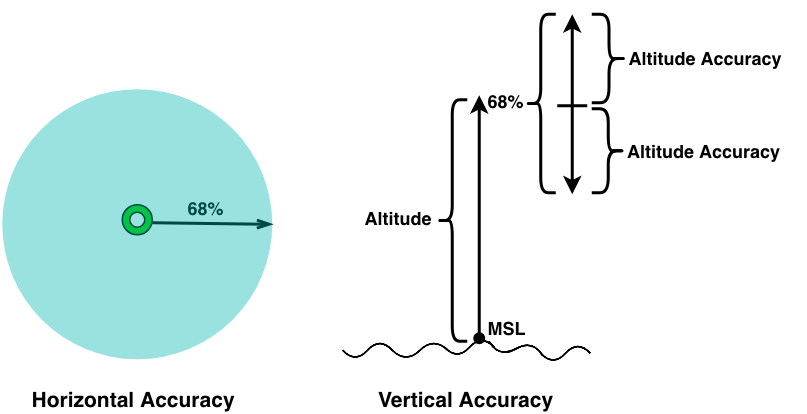
Likewise, in the case of altitude, if the verticalAccuracyInMeters value is 10 meters, this indicates that the actual altitude is expected to fall within a range of altitude - 10m to altitude + 10m with a probability of 68%. Other accuracy values, like bearingAccuracyInDegrees and speedAccuracyInMetersPerSecond will follow the same rule: a smaller uncertainty results in a better accuracy.
NoteOn Android devices, the
coordinates.altitudevalue is given in relation to the WGS 84 reference ellipsoid.
Achieving probabilities other than 68% (CEP68)
What if the given probability of 68% (CEP68) is not enough - is it possible to achieve an accuracy of 99%? Yes, it is: Since the given circular error probability (CEP) follows a chi-squared distribution with two degrees-of-freedom, it is easy to calculate the desired probability based on the following formulas:
| Probability | Radius of Uncertainty |
|---|---|
| 50% | CEP50 = 0.78 x CEP68 |
| 60% | CEP60 = 0.90 x CEP68 |
| 70% | CEP70 = 1.03 x CEP68 |
| 80% | CEP80 = 1.19 x CEP68 |
| 90% | CEP90 = 1.42 x CEP68 |
| 95% | CEP95 = 1.62 x CEP68 |
| 99% | CEP99 = 2.01 x CEP68 |
The table above can be used to visualize various probability levels for a halo indicator on the map. For example, if the horizontal accuracy is 20 meters, you can (roughly) double the radius to achieve a probability of 99%. The accuracy value is always given as CEP68, that means:
CEP99 = 2.01 x CEP68 = 2.01 x 20m = 40.2m
Now you can draw a radius of 40.2 meters around the found location - and with a probability of 99%, the real location will lie within that circle. On the other hand, the probability for a radius of 0 meters is 0%.
Print your current location as text
The following implementation shows an example of how to textually print the location information received in each update.
public class MainActivity extends AppCompatActivity {

    // ...

    // TextViews to display Location information to the user
    private TextView mLatitudeValue;
    private TextView mLongitudeValue;
    private TextView mAltitudeValue;
    private TextView mBearingValue;
    private TextView mBearingAccuracyValue;
    private TextView mSpeedValue;
    private TextView mSpeedAccuracyValue;
    private TextView mHorizontalAccuracyValue;
    private TextView mVerticalAccuracyValue;
    private TextView mTimestampValue;
    private TextView mTimestampReadableValue;
    private TextView mTimestampSincebootValue;

    @Override
    protected void onCreate(Bundle savedInstanceState) {

        // ...

        try {
            locationEngine = new LocationEngine();
        } catch (InstantiationErrorException e) {
            throw new RuntimeException("Initialization failed: " + e.getMessage());
        }

        mLatitudeValue = findViewById(R.id.lat_value);
        mLongitudeValue = findViewById(R.id.lon_value);
        mHorizontalAccuracyValue = findViewById(R.id.hor_accuracy_value);
        mAltitudeValue = findViewById(R.id.alt_value);
        mVerticalAccuracyValue = findViewById(R.id.ver_accuracy_value);
        mBearingValue = findViewById(R.id.bearing_value);
        mBearingAccuracyValue = findViewById(R.id.bearing_accuracy_value);
        mSpeedValue = findViewById(R.id.speed_value);
        mSpeedAccuracyValue = findViewById(R.id.speed_accuracy_value);
        mTimestampValue = findViewById(R.id.timestamp_value);
        mTimestampReadableValue = findViewById(R.id.timestamp_readable_value);
        mTimestampSincebootValue = findViewById(R.id.timestamp_since_boot_value);

        // Request permissions from the user
        handleAndroidPermissions();
    }

    private void handleAndroidPermissions() {
        permissionsRequestor = new PermissionsRequestor(this);
        permissionsRequestor.request(new ResultListener(){

            @Override
            public void permissionsGranted() {
                // We start location updates once al permissions have been granted
                startLocating();
            }

            @Override
            public void permissionsDenied() {
                Log.e(TAG, "Permissions denied by user.");
            }
        });
    }

    private final LocationListener locationListener = new LocationListener() {
        @Override
        public void onLocationUpdated(@NonNull Location location) {
            // Populate the TextViews with the received location information.
            populate(location);
        }
    };

    public void populate(Location location) {
        mLatitudeValue.setText(String.format(Locale.US, "%.5f %s", location.coordinates.latitude, "°"));
        mLongitudeValue.setText(String.format(Locale.US, "%.5f %s", location.coordinates.longitude, "°"));
        mAltitudeValue.setText(location.coordinates.altitude != null ? String.format(Locale.US, "%.5f %s", location.coordinates.altitude, "meters") : "-");
        mBearingValue.setText(location.bearingInDegrees != null ? String.format(Locale.US, "%.5f %s", location.bearingInDegrees, "°") : "-");
        mBearingAccuracyValue.setText(location.bearingAccuracyInDegrees != null ? String.format(Locale.US, "%.5f %s", location.bearingAccuracyInDegrees, "°") : "-");
        mSpeedValue.setText(location.speedInMetersPerSecond != null ? String.format(Locale.US, "%.5f %s", location.speedInMetersPerSecond, "m/s") : "-");
        mSpeedAccuracyValue.setText(location.speedAccuracyInMetersPerSecond != null ? String.format(Locale.US, "%.5f %s", location.speedAccuracyInMetersPerSecond, "m/s") : "-");
        mHorizontalAccuracyValue.setText(location.horizontalAccuracyInMeters != null ? String.format(Locale.US, "%.5f %s", location.horizontalAccuracyInMeters, "meters") : "-");
        mVerticalAccuracyValue.setText(location.verticalAccuracyInMeters != null ? String.format(Locale.US, "%.5f %s", location.verticalAccuracyInMeters, "meters") : "-");
        mTimestampValue.setText(String.format(Locale.US, "%d %s", TimeUnit.MILLISECONDS.toSeconds(location.timestamp.getTime()), "seconds"));
        mTimestampReadableValue.setText(String.format(Locale.US, "%tc", location.timestamp));
        mTimestampSincebootValue.setText(location.timestampSinceBoot != null ? String.format(Locale.US, "%d %s", location.timestampSinceBoot.toMillis(), "milliseconds") : "-");
    }
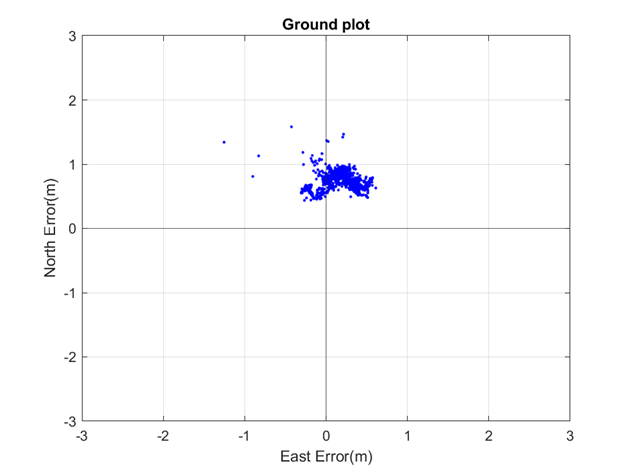
This example can be useful to debug location signals. The code can be found as part of the "Positioning" example app you can find on GitHub - in Java and Kotlin.
Updated yesterday