Visualize traffic on routes
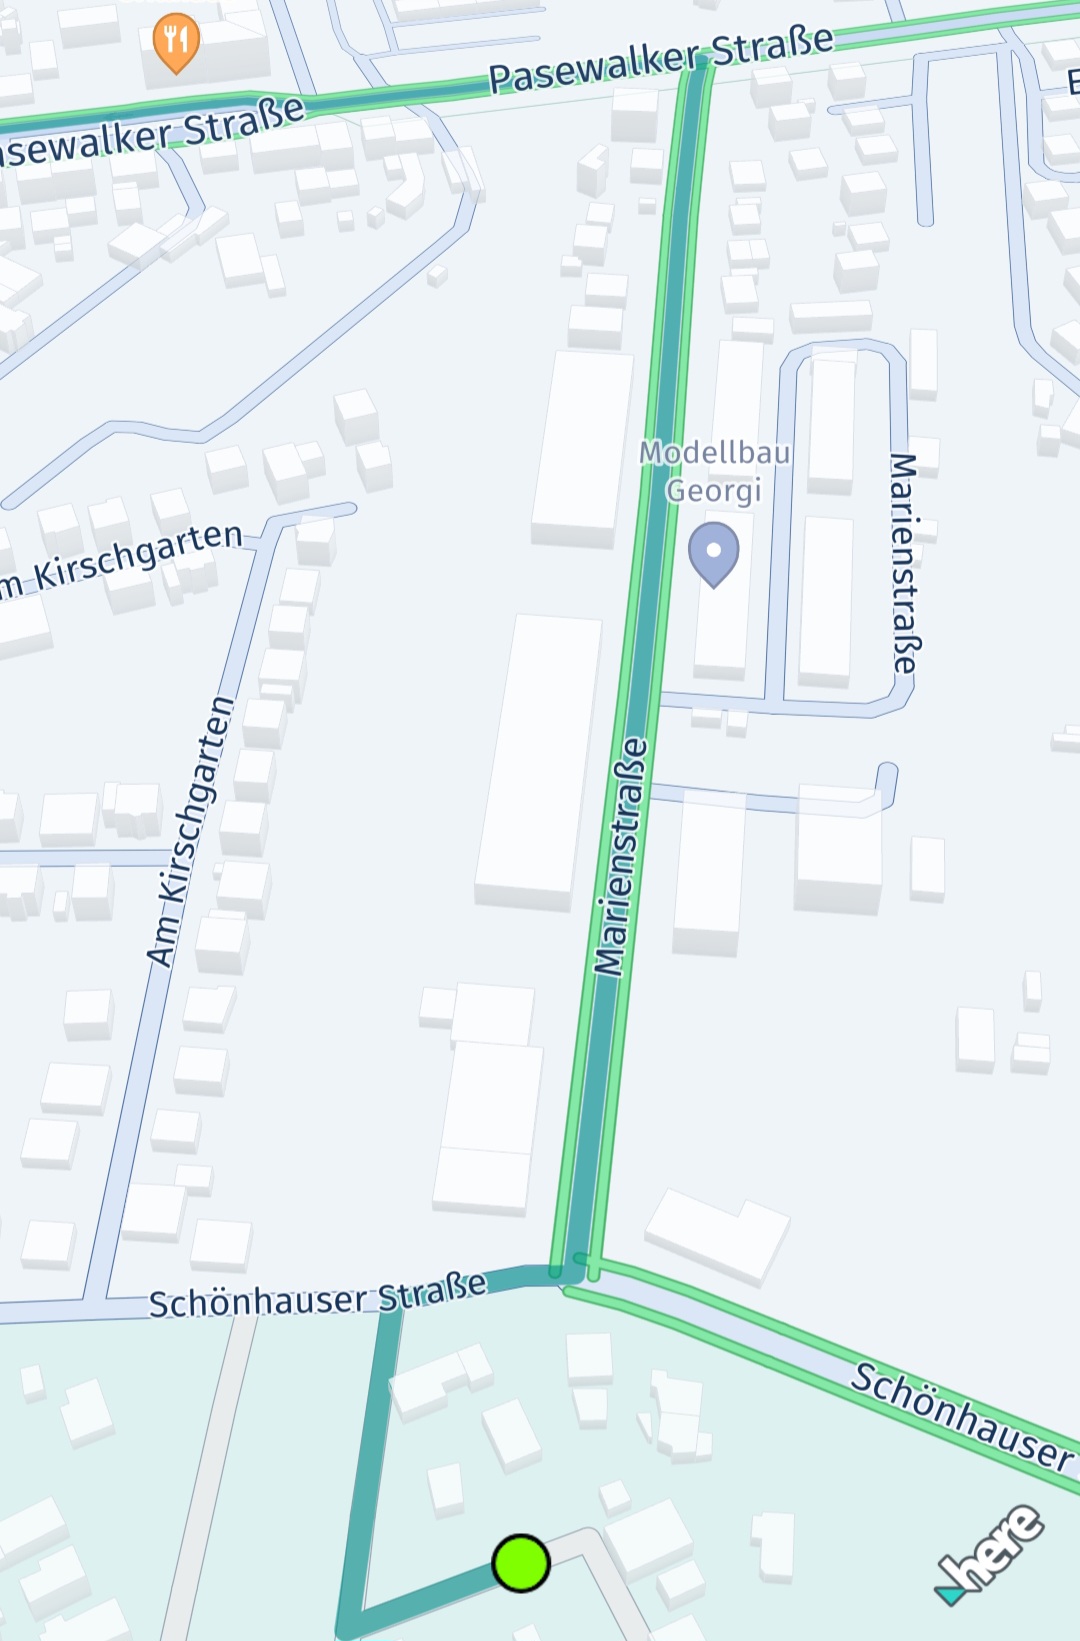
The HERE SDK enables you to visualize traffic conditions directly on route polylines. You can choose between two approaches: rendering routes adjacent to the real-time traffic flow layer on the map, or drawing custom traffic overlays using predictive traffic data from the route itself.
To understand the difference between real-time and predictive traffic data sources and when to use each approach, see here.
Render a polyline adjacent to traffic flow
By default, the HERE SDK provides the color encoding used for the traffic flow layer which indicates traffic conditions. Using MapMeasureDependentRenderSize, you can define the rendering width of your polyline based on the MapMeasure.Kind so that it renders adjacent to these traffic polylines.
Here's an example to implement it:
GeoPolyline routeGeoPolyline = route.getGeometry();
double outlineWidthInPixel;
Color polylineColor = Color.valueOf(0.051f, 0.380f, 0.871f, 1.0f);
Color outlineColor = Color.valueOf(0.043f, 0.325f, 0.749f, 1.0f);
MapPolyline routeMapPolyline = null;
try {

    // Below, we're creating an instance of MapMeasureDependentRenderSize. This instance will use the scaled width values to render the route polyline.
    // We can also apply the same values to MapArrow.setMeasureDependentTailWidth().
    // The parameters for the constructor are: the kind of MapMeasure (in this case, ZOOM_LEVEL), the unit of measurement for the render size (PIXELS), and the scaled width values.
    MapMeasureDependentRenderSize mapMeasureDependentLineWidth = new MapMeasureDependentRenderSize(MapMeasure.Kind.ZOOM_LEVEL, RenderSize.Unit.PIXELS, getDefaultLineWidthValues());

    // We can also use MapMeasureDependentRenderSize to specify the outline width of the polyline.
    outlineWidthInPixel = 1.23 * mapView.getPixelScale();
    MapMeasureDependentRenderSize mapMeasureDependentOutlineWidth = new MapMeasureDependentRenderSize(RenderSize.Unit.PIXELS, outlineWidthInPixel);
    routeMapPolyline = new MapPolyline(routeGeoPolyline, new MapPolyline.SolidRepresentation(
            mapMeasureDependentLineWidth,
            polylineColor,
            mapMeasureDependentOutlineWidth,
            outlineColor,
            LineCap.ROUND));

} catch (MapPolyline.Representation.InstantiationException e) {
    Log.e("MapPolyline Representation Exception:", e.error.name());
} catch (MapMeasureDependentRenderSize.InstantiationException e) {
    Log.e("MapMeasureDependentRenderSize Exception:", e.error.name());
}
mapView.getMapScene().addMapPolyline(routeMapPolyline);
The width values specified for MapMeasureDependentRenderSize are linearly interpolated between each successive pair of data points. It can be generated like this (code only applicable for Explore):
// Returns a hashMap where the key is the zoom level and the value is the corresponding scaled width.
private HashMap<Double, Double> getDefaultLineWidthValues() {
    HashMap<Double, Double> widthsPerZoomLevel = new HashMap<>();
    // Here width value will remain 2.18 from 0.0 zoom level to 6.0.
    // From 6.0 the updated value 2.48 will be used.
    widthsPerZoomLevel.put(0.0, 2.18);
    widthsPerZoomLevel.put(6.0, 2.48);
    widthsPerZoomLevel.put(7.0, 2.78);
    widthsPerZoomLevel.put(11.0, 3.1);
    widthsPerZoomLevel.put(16.0, 3.15);
    widthsPerZoomLevel.put(17.0, 3.35);
    widthsPerZoomLevel.put(18.0, 3.78);
    widthsPerZoomLevel.put(19.0, 6.5);
    widthsPerZoomLevel.put(20.0, 10.2);
    widthsPerZoomLevel.put(24.0, 77.5);
    return scaleCurrentHashMap(widthsPerZoomLevel);
}

private HashMap<Double, Double> scaleCurrentHashMap(HashMap<Double, Double> currentValues) {
    for (Map.Entry<Double, Double> entry : currentValues.entrySet()) {
        entry.setValue(entry.getValue() * mapView.getPixelScale());
    }
    return currentValues;
}
Render a polyline with the VisualNavigator - only available for Navigate
During turn-by-turn guidance you can use the default values from VisualNavigator which can be retrieved using defaultRouteManeuverArrowMeasureDependentWidths. Further scaling the width values will enable a clean and persistent look across various devices.
// Retrieves the default widths of a route polyline and maneuver arrows from VisualNavigator,
// scaling them based on the screen's pixel density.
private HashMap<Double, Double> getDefaultLineWidthValues() {
    HashMap<Double, Double> widthsPerZoomLevel = new HashMap<>();
    for (Map.Entry<MapMeasure, Double> defaultValues : VisualNavigator.defaultRouteManeuverArrowMeasureDependentWidths().entrySet()) {
        Double key = defaultValues.getKey().value;
        Double value = defaultValues.getValue() * mapView.getPixelScale();
        widthsPerZoomLevel.put(key, value);
    }
    return widthsPerZoomLevel;
}
Render custom traffic along a route
As an alternative to rendering the route's polyline adjacent to traffic flow, you can also render the traffic yourself utilizing the traffic data available as part of the Route object. This can be useful during route preview use cases, before starting actual guidance.
Note that this approach may be perceived as less accurate because the traffic information includes predictive data from the route instead of the real-time information provided by the traffic flow schemes. However, similar to the color encoding used for the traffic flow layer, you can indicate the traffic along a route using dynamicSpeedInfo.calculateJamFactor() that ranges from 0 (no traffic) to 10 (road is blocked). Each Section of a Route can contain various DynamicSpeedInfo instances. These are valid along the Span until the next Span. Each Span geometry is represented by a polyline that is part of the full route's polyline shape.
The following code snippet shows how to get a DynamicSpeedInfo element of the first Span of a Section:
Section firstSection = route.getSections().get(0);
DynamicSpeedInfo dynamicSpeed = firstSection.getSpans().get(0).getDynamicSpeedInfo();
val firstSection = route.sections[0]
val dynamicSpeed = firstSection.spans[0].dynamicSpeedInfo
DynamicSpeedInfo contains the baseSpeedInMetersPerSecond, which is the expected default travel speed. Note that this may not be the same as the current speed limit on a road - as a bad road condition may justify a slower travel speed. In addition, you can get the estimated actual travel speed based on the current traffic conditions with trafficSpeedInMetersPerSecond.
An example how this value can be mapped to a suitable color is shown below:
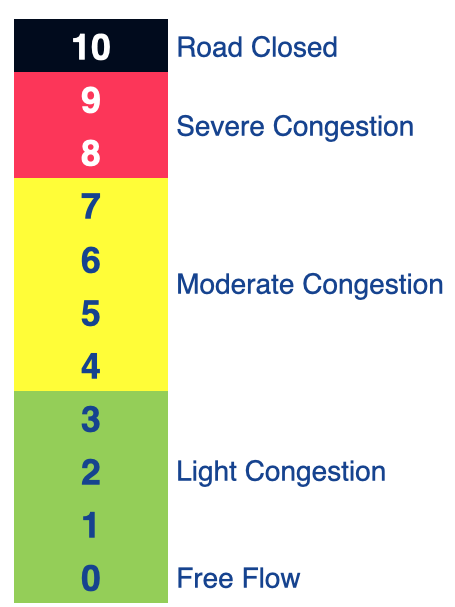
Usually, the jam factor can be interpreted like this:
- 0 <= jam factor < 4: No or light traffic.
- 4 <= jam factor < 8: Moderate or slow traffic.
- 8 <= jam factor < 10: Severe traffic.
- jam factor = 10: No traffic, that is the road is blocked.
NoteNote that the jam factor you can get from
DynamicSpeedInfois calculated piecewise-linear from the ratio oftrafficSpeedInMetersPerSecond/baseSpeedInMetersPerSecond- without taking road types and other parameters into account. Therefore, the provided jam factor does not necessarily match exactly the traffic flow visualization on the map view (if enabled). On top, theRoutingEngineuses predictive location services to predict upcoming traffic while traversing the route - whereas the traffic flow visualization represents only the current point in time (real time). Also, worth to mention, the prerendered traffic flow may use a different color representation based on the current zoom level.It is an app decision whether to prefer predicted traffic along a route that matches the given ETA - or to show instead the real-time traffic situation, which might not be accurate any more when reaching a destination in the future.
The recommended approach for the latter is to show the route and the traffic-flow side-by-side by using a map-measure dependent width for the route's polyline - instead of rendering the traffic additionally on the route itself.

If you want to visualize the traffic along a route, consider to render multiple colored MapPolyline objects for each span of a section:
// This renders the traffic jam factor on top of the route as multiple MapPolylines per span.
private void showTrafficOnRoute(Route route) {
    if (route.getLengthInMeters() / 1000 > 5000) {
        Log.d(TAG, "Skip showing traffic-on-route for longer routes.");
        return;
    }

    for (Section section : route.getSections()) {
        for (Span span : section.getSpans()) {
            DynamicSpeedInfo dynamicSpeed = span.getDynamicSpeedInfo();
            Color lineColor = getTrafficColor(dynamicSpeed.calculateJamFactor());
            if (lineColor == null) {
                // We skip rendering low traffic.
                continue;
            }
            float widthInPixels = 10;
            MapPolyline trafficSpanMapPolyline = null;
            try {
                trafficSpanMapPolyline = new MapPolyline(span.getGeometry(), new MapPolyline.SolidRepresentation(
                                new MapMeasureDependentRenderSize(RenderSize.Unit.PIXELS, widthInPixels),
                                lineColor,
                                LineCap.ROUND));
            } catch (MapPolyline.Representation.InstantiationException e) {
                Log.e("MapPolyline Representation Exception:", e.error.name());
            } catch (MapMeasureDependentRenderSize.InstantiationException e) {
                Log.e("MapMeasureDependentRenderSize Exception:", e.error.name());
            }

            mapView.getMapScene().addMapPolyline(trafficSpanMapPolyline);
            mapPolylines.add(trafficSpanMapPolyline);
        }
    }
}

// Define a traffic color scheme based on the route's jam factor.
// 0 <= jamFactor < 4: No or light traffic.
// 4 <= jamFactor < 8: Moderate or slow traffic.
// 8 <= jamFactor < 10: Severe traffic.
// jamFactor = 10: No traffic, that is the road is blocked.
// Returns null in case of no or light traffic.
@Nullable
private Color getTrafficColor(Double jamFactor) {
    if (jamFactor == null || jamFactor < 4) {
        return null;
    } else if (jamFactor >= 4 && jamFactor < 8) {
        return Color.valueOf(1, 1, 0, 0.63f); // Yellow
    } else if (jamFactor >= 8 && jamFactor < 10) {
        return Color.valueOf(1, 0, 0, 0.63f); // Red
    }
    return Color.valueOf(0, 0, 0, 0.63f); // Black
}
// This renders the traffic jam factor on top of the route as multiple MapPolylines per span.
private fun showTrafficOnRoute(route: Route) {
    if (route.lengthInMeters / 1000 > 5000) {
        Log.d(TAG, "Skip showing traffic-on-route for longer routes.")
        return
    }

    for (section in route.sections) {
        for (span in section.spans) {
            val dynamicSpeed: DynamicSpeedInfo? = span.dynamicSpeedInfo
            val lineColor = getTrafficColor(dynamicSpeed?.calculateJamFactor())
                ?: // We skip rendering low traffic.
                continue
            val widthInPixels = 10f
            var trafficSpanMapPolyline: MapPolyline? = null
            try {
                trafficSpanMapPolyline = MapPolyline(
                    span.geometry, MapPolyline.SolidRepresentation(
                        MapMeasureDependentRenderSize(
                            RenderSize.Unit.PIXELS,
                            widthInPixels.toDouble()
                        ),
                        lineColor,
                        LineCap.ROUND
                    )
                )
            } catch (e: MapPolyline.Representation.InstantiationException) {
                Log.e("MapPolyline Representation Exception:", e.error.name)
            } catch (e: MapMeasureDependentRenderSize.InstantiationException) {
                Log.e("MapMeasureDependentRenderSize Exception:", e.error.name)
            }

            if (trafficSpanMapPolyline != null) {
                mapView.mapScene.addMapPolyline(trafficSpanMapPolyline)
                mapPolylines.add(trafficSpanMapPolyline)
            }
        }
    }
}

// Define a traffic color scheme based on the route's jam factor.
// 0 <= jamFactor < 4: No or light traffic.
// 4 <= jamFactor < 8: Moderate or slow traffic.
// 8 <= jamFactor < 10: Severe traffic.
// jamFactor = 10: No traffic, ie. the road is blocked.
// Returns null in case of no or light traffic.
private fun getTrafficColor(jamFactor: Double?): Color? {
    if (jamFactor == null || jamFactor < 4) {
        return null
    } else if (jamFactor >= 4 && jamFactor < 8) {
        return Color.valueOf(1f, 1f, 0f, 0.63f) // Yellow
    } else if (jamFactor >= 8 && jamFactor < 10) {
        return Color.valueOf(1f, 0f, 0f, 0.63f) // Red
    }
    return Color.valueOf(0f, 0f, 0f, 0.63f) // Black
}
Note that we skip traffic rendering for longer routes due to performance reasons - since in this example each span with traffic is rendered as a separate polyline.
Updated 4 hours ago