Get started with Routing
The HERE SDK provides the RoutingEngine to calculate the best route directions from A to B, including multiple waypoints and localizable maneuver instructions for each turn.
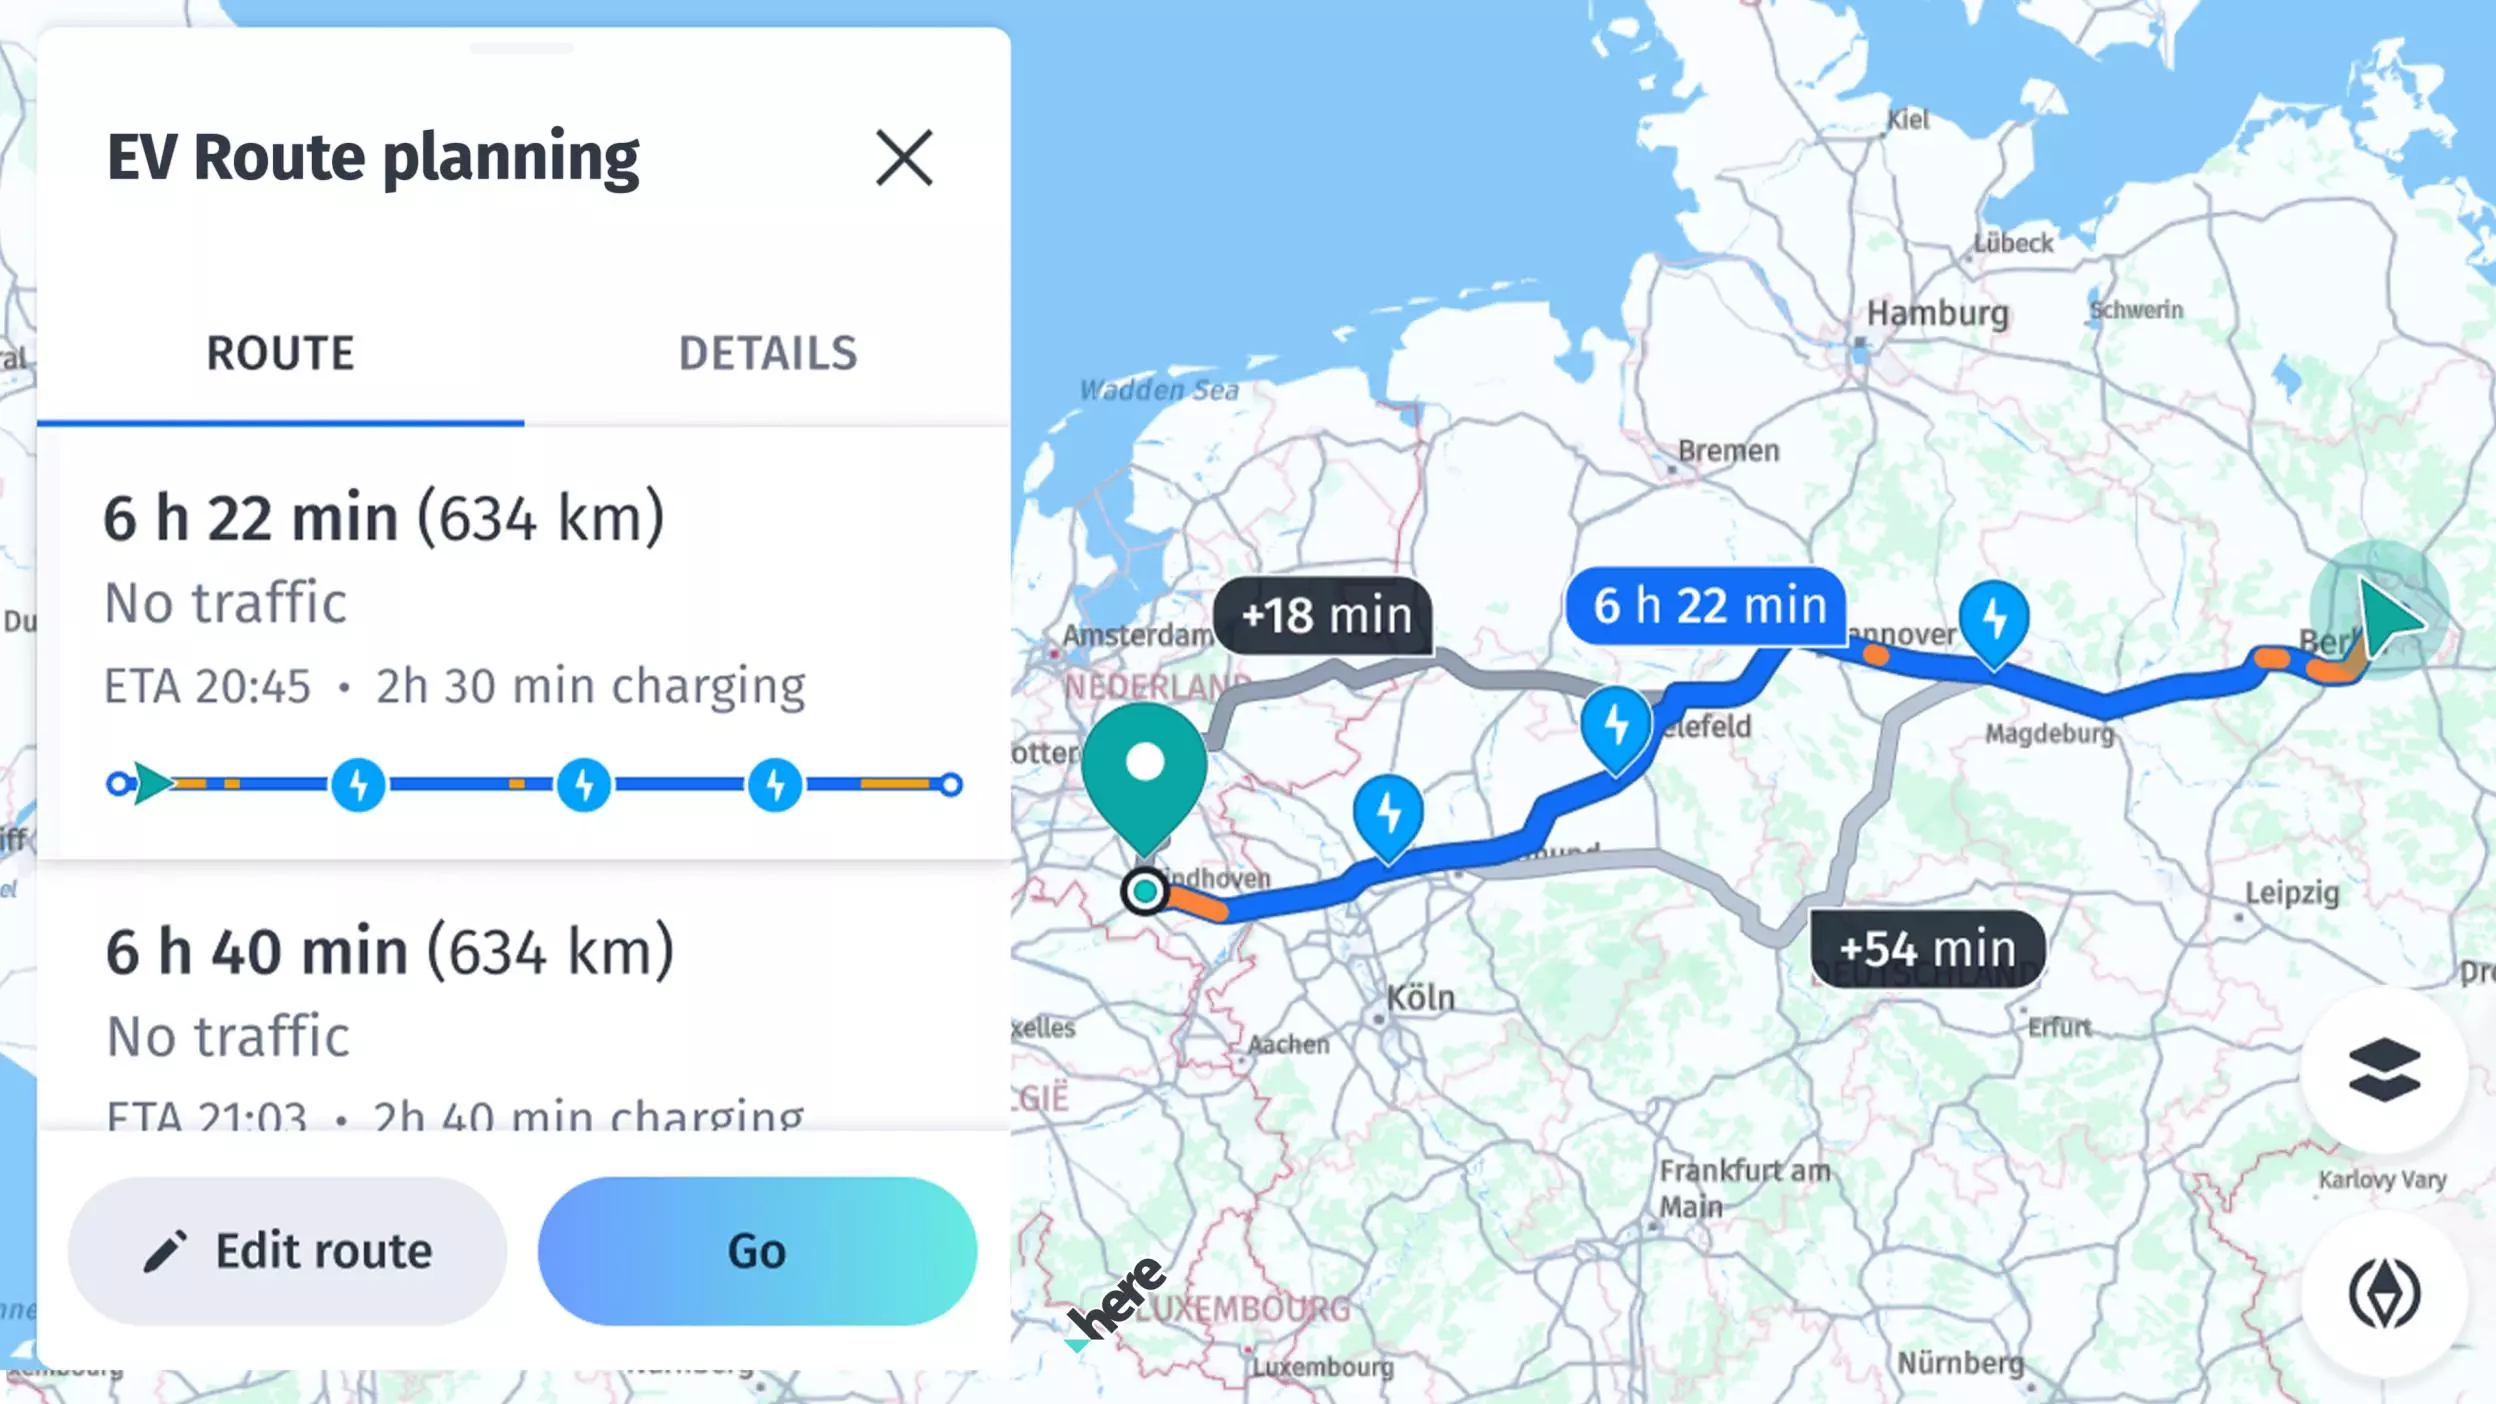
Specify your preferences by setting the desired route type (fastest or shortest) and various route options (such as speed profiles, route restrictions, vignette options, and more) to find the perfect route that saves the most energy: with our advanced routing technology and our dedicated EV route planning support HERE helps you to make the planet cleaner and safer .
Feature overview:
- Calculate routes: Calculate routes with multiple waypoints for various transport modes.
- Isoline routing: Calculate isoline polygons to represent the area of reach from a given point based on time, distance or fuel consumption.
- Search along a route: Search for places along an entire route (this feature is described in the Search section).
- Import routes / route matching: You can import routes from other APIs.
- Offline routing (only available for Navigate): When no internet connection is available, you can switch to a dedicated offline routing engine to calculate routes on already cached map data or preloaded offline maps data.
Routing is based on HERE Routing API v8. An example of a transaction based on Routing is: Calculate a route with the RoutingEngine using RoutingOptions. You can set the desired transport mode via RoutingOptions.transportSpecification.transportMode to car, truck, pedestrian, bicycle, bus, taxi or scooter and do not use TrafficOptimizationMode.timeDependent. Note that timeDependent is set, by default, as time-aware routing provides better results including the current traffic flow.
An example of Time-Aware Routing: Calculate a route with the RoutingEngine with TrafficOptimizationMode.timeDependent. Note that this is enabled, by default. If RouteOptions.arrivalTime and RouteOptions.arrivalTime are kept as null, the HERE SDK will use the current device time.
An example of Routing with toll-costs: Calculate a route with the RoutingEngine with RouteOptions.enableTolls set to true.
Routing also uses the HERE Public Transit API. An example using the HERE Public Transit API: Calculate a route with the TransitRoutingEngine.
NoteFor information about the pricing of these features, see the HERE Base Plan Pricing. If you are using the Navigate license or have other questions about pricing, contact us.
Initialize the RoutingEngine
Start your trip by creating the route engine in this manner:
do {
    try routingEngine = RoutingEngine()
} catch let engineInstantiationError {
    fatalError("Failed to initialize routing engine. Cause: \(engineInstantiationError)")
}
Creating a new RoutingEngine instance can throw an error that we have to handle as shown above. Such an error can happen, when, for example, the HERE SDK initialization failed beforehand.
Calculate routes
As a next step, you can calculate the route based on two waypoints - a starting location and a destination (both of type Waypoint that holds a GeoCoordinates instance). Below we set default RoutingOptions to calculate a route that is optimized for cars:
let routingOptions = RoutingOptions()
routingEngine.calculateRoute(with: [Waypoint(coordinates: startGeoCoordinates!),
                                    Waypoint(coordinates: destinationGeoCoordinates!)],
                             options: routingOptions) { (routingError, routes) in

        if let error = routingError {
            self.showDialog(title: "Error while calculating a route:", message: "\(error)")
            return
        }

        let route = routes!.first
        self.showRouteDetails(route: route!)
        self.showRouteOnMap(route: route!)
        self.logRouteViolations(route: route!)
}
You can call calculateRoute() multiple times. For example, you can call it to calculate routes with different routing options in parallel.
NoteWhen setting a
Waypointyou can influence on which side of the road a pedestrian or a driver should reach the stop by setting asideOfStreetHint.If a pedestrian or a driver is moving, a bearing value can help to determine the initial direction by setting
startingWaypoint?.headingInDegrees = location.bearingInDegrees. This can help to avoid unnecessary u-turns if the next destination lies in the back of a driver. For pedestrians this can lead to better routes as unnecessary street crossings can be avoided.
Each route calculation will be performed asynchronously. You will get a Route list or a RoutingError that holds a possible error when completed. If all goes well, it is nil. In case of an error, the route list is nil. For example, the engine cannot calculate routes if a route is not feasible for the specified mode of transportation.
NoteIf there is no error, the route list will contain only one result. By specifying the number of route alternatives via the route options, you can request additional route variants. By default, a route will be calculated with no route alternatives.
The showRouteDetails()-method from the code snippet above is used to show more route details including maneuver instructions. You can find the full source code in the accompanying example app. Maneuver instructions are also explained in greater detail below. The showRouteOnMap()-method contains an example, how to render a route on the map. We will explain this shortly in the section below.
Get ETA and traffic information
Additional information on the route - such as the estimated time it takes to travel to the destination (ETA) and the total length of the route in meters - can be retrieved from the Route object as shown below:
// estimatedTravelTimeInSeconds includes traffic delay.
let estimatedTravelTimeInSeconds = route.duration
// Get predictive traffic delay data.
let estimatedTrafficDelayInSeconds = route.trafficDelay
let lengthInMeters = route.lengthInMeters
You can find more information on traffic in the Real-time versus predictive traffic data sources section.
The estimated time of arrival (ETA) can be displayed in different time zones, which may vary depending on the device's geographic location. For instance, when calculating a route, the device's current time zone may differ from that of the destination. Consider a scenario where a user calculates a route from Berlin to London - each city operates in a different time zone. To address this, you can display the ETA in multiple time zones: the device's current time zone (Berlin), the destination's time zone (London), and UTC (Coordinated Universal Time), which serves as a global reference.
Here's an example of how the same ETA can vary across different time zones:
| ETA based on the device's current time zone in Berlin | ETA based on the destination's time zone in London | ETA in UTC |
|---|---|---|
| 8:30 AM | 7:30 AM | 6:30 AM |
To calculate the ETA in the device's time zone, we use the following method. This method involves retrieving the estimated travel time from a Route object, initializing the current date and time, adding the travel time, and formatting the result.
/**
 * Returns the ETA (as a string in ‘HH:mm’ format) in the current device’s timezone, derived from the estimatedTravelTimeInSeconds, which is sourced from the Route object.
 *
 * - Parameter route: Original route object from RoutingEngine.
 * - Returns: A string representing the ETA in "HH:mm" format.
 */
 func getETAinDeviceTimeZone(route: Route) -> String {
    let estimatedTravelTimeInSeconds = route.duration

    // Get an instance of the Calendar class initialized with the current date and time
    let calendar = Calendar.current
    var dateComponents = DateComponents()
    dateComponents.second = Int(estimatedTravelTimeInSeconds)

    // Add the estimated travel time (in seconds) to the current time
    if let etaDate = calendar.date(byAdding: dateComponents, to: Date()) {
        return getFormattedDate(etaDate)
    } else {
        return ""
    }
}
To calculate the ETA in the destination's time zone, we use the following method. This involves obtaining the arrival location's local time and the difference between the local time at the destination and Coordinated Universal Time (UTC).
/**
 * Calculates the estimated time of arrival (ETA) in the destination timezone for a given route.
 * It is possible that the destination can be in a different timezone compared to the source.
 * Therefore, we are also calculating the ETA in the destination timezone. For example, the source can be in Berlin and the destination can be in Dubai.
 *
 * - Parameter route: Original route object from RoutingEngine.
 * - Returns: A string representing the estimated time of arrival in the destination timezone, formatted as "hh:mm".
 */
func getETAinDestinationTimeZone(route: Route) -> String {
    let arrivalLocationTime = getArrivalLocationTime(route:route)
    let destinationDate = arrivalLocationTime.localTime

    // The timeOffset represents the difference between the local time at destination and Coordinated Universal Time (UTC) in minutes.
    let timeOffset = Int(arrivalLocationTime.utcOffset/60)

    return getFormattedDate(destinationDate,timeOffset: timeOffset)
}
To calculate the ETA in Coordinated Universal Time (UTC) for a given route, we use the following method. This method ensures that the ETA is represented in the primary time standard by which the world regulates clocks and time.
/**
 * Calculates the estimated time of arrival (ETA) in Coordinated Universal Time (UTC) for a given route.
 * UTC (Coordinated Universal Time) is the primary time standard by which the world regulates clocks and time.
 *
 * @param route Original route object from RoutingEngine.
 * @return A string representing the estimated time of arrival in UTC, formatted as "HH:mm".
 */
func getEstimatedTimeOfArrivalInUTC(route: Route) -> String {
    let utcDate = getArrivalLocationTime(route: route).utcTime

    // The UTC offset represents the difference in hours and minutes between a specific time zone and Coordinated Universal Time (UTC).
    // It indicates whether the local time is ahead (+) or behind (-) UTC.
    // By using an offset of 0, we ensure that the time being represented is in Coordinated Universal Time (UTC).
    let utcTimeOffset = 0
    return getFormattedDate(utcDate, timeOffset: utcTimeOffset)
}
The getArrivalLocationTime(route: Route) method retrieves the arrival time for a given route from the last section of the route. Each section within the route accumulates its duration sequentially. For example, if there are two sections, each five minutes long, the first section’s duration is five minutes, while the second section’s total duration is ten minutes (five minutes for each section).
// Returns the arrival time at the final location of the route.
private func getArrivalLocationTime(route: Route) -> LocationTime {
    let lastSectionIndex = route.sections.count - 1

    // The lastSection contains cumulative duration values that increase sequentially.
    // For instance, if there are two sections, each with a duration of 5 minutes, the first section will reflect a total duration of 5 minutes,
    // while the second section will show a total duration of 10 minutes.
    // This is because the total time includes the initial 5 minutes for the first section, followed by an additional 5 minutes to complete the second section, resulting in a cumulative travel time.
    let lastSection = route.sections[lastSectionIndex]
    return lastSection.arrivalLocationTime!
}
Here’s how to format the above ETA with a specific timezone:
/**
 * Formats the given date to a string representation using the device's default timezone.
 *
 * - Parameter date: The Date object to be formatted.
 * - Returns: A string representing the formatted time in the default timezone.
 */
private func getFormattedDate(_ date: Date) -> String {
    // Create a DateFormatter instance that formats the time in a short format (e.g., "HH:mm a").
    let dateFormatter = DateFormatter()
    dateFormatter.timeStyle = .short

    // Format the date using the configured DateFormatter and return the result as a string.
    return dateFormatter.string(from: date)
}
To update traffic information on an existing route, see Update traffic information. This allows you to refresh traffic data and ETAs.
Traffic-optimized route calculation
When calculating routes, the HERE SDK automatically integrates the traffic data to provide the fastest and most accurate paths.
By default, routes are optimized considering both current and predictive traffic conditions. The RoutingEngine uses predictive location services to anticipate upcoming traffic while traversing the route, ensuring that calculated routes account for traffic conditions you're likely to encounter.
- Routes automatically consider current traffic when calculating the fastest path.
- The
RoutingEngineanticipates future traffic conditions based on historical patterns and real-time data. - Estimated arrival times (ETAs) include delays from traffic congestion.
- Each
Spanof a route contains detailed traffic speed information with jam factors. - Optionally, query traffic data along the route with the
TrafficEngine.
Traffic optimization happens automatically - you don't need to enable it explicitly, but you can turn it also off.
Disable traffic optimization
The RoutingEngine uses predictive location services to anticipate upcoming traffic conditions. This means that the routes generated can change dynamically based on real-time traffic data, leading to different route shapes.
Usually, traffic optimization is desired, but if you are, for example, a bus driver, you cannot choose better routes as you have to follow a pre-defined bus route.
The HERE SDK provides a feature called TrafficOptimizationMode to manage this. If you prefer stable routes and are not concerned about traffic conditions, you can completely disable traffic optimization by choosing TrafficOptimizationMode.disabled:
routeOptions.trafficOptimizationMode = .disabled
Note that disabling TrafficOptimizationMode will also disable any traffic information from the Route and the ETA will not include potential delays.
Get incident summary from a route
If you are interested in basic traffic incident information along the route, you can get a summary of the traffic situation directly from the Route instance - per Section, by calling section.getTrafficIncidents(). The resulting TrafficIncidentOnRoute object contains a small subset of the data that is available also from the TrafficEngine, but it can be useful to give a first overview.
Examples of incident categories that are delivered as part of the Route object:
accident: Traffic accident.congestion: Traffic jam.construction: Construction work.disableVehicle: Overturned or broken down vehicle(s) on the road.laneRestriction: A lane restriction.massTransit: Incident involving mass transit such as rail or subway.plannedEvent: Incident involving activities such as sport events or festivals.roadClosure: Road closure.roadHazard: Dangerous obstruction on the road such as downed tree or traffic light out.weather: Adverse weather conditions.other: The incident is known but it doesn't fit into any of the other categories.unknown: No specific incident type is provided.
Note that the HERE SDK does not expose icon assets for these incident types, but you can enable the trafficIncidents map feature layer to show all incidents with an icon on the map. Similarly, you can also enable a trafficFlow layer to show the general traffic flow on the streets. Take a look at the Get started with Traffic section for more details.
Find upcoming speed limits and more
The Route object exposes detailed information along a Route to know upcoming speed limits, railway crossings, street attributes and road names, dynamic traffic info and much more.
Take a look at the following attributes: Span.sectionPolylineOffset, Span.dynamicSpeedInfo, Span.streetAttributes, Span.carAttributes, Span.truckAttributes, Span.scooterAttributes, Span.walkAttributes, Span.durationInSeconds, Span.streetNames, Span.routeNumbers, Span.speedLimitInMetersPerSecond, Span.consumptionInKilowattHours, Span.functionalRoadClass, Span.duration, Span.baseDuration. Consult the API Reference for a full list of attributes.
Each attribute is given per span and it is valid for the entire length of a span. Sometimes you will also find segment IDs that indicate a portion of the road network between two intersections. A Span is a route-related concept - it is a portion of the route which has the same attributes. There can be multiple spans on the same segment and each segment usually has a start offset and an end offset.
A Span defines the smallest part of a route segment and its curvature is exposed as a list of GeoCoordinates.
Get railway crossings information
A list of RouteRailwayCrossing can be retrieved from Route object that contains infomation which indicates the GeoCoordinates of the railway crossing, a RouteOffset and the RouteRailwayCrossingType of a railway for a train or a tram line that is crossing the route.
A RouteOffset is a location on the route defined by the section index and the distance in meters from the start of that section to the specified location on the route.
For more information about RouteOffset, look at the API Reference.
A quick implementation usage of RouteRailwayCrossing is shown as below:
for routeRailwayCrossing in route.railwayCrossings {
    // Coordinates of the route offset
    let routeOffsetCoordinates = routeRailwayCrossing.coordinates
    // Index of the corresponding route section. The start of the section indicates the start of the offset.
    let routeOffsetSectionIndex = routeRailwayCrossing.routeOffset.sectionIndex
    // Offset from the start of the specified section to the specified location along the route.
    let routeOffsetInMeters = routeRailwayCrossing.routeOffset.offsetInMeters

    print("A railway crossing of type \(routeRailwayCrossing.type) is situated \(routeOffsetInMeters) meters away from start of section: \(routeOffsetSectionIndex)")
}
Detect route violations
A route may contain a list of NoticeCode values that describe potential issues after a route was calculated. For example, when a route should avoid tunnels and the only possible route needs to pass a tunnel, the Route contains a notice that the requested avoidance of tunnels was violated.
- It is recommended to always check a calculated
Routefor possible violations. - The
NoticeCodeis part of aNoticeobject. A list of possibleNoticeobjects can be accessed perSectionof aRoute. - The list will be empty, when no violation occurred.
- If any possible violation is not desired, it is recommended to skip routes that contain at least one violation.
However, an implementation may judge case by case depending on the requested route options and the actual list of NoticeCode values. More about route options can be found in the next section. Important: for the sake of simplicity, the code snippets in this guide do not evaluate the possible enum values of a notice.
You can detect possible route notices with the following method:
// A route may contain several warnings, for example, when a certain route option could not be fulfilled.
// An implementation may decide to reject a route if one or more violations are detected.
private func logRouteViolations(route: Route) {
    let sections = route.sections
    for section in sections {
        for span in section.spans {
            let spanGeometryVertices = span.geometry.vertices;
            // This route violation spreads across the whole span geometry.
            guard let violationStartPoint: GeoCoordinates  = spanGeometryVertices.first else {
                print("Error: violation start geocoordinate is empty.")
                return
            };
            guard let violationEndPoint : GeoCoordinates = spanGeometryVertices.last else {
                print("Error: violation end geocoordinate is empty.")
                return
            };
            for index in span.noticeIndexes{
                let spanSectionNotice : SectionNotice = section.sectionNotices[Int(index)];
                // The violation code such as "violatedVehicleRestriction".
                let violationCode = spanSectionNotice.code;
                print("The violation \(violationCode)  starts at \(toString(geoCoordinates: violationStartPoint))  and ends at  \(toString(geoCoordinates: violationEndPoint)) .");

            }
        }
    }
}
NoteAll routes contain altitude values along the route. For example, to create an elevation profile for a planned bicycle trip.
Try the Routing example apps
On GitHub you can find the "Routing" example app, that contains all the code snippets from above, plus more.
Additionally, you can find on GitHub the "PublicTransit" example app. It shows how to use the TransitRoutingEngine to calculate public transit routes from A to B with a number of waypoints in between.
Take also a look at the Rerouting example app on GitHub. Note that it requires the HERE SDK (Navigate), but the UI building blocks and the code for the IconProvider can be also used by other licenses, for example, to show road shield icons as part of a route preview panel.
Updated 10 hours ago