Get started with Maps
The HERE SDK offers robust mapping capabilities, allowing developers to seamlessly integrate map views into their applications. Key features include adding and customizing map views, adjusting the displayed location, and modifying map properties. At the heart of the mapping API is the MapView, a subclass of View, which provides vector-based and raster-based representations of maps with various configurable properties.
HERE map data is updated on a weekly basis to ensure you always get the freshest map data available. By integrating the map view you can automatically benefit from this.
For the HERE SDK (Explore), the MapView and non-satellite-based map schemes are based on HERE Vector Tile API in combination with OMV vector tiles.
For the HERE SDK (Navigate), the MapView and non-satellite-based map schemes are based on Data IO in combination with OCM vector tiles. This is applicable during online use when no map data has been cached, prefetched or installed. Data IO is also counted when downloading or updating offline maps with the MapDownloader or the MapUpdater. Applicable only for the HERE SDK (Navigate).
NoteFor information about the pricing of these features, see the HERE Base Plan Pricing. If you have questions about pricing, contact us.
Show a map
Before you can show a map view, you need to integrate the MapView as shown here. You can use XML layouts (supported by Java and Kotlin) or Jetpack Compose with Kotlin.
Loading a map scene can be done, for example, from your MainActivity class. Add the following code to load the scene with a map scheme representing a NORMAL_DAY map render style:
private void loadMapScene() {
    // Load a scene from the HERE SDK to render the map with a map scheme.
    mapView.getMapScene().loadScene(MapScheme.NORMAL_DAY, new MapScene.LoadSceneCallback() {
        @Override
        public void onLoadScene(@Nullable MapError mapError) {
            if (mapError == null) {
                double distanceInMeters = 1000 * 10;
                MapMeasure mapMeasureZoom = new MapMeasure(MapMeasure.Kind.DISTANCE_IN_METERS, distanceInMeters);
                mapView.getCamera().lookAt(
                        new GeoCoordinates(52.530932, 13.384915), mapMeasureZoom);
            } else {
                Log.d("loadMapScene()", "Loading map failed: mapError: " + mapError.name());
            }
        }
    });
}
private fun loadMapScene() {
// Load a scene from the HERE SDK to render the map with a map scheme.
mapView!!.mapScene.loadScene(MapScheme.NORMAL_DAY) { mapError ->
if (mapError == null) {
val distanceInMeters = (1000 * 10).toDouble()
val mapMeasureZoom = MapMeasure(MapMeasure.Kind.DISTANCE_IN_METERS, distanceInMeters)
mapView!!.camera.lookAt(
GeoCoordinates(52.530932, 13.384915), mapMeasureZoom
)
} else {
Log.d("loadMapScene()", "Loading map failed: mapError: " + mapError.name)
}
}
}Note that the above shows only an isolated code snippet: to learn how to build a simple map application, including the integration and initialization of the HERE SDK, see Get started.
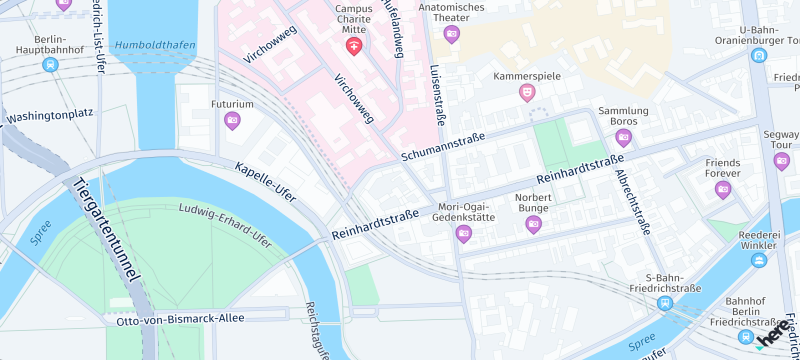
Screenshot: Showing a normal day map scheme.
Get informed when the map is ready
The HERE Rendering Engine will be attached each time after onResume() is called. The OnReadyListener tells you once this happens:
mapView.setOnReadyListener(new MapView.OnReadyListener() {
    @Override
    public void onMapViewReady() {
        // This will be called each time after this activity is resumed.
        // It will not be called before the first map scene was loaded.
        // Any code that requires map data may not work as expected until this event is received.
        Log.d(TAG, "HERE Rendering Engine attached.");
    }
});
mapView!!.setOnReadyListener { // This will be called each time after this activity is resumed.
// It will not be called before the first map scene was loaded.
// Any code that requires map data may not work as expected until this event is received.
Log.d(TAG, "HERE Rendering Engine attached.")
}Most often, you may not need to wait for this event. For example, map items can be added any time. Once the HERE Rendering Engine is attached, the map will become visible. Only code - such as picking map items from the map view - that requires map data should wait for this event to ensure that you will get the expected results.
Pick embedded POIs
By default, the map displays several icons for restaurants, public transit, and other places of interest. These points of interest (POIs), known as Carto POIs, can be selected by the user to obtain more details. You also have the option to control the visibility of these embedded POIs.
Embedded POIs are preconfigured Carto POI markers that are displayed on the MapView by default. Unlike MapMarker items, their content and visual appearance cannot be modified without using the HERE Style Editor. However, users can tap on these icons to retrieve information such as location, PlaceCategory, and the name of the POI.
Embedded POIs can be picked in parallel to other MapMarker items shown on the map, unless they are currently hidden by another map item.
private void setTapGestureHandler() {
    mapView.getGestures().setTapListener(new TapListener() {
        @Override
        public void onTap(@NonNull Point2D touchPoint) {
            pickMapContent(touchPoint);
        }
    });
}

private void pickMapContent(final Point2D touchPoint) {
    // You can also use a larger area to include multiple map icons.
    Rectangle2D rectangle2D = new Rectangle2D(touchPoint, new Size2D(50, 50));
    // Creates a list of map content type from which the results will be picked.
    // The content type values can be MAP_CONTENT, MAP_ITEMS and CUSTOM_LAYER_DATA.
    ArrayList<MapScene.MapPickFilter.ContentType> contentTypesToPickFrom = new ArrayList<>();

    // MAP_CONTENT is used when picking embedded Carto POIs, traffic incidents, vehicle restriction etc.
    // MAP_ITEMS is used when picking map items such as MapMarker, MapPolyline, MapPolygon etc.
    // Currently we need Carto POIs so adding the MAP_CONTENT filter.
    contentTypesToPickFrom.add(MapScene.MapPickFilter.ContentType.MAP_CONTENT);
    MapScene.MapPickFilter filter = new MapScene.MapPickFilter(contentTypesToPickFrom);

    // If you do not want to specify any filter you can pass filter as NULL and all of the pickable contents will be picked.
    mapView.pick(filter, rectangle2D, mapPickResult -> {
        if (mapPickResult == null) {
            Log.e("onPickMapContent", "An error occurred while performing the pick operation.");
            return;
        }
        PickMapContentResult pickedContent = mapPickResult.getMapContent();
        handlePickedCartoPOIs(pickedContent.getPickedPlaces());
        handlePickedVehicleRestrictions(pickedContent.getVehicleRestrictions());
        // ... handle more content results when needed.
    });
}

private void handlePickedCartoPOIs(List<PickedPlace> cartoPOIList) {
    int listSize = cartoPOIList.size();
    if (listSize == 0) {
        return;
    }

    PickedPlace topmostPickedPlace = cartoPOIList.get(0);
    showDialog("Carto POI picked:", topmostPickedPlace.name + ", Location: " +
            topmostPickedPlace.coordinates.latitude + ", " +
            topmostPickedPlace.coordinates.longitude + ". " +
            "See log for more place details.");

    // Now you can use the SearchEngine or the OfflineSearchEngine, when available for your license,
    // to retrieve the Place object containing more details.
}
private fun setTapGestureHandler() {
mapView.gestures.tapListener = TapListener { touchPoint -> pickMapMarker(touchPoint) }
}
private fun pickMapContent(touchPoint: Point2D) {
// You can also use a larger area to include multiple map icons.
val rectangle2D = Rectangle2D(touchPoint, Size2D(50.0, 50.0))
// Creates a list of map content type from which the results will be picked.
// The content type values can be MAP_CONTENT, MAP_ITEMS and CUSTOM_LAYER_DATA.
val contentTypesToPickFrom = ArrayList<MapPickFilter.ContentType>()
// MAP_CONTENT is used when picking embedded Carto POIs, traffic incidents, vehicle restriction etc.
// MAP_ITEMS is used when picking map items such as MapMarker, MapPolyline, MapPolygon etc.
// Currently we need Carto POIs so adding the MAP_CONTENT filter.
contentTypesToPickFrom.add(MapPickFilter.ContentType.MAP_CONTENT)
val filter = MapPickFilter(contentTypesToPickFrom)
// If you do not want to specify any filter you can pass filter as NULL and all of the pickable contents will be picked.
mapView.pick(filter, rectangle2D) { mapPickResult: MapPickResult? ->
if (mapPickResult == null) {
Log.e("onPickMapContent", "An error occurred while performing the pick operation.")
return@pick
}
val pickedContent = mapPickResult.mapContent
handlePickedCartoPOIs(pickedContent!!.pickedPlaces)
}
}
private fun handlePickedCartoPOIs(cartoPOIList: List<PickedPlace>) {
val listSize = cartoPOIList.size
if (listSize == 0) {
return
}
val topmostPickedPlace = cartoPOIList[0]
showDialog(
"Carto POI picked:", topmostPickedPlace.name + ", Location: " +
topmostPickedPlace.coordinates.latitude + ", " +
topmostPickedPlace.coordinates.longitude + ". " +
"See log for more place details."
)
// Now you can use the SearchEngine or the OfflineSearchEngine, when available for your license,
// to retrieve the Place object containing more details.
}Optionally, you can now use the SearchEngine or the OfflineSearchEngine (not available for all licenses) to retrieve the Place object containing more details: use the PickMapContentResult to get a PickedPlace object that can be used to search for the Place.
Pick embedded vehicle restriction icons
Make sure to enable MapFeatures.VEHICLE_RESTRICTIONS to render vehicle restriction icons on the map.
Once a single or multiple vehicle restriction icons have been picked, you get a MapPickResult containing a PickMapContentResult object from where you can call getVehicleRestrictions() to get the details on the picked restrictions.
This object can be used to access the icon as bitmap and to retrieve other optional properties such as TruckType.
private void handlePickedVehicleRestrictions(List<PickMapContentResult.VehicleRestrictionResult> vehicleRestrictions) {
    int listSize = vehicleRestrictions.size();
    if (listSize == 0) {
        return;
    }

    PickMapContentResult.VehicleRestrictionResult topmostVehicleRestriction = vehicleRestrictions.get(0);
    createVehicleRestrictionIcon(topmostVehicleRestriction);
}
private fun handlePickedVehicleRestrictions(vehicleRestrictions: List<PickMapContentResult.VehicleRestrictionResult>) {
if (vehicleRestrictions.isEmpty()) {
return
}
val topmostVehicleRestriction = vehicleRestrictions.first()
createVehicleRestrictionIcon(topmostVehicleRestriction)
}With the VehicleRestrictionResult you can use the IconProvider to generate an image representation as shown on the map. Use iconProvider.createVehicleRestrictionIcon(..) to generates an image.
The method requires the following parameters:
- vehicleRestrictionResult: The result of picking a vehicle restriction object from
PickMapContentResult. - currentMapScheme: The current map scheme of the
MapView. - IconProviderAssetType: Specifies icon optimization for either UI or MAP.
- size: The size of the generated image in the callback.
- iconProviderCallback: The callback object that receives the generated icon.
Here’s how to achieve this:
private void createVehicleRestrictionIcon(PickMapContentResult.VehicleRestrictionResult vehicleRestrictionResult) {
IconProvider iconProvider = new IconProvider(mapView.getMapContext());

    IconProvider.IconCallback iconProviderCallback = new IconProvider.IconCallback() {
        @Override
        public void onCreateIconReply(@Nullable Bitmap bitmap, @Nullable String description, @Nullable IconProviderError iconProviderError) {
            if (iconProviderError == null) {
                // Now you can make use of the bitmap representation.
            }
        }
    };

    iconProvider.createVehicleRestrictionIcon(vehicleRestrictionResult, currentMapScheme, IconProviderAssetType.UI, new Size2D(), iconProviderCallback);
}
private fun createVehicleRestrictionIcon(vehicleRestrictionResult: PickMapContentResult.VehicleRestrictionResult) {
val iconProviderCallback = object : IconCallback {
override fun onCreateIconReply(
bitmap: Bitmap?,
description: String?,
iconProviderError: IconProviderError?
) {
if (iconProviderError == null) {
// Now you can make use of the bitmap representation.
}
}
}
iconProvider.createVehicleRestrictionIcon(
vehicleRestrictionResult,
currentMapScheme,
IconProviderAssetType.UI,
Size2D(),
iconProviderCallback
)
}For the HERE SDK for Android Navigate, see the "CartoPOIPicking" app for an example on GitHub.
Control the visibility of embedded POIs
For the HERE SDK for Android Navigate, the visibility of embedded POIs on the map can be controlled with MapContentSettings.setPoiCategoriesVisibility(...) that allows to set a VisibilityState for a list of POI categories.
// Note: You can change the visibility of individual embedded POI categories. This allows hiding specific categories of carto POIs.
List<String> categoryIds = new ArrayList<>();
categoryIds.add(PlaceCategory.EAT_AND_DRINK_RESTAURANT);
MapContentSettings.setPoiCategoriesVisibility(categoryIds, VisibilityState.HIDDEN);
// Note: You can change the visibility of individual embedded POI categories. This allows hiding specific categories of carto POIs.
val categoryIds = mutableListOf<String>()
categoryIds.add(PlaceCategory.EAT_AND_DRINK_RESTAURANT)
MapContentSettings.setPoiCategoriesVisibility(categoryIds, VisibilityState.HIDDEN)The visibility of embedded POIs on the map can be controlled with Navigate, but not with Explore.
Note that not all POI categories are available for all map schemes.
A list of supported categories can be found in the documentation of the HERE Style Editor.
On top, Explore does not support all PlaceCategory fields to be shown as embedded POI. For example, EAT_AND_DRINK and SHOPPING are only visible when using the HERE SDK (Navigate).
Note that the following embedded POI category groups currently do not appear on the MapView of Explore:
- Accommodation
- Automotive
- Eat & Drink
- Shopping
Handle orientation changes
In order to support orientation changes for the map view component, the easiest approach is to not recreate an activity. The screen will rotate, but showing the same content - either in landscape or portrait format.
This is the most convenient option for simpler app layouts and it is used for most example apps shipped with the HERE SDK. It can be enabled like so:
<activity android:name=".YourActivity"
          android:configChanges="orientation">

</activity>
The value orientation for android:configChanges indicates that the activity will handle orientation changes (i.e., changes from portrait to landscape or vice versa) itself. It prevents the Android system from restarting your activity when the screen orientation changes. Instead, the onConfigurationChanged(Configuration newConfig) method of your activity is called, where you can optionally handle the orientation change.
However, if instead you want to create a new app layout for each orientation change, then you have two options:
- Either keep the HERE SDK alive when switching activities and initialize the HERE SDK only once, for example, when
savedInstanceStateisnullor whenSDKNativeEngine.getSharedInstance()isnull. Then after an orientation change, thesavedInstanceStatecan be used for recreating the map view. When you callmapView.onSaveInstanceState(outState)then all map items that are added to the map, like markers, polylines and so on, will be kept based on the bundled state - even if the screen orientation changes and the map view is recreated. - Alternatively, reinitialize the HERE SDK and call
mapView.onCreate(null)to create also a new map view instance. This is needed as a new HERE SDK instance or likewise a newMapViewinstance cannot be used together with a bundled state that was created based on previous instances.
An example for the HERE SDK for Android Navigate for the latter case is shown in the "NavigationQuickStart" example app, provided in both Java and Kotlin. You can find on GitHub.
Handle Web Mercator and Globe projection
The HERE SDK provides options for configuring the map's projection type, with two main types supported: Web Mercator and Globe. You can set the projection in two ways: via XML layout attributes or programmatically using MapViewOptions.
Web Mercator
The Web Mercator projection is a cylindrical map projection that represents the Earth's surface as a rectangular grid. In this projection, the map appears flat, with latitude and longitude lines forming a grid that contracts near the poles. This leads to distortion in area and scale, especially at higher latitudes.
Method 1: XML Layout Configuration
To set the Web Mercator projection in your layout resources:
<com.here.sdk.mapview.MapView
        xmlns:app="http://schemas.android.com/apk/res-auto"
        android:id="@+id/map_view"
        android:layout_width="match_parent"
        android:layout_height="match_parent"
        app:projection="web_mercator">
    </com.here.sdk.mapview.MapView>
Method 2: Programmatic Configuration
To set the Web Mercator projection programmatically using MapViewOptions:
MapViewOptions mapViewOptions = new MapViewOptions();
mapViewOptions.setProjectionType(ProjectionType.WEB_MERCATOR);
MapView mapView = new MapView(this, mapViewOptions);
Globe projection
The Globe projection renders the map as a 3D globe. This projection allows for a realistic view of the Earth, preserving relative sizes and distances, which can help users understand spatial relationships better at a global scale. Globe projection is enabled, by default.
Method 1: XML Layout Configuration
To set the Globe projection in your layout resources:
<com.here.sdk.mapview.MapView
        xmlns:app="http://schemas.android.com/apk/res-auto"
        android:id="@+id/map_view"
        android:layout_width="match_parent"
        android:layout_height="match_parent"
        app:projection="globe">
    </com.here.sdk.mapview.MapView>
Method 2: Programmatic Configuration
To set the Globe projection programmatically using MapViewOptions:
MapViewOptions mapViewOptions = new MapViewOptions();
mapViewOptions.setProjectionType(ProjectionType.GLOBE);
MapView mapView = new MapView(this, mapViewOptions);
Set a map language
You can customize the language that is used on the map to show labels for streets, cities and other map data. By default, the local language of a region is used.
Call MapView.setPrimaryLanguage(languageCode) to set the language for the world - or set null to switch back to the default behavior. This will set the language for all instances of MapView. If a language is not supported in any region of the world, the local language for that region is shown instead.
Use MapView.setSecondaryLanguage(languageCode) to set a secondary map language to support places that can show dual labels. If the text for primary and secondary language is the same, then only the primary language will be shown. If a requested language is not supported, then the local language is used. For example, some cities in India show a dual label with Latin (English) & Hindi text - at the same time.
Handle disputed territories
The HERE SDK supports multiple geographic political views and disputed borders to show the map boundaries based on an international view (default) or a local country view. The local view affects only particular areas on the map when a border and possession or control is claimed by two or more political entities - usually a country.
You can change the default geopolitical view by setting a three-letter country code for the politicalView member accessible via SDKOptions. The supported country codes are accessible on the coverage page.
When set, the map view will show all country boundaries according to the geopolitical view of the country that has been set and the MapView will show the borders accordingly.
Note that this is released as a beta feature.
If you want to change the geopolitical view at runtime, use the following code snippet:
// Optionally, clear the cache, so that changing the options has an immediate effect.
SDKCache.fromEngine(SDKNativeEngine.getSharedInstance()).clearCache(error -> {
    if (error != null) {
      // ...
    }

    SDKOptions options = SDKNativeEngine.getSharedInstance().getOptions();
    options.politicalView = "ARG";
    SDKNativeEngine.getSharedInstance().dispose();

    // Now, initialize the HERE SDK again using the updated options.
});
// Optionally, clear the cache, so that changing the options has an immediate effect.
SDKCache.fromEngine(SDKNativeEngine.getSharedInstance()!!).clearCache { error: MapLoaderError? ->
if (error != null) {
// ...
}
val options = SDKNativeEngine.getSharedInstance()!!.options
options.politicalView = "ARG"
SDKNativeEngine.getSharedInstance()!!.dispose()
// Now, initialize the HERE SDK again using the updated options.
}Make sure to call this not during any ongoing HERE SDK operation, as setting new options requires also to create a new shared instance. Ideally, set the options and the politicalView only once before initializing the HERE SDK for the first time during the app's lifecycle.
Manage the HERE watermark
When using the HERE SDK, it is required that the HERE logo is always visible on the map view. By default, the HERE logo is located at the bottom right corner of the map. However, you can easily customize its location to meet your app design by calling setWatermarkLocation() on your map view instance. It is recommended to change the default placement only when it is required due to overlapping UI elements. Note for very small views: if both edges of the map are less than 250 density independent pixels in size, the watermark will be hidden automatically.
NoteOnly upon special agreement with HERE it is possible to remove the HERE logo.
Updated yesterday