Integrate the HERE SDK
In this tutorial, you will develop an Android application that displays a map.
- To integrate the HERE SDK into an existing application, you can skip the initial steps of setting up a new project from scratch.
- If you prefer to start by running an example app that demonstrates some of the features of the HERE SDK, take a look at this tutorial.
Prerequisites
Make sure you have access to your credentials and the HERE SDK framework. To learn more, see Get started.
Create a new project
Android Studio is the recommended IDE. If you're new to Android development, please refer to the guides on developer.android.com to get started with the basics.
NoteThe resulting "HelloMap" application is available on GitHub for Java and Kotlin. More dedicated code examples are available for the HERE SDK for Android (Explore) and the HERE SDK for Android (Navigate).
- Note that the "HelloMapKotlin" app uses XML-based layouts, just like its Java counterpart. All other Kotlin apps use Jetpack Compose and a declarative UI approach.
- Additionally, the "HelloMap" app shows how to decorate the map with features such as a compass or a map ruler. These optional elements can be created on app-side as shown in the HERESDKUnits project.
Start Android Studio (this guide is based on version Android Studio Narwhal 4 Feature Drop | 2025.1.4) and create a new project by selecting:
- Start a new Android Studio Project.
- Choose Phone and Tablet, select Empty Views Activity and click Next.
- Provide a project name, e.g. "HelloMap" and select Java or Kotlin as the language.
- Next to Minimum API level, set API 24 as the minimum Android SDK.
- Select a Build configuration language.
- Make sure an appropriate directory is chosen in Save location and click Finish to continue.
You can use AndroidX support libraries. Note that these are usually added by default when you create a new Android Studio project.
Once the wizard finishes, make sure to build the plain project and execute it on an emulator (or on a device). If all goes well, you should see the "Hello World" text.
NoteJava and Kotlin are fully supported. The HERE SDK is compiled for Java and the API Reference is based on JavaDoc. However, Java is 100% interoperable with Kotlin.
Unless otherwise noted, the code snippets in this Developer Guide are written in Java. Below, you can use the tab switcher to select your preferred programming language.
Once you have a working Android application it's time to think about the features of the app. For this tutorial, the goal is to show a map view on your emulator or device.
Here's an overview of the next steps:
- Adapt your Gradle script to integrate the HERE SDK.
- Set required credentials.
- Initialize the HERE SDK.
- Add a map view to your main activity's layout file.
- Add the code to load your first map scene.
NoteWhile all of the functionalities of the HERE SDK are accessible from the emulator, usage of a real device is strongly recommended. The overall performance will be better, and some features like gestures are just easier to use on multi-touch enabled hardware. The rendering of the map view is optimized for mobile device GPUs.
Let's begin with the first step to see how you can add the HERE SDK to our project.
Integrate the Android Archive
Get the latest release artifacts including the HERE SDK framework archive (AAR) to include in your application (named heresdk-xx-xx.aar).
NoteArtifactory support and SDK dependency management via Maven is not yet supported. This means that you must manually download and integrate the HERE SDK library (AAR).
Copy the HERE SDK AAR file (*.aar) to your application's app/libs folder. If the folder is not created automatically, please create it.
Then extend the dependencies closure in the app level's build.gradle file to make sure all *.aar (for the HERE SDK AAR) and *.jar (for example, for the optional heresdk-mock.jar for unit tests) files are included, by adding the following:
dependencies {
    implementation fileTree(dir: 'libs', include: ['*.jar', '*.aar'])
    ...
}
dependencies {
implementation(fileTree(mapOf(
"dir" to "libs",
"include" to listOf("*.aar", "*.jar"),
"exclude" to listOf("*mock*.jar")
)))
...
}
NoteNote that this guide is based on the HERE SDK version 4.25.5.0. If your AAR version is different from the version used for this guide, the steps may vary and you may need to adapt the source code of your app.
Now it's time to click the Sync Now button to integrate the HERE SDK. Alternatively, navigate to the menu bar in Android Studio, select File, and then choose Sync Project with Gradle Files.
Set your credentials
When using the HERE SDK, your application must be authenticated with a set of credentials.
Once you have your credentials at hand, add your set of credentials programmatically when initializing the HERE SDK (see next step).
The credentials are not tied to the package name, but to the account used to obtain the credentials. When you plan to use the same credentials for multiple apps, then you also need to set a scope to differentiate your apps in our system.
Initialize the HERE SDK
The HERE SDK is not initialized automatically. Instead, you can freely decide at which point in time the HERE SDK should be initialized. Initialization happens synchronously on the main thread and takes around 100 ms.
NoteInitialization of the HERE SDK will be successful even if your credentials are invalid. The best way to check if your credentials are valid is to try a feature engine. Invalid credentials will result in a dedicated error enum value. Note that certain features may require more rights than others. For example, the credentials obtained for Explore will result in an error when being used with the
OfflineSearchEngine- which is not part of the subset of Explore.
Initialize the HERE SDK by executing the following method before you want to use any feature of the HERE SDK:
import android.content.Context;

import com.here.sdk.core.engine.AuthenticationMode;
import com.here.sdk.core.engine.SDKNativeEngine;
import com.here.sdk.core.engine.SDKOptions;
import com.here.sdk.core.errors.InstantiationErrorException;

...

private void initializeHERESDK() {
    // Set your credentials for the HERE SDK.
    String accessKeyID = "YOUR_ACCESS_KEY_ID";
    String accessKeySecret = "YOUR_ACCESS_KEY_SECRET";
    AuthenticationMode authenticationMode = AuthenticationMode.withKeySecret(accessKeyID, accessKeySecret);
    SDKOptions options = new SDKOptions(authenticationMode);

    try {
        Context context = this;
        SDKNativeEngine.makeSharedInstance(context, options);
    } catch (InstantiationErrorException e) {
        throw new RuntimeException("Initialization of HERE SDK failed: " + e.error.name());
    }
}
import android.content.Context;
import com.here.sdk.core.engine.AuthenticationMode;
import com.here.sdk.core.engine.SDKNativeEngine;
import com.here.sdk.core.engine.SDKOptions;
import com.here.sdk.core.errors.InstantiationErrorException;
...
private fun initializeHERESDK() {
// Set your credentials for the HERE SDK.
val accessKeyID = "YOUR_ACCESS_KEY_ID"
val accessKeySecret = "YOUR_ACCESS_KEY_SECRET"
val authenticationMode = AuthenticationMode.withKeySecret(accessKeyID, accessKeySecret)
val options = SDKOptions(authenticationMode)
try {
val context = this
SDKNativeEngine.makeSharedInstance(context, options)
} catch (e: InstantiationErrorException) {
throw RuntimeException("Initialization of HERE SDK failed: " + e.error.name)
}
}Make sure to insert correct credentials for key and secret. By calling makeSharedInstance() you initialize all what is needed to use the HERE SDK. The core class of the HERE SDK is called SDKNativeEngine. Under the hood, this instance is used by any other engine that is offered by the HERE SDK.
Note that initialization requires to set an android.content.Context. An ApplicationContext can also be used instead, but is not required. The Context is only required to set internally the default path to the map cache.
Below you can see an example how to call initializeHERESDK() in your MainActivity's onCreate() method before accessing the MapView from your layout. Always call initializeHERESDK() on the main thread.
@Override
protected void onCreate(Bundle savedInstanceState) {
    super.onCreate(savedInstanceState);

    // Usually, you need to initialize the HERE SDK only once during the lifetime of an application.
    // Before creating a MapView instance please make sure that the HERE SDK is initialized.
    // Since in this example we inflate the MapView from a layout, make sure to initialize
    // the HERE SDK before calling setContentView(...).
    initializeHERESDK();

    setContentView(R.layout.activity_main);
    ...
}
override fun onCreate(savedInstanceState: Bundle?) {
super.onCreate(savedInstanceState)
// Usually, you need to initialize the HERE SDK only once during the lifetime of an application.
// Before creating a MapView instance please make sure that the HERE SDK is initialized.
// Since in this example we inflate the MapView from a layout, make sure to initialize
// the HERE SDK before calling setContentView(...).
initializeHERESDK()
enableEdgeToEdge()
// Note that this example uses XML layouts. If you want to use Jetpack Compose,
// take a look at other example apps on GitHub, for example,
// "RoutingKotlin" uses declarative UIs with Jetpack Compose.
setContentView(R.layout.activity_main)
ViewCompat.setOnApplyWindowInsetsListener(findViewById(R.id.main)) { v, insets ->
val systemBars = insets.getInsets(WindowInsetsCompat.Type.systemBars())
v.setPadding(systemBars.left, systemBars.top, systemBars.right, systemBars.bottom)
insets
}
...
}Similarly to initializeHERESDK(), you can also free resources by disposing the HERE SDK:
private void disposeHERESDK() {
    // Free HERE SDK resources before the application shuts down.
    // Usually, this should be called only on application termination.
    // Afterwards, the HERE SDK is no longer usable unless it is initialized again.
    SDKNativeEngine sdkNativeEngine = SDKNativeEngine.getSharedInstance();
    if (sdkNativeEngine != null) {
        sdkNativeEngine.dispose();
        // For safety reasons, we explicitly set the shared instance to null to avoid situations,
        // where a disposed instance is accidentally reused.
        SDKNativeEngine.setSharedInstance(null);
    }
}
private fun disposeHERESDK() {
// Free HERE SDK resources before the application shuts down.
// Usually, this should be called only on application termination.
// Afterwards, the HERE SDK is no longer usable unless it is initialized again.
SDKNativeEngine.getSharedInstance()?.dispose()
// For safety reasons, we explicitly set the shared instance to null to avoid situations,
// where a disposed instance is accidentally reused.
SDKNativeEngine.setSharedInstance(null)
}Here's an example of how to call disposeHERESDK() in your MainActivity's onDestroy() method.
@Override
protected void onDestroy() {
    mapView.onDestroy();
    disposeHERESDK();
    super.onDestroy();
}
override fun onDestroy() {
mapView?.onDestroy()
disposeHERESDK()
super.onDestroy()
}In the Engines section you can find more ways to initialize the HERE SDK.
Add a map view
Now that you have the SDK integrated into the project and credentials, you can add a new MapView instance.
Open the layout file of the MainActivity (usually named activity_main.xml) and remove the "Hello World" TextView (assuming you followed Android Studio's wizard). By default, it created a ConstraintLayout where you can place the map view. Any other layout parent will suit too.
Note that above you have selected an Empty Views Activity. Therefore, this example will use non-declarative XML-Layouts without incorporating Jetpack Compose.
Alternatively, you can use Jetpack Compose and Kotlin with declarative UI. A tutorial on how to add a map view using Jetpack Compose can be found here.
Add the following piece of code if you are using Java or Kotlin with XML-Layouts:
<com.here.sdk.mapview.MapView
android:id="@+id/map_view"
android:layout_width="match_parent"
android:layout_height="match_parent">
</com.here.sdk.mapview.MapView>A ConstraintLayout has the advantage that it offers a flat view hierarchy and it works well with Android Studio's Layout Editor, but this is all up to you. The SDK's MapView behaves exactly as you would expect from any other Android View.
Apparently, you create the map view from a layout file. You need to also initialize it; to do this, update the onCreate() method in your MainActivity (or any other Activity where you want to show a map view) so that it looks like the following:
private MapView mapView;
@Override
protected void onCreate(Bundle savedInstanceState) {
super.onCreate(savedInstanceState);
// Usually, you need to initialize the HERE SDK only once during the lifetime of an application.
initializeHERESDK();
setContentView(R.layout.activity_main);
// Get a MapView instance from the layout.
mapView = findViewById(R.id.map_view);
mapView.onCreate(savedInstanceState);
...
}private var mapView: MapView? = null
override fun onCreate(savedInstanceState: Bundle?) {
super.onCreate(savedInstanceState)
// Usually, you need to initialize the HERE SDK only once during the lifetime of an application.
// Before creating a MapView instance please make sure that the HERE SDK is initialized.
initializeHERESDK()
enableEdgeToEdge()
setContentView(R.layout.activity_main)
ViewCompat.setOnApplyWindowInsetsListener(findViewById(R.id.main)) { v, insets ->
val systemBars = insets.getInsets(WindowInsetsCompat.Type.systemBars())
v.setPadding(systemBars.left, systemBars.top, systemBars.right, systemBars.bottom)
insets
}
// Get a MapView instance from the layout.
mapView = findViewById(R.id.map_view)
mapView?.onCreate(savedInstanceState)
...
}You will get an error about MapView being an unresolved symbol, so use the auto completion hotkey to add com.here.sdk.mapview.MapView to your imports list, or add it manually.
It is important to call mapView.onCreate() to perform additional initialization tasks. Otherwise the map will not be rendered. Note that multiple MapView instances can be created and rendered together on one screen as part of the same layout.
With initializeHERESDK() you initialize the HERE SDK before setContentView() is called. Since you use a MapView in our layout, you have to initialize the HERE SDK beforehand.
Load a map scene
Before you can see any map on the device's screen, you need to decide how the map data should be rendered. Therefore, you need to asynchronously load a scene that allows us to customize the look of the map. When you load a scene, it will use one of the default map styles the SDK is shipped with.
Loading a map scene can be done from your MainActivity class by adding few lines of code. For example, add the following method and call it when the activity has been created - or when all requested Android permissions for your app have been granted:
private void loadMapScene() {
// The camera can be configured before or after a scene is loaded.
double distanceInMeters = 1000 * 10;
MapMeasure mapMeasureZoom = new MapMeasure(MapMeasure.Kind.DISTANCE_IN_METERS, distanceInMeters);
mapView.getCamera().lookAt(new GeoCoordinates(52.530932, 13.384915), mapMeasureZoom);
// Load a scene from the HERE SDK to render the map with a map scheme.
mapView.getMapScene().loadScene(MapScheme.NORMAL_DAY, new MapScene.LoadSceneCallback() {
@Override
public void onLoadScene(@Nullable MapError mapError) {
if (mapError != null) {
Log.d("HelloMap", "Loading map failed: mapError: " + mapError.name());
}
}
});
}private fun loadMapScene() {
// Load a scene from the HERE SDK to render the map with a map scheme.
mapView?.mapScene?.loadScene(MapScheme.NORMAL_DAY) { mapError ->
if (mapError == null) {
val distanceInMeters = (1000 * 10).toDouble()
val mapMeasureZoom = MapMeasure(MapMeasure.Kind.DISTANCE_IN_METERS, distanceInMeters)
mapView?.camera?.lookAt(GeoCoordinates(52.530932, 13.384915), mapMeasureZoom)
} else {
Log.d(TAG, "Loading map failed: mapError: " + mapError.name)
}
}
}Again, as in onCreate(), you will have to resolve the unresolved packages after adding the above code.
Call loadMapScene() from within onCreate() - or once the Android permissions are granted: Note that permission handling is an optional step for this "HelloMap" application. No special permissions are required.
@Override
protected void onCreate(Bundle savedInstanceState) {
...
loadMapScene();
}override fun onCreate(savedInstanceState: Bundle?) {
...
loadMapScene()
}As for most callbacks available in the HERE SDK, onLoadScene() is called on the main thread when loading the scene is done. If MapError is not null, it will indicate what went wrong.
From the MapView, you can then access the Camera to set some custom map parameters like the location you want the map centered on, and a zoom level which is specified by the camera's distance to earth. You can configure the Camera as soon as you have a MapView instance available. However, you will see the changes only taking effect after onLoadScene() has finished.
As an exercise, you can try to replace the above used MapScheme style with the following: MapScheme.SATELLITE. What do you get? Try out also other map schemes, like the normal night scheme.
Experiment with map layers
If you have the HERE SDK for Android Navigate, you can experiment with one of the available map layers. For example, to enable textured 3D models of prominent landmarks, add the following line of code inside onLoadScene():
Map<String, String> mapFeatures = new HashMap<>();
mapFeatures.put(MapFeatures.LANDMARKS, MapFeatureModes.LANDMARKS_TEXTURED);
mapView.getMapScene().enableFeatures(mapFeatures);val mapFeatures: MutableMap<String, String> = HashMap()
mapFeatures[MapFeatures.LANDMARKS] = MapFeatureModes.LANDMARKS_TEXTURED
mapView?.mapScene?.enableFeatures(mapFeatures)Handle the lifetime
Lastly, it is recommended to clean up when the activity lifetime ends: The HERE SDK for Android provides the mapView.onDestroy() method and SDKNativeEngine.getSharedInstance().dispose() - as shown above - to safely release all of its remaining resources.
Note that when an app is shutting down anyways, then it is not mandatory to dispose the SDKNativeEngine, but it doesn't do harm to do it and it is considered good practice to cancel ongoing requests and shut down the HERE SDK services. On the other hand, be careful to not dispose the HERE SDK too early when only one of your activities is destroyed and other parts of your app still need the HERE SDK. In general, it is also possible to init / dispose the HERE SDK for each Activity individually.
Additionally, it is recommended to pause rendering the map view when the Activity is paused and save the state of the map view instance. Add the following code to your MainActivity class:
@Override
protected void onPause() {
mapView.onPause();
super.onPause();
}
@Override
protected void onResume() {
mapView.onResume();
super.onResume();
}
@Override
protected void onDestroy() {
mapView.onDestroy();
disposeHERESDK();
super.onDestroy();
}
@Override
protected void onSaveInstanceState(@NonNull Bundle outState) {
mapView.onSaveInstanceState(outState);
super.onSaveInstanceState(outState);
}override fun onPause() {
mapView?.onPause()
super.onPause()
}
override fun onResume() {
mapView?.onResume()
super.onResume()
}
override fun onDestroy() {
    mapView?.onDestroy()
    disposeHERESDK()
    super.onDestroy()
}
override fun onSaveInstanceState(outState: Bundle) {
mapView?.onSaveInstanceState(outState)
super.onSaveInstanceState(outState)
}Build and run
Now it's time to build and run the app. If all goes well, you should see a HERE map covering the whole area of the view.
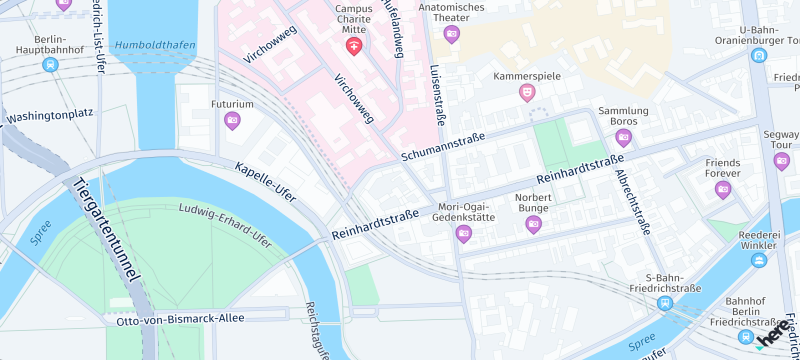
Screenshot: Showing main map scheme.

Screenshot: Showing 3D landmarks (only available for Navigate).
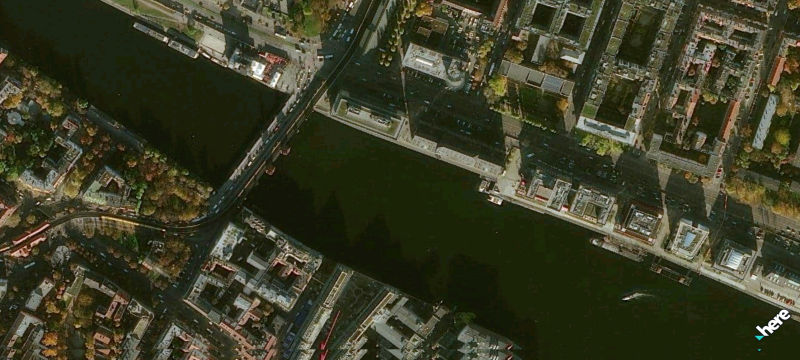
Screenshot: Showing satellite map scheme.
Next steps
- Learn more about the features of the HERE SDK. See the Feature list topic.
- Learn how to use the HERE SDK to develop for Android Auto. See Integration with Android Auto.
Updated yesterday