

Apply best practices for efficient map rendering
This article provides guidelines on how to effectively utilize the HERE Maps API for JavaScript, focusing on optimizing map responsiveness and ensuring a seamless user experience.
Use multi-geometries when applicable
In the HERE Maps API for JavaScript, H.geo.MultiLineString, H.geo.MultiPoint, and H.geo.MultiPolygon represent collections of H.geo.LineString, H.geo.Point, and H.geo.Polygon geometries, respectively.
If your objects meet the following conditions, you can improve performance by using these multi-geometry classes.
- Markers use the same
H.map.Icon. - For polylines or polygons, use the same
H.map.SpatialStyle. - You do not need to pick individual geometries as separate objects.
The following example demonstrates the non-recommended approach of creating separate map objects for each geometry:
// Array of H.geo.IPoint objects for markers that use the same icon
const points = [...];
const markers = [];
const icon = new H.map.Icon('graphics/markerHouse.png');
for (let i = 0; i < points.length; ++i) {
    // Create one marker instance for each point.
    markers.push(new H.map.Marker(points[i], { icon }));
}

// Array of point arrays representing lines.
// [
//   [lat1, lng1, lat2, lng2],
//   [lat3, lng3, lat4, lng4]
//   ...
// ]
const lines = [...];
const polylines = [];
const lineOptions = { style: {} };
for (let i = 0; i < lines.length; ++i) {
    const lineGeom = new H.geo.LineString.fromLatLngArray(line[i]);
    // Create one polyline for each geometry with the same line options.
    polylines.push(new H.map.Polyline(lineGeom), lineOptions);
}

// Array of point arrays representing polygons.
// [
//   [lat1, lng1, lat2, lng2, lat3, lng3, lat1, lng1],
//   [lat4, lng4, lat5, lng5, lat6, lng6, lat4, lng4]
//   ...
// ]
const boundaries = [...];
const polygons = [];
const polygonOptions = { style: {} };
for (let i = 0; i < boundaries.length; ++i) {
    const boundaryGeom = new H.geo.Polygon(
        new H.geo.LineString.fromLatLngArray(boundaries[i])
    );
    // Create one polygon per boundary with the same polygon options.
    polygons.push(new H.map.Polygon(boundaryGeom, polygonOptions));
}
Instead of creating multiple markers, polylines, and polygons, create one map object for each multi-geometry.
// Array of H.geo.IPoint objects for markers that use the same icon
const points = [...];

// Create one multi-point geometry for all positions.
const multiPointGeom = new H.geo.MultiPoint(points);
const icon = new H.map.Icon('graphics/markerHouse.png');

// Create one marker.
const marker = new H.map.Marker(multiPointGeom, { icon });

// Array of point arrays representing lines.
// [
//   [lat1, lng1, lat2, lng2],
//   [lat3, lng3, lat4, lng4]
// ]
const lines = [...];
const lineOptions = { style: {} };
const multiLineGeom = new H.geo.MultiLineString([]);
for (let i = 0; i < lines.length; ++i) {
    multiLineGeom.push(new H.geo.LineString.fromLatLngArray(line[i]));
}
// Create one polyline.
const polyline = new H.map.Polyline(multiLineGeom, lineOptions);

// Array of point arrays representing polygons.
// [
//   [lat1, lng1, lat2, lng2, lat3, lng3, lat1, lng1],
//   [lat4, lng4, lat5, lng5, lat6, lng6, lat4, lng4]
//   ...
// ]
const boundaries = [...];
const polygonOptions = { style: {} };
const multiPolygonGeom = new H.geo.MultiPolygon([]);
for (let i = 0; i < boundaries.length; ++i) {
    multiPolygonGeom.push(new H.geo.Polygon(
        new H.geo.LineString.fromLatLngArray(boundaries[i])
    ));
}
// Create one polygon.
const polygon = new H.map.Polygon(multiPolygonGeom, polygonOptions);
This approach reduces the number of map objects and can improve rendering performance.
Optimize map objects by zoom level
When you add many map objects to the map, use minimum and maximum zoom values to reduce visual clutter. These values define the zoom range in which an object is visible.
// Always visible once user enters city view
const cityRegionLabels = new H.map.Marker(..., { min: 8, max: 22 });

// Airports, stadiums, monuments
const landmarks = new H.map.Marker(..., { min: 10, max: 22 });

// Train stations, bus terminals
const transportationHubs = new H.map.Marker(..., { min: 12, max: 22 });

// Malls, hospitals, universities
const largeEstablishments = new H.map.Marker(..., { min: 14, max: 22 });

// Restaurants, shops, cafes
const smallEstablishments = new H.map.Marker(..., { min: 16, max: 22 });

// Building entrances
const entrances = new H.map.Marker(..., { min: 19, max: 22 });

// Individual assets: cars, deliveries, and field staff
const assets = new H.map.Marker(..., { min: 20, max: 22 });

// IoT devices, cameras, beacons
const sensors = new H.map.Marker(..., { min: 21, max: 22 });
Configuring labels this way reduces map clutter at different zoom levels.
Apply the same approach to polylines and polygon map objects.
At lower zoom levels, consider using a shared, compact icon for a large set of markers. Display the detailed marker icon only when the user focuses on a marker, for example, by hovering over or selecting it on the map or in the user interface.
// Some exemplary random geo-points:
const positions = Array(1000).fill().map((_, i) =>
    map.getCenter().walk((360 / 1000) * i, Math.random() * 1000 + 100),
  );

// A small circle representing a marker, common for all markers:
const sharedIcon = new H.map.Icon(
  `<svg xmlns="http://www.w3.org/2000/svg" width="9" height="9">
  <circle cx="4.5" cy="4.5" r="3.5" fill="white" stroke="rgba(0,0,0,0.5)"/></svg>`,
  { anchor: { x: 4.5, y: 4.5 } }
);

const markers = positions.map(
  (position, i) => new H.map.Marker(position, { icon: sharedIcon, data: { id: i }})
);
const markersGroup = map.addObject(
  new H.map.Group({ objects: markers })
);

const hoverMarker = map.addObject(
  new H.map.Marker({ lat: 0, lng: 0 }, { visibility: false, volatility: true }),
);

const createIcon = (id) =>
  new H.map.Icon(
    // A circle with an ID representing the hover-marker:
    `<svg xmlns="http://www.w3.org/2000/svg" width="30" height="30">
    <circle id="icon-circle" cx="15" cy="15" r="14.5" fill="white" stroke="rgba(0,0,0,0.5)"/>
    <text x="15" y="19" text-anchor="middle" font-family="sans-serif" font-size="11">${id}</text></svg>`,
    { anchor: { x: 15, y: 35 } },
  );

// Display the detailed marker while the pointer is hovering over a small marker:
map.addEventListener("pointermove", function (evt) {
  const target = evt.target;
  if (target instanceof H.map.Marker && target.getParentGroup() === markersGroup) {
    const id = target.getData()?.id;
    if (id !== lastID) {
      hoverMarker.setGeometry(target.getGeometry());
      hoverMarker.setIcon(createIcon(id));
      hoverMarker.setVisibility(true);
      lastID = id;
    }
  } else if (target !== hoverMarker) {
    hoverMarker.setVisibility(false);
    lastID = null;
  }
});
let lastID;
map.setZoom(14);
The result looks like this:
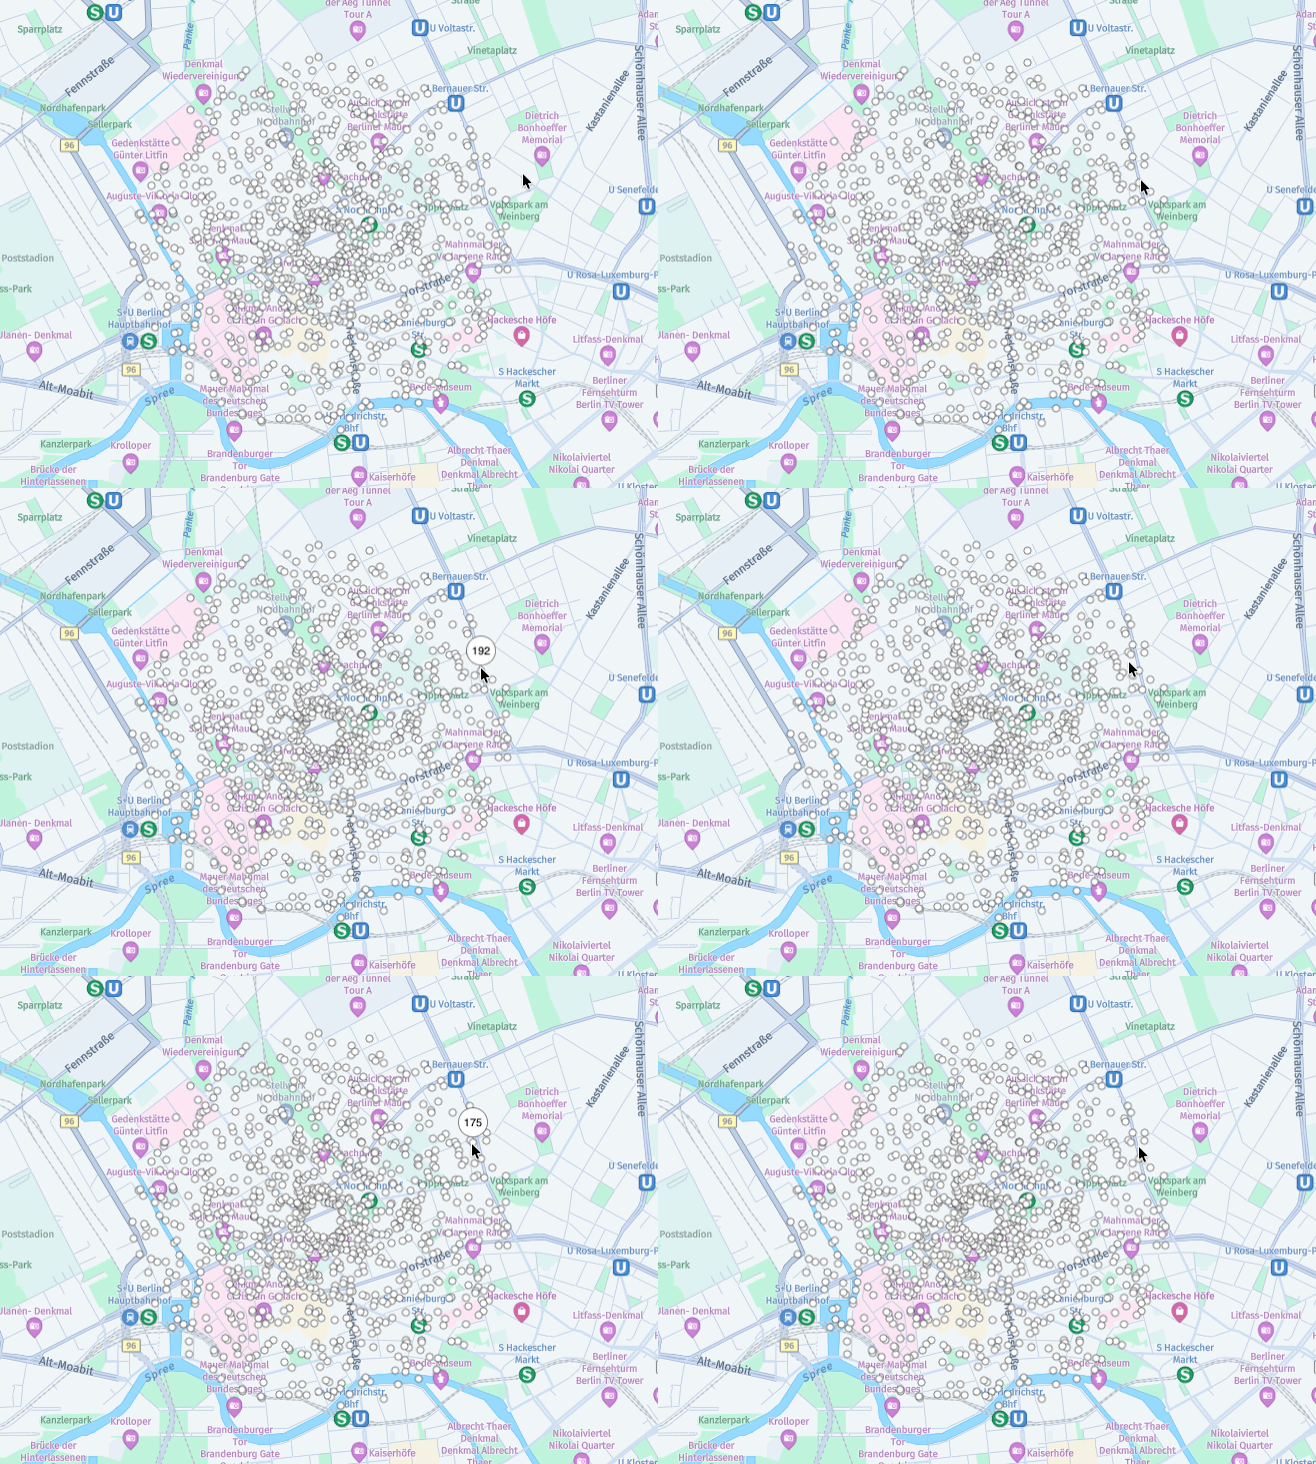
If you do not need to show some map objects at all times, set their visibility to false until you need them. Hiding unnecessary objects can reduce visual clutter.
Use separate layers for volatile and non-volatile objects
Separate map objects into layers according to how often they change. A volatile map object has frequent invalidations (for example, geometry or style changes). The map treats an object as volatile when the object or one of its parent groups is volatile.
Keeping these objects in separate layers allows the map to process changes to volatile objects without unnecessarily triggering updates for non-volatile objects. You can also hide, show, or replace a group of frequently changing objects as one unit.
The following example creates one layer for stable objects and another for objects that your app updates as it receives new data:
// Assumption: 'map' is initialized and available.
const staticObjectsProvider = new H.map.provider.LocalObjectProvider({});
const dynamicObjectsProvider = new H.map.provider.LocalObjectProvider({});

map.addLayer(new H.map.layer.ObjectLayer(staticObjectsProvider));
map.addLayer(new H.map.layer.ObjectLayer(dynamicObjectsProvider));

// Add objects that rarely change to the non-volatile layer.
const deliveryLocations = [
    new H.map.Marker(deliveryLocation1),
    new H.map.Marker(deliveryLocation2),
    ...
];
staticObjectsProvider.getRootGroup().addObjects(deliveryLocations);

// Add objects that your app updates frequently to the volatile layer.
const vehicleMarkers = [
    new H.map.Marker(startPosition, {
        volatility: true
    }),
    ...
];
dynamicObjectsProvider.getRootGroup().addObjects(vehicleMarkers);

// Update only the volatile layer when new positions arrive.
dynamicObjectsProvider.getRootGroup().getObjects().forEach(vehicleMarker => {
    vehicleMarker.setGeometry(getLatestPosition(vehicleMarker));
});
Keep objects that change together in the same layer and avoid rebuilding the non-volatile layer when volatile data changes. When you no longer need the volatile content, hide its root group with dynamicObjectsProvider.getRootGroup().setVisibility(false) or remove the layer from the map.
Delegate events from a parent map object
When many map objects need the same interaction, attach one event listener to the map instead of registering a listener on every object. This reduces the number of event listeners and avoids repeating the same callback setup for each map object. Use event.target in the callback to identify the object that triggered the event.
For example, to highlight a polygon on hover, listen for pointermove on the map and keep track of the highlighted polygon:
const polygons = Array(5).fill().map((_, i) => new H.map.Circle(
  map.getCenter().walk(360 / 5 * i, 500), 250
));
const polygonGroup = new H.map.Group({ objects: polygons });
map.addObject(polygonGroup);

const defaultStyle = new H.map.SpatialStyle({
  fillColor: 'rgba(0, 128, 255, 0.3)',
  strokeColor: 'blue',
  lineWidth: 2
});
const highlightStyle = new H.map.SpatialStyle({
  fillColor: 'rgba(255, 165, 0, 0.5)',
  strokeColor: 'orange',
  lineWidth: 3
});
let activePolygon;

map.addEventListener('pointermove', function (evt) {
  if (
    evt.target instanceof H.map.Polygon &&
    evt.target.getParentGroup() === polygonGroup
  ) {
    if (evt.target !== activePolygon) {
      activePolygon = evt.target;
      activePolygon.setStyle(highlightStyle);
    }
  } else if (activePolygon){
    activePolygon.setStyle(defaultStyle);
    activePolygon = null;
  }
});
Although you can use pointerenter and pointerleave with individual objects, these events do not bubble through parent objects for delegation. Use a bubbling event such as pointermove and track changes to the active object instead. If your app receives pointer events from the map outside the group, clear the active object when the pointer leaves the group.
Use canvas over SVG
When you use a large number of H.map.Marker objects, prefer canvas-based images over SVG images when possible. The browser creates for SVG marker icons a data-URL requests and rasterizes the SVG before it renders them.
The following example creates a distinct inline SVG icon for each marker. Although the SVG markup is inline, the browser still rasterizes each icon before H.map.Marker renders it.
const markers = [];
const positions = [...];
for (let i = 0; i < positions.length; ++i) {
    const svgString =
        `<svg xmlns="http://www.w3.org/2000/svg" xmlns:xlink="http://www.w3.org/1999/xlink" width="30" height="30" viewBox="0 0 30 30">
        <circle id="icon-circle" cx="15" cy="15" r="14.5" fill="white" stroke="black" stroke-width="1"/>
        <text x="15" y="15" text-anchor="middle" dominant-baseline="middle" font-family="Arial, sans-serif" font-size="11" fill="black">${i + 1}</text>
        </svg>`;
    const icon = new H.map.Icon(svgString);
    const marker = new H.map.Marker(positions[i], { icon });
    markers.push(marker);
}
You can create the same icon with canvas as follows:
const markers = [];
const positions = [...];
for (let i = 0; i < positions.length; ++i) {
    const canvas = document.createElement('canvas');
    canvas.width = 30;
    canvas.height = 30;
    const context = canvas.getContext('2d');
    context.beginPath();
    context.arc(15, 15, 14.5, 0, Math.PI * 2);
    context.fillStyle = 'white';
    context.fill();
    context.strokeStyle = 'black';
    context.lineWidth = 1;
    context.stroke();
    context.fillStyle = 'black';
    context.font = '11px Arial, sans-serif';
    context.textAlign = 'center';
    context.textBaseline = 'middle';
    context.fillText(String(i + 1), 15, 15);

    const icon = new H.map.Icon(canvas);
    const marker = new H.map.Marker(positions[i], { icon });
    markers.push(marker);
}
This approach avoids data-URL requests and SVG rasterization. It can improve performance when you create a large number of markers.
Reuse marker icons
In the HERE Maps API for JavaScript, the H.map.Icon class represents a reusable visual map marker. To optimize map performance, reuse an icon instance in as many marker objects as possible instead of creating a new H.map.Icon instance for each marker.
The following example demonstrates the non-recommended approach of creating a new icon object for each new marker:
// Array of anchor points for markers
var points = [...],
    markers = [];

for (var i = 0; i < points.length; i++) {
    markers.push(new H.map.Marker(points[i], {
        // A new identical Icon instance is created at each iteration
        // of the loop - do not do this:
        icon: new H.map.Icon('graphics/markerHouse.png')
    }));
};
Instead of creating a new icon object for each marker, reuse the single H.map.Icon instance across all H.map.Marker instances as shown in the following example:
// Array of anchor points for markers
var points = [...],
    markers = [],
    // Create single Icon instance
    icon = new H.map.Icon('graphics/markerHouse.png');

for (var i = 0; i < points.length; i++) {
    markers.push(new H.map.Marker(points[i], {
        // Reuse the Icon instance:
        icon: icon
      }));
}
The approach demonstrated in the preceding example allows better performance and lowers memory consumption.
Use marker clustering for large datasets
When you display many points, rendering an individual marker for each point can make the map crowded and increase rendering work. Use the clustering provider to group nearby points into clusters at lower zoom levels. As users zoom in, clusters break down into smaller groups and individual points.
Create a H.clustering.DataPoint for each location, then pass the points to a H.clustering.Provider. Add the provider to the map through an H.map.layer.ObjectLayer:
// Assumption: 'map' is initialized and available.
const dataPoints = records.map(record =>
    new H.clustering.DataPoint(record.latitude, record.longitude, 1, record.id)
);

const clusterProvider = new H.clustering.Provider(dataPoints, {
    clusteringOptions: {
        eps: 32,
        minWeight: 2
    }
});

const clusterLayer = new H.map.layer.ObjectLayer(clusterProvider);
map.addLayer(clusterLayer);
The eps option controls the clustering distance and must be a power of two. The minWeight option sets the minimum number of points required to form a cluster. Adjust these options to suit the density of your data and the desired appearance. Their defaults are 32 and 2, respectively.
When the data changes, add multiple points with clusterProvider.addDataPoints(newPoints) or replace the dataset with clusterProvider.setDataPoints(updatedDataPoints). Both operations trigger reclustering, so batch incoming changes rather than updating the provider for every individual record. Dispose of the layer and provider when they are no longer needed.
For more information, see Cluster data for visualization article.
Keep onAttach and onDetach callbacks simple
onAttach and onDetach callbacks simpleWhen using DomMarker, you can enhance its functionality by passing the onAttach and onDetach options to the DomIcon constructor, allowing you to add event listeners for all DomMarkers associated with a particular DomIcon instance.
These callbacks are triggered each time a DomMarker appears on the map or disappears from the viewport. To ensure optimal performance, do not perform computationally expensive operations in these callbacks, as they can negatively impact panning and zooming capabilities.
The following example shows the non-recommended approach that causes such performance degradation:
// Assume that domElement is an already defined DOM element
// and contains a large number of children:
var domIcon = new H.map.DomIcon(domElement, {
    onAttach: function(clonedElement, domIcon, domMarker) {
        // Avoid expensive computation inside onAttach
        // Such as quering the DOM:
        var defaultButton = clonedElement.querySelector('.btn-default');
        var infoButton = clonedElement.querySelector('.btn-info');

        defaultButton.addEventListener('click', onDefaultClick);
        infoButton.addEventListener('click', onInfoClick);
    },
    onDetach: function(clonedElement, domIcon, domMarker) {
        // Avoid expensive computation inside onDetach
        // such as quering the DOM
        var defaultButton = clonedElement.querySelector('.btn-default');
        var infoButton = clonedElement.querySelector('.btn-info');

        defaultButton.removeEventListener('click', onDefaultClick);
        infoButton.removeEventListener('click', onInfoClick);
    }
});
To ensure efficient processing, compute all necessary assets ahead of time or offload computation from the onAttach() and onDetach() methods to event callback functions. One effective approach is event delegation, as illustrated in the code snippet that follows:
// Use event bubbling to handle all events on the parent node itself,
// and perform computations only when needed.
function onMarkerClick(e) {
    var targetClassName = e.target.className;
    if (targetClassName  === 'btn-default') {
        onDefaultClick(e);
    } else if (targetClassName  === 'btn-info') {
        onInfoClick(e);
    }
}

var domIcon = new H.map.DomIcon(domElement, {
    onAttach: function(clonedElement, domIcon, domMarker) {
        // Simply subscribe to the event:
        domElement.addEventListener('click', onMarkerClick);
    },
    onDetach: function(clonedElement, domIcon, domMarker) {
        // Simply unsubscribe from the event:
        domElement.removeEventListener('click', onMarkerClick);
    }
});
Use mapviewchangeend event rather than mapviewchange
mapviewchangeend event rather than mapviewchangeThe mapviewchange and mapviewchangeend events share similar functionality, both being used to handle changes to the map viewport. However, they exhibit distinct behavior: mapviewchange is triggered at each animation step during a state change of the viewport, whereas mapviewchangeend marks the completion of this process.
While you can employ both events for handling viewport updates, mapviewchange might be excessive in many cases, such as updating a UI element with the current zoom level multiple times when the user double-clicks on the map, which is inefficient.
The following code snippets shows an example of such non-recommended configuration that causes inefficiency:
// Displays current zoom level to the end user:
function displayZoomLevel() {...}

// A listener updates the map zoom level on each map view change
// -- this occurs more than 20 times on a double-click on the map,
// inefficient and to be avoided:
map.addEventListener('mapviewchange', function () {
    var zoom = map.getZoom();

    // This function is called more than 20 times on a double-click on the map!
    displayZoomLevel(zoom);
});
The mapviewchangeend event is called only once, when the viewport change is complete. Use this event to update the map viewport at that time. The following snippet shows an example of how to adhere to this recommendation:
/*
    Displays current zoom level to the end user
 */
function displayZoomLevel() {...}

// A listener updates the map zoom level -- it is called once when the map
// view change is complete.
map.addEventListener('mapviewchangeend', function () {
    var zoom = map.getZoom();

    // The function that displays the zoom level is called only once,
    // after zoom level changed
    displayZoomLevel(zoom);
});
The mapviewchangeend event is a debounced variant of mapviewchange. As a general guideline, using mapviewchangeend can be more efficient than its counterpart.
Use built-in animation capabilities
To animate transitions between different map states, such as those resulting from changes to the map's center or zoom level, use the built-in animation capabilities of the map engine.
Methods like H.Map#setZoom, H.Map#setCenter, H.map.ViewModel#setLookAtData, accept a second argument that specifies whether an animated transition should be applied.
For more information, see H.map page in the API Reference.
Avoid creating your own zoom animations as illustrated by the following example:
// Assumption: 'map' is initialized and available.
var currentZoom = map.getZoom();
var endZoom = currentZoom + 3;

// Update zoom level on each animation frame,
// till we reach endZoom:
function step() {
    currentZoom += 0.05;
    map.setZoom(currentZoom);

    (currentZoom < endZoom) && requestAnimationFrame(step);
}

// Start zoom animation
step();
Instead, call the setZoom() method with an optional second parameter to perform an animation, as shown in the following example:
/**
 * Assumption: 'map' is initialized and available
 */
// Call getZoom() with an optional second parameter,
// indicating that an animation is to be performed:
map.setZoom(map.getZoom() + 3, true);
Use H.map.SpatialStyle instances as read-only objects
H.map.SpatialStyle instances as read-only objectsInstances of H.map.SpatialStyle are designed to be used as read-only objects. Modifying their properties can lead to visual inconsistencies and is therefore not recommended.
The following snippet illustrates a valid use case for reusing an existing SpatialStyle object across multiple Spatial objects. This operation does not modify the original SpatialStyle object.
// Assumption: 'spatial1' and 'spatial2' are initialized and available.
// Get current style of the first spatial:
var style = spatial1.getStyle();

// Reusing an existing SpatialStyle object is fine,
// because we are not modifying it:
spatial2.setStyle(style);
When reusing a style from one Spatial object on another, but with a single fillColor modification, modifying an object returned by the getStyle method can produce non-deterministic results for the visual representation of the original spatial.
// Assumption: 'spatial1' and 'spatial2' are initialized and available.
// Get current style of the first spatial:
var style = spatial1.getStyle();

// Modification of a SpatialStyle object -- never do this
style.fillColor = 'red';

// If we now apply the modified style to the second spatial, the results may be
// inconsistent -- sometimes the fillColor change takes effect, but not always!
spatial2.setStyle(style);
To change the style correctly, you can either create a new SpatialStyle object or utilize the getCopy() method on an existing object, as illustrated in the following code example:
/**
 * Assumption: 'spatial1' and 'spatial2' are initialized and available.
 */
// Get the current style of the first spatial and get an extended version
// by calling getCopy() method on it
var style = spatial1.setStyle().getCopy({
    fillColor: 'red'
});

// Now changing the style of the second class is completely safe and
// produces the expected results consistently:
spatial2.setStyle(style);
When reusing the SpatialStyle object, follow the best practice of using it multiple times. However, if modification is required, utilize the getCopy() method to obtain a copy of the original object or construct a new instance.
Updated last month