Calculate routes and directions
Route planning and navigation are among the most prevalent applications of location-based services. With the HERE Maps API for JavaScript, you can calculate optimal routes based on your specific criteria. These routes are derived from current map data and take into account real-time traffic updates.
The API provides extensive global coverage of road networks, enabling you to generate routes that adhere to custom preferences, such as fastest, shortest, avoiding toll roads, and more. Additionally, the API supports the utilization of historical speed data for route optimization, considering varying travel conditions throughout the day.
Using the service module (mapsjs-service.js), the API provides direct access to the HERE Routing API for retrieving route information, including detailed route shapes. The route data obtained from the HERE Routing API can be tailored to suit various application requirements. While the following examples cover fundamental scenarios, the possibilities are diverse and extensive.
Import the API libraries
Create the HTML container for your map by importing the libraries required by the Maps API for JavaScript to display a map, as shown in the following example:
<!DOCTYPE html>
<html>
  <head>
    <script type="text/javascript" src="https://js.api.here.com/v3/3.2/mapsjs-core.js"></script>
    <script type="text/javascript" src="https://js.api.here.com/v3/3.2/mapsjs-service.js"></script>
    <script type="text/javascript" src="https://js.api.here.com/v3/3.2/mapsjs-mapevents.js"></script>
    <script type="text/javascript" charset="utf-8" src="https://js.api.here.com/v3/3.2/mapsjs-ui.js" ></script>
    <link rel="stylesheet" type="text/css" href="https://js.api.here.com/v3/3.2/mapsjs-ui.css" />
    <meta name="viewport" content="initial-scale=1.0, width=device-width" />
  </head>
  <body>
    <div style="width: 100vw; height: 100vh" id="mapContainer"></div>
    <script>
    // Your JavaScript code goes here
    </script>
  </body>
</html>
Display a route on the map
Create JavaScript code to render a basic HERE map that displays a sample route between origin and destination markers.
// Initiate and authenticate your connection to the HERE platform:
const platform = new H.service.Platform({
  apikey: "YOUR_HERE_APIKEY",
});

// Obtain the default map types from the platform object:
const defaultLayers = platform.createDefaultLayers();

// Instantiate (and display) a map:
// Zoom and center parameters are overridden by the bounding box
// that contains the route and marker objects
const map = new H.Map(
  document.getElementById("mapContainer"),
  defaultLayers.vector.normal.map,
  {
    zoom: 7,
    center: { lat: 56.97, lng: 24.09 },
    // Add space around the map edges to ensure markers are not cut off:
    padding: { top: 50, right: 50, bottom: 50, left: 50 },
  }
);

const origin = { lat: 56.97, lng: 24.09 };
const destination = { lat: 54.7, lng: 25.24 };

// Create the parameters for the routing request:
const routingParameters = {
  routingMode: "fast",
  transportMode: "car",
  // The start point of the route:
  origin: `${origin.lat},${origin.lng}`,
  // The end point of the route:
  destination: `${destination.lat},${destination.lng}`,
  // Include the route shape in the response
  return: "polyline",
};

// Define a callback function to process the routing response:
const onResult = function (result) {
  // Ensure that at least one route was found
  if (result.routes.length) {
    const lineStrings = [];
    result.routes[0].sections.forEach((section) => {
      // Create a linestring to use as a point source for the route line
      lineStrings.push(H.geo.LineString.fromFlexiblePolyline(section.polyline));
    });

    // Create an instance of H.geo.MultiLineString
    const multiLineString = new H.geo.MultiLineString(lineStrings);

    // Create a polyline to display the route:
    const routeLine = new H.map.Polyline(multiLineString, {
      style: {
        strokeColor: "blue",
        lineWidth: 3,
      },
    });

    // Create a marker for the start point:
    const startMarker = new H.map.Marker(origin);

    // Create a marker for the end point:
    const endMarker = new H.map.Marker(destination);

    // Create a H.map.Group to hold all the map objects and enable us to obtain
    // the bounding box that contains all its objects within
    const group = new H.map.Group();
    group.addObjects([routeLine, startMarker, endMarker]);
    // Add the group to the map
    map.addObject(group);

    // Set the map viewport to make the entire route visible:
    map.getViewModel().setLookAtData({
      bounds: group.getBoundingBox(),
    });
  }
};

// Get an instance of the routing service version 8:
const router = platform.getRoutingService();

// Call the calculateRoute() method with the routing parameters,
// the callback, and an error callback function (called if a
// communication error occurs):
router.calculateRoute(routingParameters, onResult, function (error) {
  alert(error.message);
});

// MapEvents enables the event system.
// The behavior variable implements default interactions for pan/zoom (also on mobile touch environments).
const behavior = new H.mapevents.Behavior(new H.mapevents.MapEvents(map));

// Enable dynamic resizing of the map, based on the current size of the enclosing container
window.addEventListener("resize", () => map.getViewPort().resize());
The code from the preceding example performs the following operations:
- Platform initialization: Initialize and authenticate your connection to the HERE platform. This is done by creating an instance of
H.service.Platformand providing your API key. - Default map types: Obtain the default map types from the platform object by using the
platform.createDefaultLayers()method. These default layers include vector maps for various purposes. - Map initialization: Instantiate and display a map by creating an instance of
H.Map. You specify the HTML element to display the map, the map type (in this case, a vector map), and set initial properties like zoom level, center coordinates, and padding to ensure markers are fully visible within the map boundaries. - Origin and destination: Define geographic coordinates for the origin and destination of the route. These represent the starting point and endpoint for the route calculation.
- Routing parameters: Create parameters for the routing request in the
routingParametersobject. These parameters specify the routing mode (for example,fast), transport mode (for example,car), origin and destination coordinates, and request to include the route shape in the response. - Routing callback function: Define a callback function called
onResultto process the routing response. This function handles the route data obtained from the HERE Routing API v8. It extracts route shapes, creates a polyline to represent the route, adds markers for the start and end points, and adjusts the map view to display the entire route. - Routing service initialization: Get an instance of the HERE routing service version 8 using
platform.getRoutingService(null, 8). This service allows you to calculate routes and retrieve route information. - Calculate route: Call the calculateRoute() method on the routing service, passing the routing parameters, the
onResultcallback function, and an error callback function. This initiates the route calculation based on the specified parameters. - Map event handling: Enable event handling for map interactions and dynamic resizing of the map. This includes adding behavior for map events, like panning and zooming, and resizing the map to adapt to changes in the container size.
Note
The member elements of the
routingParametersobject literal directly map to the URL parameters required by the HERE Routing API. The parameter object can include any parameters recognized by the Routing API, offering complete flexibility in defining a route calculation request.
Based on configuration from the preceding example, the following routing request is formed:https://router.hereapi.com/v8/routes ?apikey={YOUR_API_KEY} &routingMode=fast &transportMode=car &origin=56.97,24.09 &destination=54.70,25.24 &return=polylineFor more information, see Calculate route in the HERE Routing API v8 Developer Guide.
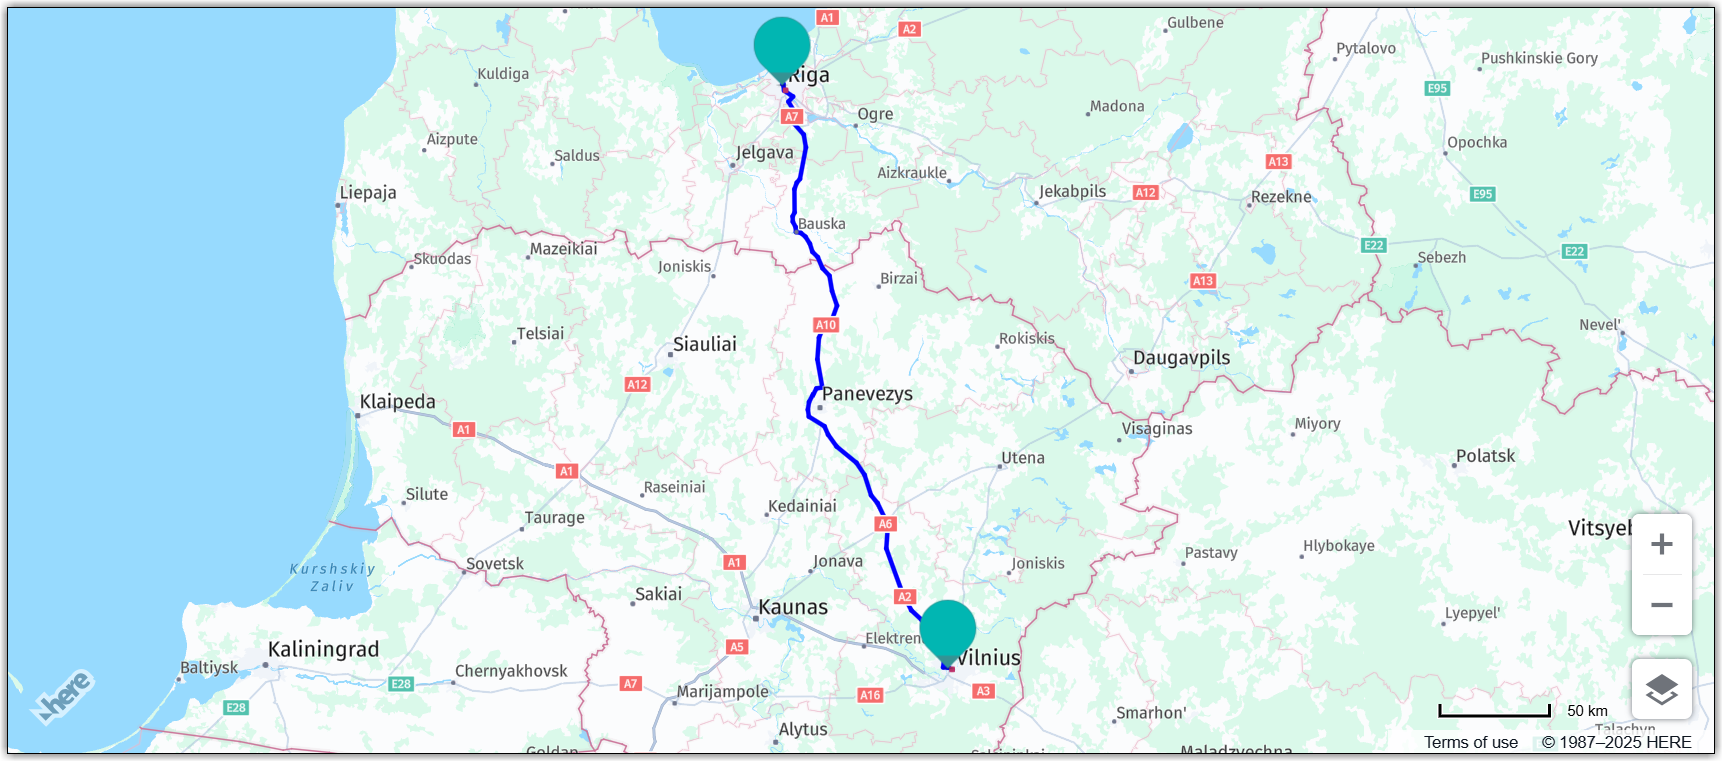
Result: The following map shows the result of the route calculation, with the start of the Route in Vilnius, Lithuania, and end of the route in Riga, Latvia, indicated by markers with default icons, and the route itself shown as a blue polyline:
Add multiple waypoints
Using waypoint markers in route planning and navigation applications can help users visualize and understand their route more effectively. Such markers provide clear indications of where the route passes through or stops at specific points of interest.
The following steps provide instructions on how to add waypoint markers, based on the preceding routing example:
-
Add the waypoints object with the coordinates specifying the placement of additional markers on the map:
const waypoints = [ // Liepaja, Latvia { lat: 56.5, lng: 21.01 }, // Klajpeda, Lithuania { lat: 55.7, lng: 21.2 }, ]; -
Create an empty array to store waypoint markers:
const waypointMarkers = []; -
Update the HERE Routing API v8 query to include via waypoints, with coordinates defined by the waypoints variable:
const routingParameters = { routingMode: "fast", transportMode: "car", origin: `${origin.lat},${origin.lng}`, destination: `${destination.lat},${destination.lng}`, return: "polyline", // Add a via parameter to the query for each coordinate pair: via: new H.service.Url.MultiValueQueryParameter( waypoints.map((wp) => `${wp.lat},${wp.lng}`) ), }; -
Within the
onResultcallback function, add markers for each waypoint and add them to the map:// Create waypoint markers: waypoints.forEach((waypoint) => { const waypointMarker = new H.map.Marker({ lat: waypoint.lat, lng: waypoint.lng, }); // Populate the waypointMarkers array: waypointMarkers.push(waypointMarker); }); -
Add waypoint markers to the map objects group:
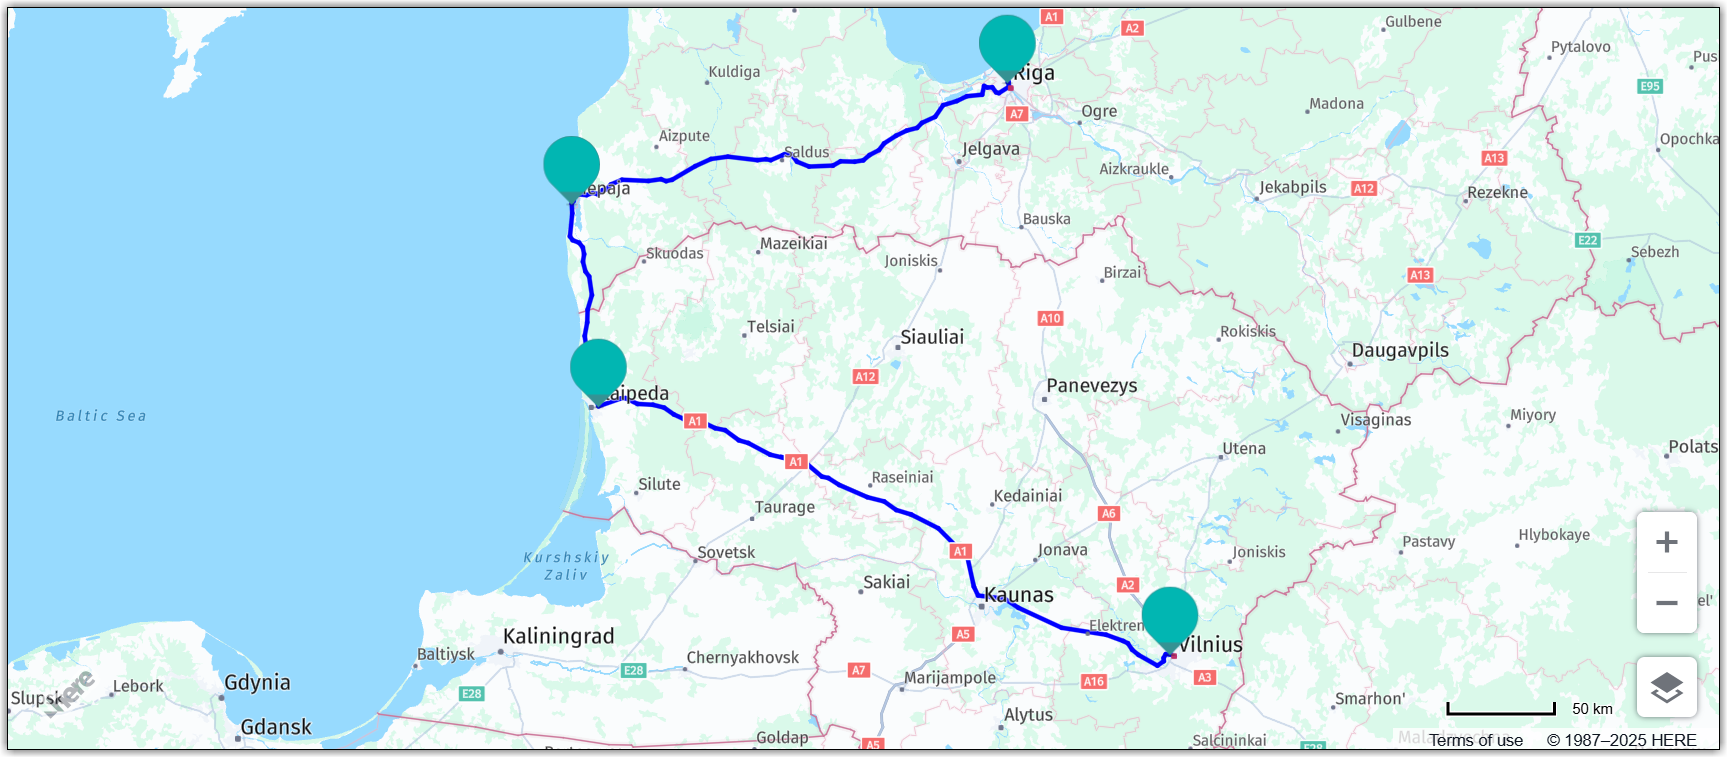
// Add ...waypointMarkers as an argument: group.addObjects([routeLine, startMarker, endMarker, ...waypointMarkers]);Result: The map now displays waypoint markers together with an updated route that passes through the
viawaypoints:
Customize marker style
In the HERE Maps API for JavaScript, you can use custom markers instead of the pre-defined marker icons. For example, you can use custom SVG styles that allow you to create markers with unique and distinctive appearances. This can be particularly useful when you want to match the markers to your brand or design requirements or make it easier for user to distinguish between various marker types (for example, start, stop, or waypoint).
-
Define the style for marker icons:
// Define the marker style const commonSvgStyle = ( fill ) => `<svg xmlns="http://www.w3.org/2000/svg" width="48" height="48" viewBox="0 0 48 48"> <path d="M24 0C12.955 0 4 9.075 4 20.075C4 28.35 24 48 24 48S44 28.35 44 20.075C44 9.075 35.045 0 24 0Z" fill="${fill}"/> </svg>`; // Define the fill colors for start, end, and waypoint markers: const startFill = "red"; const endFill = "green"; const waypointFill = "purple"; // Create SVG icons for start, end, and waypoint markers using the common style and the corresponding fill color: const startIconSvg = commonSvgStyle(startFill); const endIconSvg = commonSvgStyle(endFill); const waypointIconSvg = commonSvgStyle(waypointFill); -
Within the
onResultcallback function, update thestartMarker,endMarker, andwaypointMarkervariables with the corresponding SVG style definition, as shown in the following example:// Origin marker (red): const startMarker = new H.map.Marker(origin, { icon: new H.map.Icon(startIconSvg, { size: { w: 32, h: 32, }, }), }); // Destination marker (green): const endMarker = new H.map.Marker(destination, { icon: new H.map.Icon(endIconSvg, { size: { w: 32, h: 32, }, }), }); // Waypoint markers (purple): waypoints.forEach((waypoint) => { const waypointMarker = new H.map.Marker({ lat: waypoint.lat, lng: waypoint.lng}, { icon: new H.map.Icon(waypointIconSvg, { size: { w: 24, h: 24 } }) }); waypointMarkers.push(waypointMarker); });
Hint
You can change the icon size through
w(width) andh(height) parameters, for example, to make waypoint markers less prominent that the start and end markers.
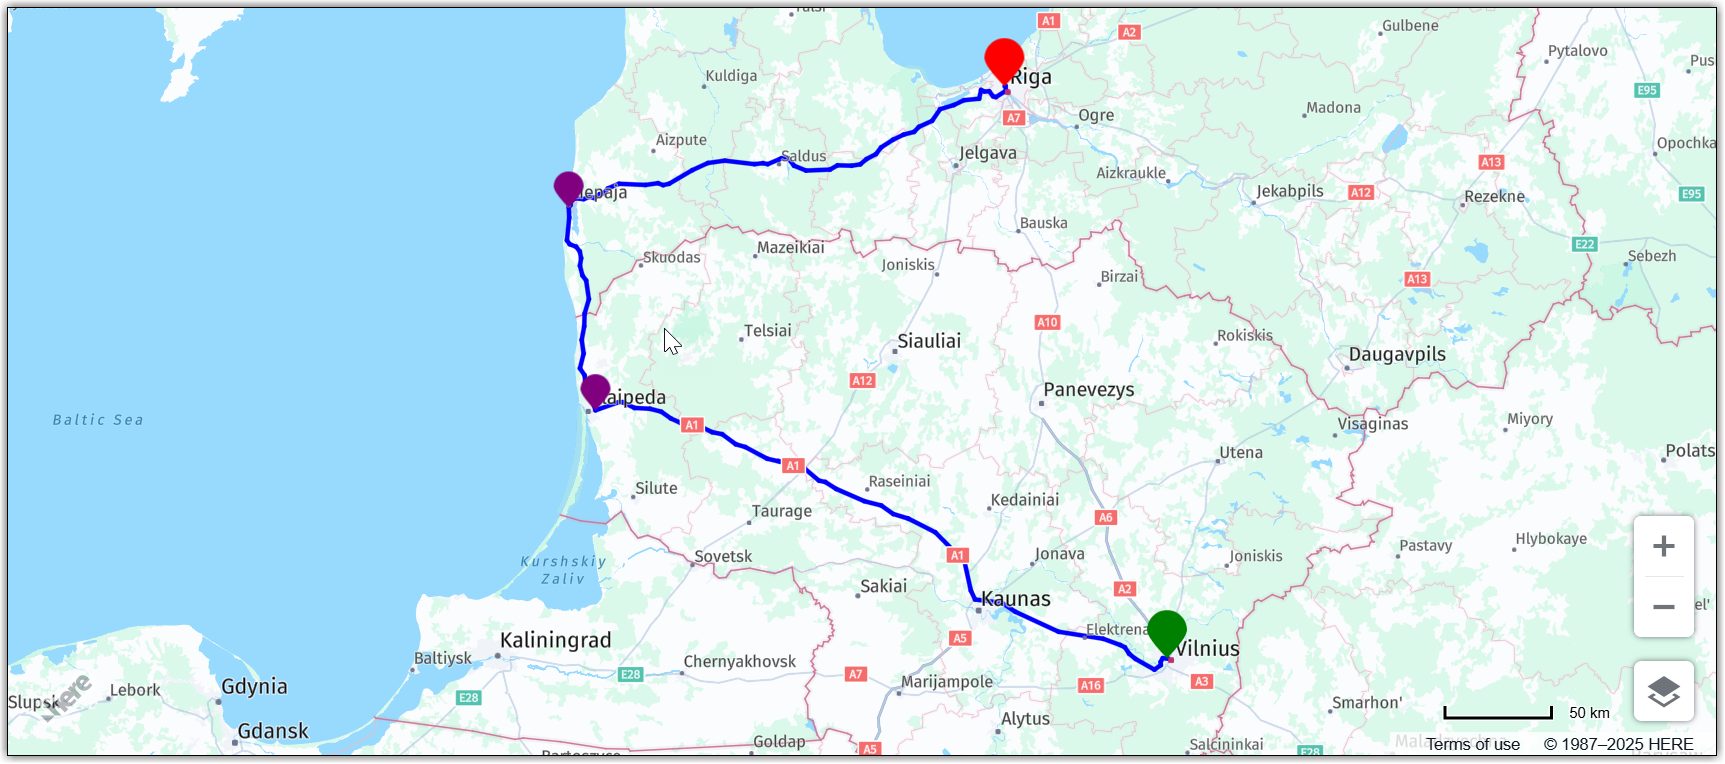
Result: Each marker type now has a distinct style, as shown in the following figure:
Show route direction arrows
The HERE Maps API for JavaScript offers a way to render arrows on the route polyline to indicate the direction of travel. The following code enhances the onResult callback from the previous example by providing a style that describes the dash of the polyline through the H.map.SpatialStyle class.
To render the route in the form of direction arrows, replace the existing routeLine definition with the following code:
const routeLine = new H.map.Polyline(multiLineString, {
  style: {
    strokeColor: 'blue',
    lineWidth: 4,
    lineDash: [1.5, 0.3],
    lineDashImage: H.map.SpatialStyle.DashImage.ARROW
    },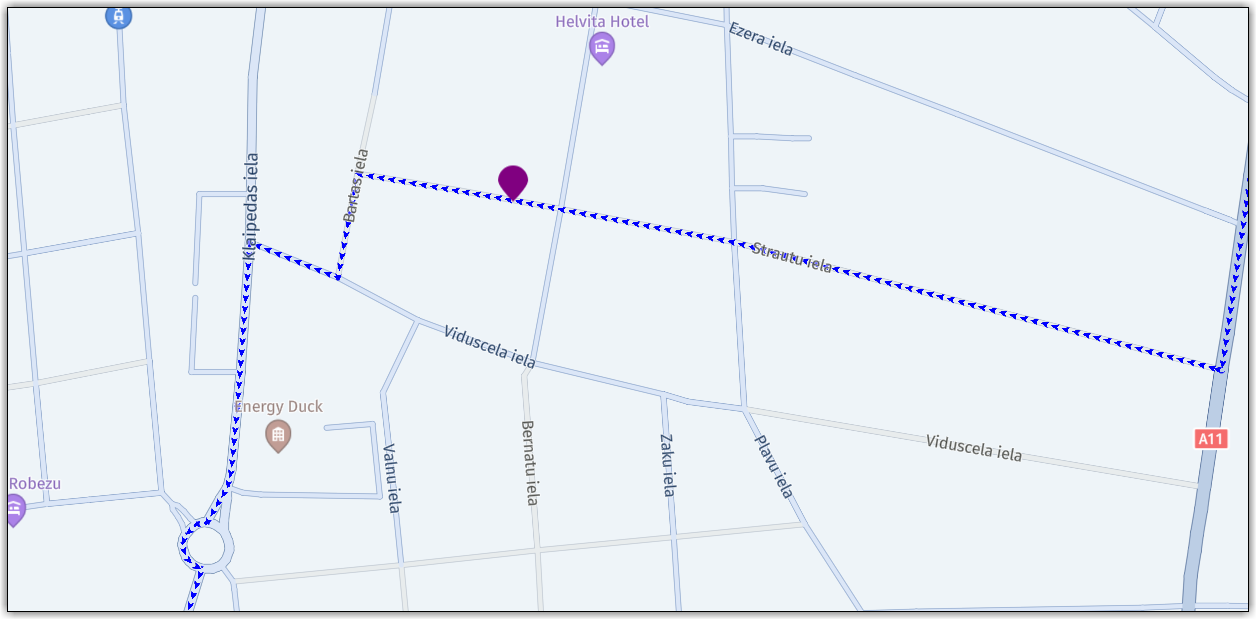
});Result: The following figure shows how route appears on the map:
Display isolines
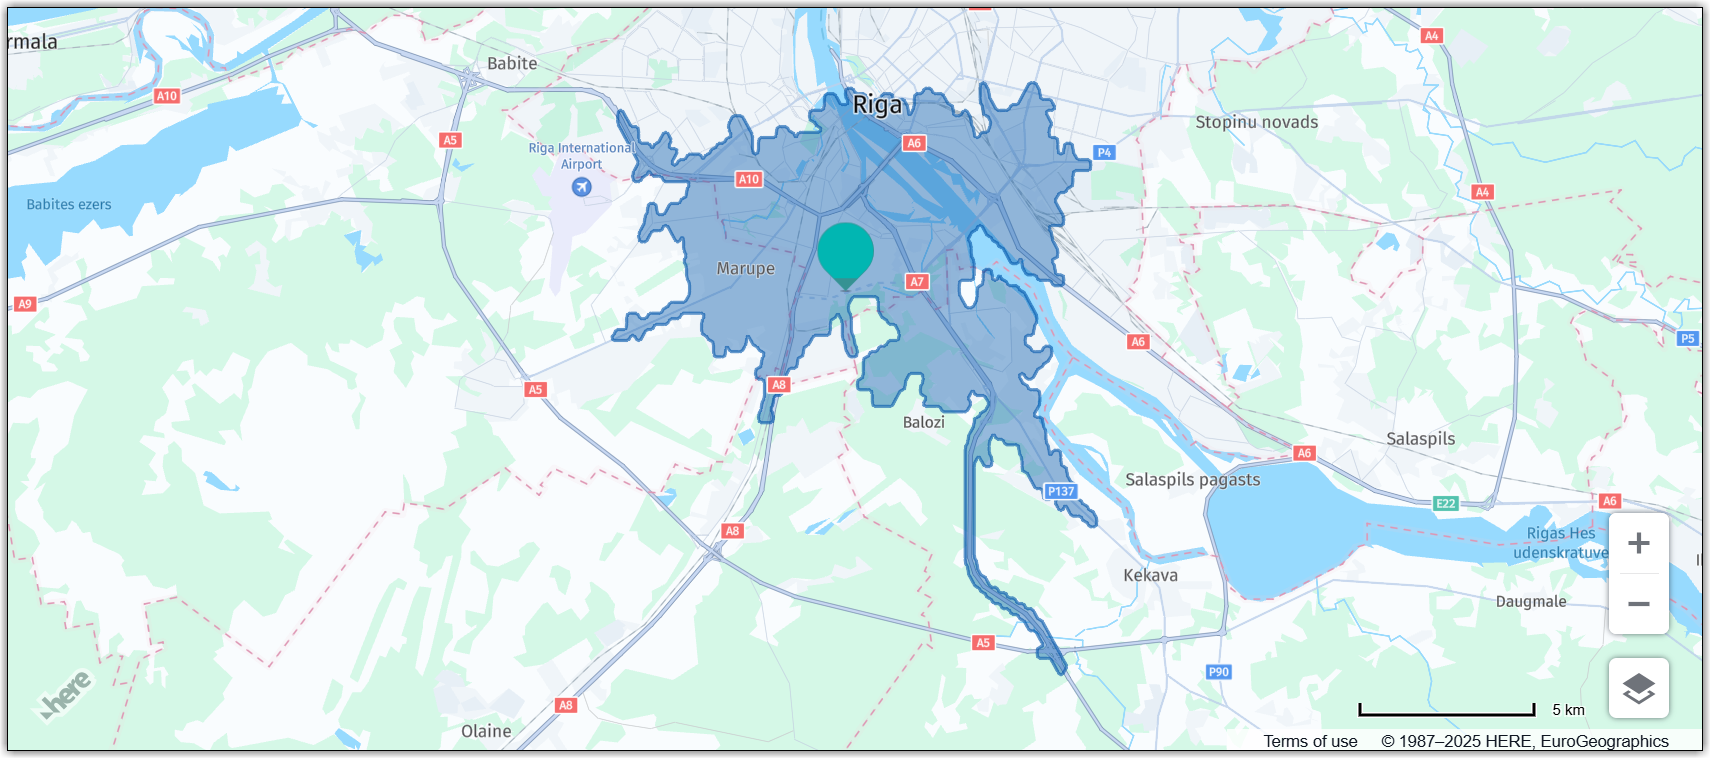
An isoline is a line on a map that represents the area that one can reach from a specific point within a certain amount of time or distance based on a particular mode of transportation.
The following code sample shows how to calculate an isoline representing points that lie no further than a 15 minutes' car journey from the center of Riga. The example uses the RoutingService class to obtain the isoline and builds upon the base map described in Get started with HERE Maps API for JavaScript as the foundation for introducing code additions.
var routingParams = {
  transportMode: "car",
  origin: "56.9,24.1",
  "range[values]": "900",
  "range[type]": "time",
  routingMode: "fast",
  optimizeFor: "quality",
};

// Define a callback function to process the isoline response.
var onResult = function (result) {
  var isolines = result.isolines[0],
    objects = [new H.map.Marker(result.departure.place.location)];

  isolines.polygons.forEach((section) => {
    let lineString = H.geo.LineString.fromFlexiblePolyline(section.outer);

    // Create a polygon to display the area
    objects.push(new H.map.Polygon(new H.geo.Polygon(lineString)));
  });

  // Add the polygon and marker to the map:
  map.addObjects(objects);

  // Center and zoom the map so that the whole isoline polygon is
  // in the viewport:
  map.getViewModel().setLookAtData({ bounds: objects[1].getBoundingBox() });
};

// Get an instance of the routing service:
var router = platform.getRoutingService(null, 8);

// Call the Routing API to calculate an isoline:
router.calculateIsoline(routingParams, onResult, function (error) {
  alert(error.message);
});
The code from the preceding example performs the following operations:
- Routing parameters: Define a
routingParamsobject that specifies that the fastest routes for a car are to calculate, set the starting point and the time. - Routing callback function: Define a callback to invoke when the results of the routing request become available. The callback function creates a polygon, using the points of the calculated isoline, adds the polygon and a marker at the center of the isoline polygon to the map, and sets the map view port so that the entire isoline is visible.
- Routing service initialization: Instantiate the Routing Service v8.
- Calculate and display the isoline: Call the Routing Service method
calculateIsoline()passing to it the parameter object and the success and error callbacks.
Result: The map now displays an isoline with the requested parameters, as shown in the following figure:
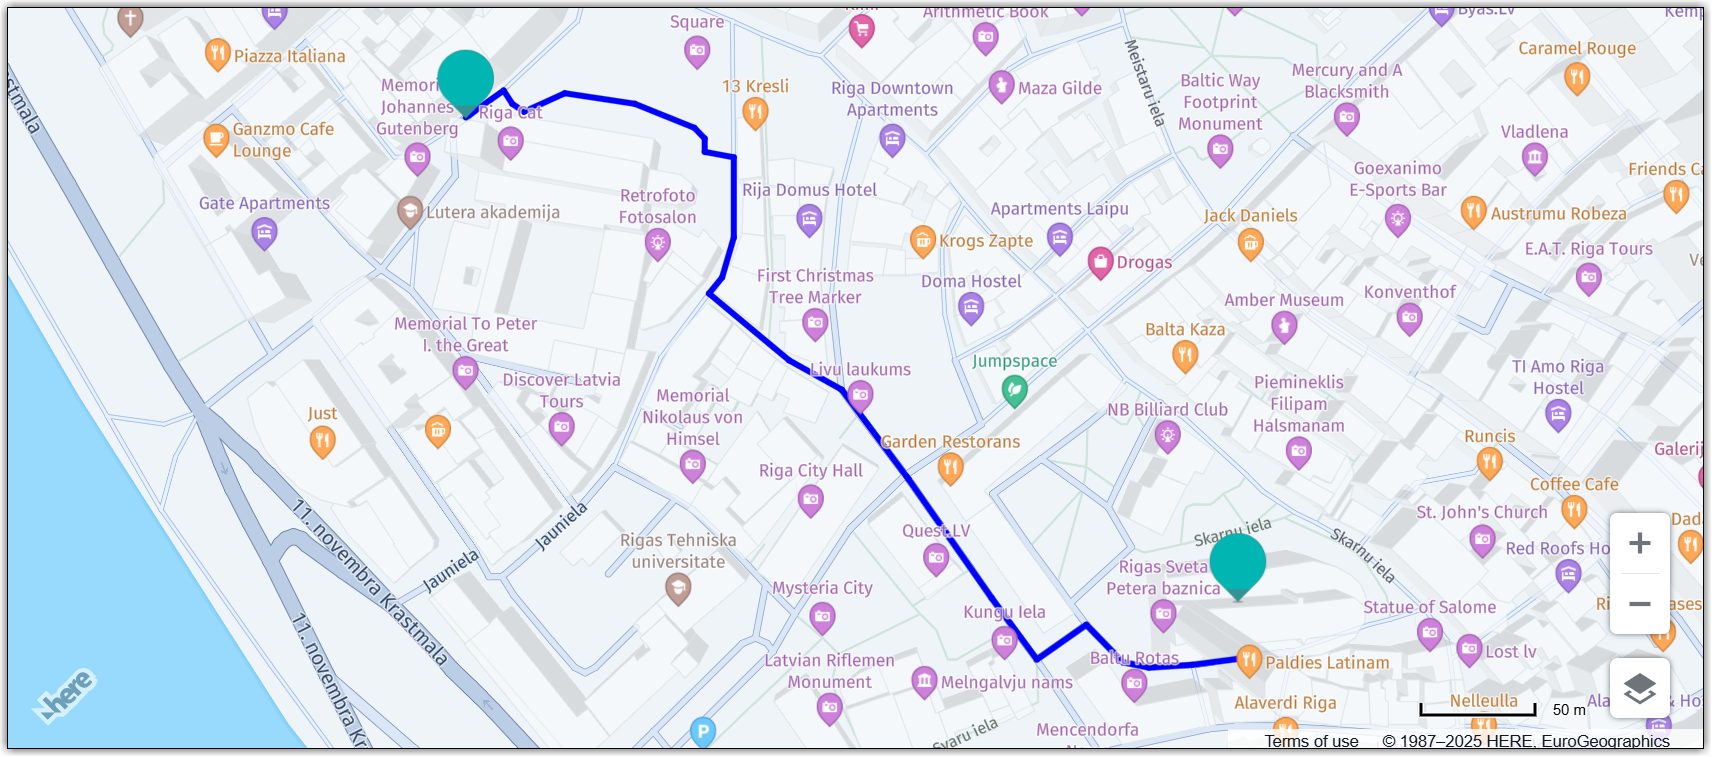
Determine a route with addresses as input
Some use cases might require that you determine routing coordinates by geocoding addresses first. The following code samples use the Search Service to geocode addresses for the origin and destination points so that the Routing Service can calculate a pedestrian route between those points and display the resulting route on the map. The asynchronous nature of operations like geocoding and routing calculations is handled by using promises to ensure the code flows correctly.
The following code sample builds upon the base map described in Get started with HERE Maps API for JavaScript as the foundation for introducing code additions.
-
Connect the map to the Search Service as shown in the following example:
const searchService = platform.getSearchService(); -
Define the search queries for the origin and destination points:
const originAddress = "Sv. Pētera baznīca, Riga"; const destinationAddress = "Doma Laukums"; -
Enable geocoding of addresses in an asynchronous manner by using the Search Service based on the HERE Geocoding and Search API:
// Geocode an address using the search service:
function geocodeAddress(address) {
  return new Promise((resolve, reject) => {
    searchService.geocode(
      {
        q: address,
      },
      (result) => {
        /*
            Access the geographic position information of
            the first (presumably most relevant) result
            obtained from the geocoding process:
            */
        const location = result.items[0].position;
        resolve(location);
      },
      (error) => {
        console.error(
          `Error fetching geocoding data for ${address}:`,
          error
        );
        reject(error);
      }
    );
  });
}
The
geocodeAddress()function from the preceding example encapsulates the asynchronous geocoding call, allowing you to pass an address and receive a promise that resolves to an object containing the corresponding latitude and longitude upon successful geocoding, or rejects with an error if the geocoding fails. The function takes anaddressstring as an argument to send a request to the HERE Geocoding and Search API v7, for example:https://geocode.search.hereapi.com/v1/geocode?xnlp=CL_JSMv3.2.0.0&apikey={YOUR_HERE_APIKEY}&q=Sv.%20P%C4%93tera%20bazn%C4%ABca%2C%20RigaAssuming the geocoding operation was successful, the function extracts the value of the
positionattribute value from the most relevant result for the provided address query. For more information on the HERE Geocoding and Search API requests and responses, see Get started in the corresponding Developer Guide. -
Use
Promise.allto geocode both origin and destination addresses, as shown in the following example:// Use Promise.all to geocode both origin and destination addresses Promise.all([geocodeAddress(originAddress), geocodeAddress(destinationAddress)]) .then(([origin, destination]) => { // Create routing parameters for calculating the route const routingParameters = { routingMode: "fast", transportMode: "pedestrian", origin: `${origin.lat},${origin.lng}`, destination: `${destination.lat},${destination.lng}`, return: "polyline", }; const onResult = function(result) { if (result.routes.length) { const lineStrings = []; result.routes[0].sections.forEach((section) => { lineStrings.push( H.geo.LineString.fromFlexiblePolyline(section.polyline) ); }); const multiLineString = new H.geo.MultiLineString(lineStrings); const routeLine = new H.map.Polyline(multiLineString, { style: { strokeColor: "blue", lineWidth: 4, }, }); const startMarker = new H.map.Marker(origin); const endMarker = new H.map.Marker(destination); const group = new H.map.Group(); group.addObjects([routeLine, startMarker, endMarker]); map.addObject(group); map.getViewModel().setLookAtData({ bounds: group.getBoundingBox(), }); } }; const router = platform.getRoutingService(null, 8); router.calculateRoute(routingParameters, onResult, function(error) { alert(error.message); }); }) .catch((error) => { console.error("Error fetching coordinates:", error); });This method is calling
geocodeAddress()twice, which returns promises for each geocoding operation.Promise.all()waits for both of these promises to resolve, allowing you to handle their combined results (the resolved values of both promises) in the.then()block.
The following figure illustrates the resulting map, which includes the origin and destination markers placed at the coordinates obtained through address geocoding, along with the calculated route between these markers:
Next steps
- For more information about the HERE Routing API v8, see the corresponding documentation.
- For more information about the HERE Geocoding and Search API v7, see the corresponding documentation.