How to develop a Flink application
How to develop a Flink application
Objectives: Develop a simple Flink application.
Complexity: Beginner
Time to complete: 30 min
Source code: Download
This tutorial demonstrates how to develop, debug, and run a simple Flink application that reads data from the stream
layer, and logs all this data using log4j.
The tutorial covers the following topics:
- Set up the Maven project
- Write the source code
- Run the application
- Attach the debugger
- Project generation using Maven archetype
Set up the Maven project
Download the source code at the beginning of the tutorial and put it in a folder of your choice, or create a folder
structure for your project from scratch:
develop-flink-application
└── src
    └── main
        ├── java
        └── resources
        └── scala
You can do this with a single bash command:
mkdir -p develop-flink-application/src/main/{java,resources,scala}The Maven POM file is similar to the one in the
Verify Maven Settings example, however, with an updated parent POM and dependencies
sections:
The Parent POM is sdk-stream-bom_${scala.compat.version}, because we need to use Flink-related libraries.
<parent>
    <groupId>com.here.platform</groupId>
    <artifactId>sdk-stream-bom_2.13</artifactId>
    <version>2.88.6</version>
    <relativePath/>
</parent>
The following dependencies are used:
com.here.platform.data.client:local-support_${scala.compat.version}to read data from a local data catalog.org.apache.flink:flink-clientsto provideExecutorFactoryfor the Flink application.org.apache.flink:flink-streaming-javato run a Java and Scala Flink application.com.here.platform.data.client:flink-support_${scala.compat.version}to read data from the data catalogs on the
platform.org.slf4j:slf4j-reload4jto log application results to the console and to the Splunk on the platform.com.here.platform.pipeline:pipeline-interface_${scala.compat.version}to get information about input catalogs from thePipelineContext.
Dependencies:
<dependencies>
    <dependency>
        <groupId>com.here.platform.data.client</groupId>
        <artifactId>flink-support_${scala.compat.version}</artifactId>
    </dependency>
    <dependency>
        <groupId>com.here.platform.data.client</groupId>
        <artifactId>local-support_2.13</artifactId>
        <exclusions>
            <exclusion>
                <groupId>com.here.platform.data.client</groupId>
                <artifactId>client-core_2.13</artifactId>
            </exclusion>
        </exclusions>
    </dependency>
    <dependency>
        <groupId>com.here.platform.pipeline</groupId>
        <artifactId>pipeline-interface_${scala.compat.version}</artifactId>
    </dependency>
    <dependency>
        <groupId>org.apache.flink</groupId>
        <artifactId>flink-clients</artifactId>
    </dependency>
    <dependency>
        <groupId>org.apache.flink</groupId>
        <artifactId>flink-streaming-java</artifactId>
    </dependency>
    <dependency>
        <groupId>org.slf4j</groupId>
        <artifactId>slf4j-reload4j</artifactId>
    </dependency>
</dependencies>
Once you have added all the necessary dependencies to the pom.xml file, the next step would be to write the code of
the application and run it.
Write the source code
As mentioned before, the tutorial shows how to write a simple Flink application that reads data from a stream layer and
outputs the data in the console. The data is added to the stream layer during the execution of your stream application
using OLP CLI. All data read from the layer is logged to the console at the same time
using log4j. The configuration of log4j is located in
the src/main/resources/log4j.properties file.
Let's look at the implementation of this Flink application. In the code snippet below, you can see that
the FlinkQueryApi is used to create a subscription to receive new data added to the stream layer. Once the subscription is
created and the DataStreamSource source function that emits new data from stream layer is declared, we map partitions
using the SampleMaper class that extends RichMapFunction, which provides setup and teardown methods.
The SampleMapper class downloads partitions and logs as a human-readable string.
/*
 * Copyright (c) 2018-2026 HERE Europe B.V.
 *
 * Licensed under the Apache License, Version 2.0 (the "License");
 * you may not use this file except in compliance with the License.
 * You may obtain a copy of the License at
 *
 *     http://www.apache.org/licenses/LICENSE-2.0
 *
 * Unless required by applicable law or agreed to in writing, software
 * distributed under the License is distributed on an "AS IS" BASIS,
 * WITHOUT WARRANTIES OR CONDITIONS OF ANY KIND, either express or implied.
 * See the License for the specific language governing permissions and
 * limitations under the License.
 */

import com.here.hrn.HRN;
import com.here.platform.data.client.flink.javadsl.FlinkDataClient;
import com.here.platform.data.client.flink.javadsl.FlinkQueryApi;
import com.here.platform.data.client.flink.javadsl.FlinkReadEngine;
import com.here.platform.data.client.flink.serializers.ScalaNoneSerializer;
import com.here.platform.data.client.javadsl.Partition;
import com.here.platform.data.client.settings.ConsumerSettings;
import com.here.platform.pipeline.PipelineContext;
import org.apache.flink.api.common.eventtime.WatermarkStrategy;
import org.apache.flink.api.common.functions.OpenContext;
import org.apache.flink.api.common.functions.RichMapFunction;
import org.apache.flink.api.common.serialization.SerializerConfigImpl;
import org.apache.flink.api.connector.source.Source;
import org.apache.flink.streaming.api.datastream.DataStreamSource;
import org.apache.flink.streaming.api.environment.StreamExecutionEnvironment;
import org.slf4j.Logger;
import org.slf4j.LoggerFactory;
import scala.None$;

public class DevelopFlinkApplication {

  private static final Logger LOGGER = LoggerFactory.getLogger(DevelopFlinkApplication.class);

  private static final String STREAMING_LAYER = "streaming-layer";
  private static final String CONSUMER_GROUP_NAME = "flink";
  private static HRN catalogHrn;

  public static void main(String[] args) throws Exception {

    // Create pipeline context
    PipelineContext pipelineContext = new PipelineContext();

    // Get input catalog hrn from the pipeline-config.conf file
    catalogHrn = pipelineContext.getConfig().getInputCatalogs().get("input-catalog");

    // Create queryApi for the source catalog
    final FlinkDataClient flinkDataClient = new FlinkDataClient();
    FlinkQueryApi queryApi = flinkDataClient.queryApi(catalogHrn);

    // Create the context in which a streaming program is executed
    StreamExecutionEnvironment env = StreamExecutionEnvironment.getExecutionEnvironment();
    SerializerConfigImpl serializerConfig =
        (SerializerConfigImpl) env.getConfig().getSerializerConfig();
    serializerConfig.registerTypeWithKryoSerializer(None$.class, ScalaNoneSerializer.class);

    // Specify Kafka consumer group name
    ConsumerSettings consumerSettings =
        new ConsumerSettings.Builder()
            .withGroupName(CONSUMER_GROUP_NAME)
            .withLatestOffset()
            .build();

    // Subscription to receive new data added to the stream layer
    Source<Partition, ?, ?> subscriptionFunction =
        queryApi.subscribe(STREAMING_LAYER, consumerSettings);

    // Source function that emits new data from stream layer
    DataStreamSource<Partition> partitions =
        env.fromSource(subscriptionFunction, WatermarkStrategy.noWatermarks(), "StreamLayerSource");

    // Read partition bytes, map to human-readable string
    // using the Sample Mapper class that implements RichMapFunction recommended to use by Data
    // Client Library,
    // and log using log4j
    partitions.map(new SampleMapper(catalogHrn));

    // Trigger the program execution
    env.execute();
  }

  static class SampleMapper extends RichMapFunction<Partition, String> {
    private transient FlinkDataClient flinkDataClient;
    private transient FlinkReadEngine flinkReadEngine;
    private HRN catalogHrn;

    public SampleMapper(HRN catalogHrn) {
      this.catalogHrn = catalogHrn;
    }

    public SampleMapper() {}

    @Override
    public void open(OpenContext parameters) {
      // Create read engine to read the partition bytes
      flinkDataClient = new FlinkDataClient();
      flinkReadEngine = flinkDataClient.readEngine(catalogHrn);
    }

    @Override
    public String map(Partition partition) {
      byte[] dataAsBytes = flinkReadEngine.getDataAsBytes(partition);
      String partitionContent = new String(dataAsBytes);
      LOGGER.info(partitionContent);
      return partitionContent;
    }

    @Override
    public void close() {
      // FlinkDataClient is a heavyweight object that needs to be created once, reused and
      // terminated.
      flinkDataClient.terminate();
    }
  }
}
/*
* Copyright (c) 2018-2026 HERE Europe B.V.
*
* Licensed under the Apache License, Version 2.0 (the "License");
* you may not use this file except in compliance with the License.
* You may obtain a copy of the License at
*
* http://www.apache.org/licenses/LICENSE-2.0
*
* Unless required by applicable law or agreed to in writing, software
* distributed under the License is distributed on an "AS IS" BASIS,
* WITHOUT WARRANTIES OR CONDITIONS OF ANY KIND, either express or implied.
* See the License for the specific language governing permissions and
* limitations under the License.
*/
import com.here.hrn.HRN
import com.here.platform.data.client.flink.javadsl.{FlinkDataClient, FlinkReadEngine}
import com.here.platform.data.client.flink.serializers.ScalaNoneSerializer
import com.here.platform.data.client.javadsl.Partition
import com.here.platform.data.client.settings.{ConsumerSettings, LatestOffset}
import com.here.platform.pipeline.PipelineContext
import org.apache.flink.api.common.eventtime.WatermarkStrategy
import org.apache.flink.api.common.functions.RichMapFunction
import org.apache.flink.api.common.serialization.SerializerConfigImpl
import org.apache.flink.streaming.api.environment.StreamExecutionEnvironment
import org.slf4j.LoggerFactory
import java.io.Serializable
object DevelopFlinkApplicationScala {
private final val Logger = LoggerFactory.getLogger(classOf[DevelopFlinkApplication])
private final val StreamingLayer = "streaming-layer"
private final val ConsumerGroupName = "flink"
def main(args: Array[String]): Unit = {
// Create pipeline context
val pipelineContext = new PipelineContext
// Get input catalog hrn from the pipeline-config.conf file
val catalogHrn = pipelineContext.getConfig.getInputCatalogs.get("input-catalog")
// Create queryApi for the source catalog
val client = new FlinkDataClient
val queryApi = client.queryApi(catalogHrn)
// Create the context in which a streaming program is executed
val env = StreamExecutionEnvironment.getExecutionEnvironment
env.getConfig.getSerializerConfig
.asInstanceOf[SerializerConfigImpl]
.addDefaultKryoSerializer(None.getClass, classOf[ScalaNoneSerializer])
// Specify Kafka consumer group name
val consumerSettings = ConsumerSettings(ConsumerGroupName, LatestOffset)
// Subscription to receive new data added to the stream layer
val subscriptionFunction = queryApi.subscribe(StreamingLayer, consumerSettings)
// Source function that emits new data from stream layer
val partitions =
env.fromSource(subscriptionFunction, WatermarkStrategy.noWatermarks(), "StreamLayerSource")
// Read partition bytes, map to human-readable string
// using the Sample Mapper class that implements RichMapFunction recommended to use by Data Client Library,
// and log using log4j
partitions.map(new SampleMapper(catalogHrn))
// Trigger the program execution
env.execute
}
class SampleMapper(hrn: HRN) extends RichMapFunction[Partition, String] with Serializable {
@transient
private lazy val flinkDataClient: FlinkDataClient = new FlinkDataClient()
@transient
private lazy val flinkReadEngine: FlinkReadEngine =
// Create read engine to read the partition bytes
flinkDataClient.readEngine(hrn)
override def map(partition: Partition): String = {
val partitionContent = new String(flinkReadEngine.getDataAsBytes(partition))
Logger.info(partitionContent)
partitionContent
}
override def close(): Unit =
// FlinkDataClient is a heavyweight object that needs to be created once, reused and terminated.
flinkDataClient.terminate()
}
}Once the code is written, you can prepare resources and run the application.
Run the application
To run the application, you need to prepare the resources - create a catalog with a stream layer where
the data will be written.
In this tutorial we will run our application locally, therefore, it will be enough for us to create a local catalog. No
authentication and no access to the external network are needed to run this tutorial as we use local catalogs. Since
they are contained in a local machine, they are not subject to naming conflicts within your realm and you can use any
name you want.
To create a local catalog with a stream layer, you will need the catalog-with-stream-layer.json config file that you downloaded together with the source code at the beginning of the tutorial. It contains configuration allowing you to create a catalog with a layer using only one OLP CLI command:
olp local catalog create streaming-catalog streaming-catalog --config catalog-with-stream-layer.jsonThe structure of the catalog-with-stream-layer.json file is as follows:
{
  "id": "input-catalog",
  "name": "Develop Flink Application",
  "summary": "Catalog for Stream Data",
  "description": "The catalog containing the notification stream",
  "layers": [
    {
      "id": "streaming-layer",
      "name": "Notification Stream",
      "summary": "Stream for notification",
      "description": "Stream for notification",
      "layerType": "stream",
      "volume": {
        "volumeType": "durable"
      },
      "partitioning": {
        "scheme": "generic"
      },
      "contentType": "text/plain"
    }
  ]
}
NoteIf a billing tag is required in your realm, update the config file by adding the
billingTags: ["YOUR_BILLING_TAG"]property to thelayersection.
As mentioned in the Set up the Maven project chapter, the PipelineContext is used
to get information about the input catalog from the pipeline-config.conf file.
The structure of the pipeline-config.conf file is as follows:
pipeline.config {

  output-catalog {hrn = "OUTPUT_CATALOG_HRN"}

  input-catalogs {
    input-catalog {hrn = "INPUT_CATALOG_HRN"}
  }
}
Although we do not use the output catalog in our tutorial,
we can use the input catalog HRN to replace both OUTPUT_CATALOG_HRN and INPUT_CATALOG_HRN in the pipeline-config.conf file.
After you have replaced the placeholder, run the application from the root of the downloaded tutorial using the following
command:
mvn compile exec:exec \
    -Dexec.args="--add-opens=java.base/java.util=ALL-UNNAMED -cp %classpath \
    -Dpipeline-config.file=pipeline-config.conf \
    -Dhere.platform.data-client.endpoint-locator.discovery-service-env=local DevelopFlinkApplication"
mvn compile exec:exec \
-Dexec.args="--add-opens=java.base/java.util=ALL-UNNAMED -cp %classpath \
-Dpipeline-config.file=pipeline-config.conf \
-Dhere.platform.data-client.endpoint-locator.discovery-service-env=local DevelopFlinkApplicationScala"The command has the following parameters:
exec.args="-cp %classpath ... DevelopFlinkApplication[Scala]– Defines the arguments passed to thejavacommand:--add-opens=java.base/sun.nio.ch=ALL-UNNAMED- add-opens configuration to be able to run Spark application with Java 17.cp %classpath– Sets the classpath to include all dependencies managed by Maven.%classpathis automatically expanded by theexec-maven-pluginto include the compiled classes and dependencies.-Dpipeline-config.file=pipeline-config.conf– Sets a system property to specify the pipeline configuration file.-Dhere.platform.data-client.endpoint-locator.discovery-service-env=local- Configures the Data Client Library to only use local catalogs.DevelopFlinkApplication[Scala]– Specifies the main class to be executed.
At this moment, the application is running, but there is no data in the input catalog. Let's put some partitions in it. Open a new
console window and run the following bash script that uploads data with the First HERE Platform Flink Application
content to the stream layer 10 times every 5 seconds:
#!/usr/bin/env bash

# Copyright (c) 2018-2026 HERE Europe B.V.
#
# Licensed under the Apache License, Version 2.0 (the "License");
# you may not use this file except in compliance with the License.
# You may obtain a copy of the License at
#
#     http://www.apache.org/licenses/LICENSE-2.0
#
# Unless required by applicable law or agreed to in writing, software
# distributed under the License is distributed on an "AS IS" BASIS,
# WITHOUT WARRANTIES OR CONDITIONS OF ANY KIND, either express or implied.
# See the License for the specific language governing permissions and
# limitations under the License.


# Local catalog hrn with stream layer
CATALOG_HRN=$1
# Folder with data that is uploaded to the stream layer
FOLDER_WITH_DATA="./src/main/resources/data"


# Upload data to the stream layer 10 times every 5 seconds
for i in {1..10}
do
  olp local catalog layer stream put ${CATALOG_HRN} streaming-layer --input "${FOLDER_WITH_DATA}"
  sleep 5
done
To run the script, execute the following command:
bash scripts/populate-streaming-data.sh $YOUR_CATALOG_HRNOnce the script is running, you should see the logs with the same information in the console of the running application.
Attach the debugger
In this chapter you will learn how to debug Flink applications using the capabilities of Intellij Idea, or rather you
will learn how to attach to the process
to start debugging if you run your program through the console.
In order to configure the debugger, you need to set up the MAVEN_OPTS variable. To do so, stop the running application
and run the following command:
export MAVEN_OPTS=-agentlib:jdwp=transport=dt_socket,server=y,suspend=n,address=5005export MAVEN_OPTS=-agentlib:jdwp=transport=dt_socket,server=y,suspend=n,address=*:5005The option has the following parameters:
address– the port that will be used for debugging. The tutorial uses port5005, however, you can use any
free port.server=y– specifies that the process should listen for incoming debugger connections (act as a server).suspend=n– specifies that the process should wait until the debugger has been connected.
Now you can run your application using the following command:
mvn compile exec:exec \
    -Dexec.args="--add-opens=java.base/java.util=ALL-UNNAMED -cp %classpath \
    -Dpipeline-config.file=pipeline-config.conf \
    -Dhere.platform.data-client.endpoint-locator.discovery-service-env=local DevelopFlinkApplication"
mvn compile exec:exec \
-Dexec.args="--add-opens=java.base/java.util=ALL-UNNAMED -cp %classpath \
-Dpipeline-config.file=pipeline-config.conf \
-Dhere.platform.data-client.endpoint-locator.discovery-service-env=local DevelopFlinkApplicationScala"Make sure that line Listening for transport dt_socket at address: 5005 appears in the logs.
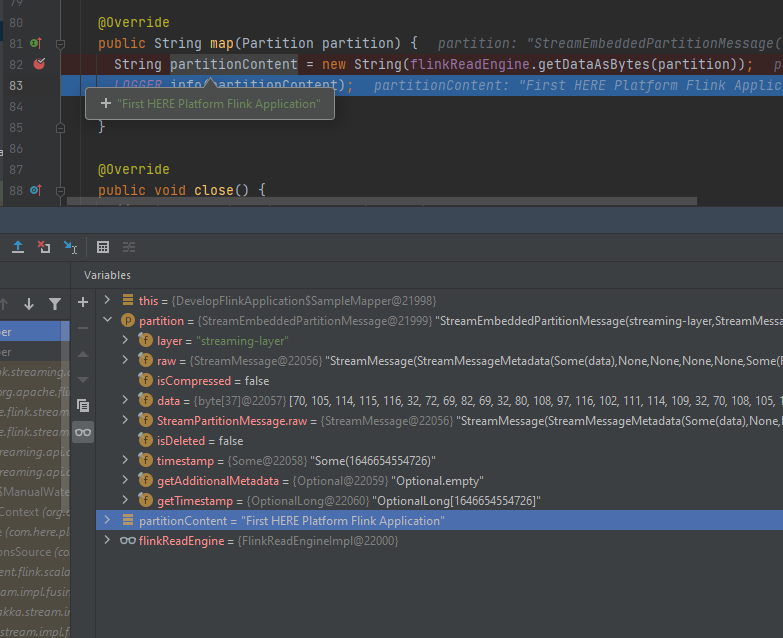
Let's set the breakpoint before we attach to the running application, for example, in the line where the partitions are mapped.
From this line, you can get a lot of useful information about the partition you downloaded:

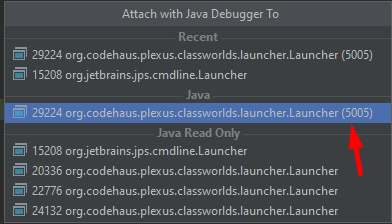
Now we can attach to the process using Run > Attach to Process and select the process with the specified 5050
port.
Once the process is attached and your program is running and waiting for the data to appear in the stream layer, you
need to run the script again to inject data:
bash scripts/populate-streaming-data.sh $YOUR_CATALOG_HRNAfter running the scripts/populate-streaming-data.sh script, the debugger should stop at the breakpoint as soon as new
data appears in the catalog and your application will start reading it. Now you can step through the code and inspect
the content of the variables and the stack trace.
You can also use the
standard Java Debugger
instead of the debugger in the Intellij IDEA.
Project generation using a Maven archetype
You can use a Maven archetype to bootstrap a Maven project for a Flink application. In this case, the project is set up faster with the following tasks completed automatically:
- Inclusion of the SDK BOM file.
- Creation of the Maven profile that generates the fat JAR for the platform.
For more information on your streaming pipeline options, see SDK Workflows.
To create a Flink application project, use the following command for the Java project:
mvn archetype:generate -DarchetypeGroupId=com.here.platform \
-DarchetypeArtifactId=streaming-java-archetype \
-DarchetypeVersion=1.0.1060 \
-DgroupId=com.here.platform.tutorial \
-DartifactId=develop-flink-application \
-Dversion=1.0-SNAPSHOT \
-Dpackage=com.here.platform.tutorial
mvn archetype:generate -DarchetypeGroupId=com.here.platform ^
-DarchetypeArtifactId=streaming-java-archetype ^
-DarchetypeVersion=1.0.1060 ^
-DgroupId=com.here.platform.tutorial ^
-DartifactId=develop-flink-application ^
-Dversion=1.0-SNAPSHOT ^
-Dpackage=com.here.platform.tutorialFor the Scala project use the following command:
mvn archetype:generate -DarchetypeGroupId=com.here.platform \
-DarchetypeArtifactId=streaming-scala-archetype \
-DarchetypeVersion=1.0.1060 \
-DgroupId=com.here.platform.tutorial.scala \
-DartifactId=develop-flink-application \
-Dversion=1.0-SNAPSHOT \
-Dpackage=com.here.platform.tutorial
mvn archetype:generate -DarchetypeGroupId=com.here.platform ^
-DarchetypeArtifactId=streaming-scala-archetype ^
-DarchetypeVersion=1.0.1060 ^
-DgroupId=com.here.platform.tutorial.scala ^
-DartifactId=develop-flink-application ^
-Dversion=1.0-SNAPSHOT ^
-Dpackage=com.here.platform.tutorialBuild your project to run locally
To build your project, run the following command in your project folder.
mvn installBuild your project to run on the platform
To run your pipeline on the platform, you need to build a fat jar first. To build it, use the following command.
mvn install -PplatformFor more information on building a fat jar, see the Include the SDK in your project.
Conclusion
In this tutorial, you have learned the stages of the Flink program development. To learn how to run a Flink application
on the platform and to get acquainted with such monitoring tools as Splunk, Grafana, Flink UI, and Platform Billing
Page, see the Run a Flink application on the platform tutorial.
Further information
For more details on the topics covered in this tutorial, see the following sources:
- For more information on how to develop Flink applications, see the
Apache Flink Documentation. - For more information on how to work with local catalogs using OLP CLI, see the
OLP CLI Guide. - For more information on how to attach to process to debug your application, see the
Debugging code Developer Guide