Obtain a map image through address look-up
This tutorial guides you through the process of creating a simple web application for place search using the Flask framework. The application allows users to input a location, retrieve its coordinates through the HERE Geocoding & Search API, and then use the HERE Map Image API to display the corresponding map image with a marker at the specified location, as shown in the following figure:
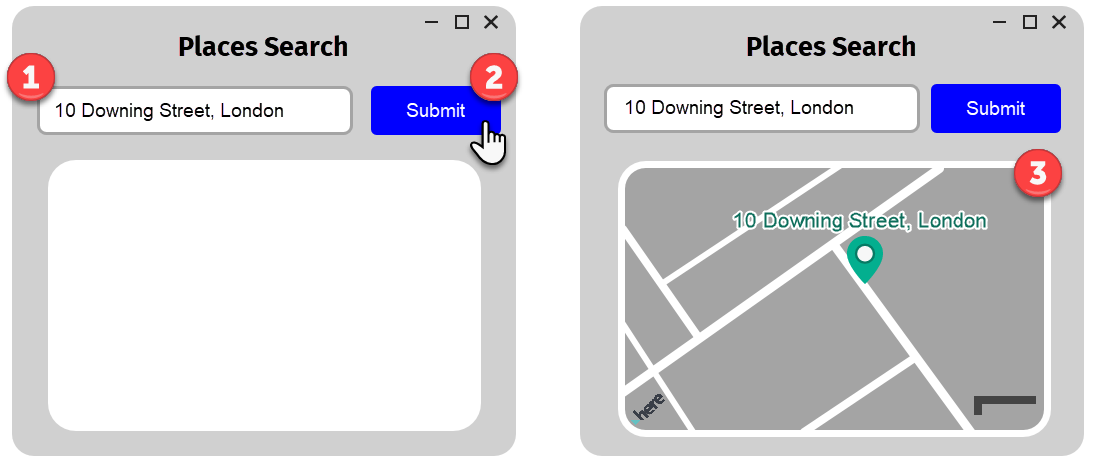
In the preceding process illustration:
- Users input a location for which they want to retrieve a map.
- After submission, the application translates the input into a HERE Geocoding API request, fetching the coordinates that best correspond to the provided location.
- Using the acquired coordinates, the application sends a request to the HERE Map Image API, generating a static map image and positioning a marker at the specified location's coordinates.
Before you begin
- Acquire basic knowledge of Python and Flask.
- Obtain an API Key: If you do not have one already, sign up for a HERE platform account and generate an API key. For more information, see Get started with the HERE Map Image API.
Set up a project
Create a project structure for your Python app and install the Flask package that allows your app to process API requests.
-
Create a new directory for your project, for example,
places-search-app. -
Install the Flask package, for example, by using
pip:pip install Flask requests -
In the project directory that you created, create a new file called
app.py. The file will contain the Python code with the application logic. Leave the file empty for now. -
In the project directory, create a new folder called
templates, and then open it. -
In the
templatesfolder, create a new file calledindex.html. This file will contain the HTML and CSS presentation layer for your application. Leave the file empty for now.
Result: You established a skeleton structure for your application with separate components for the application logic and the presentation layer, as shown in the following diagram:
 places-search-app
   ├── app.py
   └── templates
        └── index.html
Configure the HTML template
Develop a basic user interface by completing the index.html file with HTML and CSS code. This interface will allow users to input a location and view the map image.
-
In your project directory, navigate to the
templatesfolder that you created earlier. -
Use a text editor or code editor of your choice to open the
index.htmlfile. -
In the
index.htmlfile, paste the following code:<!DOCTYPE html> <html> <head> <title>Places Search</title> <style> /* Add your custom CSS styles here */ </style> </head> <body> <form method="POST" action="/"> <input type="text" name="location" placeholder="Enter a location"> <input type="submit" value="Submit"> </form> <div id="map"> <img src="{{ image_url }}" alt="No map available"> </div> </body> </html>The key components of this HTML template include:
-
<title>- Specifies the title of the web page that will appear in the browser's title bar or tab. -
<form>- Defines a form that allows users to input a location, for example,Long Beach, Los Angeles,10 Downing Street, and so on. The method attribute is set to POST to indicate that form data will be sent to the server. -
<input>- Creates an input field where users can enter a location. The name attribute is set tolocationto identify this input field when the form is submitted. -
<div id="map">- A placeholder for displaying the map image. Thealtattribute is used to conditionally render a message ifimage_urlis not available.
-
-
Optional: To customize the appearance of your web application, you can add custom CSS styles within the
<style>tag, as shown in the following example:body { font-family: 'Arial', sans-serif; margin: 0; padding: 0; } h1 { font-family: 'FiraGO', sans-serif; text-align: center; margin-top: 20px; font-size: 24px; } form { text-align: center; margin-top: 20px; } input[type="text"] { padding: 10px; font-size: 16px; width: 300px; margin-bottom: 20px; } input[type="submit"] { padding: 10px 20px; font-size: 16px; background-color: #0072ce; color: #fff; border: none; cursor: pointer; } #map { margin: auto; text-align: center; width: 600px; height: 400px; border: 1px solid #ccc; padding: 10px; } #map img { max-width: 100%; max-height: 100%; } p { text-align: center; font-size: 16px; color: #333; } -
Save the file.
Result: You set up the presentation layer for your web application. You can now develop the logic that will translate the location name from the user input into a URL that your application can use to retrieve an image with a marker from the HERE Map Image API.
Configure the application logic
The objective of the following steps is to develop a logic to process the textual location input from the user and then transform that input into a request URL whose format is acceptable by the HERE Map Image API, and then send and retrieve the image and display it on a web page, as defined in the HTML template. The target request URL follows this format:
https://image.maps.hereapi.com/mia/v3/base/mc/bbox:{west_coordinate,south_coordinate,east_coordinate,north_coordinate};padding=64/600x400/png8
?apiKey={YOUR_API_KEY}
&overlay=point:{latitude}{longitude};size=large;label={label_text};text-color=%23972E2B;text-outline-color=%23FFF;outline-width=2&style=lite.day
&scaleBar=km
Understand the request URL
The following list provides a breakdown of the key elements of the request URL:
- The request URL establishes essential specifications for all generated images, including resource type, image dimensions, and file type.
- The
bboxparameter determines the camera's position within the map image. It automatically adjusts the zoom level based on user search precision. For example, it provides higher zoom for specific addresses and lower zoom for broader regions like cities or provinces. Thebboxparameter value is sourced from themapviewproperty in the HERE Geocoding & Search API's /geocode endpoint response. - The
overlayparameter adds a marker icon to map images. The parameter positions the marker at the user's location choice. The parameter value follows the format for compact overlay encoding for consistent appearance. Consider the following marker properties:{latiture},{longitude}- The marker coordinates on a map are derived from thepositionproperty in the HERE Geocoding & Search API's /geocode endpoint response.{label}- The label text that is displayed above the marker icon and is derived from theaddress.labelproperty of the/geocodeendpoint response.
styleandscaleBar- These parameters set the map style and provide an additional scale bar overlay for better sense of physical dimensions.
Hint
You can use various methods to adjust the map image positioning that correspond to your requirements. For example, you set the map position by using the
centerparameter and source thelatitudeandlongitudevalues from thepositionparameter of the/geocodeendpoint response. In such case, you need to manually set thezoomvalue.
Initialize the Flask app
Initialize a Flask application instance named app, set API credentials, and define the main app route.
-
From your project directory, open the
app.pyfile by using a text or code editor of your choice. -
Import the required libraries:
from flask import Flask, render_template, request import requests -
Initialize the Flask app:
app = Flask(__name__) -
Provide the HERE API credentials:
API_KEY = 'YOUR_API_KEY' -
Define the main app route:
@app.route('/', methods=['GET', 'POST'])This code defines the actions that are allowed within the web application. In this case, these are
GETandPOSTrequests.
Handle POST requests
In the app.py file, create the function that is the main entry point of the web application and which handles incoming requests to the root URL ("/") of the application. In this case, the function (named index()) is triggered when a user visits the website or submits a form on the homepage by entering a location name or address they want to display on a map.
You can define such function, as shown in the following example:
def index():
    if request.method == 'POST':
        location = request.form.get('location')
        coordinates, mapview, label = get_coordinates(location)

        if coordinates:
            # Generate the bbox parameter
            bbox_param = f"bbox:{mapview}" if mapview else ""

            # Generate the marker overlay parameter
            marker_param = f"overlay=point:{coordinates[0]},{coordinates[1]};size=large;label={label};text-color=%23972E2B;text-outline-color=%23FFF;outline-width=2"

            # Generate the image URL using the HERE API with bbox and marker parameters
            image_url = f"https://image.maps.hereapi.com/mia/v3/base/mc/{bbox_param};padding=64/600x400/png8?apiKey={API_KEY}&{marker_param}&style=lite.day&scaleBar=km"

            return render_template('index.html', image_url=image_url)

    return render_template('index.html', image_url='')
In this example:
if request.method == 'POST':- Checks whether the incoming request method is a POST request with a form submission.location = request.form.get('location')- Retrieves the value of the input field namedlocationfrom the submitted form, for example,10 Downing Street, London.coordinates, mapview, label = get_coordinates(location)- After obtaining the user's input location, this line calls theget_coordinates()function (as defined in the Retrieve the latitude, longitude, and map view of the location section), passing the location as an argument. The function is expected to provide two values in return:coordinatesandmapview:coordinates- Stores thelatitudeandlongitudevalues of the location obtained through geocoding.mapview- Stores the information required for setting the camera position on the map image.label- Stores the information required to populate the marker label.
bbox_param = (...)- If validmapviewdata is available, this line generates thebboxparameter for the map image URL.marker_param = (...)- Generates theoverlayparameter for the map image URL. The parameter adds a marker icon to the map image at the specified coordinates. It uses thelabel,latitudeandlongitudevalues stored in the coordinates variable.image_url = (...)- After creating thebbox_paramandmarker_param, this section constructs the complete URL for the map image using the HERE Map Image API.return render_template(...)- Sends the constructedimage_urlto theimdex.htmltemplate. This template is responsible for displaying the map image with the applied parameters.
Retrieve the latitude, longitude, and map view of the location
Define the get_coordinates() function that is responsible for obtaining geographical coordinates and map view information for a given location using the HERE Geocoding & Search API.
Define the function that transforms user input into a set of coordinates for obtaining the values for bounds and marker parameters for map images, as shown in the following example:
def get_coordinates(location):
    geocoding_url = 'https://geocode.search.hereapi.com/v1/geocode'
    params = {
        'q': location,
        'apikey': API_KEY
    }

    response = requests.get(geocoding_url, params=params)
    data = response.json()

    if 'items' in data and len(data['items']) > 0:
        item = data['items'][0]
        mapview = f"{item['mapView']['west']},{item['mapView']['south']},{item['mapView']['east']},{item['mapView']['north']}"
        latitude = str(item['position']['lat'])
        longitude = str(item['position']['lng'])
        label = item['address']['label']
        return (latitude, longitude), mapview, label
    else:
        return None, None, None
In this example:
-
https://geocode.search.hereapi.com/v1/geocode- Sets up the base URL for the HERE Geocoding & Search API and creates a dictionary calledparamsto include the necessary parameters for the API request:q- The location argument passed to the function, representing the user's search location.apiKey- The API key for authentication.
-
response = requests.get(geocoding_url, params=params)- Sends a GET request to the API using the constructed URL and parameters. The response is stored in theresponsevariable. -
data = response.json()- parses the response as a JSON file and stores it in thedatavariable. -
if 'items' in data and len(data['items']) > 0:- Checks if the JSON response contains the keyitemsand if the length ofitemsis greater than0. If these conditions are met, the function proceeds to extract the required information. -
item = data['items'][0]- Extracts the first item ([0]) from theitemsarray in the response. The first item represents the best match for the location that the user entered. -
mapview = (...)- Retrieves the map view details from theitem['mapView']property and constructs a formattedmapviewstring.Note
The following example demonstrates how
mapViewvalues are matched to thebboxparameter to obtain the correct map camera position:"mapView": { "west": 2.33073, "south": 48.86836, "east": 2.33347, "north": 48.87016 }Based on the preceding example, the
bboxparameter should be formatted as:bbox=west,south,east,north -
label = item['address']['label']- Thelabelvalue for themarkerparameter is extracted from theitem['address']['label']property. -
The
latitudeandlongitudevalues are extracted from theitem['position']property and converted to strings. -
return (latitude, longitude), mapview, label- If valid data was obtained, the function returns a tuple containing thelatitudeandlongitudeas well as themapviewstring.
Run the application
Complete the application setup and run it in the browser window.
-
In the
app.pyfile start the Flask development server when the script is run directly as the main program by adding the following code:if __name__ == '__main__': app.run() -
Save the file.
-
Open the Command Prompt and then navigate to the project folder of your application, for example,
places-search-app:cd path/to/your/places-search-app -
Start a Flask development server by entering the following command:
python app.pywhere
app.pyis the name of your main file with the application logic. -
Open a web browser window and then navigate to the http://127.0.0.1:5000/ URL address, which is the default address the Flask development server listens to.
-
Explore the application by entering different locations or addresses and retrieving corresponding map images with markers, as shown in the following example:
Next steps
- To explore all supported endpoints and parameters, see the API Reference.
- To gain more hands-on experience with the HERE Map Image API see the
Tutorialssection of this guide.