Display routing information on a map image
Improve user interaction by embedding route details directly onto your map images. This guide demonstrates how to integrate HERE Routing API v8 with the HERE Map Image API to enhance your web page:
- Obtaining Route Information:
Begin by extracting a route polyline that accurately represents the optimal path between your designated origin and destination points. Additionally, gather the coordinates for both the departure and arrival markers. - Displaying the Route on a Map Image:
Utilize the polyline and marker coordinates to create a map image that effectively communicates the route.
Tip: Handling complex routes
For complex routes with many waypoints or detailed polylines that may exceed URL length limits, consider using the POST method to move the overlay data to the request body. This supports larger payloads and is particularly useful for detailed routing scenarios. Alternatively, you can use flexible polyline encoding to compress the route data.
Before you begin
Obtain an API Key: If you do not have one already, sign up for a HERE platform account and generate an API key. For more information, see Get started with the HERE Map Image API.
Create a HTML template
Define a basic HTML file as a container for your mapping logic.
-
In a directory of your choice, create a HTML file.
-
Use a text or code editor to open the HTML file.
-
Inside the file, paste the following HTML code:
<!DOCTYPE html> <html lang="en"> <head> <meta charset="UTF-8"> <meta name="viewport" content="width=device-width, initial-scale=1.0"> <title>Static Map with Routing Info</title> </head> <body> <div id="map"></div> <script> // Your JavaScript code for map rendering goes here. </script> </body> </html> -
Save the file.
Obtain route information
Use the HERE Routing API v8 to obtain the route details based on the origin and destination coordinates.
-
Inside the
<script>element of the HTML file that you created, add variables that represent your API key together with origin and destination coordinates, as shown in the following example:const apiKey = '{YOUR_API_KEY}'; // Replace with your actual HERE API key // Sample locations in Riga, Latvia const origin = { lat: 56.9517121, lng: 24.0806104 }; const destination = { lat: 56.9481938, lng: 24.110582 }; -
Define a function that takes the origin and destination coordinates, processes the HERE Routing API v8 response, and then returns a corresponding polyline together with departure and arrival coordinates. See the following example:
async function getRouteDetails(origin, destination) {
    // Construct the URL for routing API with the provided coordinates and API key
    const routingURL = `https://router.hereapi.com/v8/routes?transportMode=car&origin=${origin.lat},${origin.lng}&destination=${destination.lat},${destination.lng}&return=polyline&apiKey=${apiKey}`;

    // Fetch route information using the constructed URL
    const response = await fetch(routingURL);

    // Parse the response data as JSON
    const data = await response.json();

    // Check if there is at least one route in the response
    const route = data.routes?.[0];
    if (!route) {
        throw new Error('No routes found');
    }

    // Extract departure, arrival, and polyline details from the first route's section
    const section = route.sections[0];
    const departure = section.departure.place.location;
    const arrival = section.arrival.place.location;
    const polyline = section.polyline;

    // Return an object containing departure, arrival, and polyline information
    return { departure, arrival, polyline };
}
The key function components from the preceding example include:
async function getRoutePolyline(origin, destination)- Declares thegetRoutePolyline()in the asynchronous mode that allows pausing the logic execution by usingawaituntil operations that take time (such as fetching data from a remote server) complete.const routingURL- Constructs an URL request in the format acceptable by the HERE Routing API v8. The request is set to return a route polyline between the origin and destination coordinates, with the transportation mode set tocar.const response = await fetch(routingURL)- Awaits the response data from the request URL.const data = await response.json()- Extracts the JSON data from the response body. Theawaitkeyword is used to pause execution until the JSON parsing is complete.const route = data.routes?.[0]- Checks if at least one route is available.const section = route.sections[0]- Extract the route section information. In this tutorial, routes consist of single sections only.const departure,const arrival, andconst polyline- Extracts the departure, arrival, and encoded polyline data from the section.return {departure, arrival, polyline}- Returns an object containing the extracted departure, arrival, and polyline information.
Result The function returns the required route data, in the following format:
{
    departure: {
        lat: 56.9517151,
        lng: 24.0806285
    },
    arrival: {
        lat: 56.9482663,
        lng: 24.1106749
    },
    polyline:'BGm6h0sDqv49tBlH6DnQ4I_dwM_EoB3IUUvMA3InB_JrE3hBzFzjBnBvHrOsOrTwWzKsO_OgU7kBk1B_T0U3S0ZsT4iDwCwMgFkXsJ8fwMgyBUgFoBgK4D0ZwCgPsEgZkDwRkD8Q4DsTsEoa4DkX8BwMwH8VwHkXoGoVsEoQ4DoLsEgKsE8G4D0UgFsYoB8GoB8GoBoGsJkwBsY09D8G8kB0P8xC4S4iDwHsnBoBoGoB8GoBoGoBoGoG8f8BgKwMw'
}Tip
- Depending on your use case, you can extract additional routing information to display on map images. For example, you can calculate a route with multiple via waypoints and then display those waypoints as additional markers.
- Routes with many waypoints may produce very long URLs. If you encounter URL length limits, consider using the POST method or flexible polyline encoding.
Construct a map image request URL
Construct a URL for a static map image that includes a polyline and markers for departure and arrival points.
The following snippet provides a sample configuration for a function that creates an URL request to HERE Map Image API and then appends the resulting image to the appropriate element within the HTML file:
async function displayStaticMap(arrival, departure, polyline) {
    try {
        // Construct the URL for the static map image
        const staticMapUrl = `https://image.maps.hereapi.com/mia/v3/base/mc/overlay:padding=64/800x400/png?apiKey=${apiKey}&overlay=point:${departure.lat},${departure.lng};label=Departure|${arrival.lat},${arrival.lng};label=Arrival|size=large;text-color=%23972E2B;text-outline-color=%23FFF;outline-width=2&overlay=line:${polyline}&features=pois:disabled&style=lite.day&scaleBar=km`;

        // Create a new Image element
        const mapImage = new Image();

        // Set the source URL of the image to the constructed static map URL
        mapImage.src = staticMapUrl;

        // Find the HTML element with the ID 'map' and append the image to it
        document.getElementById('map').appendChild(mapImage);
    } catch (error) {
        // If any errors occur, log them to the console
        console.error('Error:', error);
    }
}
The key function components from the preceding example include:
const staticMapUrl = ...- Constructs the URL for the static map image. The request URL contains the following parameters:base/mc/overlay:padding=64/800x400/png8- Establishes essential specifications for all generated images, including resource type, image dimensions, camera position, and file type.apiKey- Your HERE API key.overlay=line...- Draws a line between the arrival and departure coordinates. Adheres to the custom format specification for flexible polyline encoding.overlay=point...- Draws markers at the departure and arrival coordinates. The markers have custom labels, colors, and size according to the custom overlay encoding specification for markersstyle- Sets the map style tolite.day. This style allows for easier overlaying of additional information.features=pois:disabled- Removes map clutter by disabling the display of points of interest.
const mapImage = new Image()- Creates a newImageobject, which will be used to display the static map image.mapImage.src = staticMapUrl- Sets thesrcproperty of theImageobject to the constructedstaticMapUrl. This triggers the browser to load the image from the URL.document.getElementById('map').appendChild(mapImage)- Obtains a reference to the HTML element with the id"map"and then appends theImageobject (containing the map image) to the map container element, effectively displaying the map on the web page.
Orchestrate the process
Create a function to orchestrate the whole process: fetching route details, generating a map image, and handling any errors that might occur along the way. Call the function immediately after its definition to start the execution of these tasks.
The following snippet provides a sample configuration for a function that is the entry point of the getRouteDetails() and displayStaticMap() functions:
async function main() {
    try {
        const routeData = await getRouteDetails(origin, destination);
        displayStaticMap(routeData.arrival, routeData.departure, routeData.polyline);
    } catch (error) {
        console.error('Error:', error);
    }
}

main();
The key components from the preceding example include:
const routeData = await getRouteDetails(origin, destination)- ThegetRouteDetails()function is called with theoriginanddestinationcoordinates to retrieve route information.displayStaticMap(routeData.arrival, routeData.departure, routeData.polyline)- When the route data is obtained, thedisplayStaticMap()function is called with thearrival,departure, andpolylinedata to display the static map image.main()- Themain()function is executed when the script runs, initiating the entire process of fetching route details and displaying the static map.
Request and display the image
Save the file and then open it in a web browser.
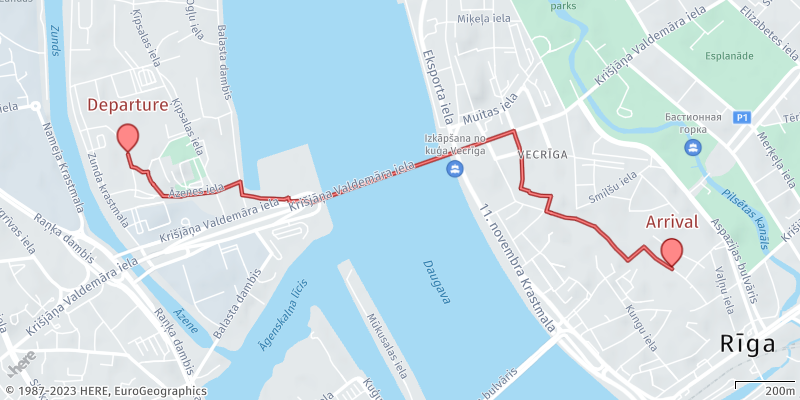
Result: The browser window displays a map image that contains routing information in the form of a route polyline and markers for the departure and arrival coordinates, as shown in the following figure:
Next steps
- To explore all supported endpoints and parameters, see the API Reference.
- To gain more hands-on experience with the HERE Map Image API see the
Tutorialssection of this guide. - For handling large or complex overlay data, see: